Bone Grinder
| Type | Dungeon |
|---|---|
| Status | Explored March 883 TA |
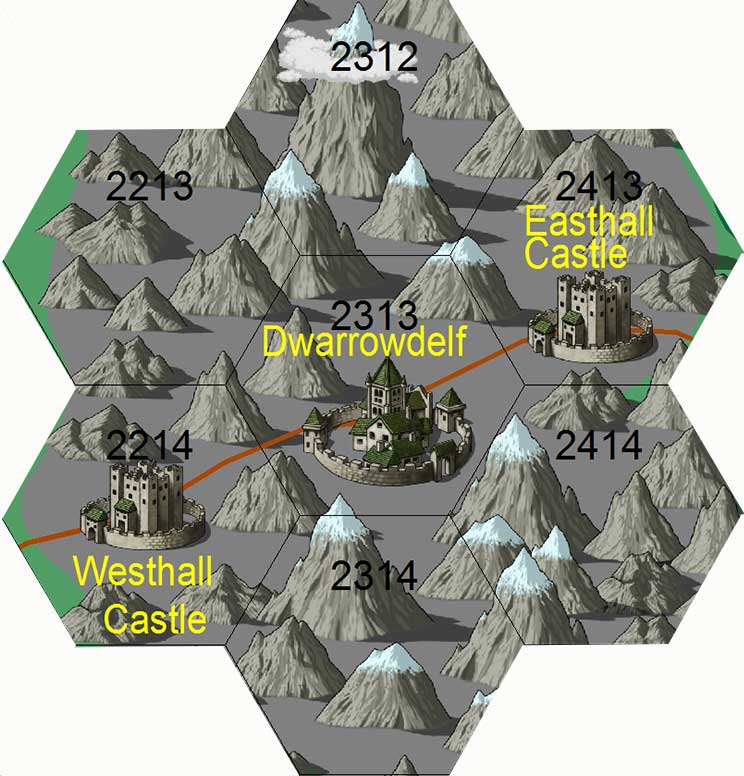
| Location | Shadowkeep (now Dwarrowdelf) |
| Hex | 2313 |
| Campaign | Shadowkeep Campaign #7 |
| Adventure # | 71 |
Introduction
Beyond the seventh portal, lies the seventh level of the Shadowkeep. This level is commonly known as the "pit". At the bottom of the pit lies the eighth portal. It is a simple door, buried in treasure and guarded by a beast known as the Bone Grinder.
Canto Seven: Bone Grinder
My voice returns, my sight does too,
My soul and words will guide you through,
The Seventh Portal holds no luck,
From icy Six down to the muck.
Bone Grinder waits for its next meal,
Without the sword your fate is sealed,
The switching souls is your only chance,
Send the meekest for death to dance.
The switch lies torn in sundered parts,
Make them whole and bare your heart,
The blade lies with the misfits old,
The handle with the rock god bold.
And though your quest lies always down,
A treasure sometimes wears a crown,
Temptation flares, you're not so strong,
The gods will slay you if you're wrong.
Down to the muck to meet your fate,
When all is clean you'll find the Eighth.
Bone Grinder: Portal 7, Overview
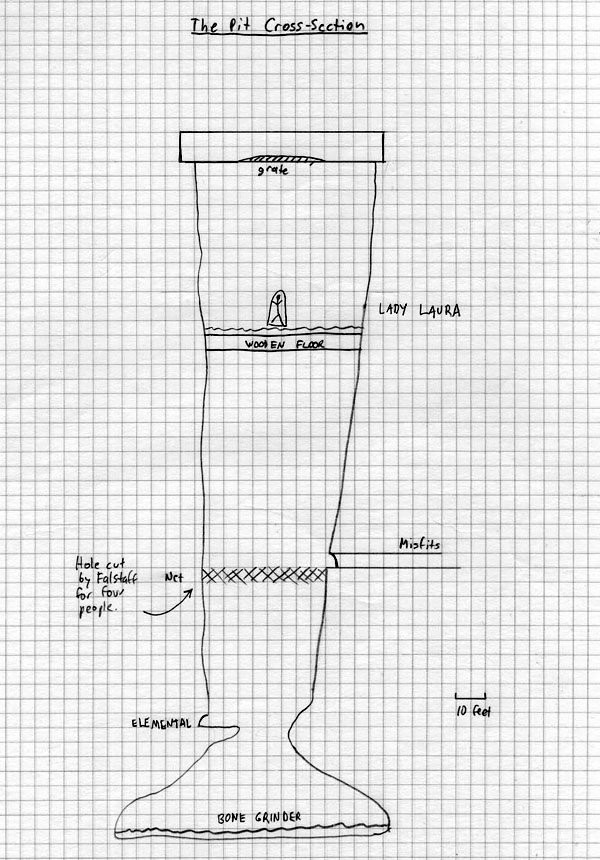
Bottom Room: The Bone Grinder
Long in the past, this pit was used to dump refuse, unwanted prisoners, and other curious items. At the bottom, the Bone Grinder would eat everything it could, including bones. The noise of its eating was horrific and spawned many stories from those above. Hundreds of years ago, the Bone Grinder ate two items of magic that have made it very powerful: a potion of complete invulnerability to spells (an experiment thought a failure by the alchemist who created it) and a sack of ever-plentiful food (which has allowed it to survive and grow without food). It is very angry since the wooden roof was built over the tunnel, depriving it of all joy. The Bone Grinder cannot be killed without the Sword of Switches, a magical device that switches souls between the combatants. This means that if the Bone Grinder wins, the Bone Grinder dies.
The Bone Grinder is a mass of jaws, claws, and eyes, seemingly connected by black fibrous appendages. It can completely flatten into the mud or rise to a height of thirty feet. It attacks as an ancient dragon, and can breathe chlorine gas like a green dragon. The Bone Grinder cannot be harmed by magical or mundane weapons, its skin flows back together when injured. Furthermore, it cannot be targeted by spells of any kind (except the sword). Treasure: 3 medium amethyst (800 gp), 3 small emeralds (1200 gp), 2 medium topaz (600 gp), Cloak of the Lurker, Potion of Grave Healing, Potion of Water Breathing, Ioun Stone (red), Rod of Resurrection.
Top Room: Lady Laura's Prison
If the party explores the roof of the tunnel, they will discover a wooden barricade. It is trapped with a glyph of warding (petrification). It will also set off an alarm sound to warn the denizens above. Finally, it is covered by waste debris, rotten human limbs, and other vile garbage. If the party gets through, they will come into a single room described as follows:
Careful examination shows that the elven woman is standing on a bed of fine white crystals. Also, above her head, a small red vial sits precariously balanced on a small glass shelf. Any movement will cause the vial to topple.
The gargoyles animate if the room is entered OR the alarm is sounded. They fight at 10 times the normal strength AND when killed they reappear as statues on the ledge and reanimate in 6 rounds.
The glyph is set by Atli the White Rider, son of Harek, and will kill anyone who touches it.
The capsule that holds Lady Laura is filled with a 40th level sleeping gas. In addition, the room is magically sealed so that no spells can pass in or out.
If Lady Laura is revived, she will recognize the party. She will relate to Ernie how King Gregory summoned him to help, but Ernie never came. She will relate how King Gregory was captured by Atli the White. The King and the entirety of the Council was wiped out like dry kindling by a fire. She witnessed their deaths, but for some reason was spared. Her last memory is of Atli taking a stylus-shaped device and putting it up to her heart. Drawing back the lever, a white liquid filled the device. He then took out a black piece of parchment and wrote some word onto the paper with the stylus, draining it of the white liquid. His parting words to Laura were: "Your magic is pure, my Queen. While I can't destroy it, this should make sure that you never use it again." With that, he threw the paper on the ground and it melted into the stone. Lady Laura said that a great emptiness overcame her, and she slumped asleep.
DM: The note is a puzzle that sank into the Bone Grinder's pit.
DM: Laura will go with the party, fighting, but without spell capabilities unless the parchment is recovered and the puzzle solved. Note that it can easily be destroyed.
The Shaft
Along the sides of the shaft are two tunnels that lead into various parts of the dungeon. Originally an old underground stream welling up from a long-dead spring, these tunnels are the home of some questionable denizens. The Sword of Switches lies in two parts: the blade and the handle.
The Misfits of Old. A gnome wizard was once tossed into the pit when he was thought to be dead. However, he survived not only his torture, but the fall. He climbed to a cave above the floor of the pit and built a net to catch things being tossed down. Over time, he found several other survivors, nursing them to health. When the tunnel was sealed up, his followers died. But the gnome's mind snapped, and he started calling himself Micent Mindwalker. He has created an illusion of a small city under the earth that ties into the chapel on the previous level. He will read the mind of Hylax and create a tower (identical to Hylax's) and try to trick the party into staying.....
The Maze of the Earth Lord Zaxxyx. This is an elemental place of earth. It is home to a race of elementals who will try to lure the party deeper and deeper into their lair. Once in the center of the caves, they will demand all metal or they will cave the roof in......
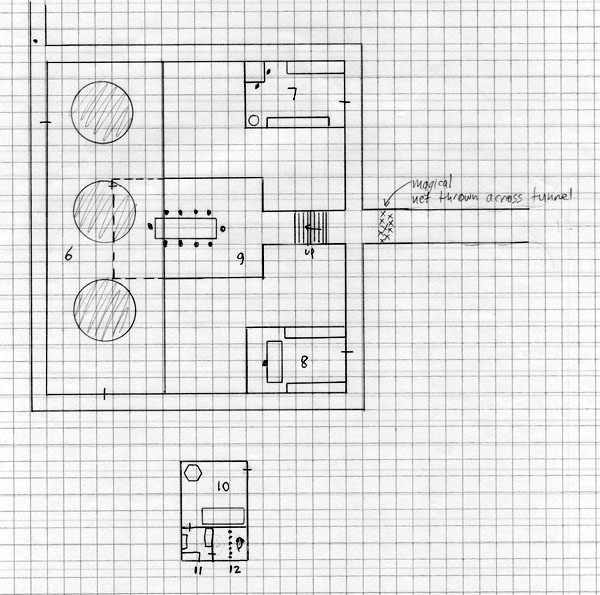
Bone Grinder: Portal 7, Level 1
Misfits of Old
"A small set of stairs wind down into the rock for about 100 feet. Every 10 feet or so, another oil lamp hangs from the wall, empty and dark. The air here is stale, and the dust lies very heavy. It is obvious that this passageway has not been used for some time."
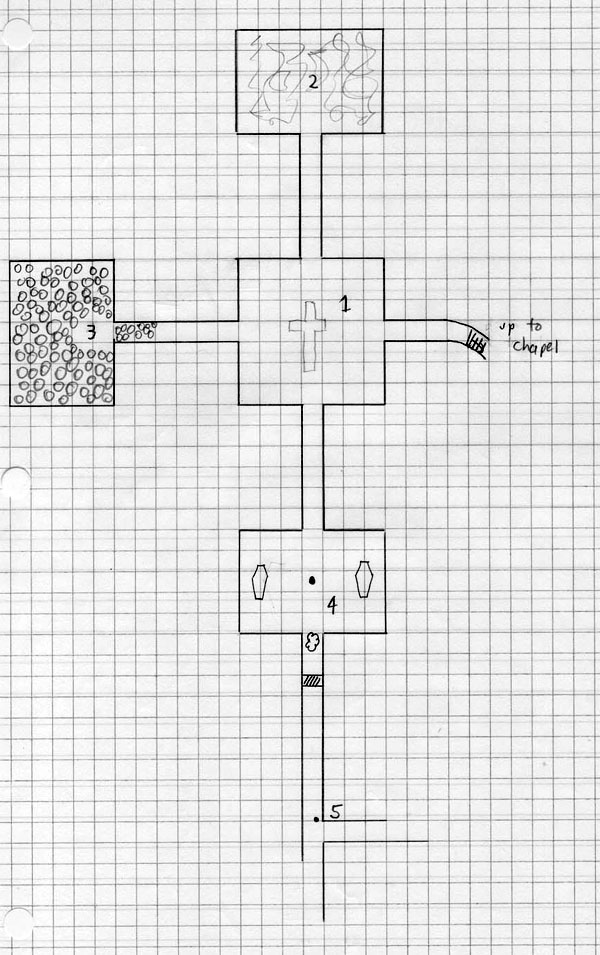
Room 1: The Ante-Chamber
Underneath the dust, there is a white cross painted on the floor.
Room 2: Northern Passage
If the party steps through the bars, two spectral bears will attack the party. They fight as double-sized bears that cannot be hit by mundane weapons. Their treasure is underneath the debris. Treasure: 500 gold pieces, 2 small diamonds.
Room 3: Eastern Passage
If the party digs through the rubble, they will be able to get into the tomb beyond. There they will be treated to two double-sized phase spiders. The phase spiders will enter Room 1 if there is a fight there (food). They have no treasure.
Room 4: Southern Passage
Careful inspection will show that the wall behind the southern niche is very new in construction.
The new wall can be broken down (alerting the sleeping guard in Room 5) or stealthfully done. The black glowing gem is just that, a black glowing gem. It is not evil, just magical. The coffins contain skeletons with mundane armor and swords.
Room 5: Sleeping Guard
This portion of the dungeon is the domain of Micent Mindwalker, a gnome of very questionable sanity. See the notes on the next page for details. Remember that these rooms are illusionary, so they can be changed at any point. The gnomes are actually very large (double-sized) carrion crawlers, however they will fight as 6th level fighters.
The gnome has red eyes (like a rat).
"Oh my, nobody has ever come down this hallway before. Oh dear, oh dear. Let's see. Halt who goes there, friend or foe?"
The gnome, Smedley, will then begin to complain about the terrible stench and ratty condition of the party. My master, Micent Mindwalker will not like this, not one little bit. Off to the showers with y'all….
Room 6: The Baths
This is actually an illusion. The room really holds festering pools of stagnant cave water. The serving women will take away the party's clothes to be washed, mended, and otherwise tended. If the party resists, they will allow the party to go with them to watch. The serving women will also bring them shaving utensils, offer to cut their hair, get a manicure, etc. This is important since the gnome wizard will need a small personal item to make his figures.
Room 7: The Maid's Rooms
Again, this is an illusion. This room really is just a dung heap, literally.
Room 8: The Butler's Room
More dung, I'm afraid. And some more rancid water. Kendrick.
Room 9: The Grand Hall
It is here that the party will meet Micent Mindwalker. Micent is a 30th level wizard who longs for company and will try to keep them here by magic or mundane means.
Treasure: Ring of Spell Turning, Ring of Protection +4, Boots of the Elvenkind, Key to Leomund's Locker.
Room 10: The Kitchen
This room is actually filled with dung and rotting corpses.
Room 11: The Pantry
This room is the same as above.
Room 12: The Carrion Room
Careful examination shows an old set of leather armor and a long sword under one of the piles of dung.
This is actually Arla, a old human consort of Micent. He imagined that she was cheating with one of his illusions, and he turned her into a carrion crawler. Always a fan of irony. She will help the party if she isn't killed immediately. Arla will fight as a 3rd level thief, and she has knowledge only of this level only.
The Great Cavern
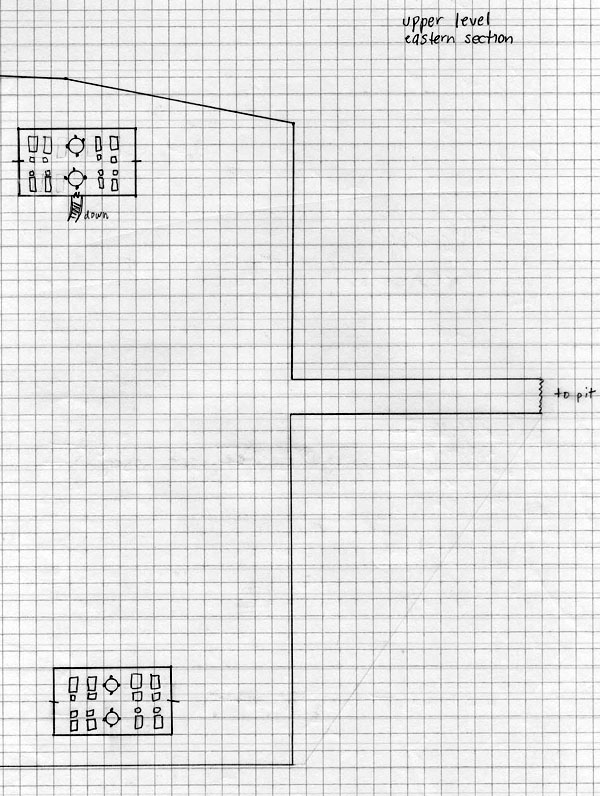
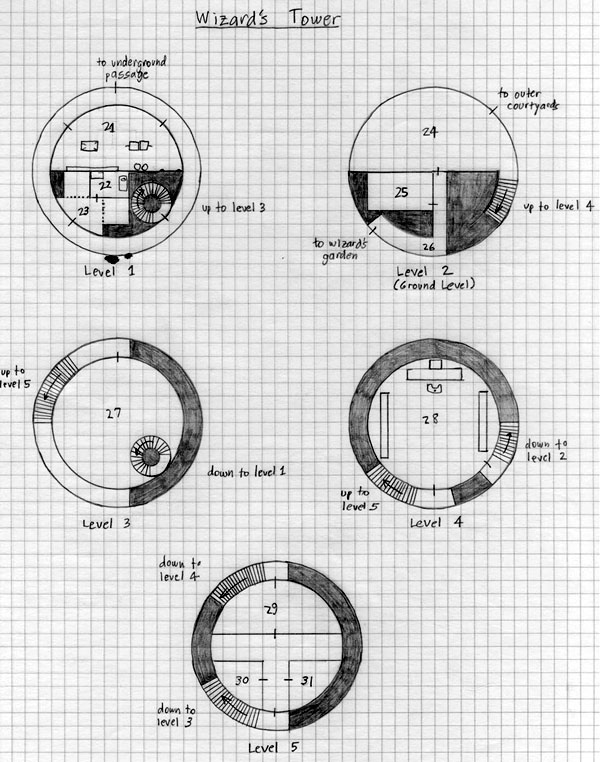
Micent will pull memories out of the party to shape this portion of the dungeon. In particular, he will use the wizard's tower from Dragonsford as a template, feeling that this will make the party feel more at home.
One Guard House will always be empty while the others sleep, rest, or eat.
Rooms 13-16: Guard Houses
If there are guards here, they will be either (1-2) eating, (3-4) sleeping, or (5-6) playing cards.
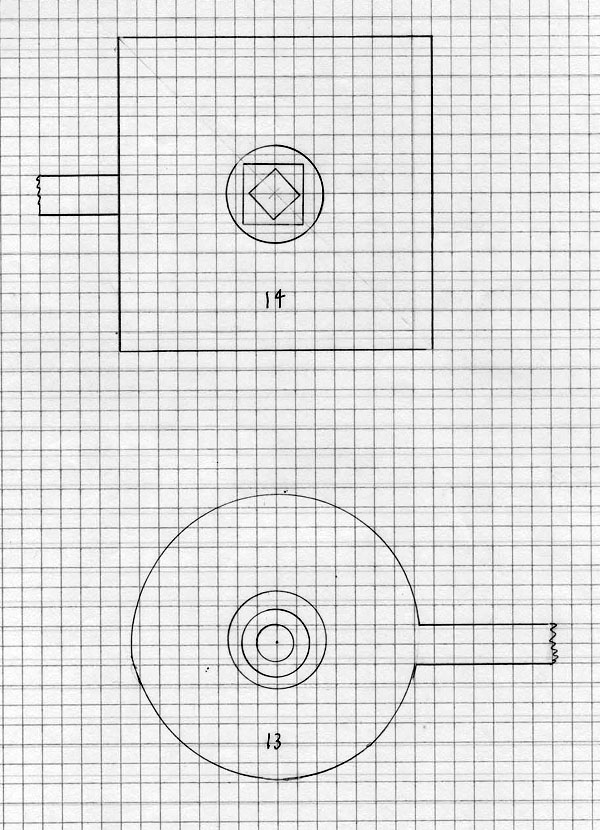
Room 13 has a secret door to a passage that leads down into the dark. The tunnel is hewn for the first twenty feet or so, and then it becomes a natural passage.
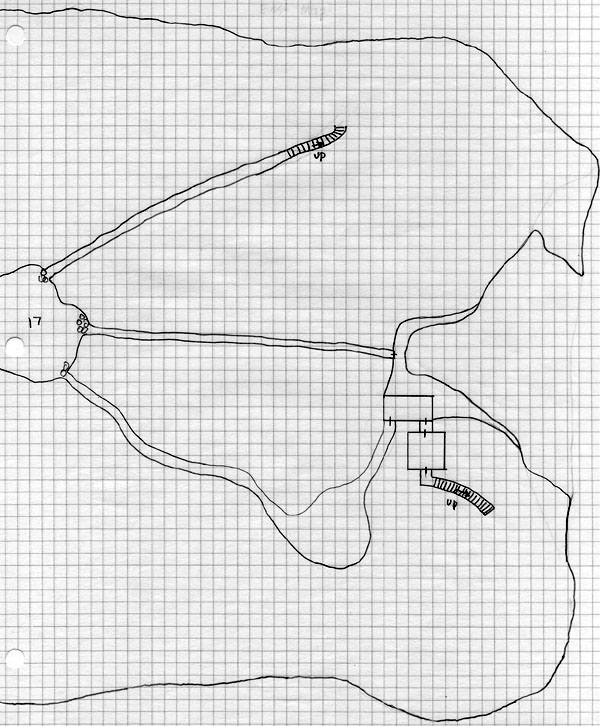
Room 17: Eastern Underground Passage
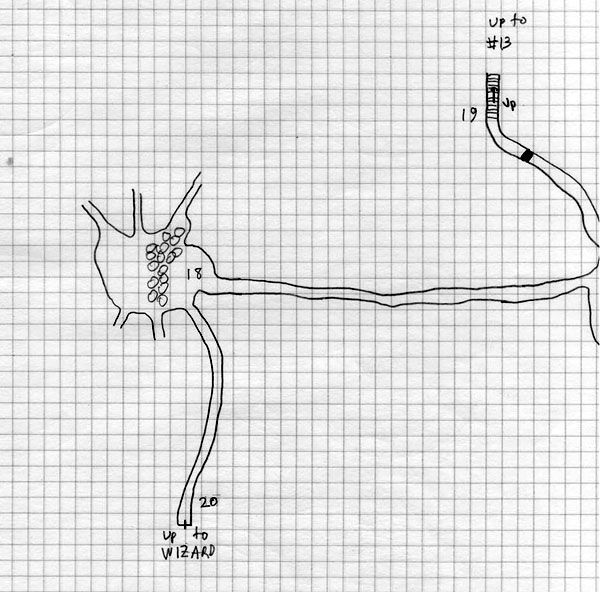
Room 18: Western Underground Passage
Four lurker aboves will drop onto the party unless they look like a gnome guard.
Room 19: Stairs to Guard's Room (Room 13)
When the tunnel is entered, a magic mouth will appear saying:
Speak the Word from Micent's Mind,
Or By My Words I Will Thee Bind
The word of passage is: THIEF
If the party fails to say this, an alarm will sound and they will be subject to 30th level Hold Monster spells until they are 200' away.
Room 20: Stairs to Wizard's Tower
When this tunnel is entered, eight Will-O-The-Wisps will appear before them coming rapidly. They will try to lead the party away from the tower or attack. The party must utter the following poem to dispel them:
About, about in reel and rout
The death-fires danced at night;
The water, like a witch's oils,
Burnt green, and blue and white.
Room 21: Torture Chamber
There is nothing of interest here.
Room 22: Jailor's Room
The chest contains a 1000 gold pieces. The ogre is actually an ogre that wandered in and was charmed by Micent. The wheels operate the portculises in Room 23.
Room 23: Prison
Micent will bring unruly party members here if captured.
Room 24: The Foyer
"This room is a semi-circle occupying half of the ground floor of the tower. A set of stairs in the southeast corner lead up, and a door is in the middle of the south wall. This room is finely finished with overstuffed leather chairs and couches. Several bookshelves line the walls, holding mostly small clay statues done in a primative motif. A crystal decanter and six crystal goblets are on a small table in the southeast corner. A gnome servant stands by the door in the south."
Room 25: Servant's Quarters
Room 26: Hallway to Garden
There is nothing of interest here.
Room 27: The Museum
Treasure: Platinum Ring with diamond (9,000 gp), Silver Mace with gems (12,500 gp), 10 Gold Rings (100 gp each), 2 small amethysts.
Room 28: The Room Of Slaves
Careful examination shows that the kiln is still warm, as are four of the clay statues (assuming this has been done). The large chest under the desk in closed and locked.
By smashing the statues the party is restored to consciousness. Also, all the gnomes are returned to carrion crawlers and the carrion crawler is returned to his consort.
The chest is a magical Leomund's Locker. It is locked and breaking the lock destroys the magic. It contains: 300 platinum pieces, 500 gold pieces, 1000 silver pieces, 3 very large garnets.
There will always be four guards here.
Room 29: The Room of the Sword
Close examination will reveal the following verse written on the black dais:
WINNERS ALWAYS FIND THE BEST ANSWER QUICKLY
The party will also notice that each side of the block (except the bottom) has a number faintly visible in fine blue runes: 3, 4, 5, 6, 7
Answer: 5 (number of letters in words)
This is actually the blade of the Sword of Switching.
When touched, the room will fill with black choking smoke which affects the characters in 1 minute. Characters will need to make a saving throw each round versus poison or die. Note that this is contact poison not inhaled poison.
A trapper sits on the floor just outside of Room 29. It will attack if any creature steps on it.
Room 30: Guard's Room
Room 31: Guard's Room
The guards will be alerted by the Trapper outside of Room 29 or any big noises on this level or Level 4 of the dungeon.
|
Monsters
Spectral Bears (2) |
Treasure
500 gold pieces |
Bone Grinder: Portal 7, Level 2
The Maze of the Earth Lord Zaxxyx
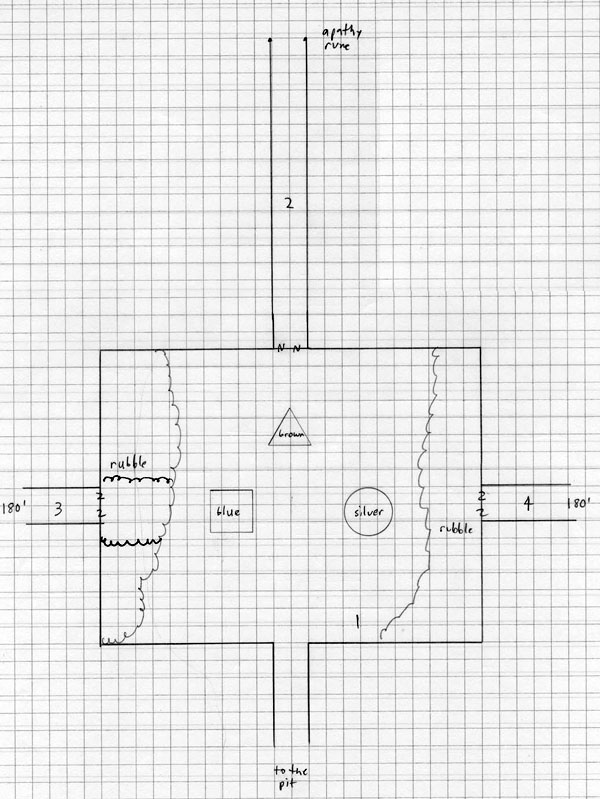
Room 1: The Hall of Elemental Magic
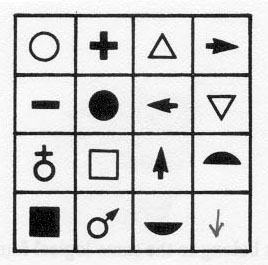
Standing on the symbols give the following reactions:
- Blue: You see undulating sheets of blue-green light after a few seconds.
- Silver: You see slowly rising clouds of pale light after a few seconds.
- Brown: You see a throbbing brown radiance spreading out in pulses after a few seconds. When these hit the northern wall, a set of secret doors are revealed.
Room 2: Corridor of Earth
If the party tries to move south they take 1d6 per 10 feet of elemental earth damage (save to half), the wall begin to blaze a yellow brown color, the smell of dung is noticiably stronger, and movement is slowed to 3 (as if moving through heavy muddy earth).
Room 3: Corridor of Water
If the party tries to move to the east, they take 1d6 per 10 feet of drowning damage and movement is slowed to 3 (as if moving underwater).
Room 4: Corridor of Air
If the party tries to move to the west, the wind turns into a cold blast and they take 1d6 per 10 feet of elemental air damage (save to half) and movement is slowed to 3 (as if moving against a great gale).
Passing through the portal into this room, a glyph fires off and all party members must make a saving throw versus divine magic at 32nd level. Failing to do this means that they cannot pass back through the portal. Even approaching the portal will make them nauseous.
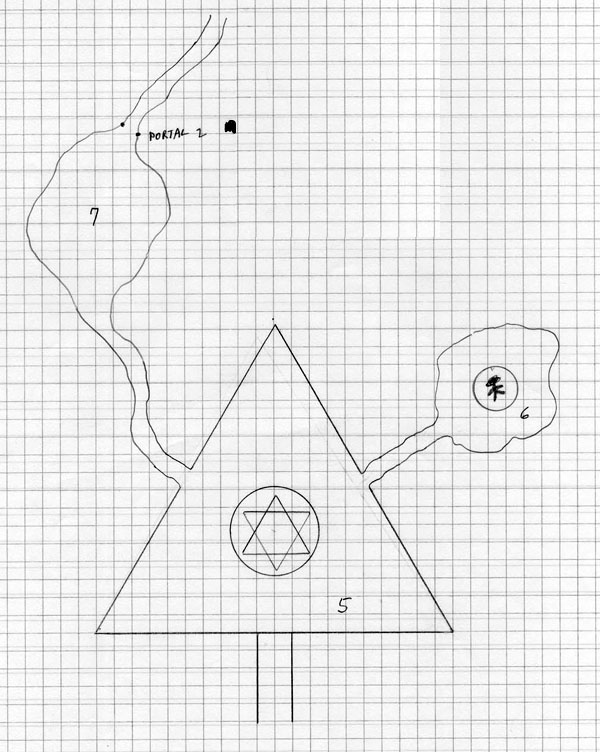
Room 5: The Hall of the Elemental Earth King
This is room that the Elemental Earth King used as an audience chamber. Those invoking his name were summoned to the center of the circle. This will not work unless the real Elemental Earth King is released.
Room 6: Elemental Earth King's Prison
If the party approaches the sphere, they will be buffeted by winds which are holding the water in place. There is no way to release the sphere unless the other Elemental Kings are brought into help.
Room 7: Xorn Trap Room
Eight Xorn will attack the party when they enter the room here. They will try to force the party northward or flee northward to get the party to follow.
Passing through the portal into this room, a glyph fires off and all party members must make a saving throw versus divine magic at 32nd level. Failing to do this means that they cannot pass back through the portal. Even approaching the portal will make them nauseous.
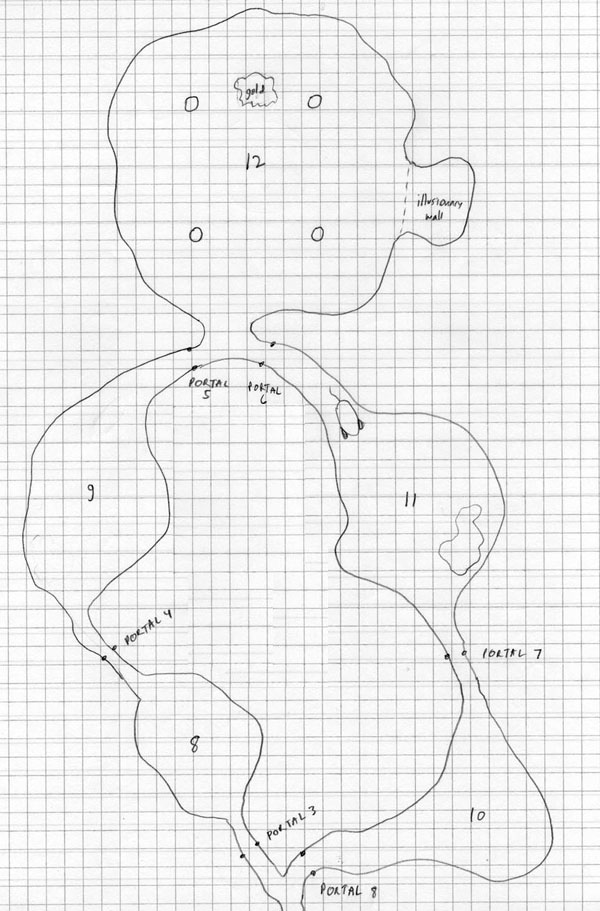
Room 8: Stone Giant Trap Room
Twelve Stone Giants will attack the party when they enter the room here. They will try to force the party northward or flee northward to get the party to follow.
Passing through the portal into this room, a glyph fires off and all party members must make a saving throw versus divine magic at 32nd level. Failing to do this means that they cannot pass back through the portal. Even approaching the portal will make them nauseous
Room 9: Trap Room
Passing through the portal into this room, a glyph fires off and all party members must make a saving throw versus divine magic at 32nd level. Failing to do this means that they cannot pass back through the portal. Even approaching the portal will make them nauseous
Room 10: Basilisk Trap Room
Sixteen basilisks will attack the party when they enter the room here. They will try to force the party northward or flee northward to get the party to follow.
Passing through the portal into this room, a glyph fires off and all party members must make a saving throw versus divine magic at 32nd level. Failing to do this means that they cannot pass back through the portal. Even approaching the portal will make them nauseous
Room 11: Golden Trap Room
The dragon is actually an illusion. The gold pieces are the trap. When the characters pass by, they will jump up on tiny legs and chase after them, biting for 1 hp of damage each. They move at 3", but are ferocious at herding the party to the north. They will sit still and let themselves be loaded into bags with other coins (which they will eat).
Passing through the portal into this room, a glyph fires off and all party members must make a saving throw versus divine magic at 32nd level. Failing to do this means that they cannot pass back through the portal. Even approaching the portal will make them nauseous
Room 12: Chamber of the Xorn Lord Zaxxyx
The gold is actually an illusion, and it will disappear when the party touches it. At that time, the Xorn Lord Zaxxyx will appear with his minions. He will demand that the party take off all their possessions and leave or he will collapse the roof and kill them.
His treasure trove is in an illusionary room off the east end of this room. It contains the following treasure garnered from others who have wandered by (most via the teleport). Treasure: 10,000 copper pieces, 6,500 silver pieces, 4,000 gold pieces, 1,000 platinum pieces, gems (whatever is left in the box), Potion of Mana, Helmet +6, Cloak of Protection +4, Manual of Puissant Skill at Arms, Mortar of Elemental Earth. Monsters: Basilisks (20), Xorn (60), Stone Giants (40).
Room 13: The Hall of the Elemental Air King
If the party calls for the Elemental Air King to appear, he will. He will then help the party for a small sacrifice.
If the party tries to take the censer, the Elemental Air King will appear and attack. Treasure: Censer of Elemental Air, Crown of Air Elemental
Room 14: The Hall of the Elemental Water King
If the party calls for the Elemental Water King to appear, he will. He will then help the party for a small sacrifice.
If the party tries to take the bowl, the Elemental Water King will appear and attack. Treasure: Bowl of Elemental Water, Crown of Water Elemental
|
Monsters
Earth Elemental King |
Treasure
10,000 copper pieces |
