Difference between revisions of "Hall of Relics"

From realm
Jump to navigation Jump to search
(Pushed from realm.)
 
(One intermediate revision by the same user not shown)
Line 19: Line 19:
 
Beyond the second portal, lies the second level of the Shadowkeep. This small three tiered challenge is commonly known as the Hall of Relics. The hall lies directly below the castle, and used to be connected to the castle by the now collapsed spiral staircase in Room 4. In times of great need, the king and his advisors could flee down the staircase and into the safety of Rooms 10-15. The upper level was designed to hold the king's booty. As each king came into his own power, a new room was added onto the structure. Thus, Room 1 belonged to the newest king and Room 3 to his grandfather. These rooms are guarded by the strange tar creatures that were discovered during the hall's construction known as the Quat. A number of traps have been set here to guard against high level fighters and mages, since those were the only beings that could truely threaten the king. A small shrine in Room 10 will teleport the adventurer to the underground Temple of War, the king's diety. The earthquake that destroyed this connection to the lower levels also killed all above who might know of its existence. Or did it?  
 
Beyond the second portal, lies the second level of the Shadowkeep. This small three tiered challenge is commonly known as the Hall of Relics. The hall lies directly below the castle, and used to be connected to the castle by the now collapsed spiral staircase in Room 4. In times of great need, the king and his advisors could flee down the staircase and into the safety of Rooms 10-15. The upper level was designed to hold the king's booty. As each king came into his own power, a new room was added onto the structure. Thus, Room 1 belonged to the newest king and Room 3 to his grandfather. These rooms are guarded by the strange tar creatures that were discovered during the hall's construction known as the Quat. A number of traps have been set here to guard against high level fighters and mages, since those were the only beings that could truely threaten the king. A small shrine in Room 10 will teleport the adventurer to the underground Temple of War, the king's diety. The earthquake that destroyed this connection to the lower levels also killed all above who might know of its existence. Or did it?  
  
<div style="text-align: center; border: 0px dotted gray; font-style: italic;">
+
<div style="text-align: center;"><div style="border: 0px dotted gray; font-style: italic; display: inline-block;">
 
'''Canto Two: Relics'''<BR>
 
'''Canto Two: Relics'''<BR>
 
<BR>
 
<BR>
Line 34: Line 34:
 
A simple prayer and nothing more,<BR>
 
A simple prayer and nothing more,<BR>
 
To the third and the God of War.<BR>
 
To the third and the God of War.<BR>
</div>
+
</div></div>
  
 
== Hall of Relics: Portal 2, Level 1 ==
 
== Hall of Relics: Portal 2, Level 1 ==
Line 102: Line 102:
 
NOTE: A successful solution means that the character come out with the appropriate key (no treasure) and experience. Failure means that the character comes out without the appropriate key, and he has taken a constitution death (not really dead).
 
NOTE: A successful solution means that the character come out with the appropriate key (no treasure) and experience. Failure means that the character comes out without the appropriate key, and he has taken a constitution death (not really dead).
  
[[File:hallofrelics04.jpg]]
+
[[File:hallofrelics04.jpg|center|500px]]
  
 
'''Room 5: Spiral Deathtrap (Brass)'''
 
'''Room 5: Spiral Deathtrap (Brass)'''

Latest revision as of 16:56, 30 December 2015

Hall of Relics
Type Dungeon
Status Explored March 883 TA
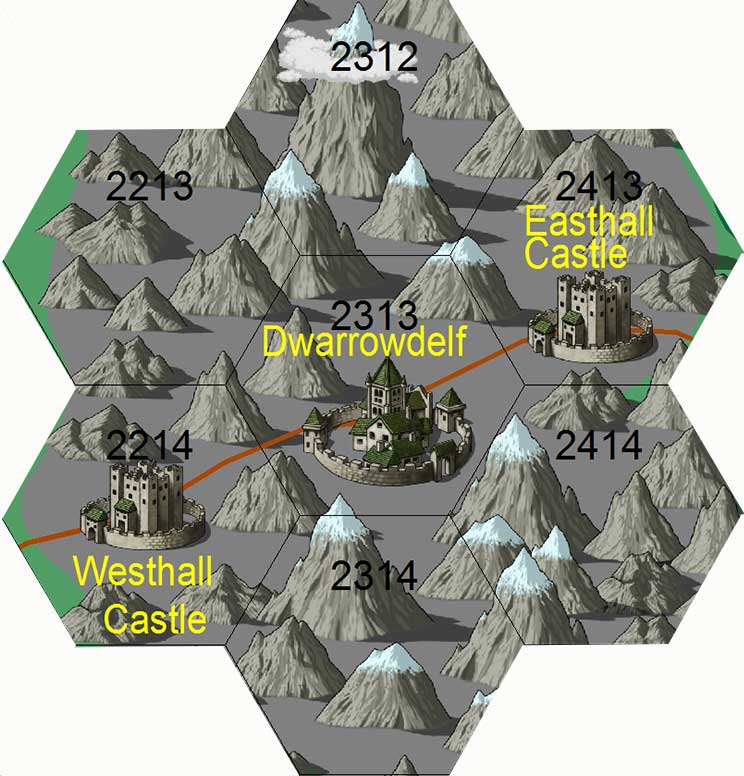
Location Shadowkeep (now Dwarrowdelf)
Hex 2313
Campaign Shadowkeep Campaign #2
Adventure # 66
Map-dwarrowdelf.jpg

Introduction

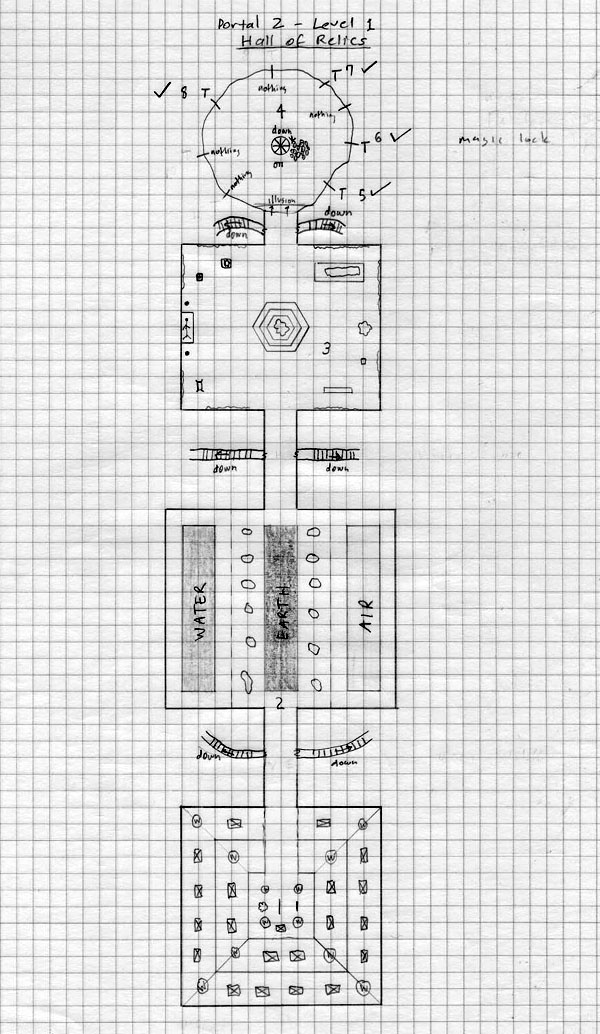
Beyond the second portal, lies the second level of the Shadowkeep. This small three tiered challenge is commonly known as the Hall of Relics. The hall lies directly below the castle, and used to be connected to the castle by the now collapsed spiral staircase in Room 4. In times of great need, the king and his advisors could flee down the staircase and into the safety of Rooms 10-15. The upper level was designed to hold the king's booty. As each king came into his own power, a new room was added onto the structure. Thus, Room 1 belonged to the newest king and Room 3 to his grandfather. These rooms are guarded by the strange tar creatures that were discovered during the hall's construction known as the Quat. A number of traps have been set here to guard against high level fighters and mages, since those were the only beings that could truely threaten the king. A small shrine in Room 10 will teleport the adventurer to the underground Temple of War, the king's diety. The earthquake that destroyed this connection to the lower levels also killed all above who might know of its existence. Or did it?

Canto Two: Relics

Three kings lie here from ancient past,
These tests have held them long and fast.

The ancient hallway carved of stone,
Is empty yet is not alone,
Creatures black as hell's own pit,
From down below will loyally sit.

Defilers die, all others pass,
Into eight tests and down to mass,
A simple prayer and nothing more,
To the third and the God of War.

Hall of Relics: Portal 2, Level 1

Hall of Relics: Portal 2, Level 1

Room 1: New Treasure Vault

This room is carved from the finest stone polished to a glossy luster. The walls, ceilings, and floor are grey, with an intricate pattern of cross thatched lines lining the edges. Golden guilt work highlight the lines, giving the room a regal bearing. The room is built on three levels each progressively higher as you move from the center of the floor, giving an amphitheater-like appearance.

In the corners of each of the levels, are twelve suits of armor proudly displayed. Each suit has a different shield propped up in front. All of the armor shows signs of rust and deterioration except for the suit in the southwest corner, which shines with a magical glow. A small set of dwarven plate, with the heraldic shield of a white unicorn on a purple background.

Twenty large chests are placed bewtween the sets of armor. Fourteen on the upper ledge and six on the lower ledge. On the ground floor is a small chest on a pedestal of stone near the south wall. The chest is unlocked. On the ground floor against the eastern wall is a full length mirror framed in a reddish wood and delicately adorned in iron and gold. The scene from this mirror (insert Description of Room 41). Finally, on the western wall of the ground floor is a beautiful robe of flowing colors hanging on a wooden frame, color after color cascading from the upper part of the robe to the hem in sparkling rainbows of dazzling light.

This room has no monsters. However, any character attempting to leave the room will find themselves faced with the following creatures.

Eight small monkey-like creatures face the party. Their skin is jet black and glistens in the torchlight, resembling polished stone. Only their eyes show signs of life. They move silently, quickly, and with a flowing motion.

The monkey-like creatures are the Protectors or Quat (meaning short person). They were discovered when building the hall, and they are protectors of the king's treasure. If the party returns the booty, then they will allow unhindered passage.

The treasure is: Robe of Scintillating Colors, Mirror of Teleportation, Plate Mail +3 (dwarven), Large Chests (14): 14,000 copper pieces, Large Chests (8): 8,000 silver pieces, Small Chest: 500 gold pieces, very small topaz (8), Amulet of Masking, Wand of Magic Detection, Hand Hammer +1, Potion of Invulnerability

Room 2: Middle Treasure Vault

This room is carved from the finest stone polished to a glossy luster. The walls, ceilings, and floor are grey, with an intricate pattern of cross thatched lines lining the edges. Golden guilt work highlight the lines, giving the room a regal bearing. The room is built as a hallway flanked on either side by 8 foot high ledges.

The center of the room is a 20 foot wide by 100 foot long patch of earthen soil. The soil is crumbly and rich. Lining the hallway of either side of the earth are 12 full-sized golden statues of various woodland animals. These are: wolf, badger, deer, small bear, raccoon, beaver, weasel, skunk, porcupine, otter, boar, and wolverine. These statues are solid gold, very heavy, and fairly detailed in their work. On the ledge are two large glass tanks 20 feet wide,100 feet long, and reaching 20 feet in the air. The western tank is filled with water. Suspended in the water are 40 small golden fishes of all types and varieties. The fish appear to be swimming at first, although a closer examination shows them to be statues carried along the currents in pool. The eastern tank is contains 20 small birds again suspended statues hovering in the air, as if held up by currents of wind.

This room is guarded by three elementals who were set here to guard the second king's treasure. They will animate and attack if any of "their" objects are touched. They cannot leave the room, but there are always the Quat.

The treasure is: 12 golden animal statues (2500 gp each), 40 golden fish statues (500 gp each), 20 golden birds statues (1000 gp each).

Room 3: The Old Treasure Vault

This room is carved from the finest stone polished to a glossy luster. The walls, ceilings, and floor are grey, with an intricate pattern of cross thatched lines lining the edges. Golden guilt work highlight the lines, giving the room a regal bearing.

The center of the room is dominated by a large golden statue of a handsome man dressed in chain mail. He wears a crown on his head, a s gnarled staff is in his hand. He is facing north. A three-step hexagonal dias leads up to the massive work.

Four tapestries on the eastern wall show the man with a cathedral in the background. The first work shows him paying a farmer for some land with a large bag of gold. The ghostly outline of a cathedral is behind. The second shows the man paying stone masons with another large bag of gold. The cathedral in the background is merely a foundation at this point. The third shows the man standing in front of the cathedral, now finished, and presenting a golden statue of the War God to some thankful monks. Finally, the fourth shows the man, this time in spirit form above the cathedral. The people are looking heavenward, and blessing the work the man had done. In front of the tapestries are four items. In the north, a golden replica of a cathedral sits upon a wooden table. In the center of the eastern wall, a full-sized golden statue of the War God looks towards the center of the room. Next to that, a wooden staff is held upright by a small pedestal of stone. Finally, a blue velvet cushion rests on the floor in front of the southern tapestry.

Four tapestries on the western wall show the man in various stages of his life. The first work shows him being crowned king. An adoring crowd watches. The second shows him getting married to a red-haired princess, whose features are hidden by a veil. The third is a portrait of a baby, tucked into the folds of red velvet blanket. Finally, the southern wall shows a funeral procession attended by hundreds of weeping women and children looking heavenward. In front of the tapestries are four items: a golden crown (similar to the one on the statue) on top of a short stone pedestal, a small ring in a glass box on top of a short stone pedestal, a set of matching gold candlesticks stand on either side of a stone coffin with a bas-relief of a young woman on top, and finally, a hickory rocker with gold gilded edges and a red velvet blanket inside.

There are no traps here, only the Quat. The treasure is: Golden Statue of the King, Tapestries (4), Golden Statue of the War God, Staff of Withering, Golden Crown, Ring of Conjuring, Hickory Cradle, Golden Candleabras (2).

Room 4: The Key Room

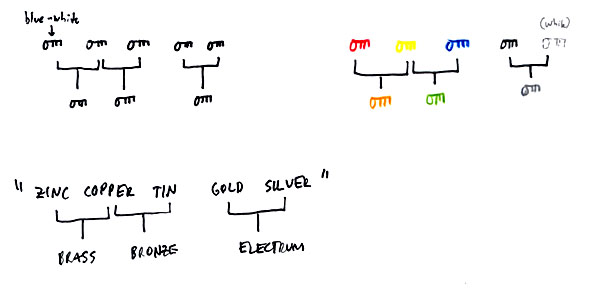
This natural cavern has been helped by human tools to appear in its present shape. The room is 90 feet in diameter with a ceiling about 30 feet in height. The walls have been shaped to give the room a round appearance. eight massive wooden doors, built of oak and bound in iron, circle the perimeter of this room. These doors have no locks. In the southern wall, a hallway has been cut into solid rock, its polished surface belying years of careful craftsmanship. In the center of the room is a large pillar of stone, it too, being polished to shine brightly. Set in the pillar is a single stone door. This door has eight keyholes in it arranged in an odd pattern. The top left keyhole holds a soft bluish-white metal key. Above the keyholes is another strange pattern made of colors. Propped up against the far side of the pillar is a skeleton dressed in leather armor, the dried blood of a knife wound in his chest. A piece of parchment lies on the ground next to his hand written in very poor common.

Cyril, I have written this note in the hopes that you can catch up to me. Wyly and I have been testing these doors. It seems that they are teleports of some sort. We entered the first room together, but we couldn't leave until one of us was dead. Wyly took that option. I have found four keys so far, but I can't make any sense out of this door. I'm sure that it leads to the king's treasure. Wait for me here. I will return shortly. Baldur.

If any of the four active doors are touched, the first character doing so will be teleported out of the room and into a private adventure. Any other characters touching the door will have to kill the others to escape. When alone in the room, you appear as someone else. When together, you appear as yourself.

If the eight keys are inserted into their proper places, the door will open and the party will see:

A set of spiral stairs lead down further into the earth. Above, a set of spiral stairs have collapsed leaving only a solid wall of stone. The air here is very musty with disuse.

NOTE: A successful solution means that the character come out with the appropriate key (no treasure) and experience. Failure means that the character comes out without the appropriate key, and he has taken a constitution death (not really dead).

Hallofrelics04.jpg

Room 5: Spiral Deathtrap (Brass)

You find yourself in a large pit 100 feet deep with a spiral staircase winding around the inside wall. You are on the stairs halfway between the ceiling and the floor. You know that there is an exit on the top OR the bottom, but you can't determine which. You hear footsteps approaching from above you and below you. It must be the enemy archers and swordsmen. You have the following items: brass key, flint, tinderbox, 50 feet of rope, a small sack with one dose of herbs which are poisonous when eaten or smoked, and three potions: Potion of Floating (10 feet/round for 5 rounds), Potion of Sinking (10 feet/round for 5 rounds), and a Potion of Invisibility (5 rounds).

What do you do? Since you don't know where the exit is, you must be able to get to both locations. The obvious solution is to imbibe the Potion of Sinking, jump off the stairs, imbibe the Potion of Invisibility (so you aren't feathered), light the herbs on fire, float them upward, and let the smoke fill up the pit (killing everyone except for you).

Room 6: The Dead Mistress (Copper)

You (a tall dark-haired muscular man) are standing fully clothed except for your shirt which is beside a large canopied bed. In the folds of the blankets of the bed is a dead woman (the queen)- a dagger protruding from her chest. You hear the pounding of two sets of feet coming up the stairs, the king and a guard. In the room is a closed window with a 100 foot coil of rope beside it. A small table stands by the bed with a two empty glasses and a decanter of scotch. A torch burns in a bracket near the bed. Propped up next to the window is a sword. A shield hangs on the far wall. You only have almost no time to prepare before the king and guard arrive.

What do you do? Throw the scotch on the bed. Light it on fire. Open the window and throw the rope out. Come back and be beating on the flames with your shirt. When the king arrives, send the guard to get help with the fire, and offer to chase the culprit yourself.

Room 7: The Dragon's Cave

You (a thin blond haired boy with only a shirt and trousers) are standing in a field looking up at a cliff containing three caves (one in the west, one to the north, and one to the east). Three paths lead to the caves, and there are three signs beside the three paths. The signs have the following riddles on them:"

WEST: The eastern cave is empty.
NORTH: Here sleeps the dragon.
EAST: The northern cave is empty.

"An old man is sitting on the ground next to you. He looks up and smiles. "I know that you are looking for the TIN KEY, my son. Let me tell you what I know about these caves. First, one of these caves contains a dragon, the second the TIN KEY, and the third an exit back from whence you came. Only the TIN KEY cave has a true sign leading to it. Go to the cave, get the key, and then go to the exit." The old man stops speaking, and you look over. He is gone."

What do you do?

NORTH does not contain the TIN KEY since the TIN KEY has a true sign.
NORTH does not contain the dragon since the dragon sign is false.
Thus, NORTH is EMPTY.
Thus, EAST statement is true, so it contains the TIN KEY.
Thus, by elimination, WEST contains the dragon.

Room 8: Baldur's Trap (Bronze)

You (your character) finds yourself standing in a small room. In the center of the room is a wooden table with a knife stabbed into it. Leaning against the table is middle aged man dressed in leather armor. He smiles and greets you.

Welcome, my son. Listen to my puzzle and carve your answer into the table, do not speak it aloud, and the key shall be yours.

I have a large box, (chest)
with two lids, (eyelids)
many weathercocks, (veins)
two caps, and (knee caps)
twenty articles a carpenter can't do without. (nails)
Then I have always by me a couple of good fish, (soles)
and a number of rabbits, (hair)
two students, (pupils)
two lofty trees, and (palms)
fine flowers. (iris)
I boast also a handsome stag, (heart)
two places of worship, (temple)
weapons of warfare, (arms)
and the steps of the inn (insteps)

The man is actually Baldur, the thief partner from Room 4. He has been waiting here for someone to solve this puzzle. When they carve the answer into the table, he will attack. Baldur fights as an 18th level thief (and will try to backstab). In his pockets are the following additional items.

A note with the puzzle above PLUS the following lines.

All pronounce me a wonderful piece of Mechanism,
but few have numbered up the strange medley of things
which compose my whole. Speak my name and the
key to all life is yours.

Four keys: gold, silver, electrum, and bronze. The treasure is: 100 gold pieces, 3 small sapphire gems, Potion of Speed, "C" rune stone.

Hall of Relics: Portal 2, Level 2

Hall of Relics: Portal 2, Level 2

Room 9: The Quat Caves

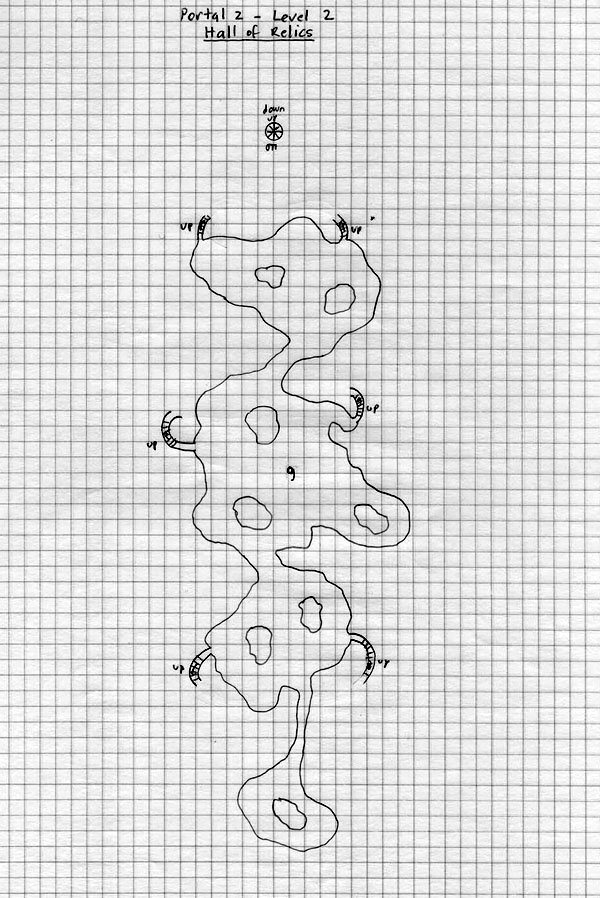
A number of small rough-hewn stairways lead down into a large cave complex. The stairways are small, winding, and treacherous. The room below is obviously a natural cave complex. The walls are damp and the air is very stale. A number of large black pools (tar, perhaps) can be found here. The floor is well traveled, but there are no other signs of living creatures.

If approached in a friendly manner, the Quat will not be hostile. Normally, there are no Quat around, but the situation may dictate otherwise.

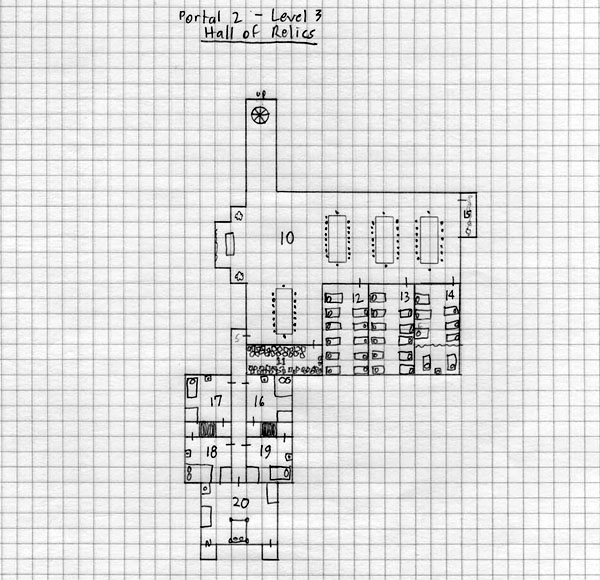
Hall of Relics: Portal 2, Level 3

Hall of Relics: Portal 2, Level 3

Room 10: The King's Sanctuary

This room is made of cut stone, plain and unadorned. A spiral staircase in the north end of this room leads up. The western wall of the room holds a small shrine to the War God. A makeshift altar looks onto a tapestry bearing the god's image. Two iron golems stand to either side of the altar. Four large tables and chairs fill the rest of this room. From the size of the room, it looks as if it were designed to house about 50 occupants. The room is neat and orderly, although a thick layer of dust will show that nothing has happened here in a very long time.

If the party approaches the altar without the crown from Room 3, the iron golems will animate and attack. The prayer from Room 20 is needed to get the teleport working here.

Take me to your temple strong, To test my will and right my wrongs.

Room 11: Storeroom

This room is lined with shelves on the north and south walls. The shelves are filled with all manner of dry goods, jerky, dried fruit, jars of vegetables, wine, water, and the like. Adventurers will recognize immediately that none of this food needs fire to prepare or will spoil. It looks like the provisions here could feed 50 for almost a month if rationed properly.

There is nothing else of interest here.

Room 12: Soldier's Bunkhouse

The long narrow room is lined with double bunk beds on both the east and west walls. A total of twenty-two beds with cloth-stuffed mattresses and wool blankets are neatly made and awaiting soldiers. The room does not look as if it has been used.

There is nothing else of interest here.

Room 13: Soldier's Bunkhouse

The long narrow room is lined with double bunk beds on both the east and west walls. A total of twenty-two beds with cloth-stuffed mattresses and wool blankets are neatly made and awaiting soldiers. The room does not look as if it has been used.

There is nothing else of interest here.

Room 14: Soldier's Bunkhouse

The long narrow room is lined with double bunk beds on both the east and west walls. A total of twelve beds with cloth-stuffed mattresses and wool blankets are neatly made and awaiting soldiers. A curtain at the southern end of the room divides off an area with two regular beds. At the foot of each bed a small footlocker contains extra blankets and sleeping clothes. A small wash basin between the beds is empty. The room does not look as if it has been used.

There is nothing else of interest here.

Room 15: Latrine

This room was obviously designed as a latrine as betrayed by the long wooden bench and four copper pots. This room has never been used.

There is nothing else of interest here.

Rooms 16 - 19: High Council Chambers

This room is furnished with a nice bed filled with down, pillows, and a number of warm wool blankets. A large wardrobe stands empty in the corner. Next to the bed is a small wash basin and stool. A door leads to a small privy, again unused. This room is empty.

There is nothing else of interest here.

Room 20: King's Chambers

Far from the opulence of the palace, this room is dominated by a large canopy bed pushed up against the southern wall. A large rug covers the majority of the floor. The walls are hung with warm red tapestries in abstract patterns. Two large wardrobes are pushed against the wall, and a small washbasin stands in the northwest corner. In the southeast corner is a door leading to a privy.

The secret door in the southwest corner opens into a small room with a locked treasure chest. The chest glows with a magic aura, and has the following riddle upon it.

All men be it known,
I do declare my champion,
Doth protect me with,
Mighty sword that slays,
Everyone who my will defies

If the proper word is not spoken, a knight in glowing plate mail will appear to challenge the defiler. Afterwards, he will disappear. He has (80% absorption) from his magical armor. Otherwise, he fights as a 21st level fighter.

The treasure is in a small chest: 100 gold pieces, 2 small diamonds, "T" Rune Stone, The War God's Prayer - "Take me to your temple strong, To test my will and right my wrongs", The Poem about the War God's Temple.

Monsters

Water Elemental
Earth Elemental
Air Elemental
Baldur the Thief
Quat (40)
Iron Golem (2)
King's Champion

Treasure

Robe of Scintillating Colors
Mirror of Teleportation
Plate Mail +3 (dwarven)
14,000 copper pieces
8,000 silver pieces
500 gold pieces
very small topaz (8)
Amulet of Masking
Wand of Magic Detection
Hand Hammer +1
Potion of Invulnerability
12 golden animal statues (2500 gp each)
40 golden fish statues (500 gp each)
20 golden birds statues (1000 gp each)
Golden Statue of the King
Tapestries (4)
Golden Statue of the War God
Staff of Withering
Golden Crown
Ring of Conjuring
Hickory Cradle
Golden Candleabras (2)
100 gold pieces
3 small sapphire gems
Potion of Speed
"C" Rune Stone
100 gold pieces
2 small diamonds
"T" Rune Stone
War God's Poem
The Poem about the War God's Temple