Heart of the Wolfshaunt
| Type | Dungeon |
|---|---|
| Status | Explored March 905 TA |
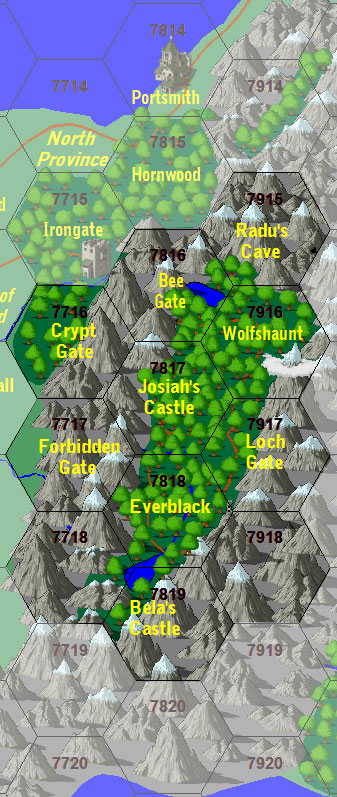
| Location | Wolfshaunt |
| Hex | 7916 |
| Campaign | The Wolfshaunt Campaign |
| Adventure # | 118 |
DM’s Notes
It is March 905 TA. A year has passed since the last adventure. It is the beginning of the campaign season.
Backstory for Awakening of the Wolfshaunt
The release of the Nephew – a vampire who was slew Booth and pretended to be him during the last adventure – was able to contact one outsider to let him know of his location before being recaptured and placed back into the vault. This outsider – Loomis – has been searching for the Forbidden Library his entire life – as his father and previous generations have done before. Calling themselves The Cult of the Shattered Moon – so named because their organization lies sundered by the Wolfshaunt Gate – Loomis stole the cyptex, used their remaining tokens to travel back to the Grandfather’s Castle, and are now trying to open the Wolfshaunt Gate permanently.
Unable to open the device directly, but suspecting where all the answers lay, the Grandfather created the Book of Secrets to “guide” extraordinary adventurers to find the clues, come to the castle, and open the cryptex. Then, he sent a pack of wolves through the gate and left the book on the chair in the Chapel of Udolf to be found.
The correct solution for the party is to find the cyptex and take it away without opening it.
Backstory for the Wolfshaunt Unleashed
Released from the Wolfshaunt, Grandfather Josiah seeks to leave the Wolfshaunt and establish residence in the Reaches. In order to do this on a grand scale, he must bring darkness to the land - which will weaken the people, starving them and making them more docile - and allow him free reign.
In order to do this, he is attempting to create a vast network of lightning rods (which are the real threat - not the storm) and activate them to create a powerful magical dimming of the sun. This requires thousands of lightning rods scattered around the area. He is getting the locals to help him by having the Hermit "selling" them rods and forcing them to protect them from removal.
The second task is to rescue his people from the Library - which will require an army which is currently coming out of the Wolfhaunt. In order to do this, he has enlisted the aid of the Tomb Kingdom - to bring back the Sandwurms to transport the army across the Sands of Time and into Sandal - where they will take the Library by force. The party must go to the Tomb Kingdom and stop the summoning of the great wurms.
The entire Wittenagemot campaign is centered around getting the Wolfshaunt army to Sandal in order to get to the Forbidden Library to release the other members of the Houses that are entrapped there. This would be a good change from the random kill cities campaign. This will be one of the short adventures – go to the Tomb Kingdom and keep the Sandwalkers from arising! Oh, Sandwalkers – actual Wittenagemot units which will transport units across the desert. Brilliant.
The final task is to return to the Wolfshaunt and subdue Father Joseph's line of kin and gain control of a Grandfather's Ring. THE NEPHEW + 12 OTHERS ALLOWED TO GO FREE!!! The Nephew will give them the intel report about what the Wolfshaunt is planning.
Backstory for the Heart of the Wolfshaunt
The two introductory adventures are designed to affect Witenagemot. The first is the discovery of stone dwarven ships that can be used in the fight against the Tang Armada (and later the Old Kingdom Navy). The second is an attempt by Grandfather Josiah to open the Flower Gate. This gate is unique, as it accessed from outside the Wolfshaunt - kept running for centuries by gnomes sealed behind the gate.
A small adventure to the Bee Gate will provide an introduction to Grandfather Bela. The party will also encounter Radu, a rogue vampire who is the most dangerous inhabitant in the Wolfshaunt - although a free spirit that might help the party. Finally, they can visit Azura Morgan's tomb - to retrieve a staff that allows them to teleport between the Wolfshaunt and the Reaches without using the tunnel and token system.
The main event is the Mustering - which binds the wolves of the Wolfshaunt - as a means of keeping balance in the land. This time, the party can get involved in the Mustering - either failing and allowing the vampires to retain control or winning the contest and choosing themselves whether to bind the wolves or not. This will make the wolves allies or enemies in the final battle for the Wolfshaunt.
Mutiny Bay
DM's Background
In the second age, a group of dwarven adventurers seeking gold in the Wyrmwyld Mountains discovered 12 strange stone ships - ancient and alien in their construction. They were in a hidden valley high in the mountains - far from the ocean. The dwarven king sent his engineers and laborers to retreive them - although many felt they would not float. But indeed, when set on the water, they hovered above the water's surface - balanced in even the most stormy of weather. The dwarves sailed the ships back to Teuefeldorf.
By the time they made it to Teufeldorf, only a sole crewman was left, and he was mad. The dwarves set another crew out to the Tang Empire, but the ships returned again with a single mad sea dwarf.
So, the ships were buried under Dwarrowdelf in order to keep them safe.
These ships are massive stone vessels - impossibly old and carved with runes clearly not dwarven. Each has a bank of six large cannons. While slightly slower than their modern counterparts, they can move in stormy weather. The cannons (once activated with long distance powder) can shoot farther than modern ship cannons.
MORE IMPORTANT NOTE: The ships are powered by an energy that causes their crew to eventually mutiny until only one sailor is left - who then goes mad and kills himself.
Prologue
Encounter 1: Entrance to Docks
Each of the figures is a shrine statue - similar to those worshipped when Dwarrowdelf was called the Shadow Keep. In fact, these statues appear to be representations of the God of Food and Wine. Shrine statues were used to ask the gods for a boon.
Careful search will show a small oval opening several inches across in the base of each.
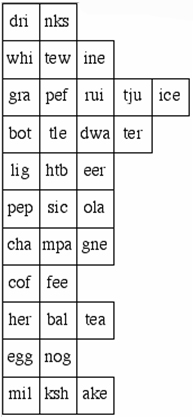
Along the base of the shelf is carved the following:
These tiles into words or phrases make,
Items of interest to all who may partake,
Master is one, slaves the rest,
Touch the master and solve the test.
If solved (see below), the "dri" and "nks" will resolve into the following:
Placing Ernie's stones into the slot will cause the statues to animate. They will speak in a crazy voice - "Your faith is true and heart not sour, we grant a boon to your weapon of power."
Each statue is worth 6 charges.
+1 to +2 = 1 charge
+2 to +3 = 1 charges
+3 to +4 = 2 charges
+4 to +5 = 2 charges
+5 to +6 = 4 charges
Encounter 2: The Docks
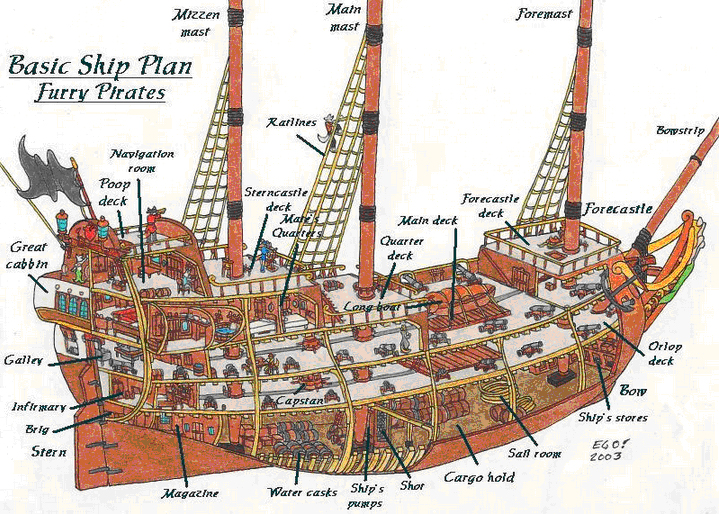
NOTE: The ships are incorporeal, but the party can fly around them.
There are three magical areas on the ship - the cannon battery, the masts, and the great room
The hounds move to attack. They will use their tentacles to try and push the party from dock. They are incorporeal, however, and cannot be damaged by mundane means. If dispelled, they will reappear next to a lantern.
NOTE: The key to is destroy the lanterns - which will cause the hounds to disappear.
IMPORTANT: The water is actually swirling mist. If anyone is knocked into the water, then it will awaken the Soul Eater.
OBLIVION: Docks are filled with the souls of all the dwarves (mostly in the Second Age) who were killed on the ship. They are wailing and pointing into the inky blackness of the swirling mist below the dock.
NOTE: Once the hounds are dispatched, the party will hear splashes and ripples in the water - as if something monstrous is waking up.
SHIP NAMES: Mutiny Bay, Privateer, Red Howl, Victory Lust, Savage Trinity, Hateful Saber, Hades Minnow, Uncultured Ghost, Silent Rovers, Greedy Deceit, Shadows of Plunder, and Filthy Tide.
Encounter 3: Main Deck
This is Dugald Axeworthy hanging from the mast - a rope about his neck. Clearly he has been in a fight, as his wounds are fresh.
The book has all its pages torn out except one. On it, is written TRAITOR. (see handout)
First group - landed on dock. Killed by dogs.
Second group - landed on dock. All except Dugald and two adventurers killed by dogs. They escaped to the ship. Hid in the Navigation Room. The puzzle was already solved, so they don't remember anything about that. Could hear voices below in the Great Cabin. Lived on rations. The dogs didn't come on the ship.
Dugald found a book (later thrown overboard by Arvil as a treatise to He-Who-Lurks-In-The-Deep). It spoke of a small toy ship that was the focal point for teleporting the ships to Dwarrowdelf. However, Dugald never found any toy ships.
Then, his two companions (Kyran Slateclimber and Arvil Uglygold) turned on him. They hung him. Then themselves.
They did find out that the water is not real and will not support a dwarf who jumped in to swim about.
Encounter 4: The Navigation Room
NOTE: The players may pinch to zoom in and out. A small glowing dot shows in the middle of the Shadowyarn Mountains under Dwarrowdelf.
The lanterns are actually will-o-wisps.
On the fourth wall, near the door, a small image is hung that glows in a warm yellow light. A small sign hangs near the picture.
One must exit, one must seek,
Trace to route, the ship to keep.
Turn sharply on the orange winds,
Yellow winds allow slight bends,
Any wind can be done straight,
Through all the winds navigate.
With magic eyes, you can see ever so slightly a disturbance on the dust that covers the picture's surface, as if someone has run their finger across its surface hundreds of years ago.
This tells the party how to "activate" the ships.
Once a Navigation Room is entered by one person, all the rest keep teleporting back to the main deck (until solved).
The person in the room begins to feel a rising sense of dread and panic - they are alone on the empty seas, the ships out of control, they will never see their loved ones again...
This is followed by escalating physical damage:
1st round = 10%
2nd round = 20%
3rd round = 30%
4th round = 40% - healing is probably necessary at this point. Note after 10 rounds they will be killed as damage will equal 100%.
On the main deck, the party will be attacked by scores of ghostly dwarven apparitions. If they touch the party, they will be aged 10d6 years AND need to make a saving throw vs. mind control or be enraged at their compatriots AND modest damage.
The idea, of course, is that they all rush to other ships to get them to turn real.
Once the ship is solid, all can enter it, but they will start to think mutinous thoughts - one of your companions has been replaced. Seek him out or be killed in your sleep.
Once the party is in full swing - the Soul Eater comes alive and starts destroying the pillars that hold the roof up. If the party is available, the tentacles will strike at them too.
The other navigation room puzzles:
Encounter 5: Great Cabin
From the windows outside, the scene inside is easily observed.
These are the Mad Captains - the final dwarf from each ship. They have gathered here to figure out a way to escape. They ran out of ideas centuries ago.
They know that they were all crewmen - not all captains - who set out from Teufeldorf in the Second Age. Their crews mutinied, and they managed to get their ships back to Teufeldorf. They remember a dwarven wizard casting a spell to teleport the ships to "dry docks" for repairs - and ended up here. Trapped for eternity.
"Transferring command of the Mutiny Bay to U-Gene, do you accept the charge?"
They might attack the party, or they can be reasoned with. They will ask the party to become the captains of the ships - which will cause them to turn to dust. The party would then be unable to leave the ships - teleporting back until someone else assumes command.
Amongst the books, trinkets, pieces of driftwod, etc. is the hull of a small toy ship. It is made of the same stone as the real ships. It is intricate in its detail and seems to be a close replica. A hole in the deck is for a missing mast, and a small cannon galley below deck is missing a cannon.
EBONY TIME FLY, LAMP OF WISHES, HORN OF HOLDING
Putting the ship together will awaken the tentacled monster.
Encounter 6: The Cannon Deck
From the goo, a white skeletal creature emerges with a cutlass. Then more and more. The skeletons will try to move large cannons to point at the party - without success.
The party must seek a way to get the goo out of the room - otherwise they need to search the boxes for a small toy cannon.
A locked room at the far end of the cannonade is marked "Long distance cannon powder. Measure carefully. Extremely dangerous".
Time the solution: Treasure is a chit that allows an attack into an adjacent hex from the dwarven ships. Up to 10 chits.
Encounter 7: The Crow's Nest
When touched, the crow swivels in all directions. It is actually a spyglass. Looking through it, you can see the cavern bright as day. Night vision!
The party can see what is going on in the other ships quite easily.
They can also see the large multi-tentacled creature at the bottom of the cavern floor.
Looking straight up the mast, you can see a bird's nest that has been built at the top of the masthead. Sticking out of the nest is a small toy ship's mast.
Encounter 8: The Soul Eater
The black mist is a tentacled monster. Characters cannot float in the mist and cannot breath in the mist. It will not attack until the end of the encounter. It is a soul eater from the deep - a legendary horror of pirates - a creature that seeks to capture and torture men and eat their souls - leaving them to wander the seas without hope forever.
Will awaken the ancient tentacled creature - which will attack and seek to suck the souls from the party.
If it is challenged, it will begin destroying the pillars that hold up the room. This could devastate Dwarrowdelf (or are they actually under T-Dorf).
Encounter 9: The Teleport to Teufeldorf
Putting the three parts of the ship: the hull, cannon and masts together will cause the little ship to fuse and transform into a single stone figurine. The figurine glows with a magical aura. On the bottom of the hull, the words appear:
Fill my sails with living air,
Return to the seas sailing fair.
Blowing on the ship causes the cavern to begin to spin, the air grows hot, and suddenly there is a loud popping sound.
You find yourself outside in a very familiar place. Teufeldorf harbor. It is the same time of day as when you left to descend the well in Dwarrowdelf.
NOTE: Each "captain" will be on their own ship - unable to leave until somebody else "assumes" command.
In a few minutes, you see the harbor master coming towards you in large rowboat. Several mate are with him.
Harbor Master Tobias Stryker.
Admiral Second Age - Gustav Seaspray
The Waterfall Chapel
DM's Background
The powerful magic that keeps the Wolfshaunt closed except for the tunnels is created by two giant machines that generate an anti-magic barrier. There is one machine on each side of the mountain range. Taking down one side will not disable the wall - both need to be disabled. The one inside the Wolfshaunt is called the Fang. The one outside the Wolfshaunt is called the Flower Gate.
BTW, the secret saying for the Fang is: The fang of defense, Is sharpened by bone.
Gnomes run both sides of the barrier. On the Reaches side, they have let themselves be sealed in for hundreds of years. Consequently, everyone has forgotten their location.
A bug-eyed gnome - a deep gnome - comes looking for Hylax in Teufeldorf. He was sent to look for Cogwhistle, a gnome on the High Council of Evan Stoutheart - a Paladin King of Teufeldorf several hundred years ago. Cogswhistle is long dead, so he approaches Hylax.
- One of the village elders is dead. His body is actually stuffed in the air vent. Killed by a vampire.
- The gnomes opened up the door (mistake #1).
- They went to Hylax for help.
- While Clixworth is gone, the vampires came through the door and grabbed the elders.
- They tortured them and got the code.
- Knowing the party is coming, they quickly set up a diversion to get them to go to the Waterfall Chapel.
- Once in the Waterfall Chapel the party will trip the time trap and flash to alert the vampires.
- The vampires will then invade the gnomes again to do the ceremony.
Prologue
Clixworth is dismayed when Hylax doesn't know the response to his secret saying.
The flowers of defense
Are watered from above.
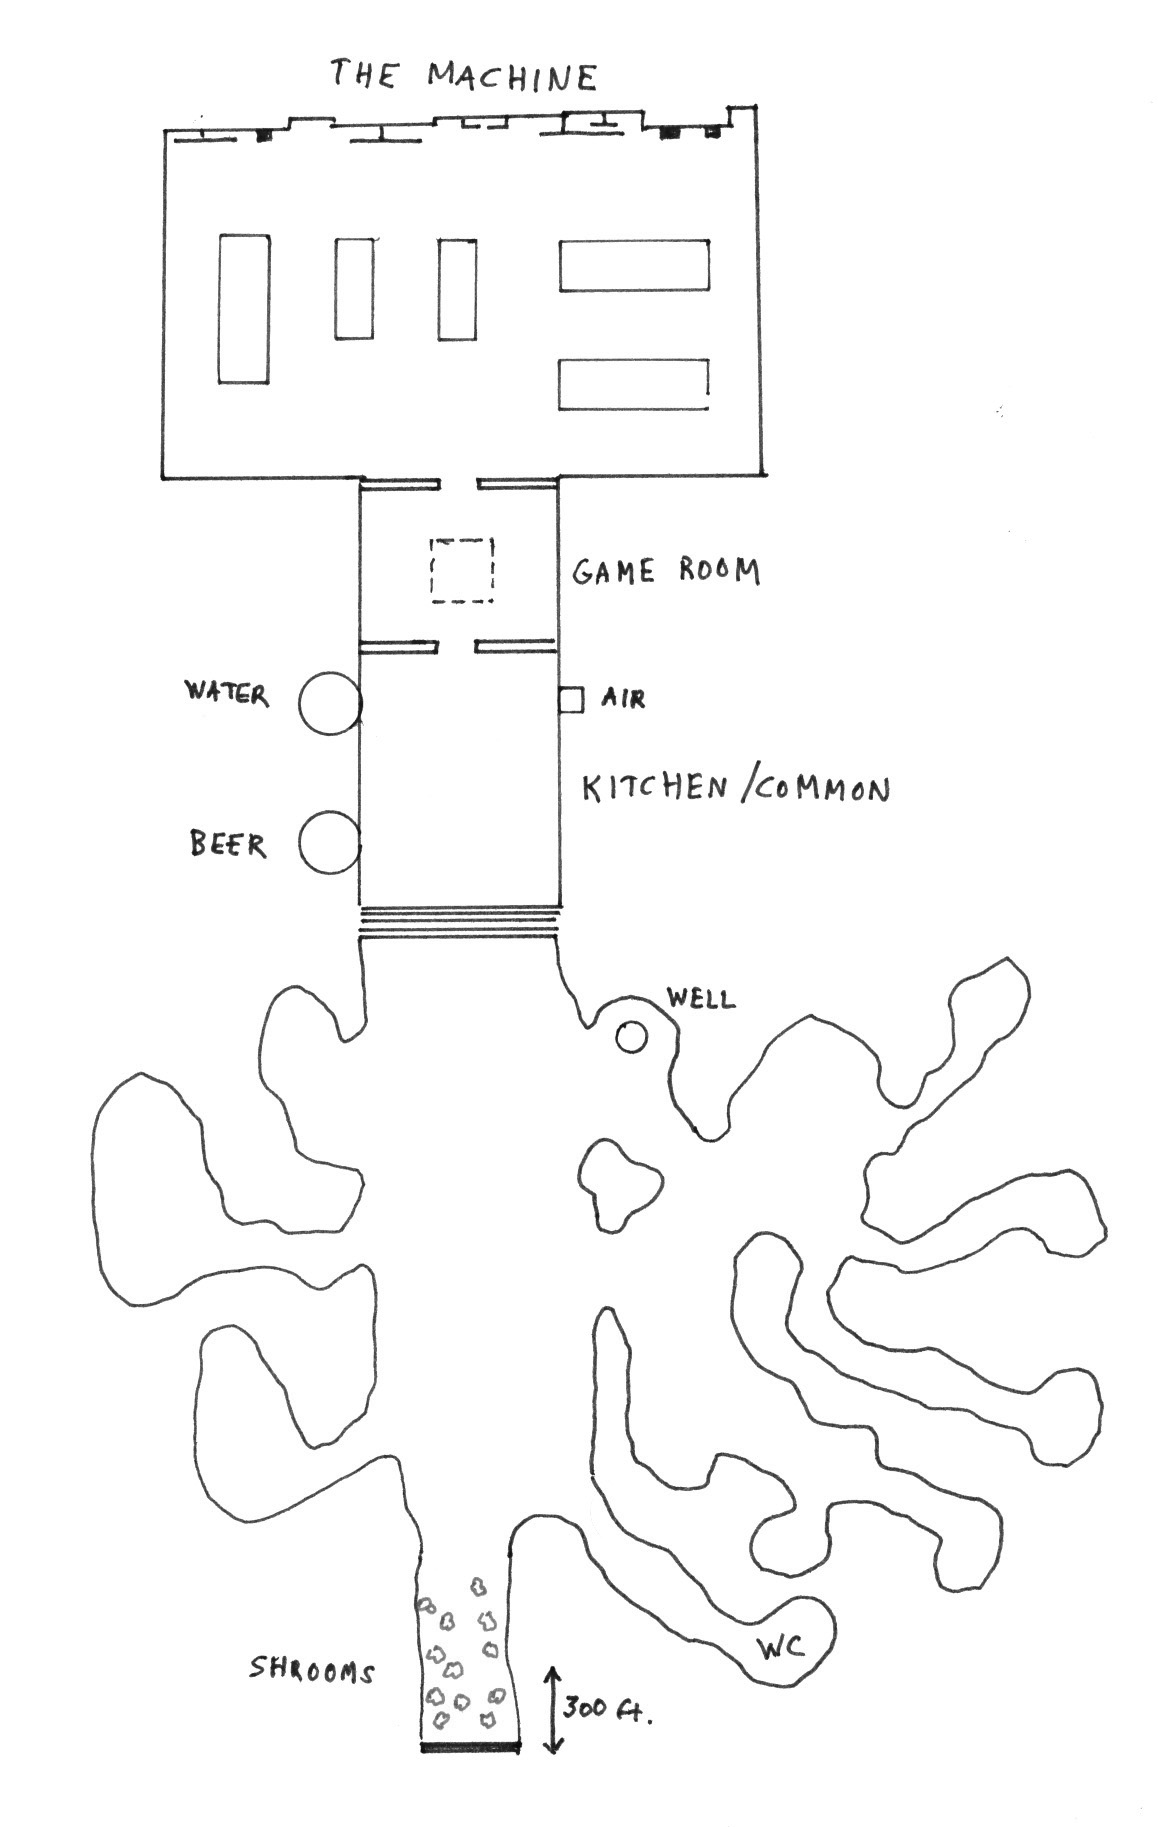
The gnomes have lived behind the Flower Gate for several hundred years, tending the machine, growing mushrooms, brewing mushroom beer, and building games to amuse themselves. Their favorite game is one where players are allowed a few hours to "modify" an existing mechanical robot - to duel each other in a three-dimensional cage match.
There have always been elders with the lines from the Flower poem which will disable the gate on this side. Each elder knows 2 lines. This way, if one dies, then the others can teach a new elder. However, the elders have lived in their solitary rooms in the cave for hundreds of years without aging.
AB Arcwood Blundersocket
BC Bicco Crankweaver
CD Coggy Drivewiss
DE Dizzy Elwright
EA Elmore Autogear
The Elders couldn't be taken - the Flower Gate was made so that as long as the machine was running, the Elders wouldn't age and couldn't leave except through the gate itself.
Encounter 1: The Flower Gate
The rest of the elders are missing! They were taken yesterday night. The door was open, but we posted the Elwright twins as guards. This morning, we woke up and there was nothing but a small scrap of black cloth snagged in the door.
Hurry they must be saved before the evil ones can learn their secrets!!!
Oona heard from the fleeing figures the words "Waterfall Chapel" in a low, scraping voice. She thought it was a dream - a nightmare. She had been smoking a few "special" mushrooms.
NOTE: Of course, because of the time lag, the elders have already been killed. The bad guys are waiting to get back into the Flower Gate and start the ceremony - which they now know.
NOTE: When the party first arrives, Arcwood Blundersocket is stuffed in the air vent. The vampires couldn't get him out because of the magical protection. So, they had stuffed him in the air vent so that the gnomes would have to open up the rusted gate.
Flower Gate Description
Oona will not trust the party with her secret. She has been here since the beginning. She does know of an ancient chapel behind a waterfall about 20 miles to the east. The monks were wiped out by a plague even before Oona arrived at the cave, but she knows few details.
Encounter 2: The Waterfall Chapel
As the party approaches, two ancient vampiric dragons - hidden in the cavern outside the chapel move to attack. Breath weapon sucks life - and gives it back to the dragons. Can be used on things other than the party - like cows!
This is really a ruse - make it look like the chapel is guarded.
The chapel is empty.
Encounter 3: The Crypt of Eternal Stars
As you approach this room, you hear scrabbling - like claws scraping on stone.
From the dates, you know this chapel has been empty for almost five hundred years.
There is a slight aura of magic coming from the ceiling - the stars are actually "circling" the ceiling.
Several ghoul-like creatures will try to push the party into the pillars. Or, the party may touch the pillars in searching them.
In either case, this will cause a bright flash in the room. This is a signal to the vampires outside the Flower Gate that it is safe to enter.
Then, the pillars will grow stone arms and begin trying to grasp the party. On a successful grapple, the victim will be trapped by Time Stop (no save) - which essentially holds them in place without an action. In their minds, they are still acting - but so slowly that nothing is seen by those in "real time".
If all are captured, then they will be held forever.
The pillars can take massive damage, but they dish out none.
Encounter 4: The Elders
The gnomes are dead. They are the Elders - recently captured. Each has given up their poem - compelled by a deathly white man with glowing red eyes. The man had a simple gold coin on a chain that made them tell their secrets - which another hunched man wrote down.
Among the tools, the party can find a vial of ink, a pen and several sheets of paper. They can do the rubby trick to get the poem from the top sheet.
We were taken from the ore-bed and the mine,
We were melted in the furnace and the pit—
We were cast and wrought and hammered to design,
We were cut and filed and tooled and gauged to fit.
Some water, coal, and oil is all we ask,
And a thousandth of an inch to give us play:
And now, if you will set us to our task,
We will serve you four and twenty hours a day!
But now we seek to give you rest
We release you from the bonds of toil, be silent!
The gate is ancient and has not been opened in recent years - rust is over the hinges. The area beyond the gate radiates an aura of good.
Two small plates are on the front of the gate. One has a key symbol. The other has a lock symbol.
When touched. the symbols appear on each of the plates.
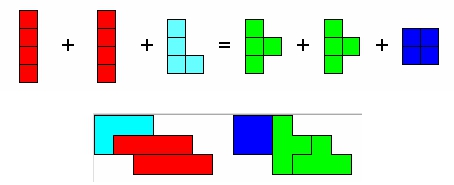
Add the shapes on the left hand side of the equal sign to make the same shape as on the right hand side of the equal sign.
Encounter 5: The First Abbot
This is the tomb of the First Abbot. He is buried here with magic items to help the party.
When disturbed, the ghost of the abbot will appear. He is an old man, not ancient. His back is straight and his gaze is clear. He is dressed in monk's robes. He holds an ancient gnarled staff in his hands.
Upon seeing the party, he will bless them. He will walk to the abbey - falling to his knees that the monks are dead. Then, he will pass among the barrows outside.
Somehow, he will communicate that the party may have his Abott's staff in exchange for seeking new acolytes for the order.
Encounter 6: The Dragon Entrance
Flying about the entrance to the Flower Gate are 12 ancient vampiric dragons. They are on high alerts for the party.
Inside the main room, the bodies of dozens of gnomes walk about in a dazed stupor - vaguely zombie-like in their countenance.
As the party enters the room, the creatures begin to shuffle towards them.
Oona will call the party's attention from her alcove. She has been hiding under her blankets.
Encounter 7: The Failsafe Switch
Encounter 8: The Final Showdown
These are minions of Grandfather Bela.
Jael - The fighter will run through the wall - causing all his magic armor and weapons to be ruined. 2 TOKENS ESCAPED
Solomon - The other fighter will summon others to help. Maybe summon a vampiric dragon? LONG SWORD +5, GOOD SLAYER, 2 TOKENS
Xenos - The hunchbacked man will cast a Wall of Stone to slow the party. And then pull out his EPIC WAND OF DISINTEGRATION to start blasting away. 2 TOKENS
Cyran - They can hear the gears grinding down as the vampire continues to read the poetry. COIN OF CHARMING, 2 TOKENS
They are here to open the door for Grandfather Bela. He has found the Bee Gate on the other side of the Wolfshaunt.
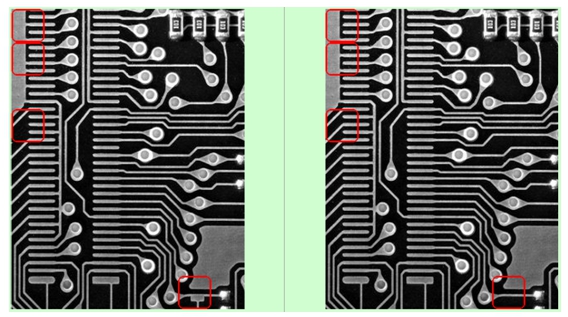
Looking for the switch requires someone to identify the differences between the two machines.
Throwing the switch causes the machine in the Failsafe Room to start to hum - an increasing whine as it builds up momentum.
Once defeated, the vampire and hunchback will teleport away (in the Realm - obviously).
Heart of the Wolfshaunt
The Council of Five
In the dim history of the Wolfshaunt, the Council of Five was formed by the leaders of the most powerful houses (Grandfather Josiah, Grandfather Bela, Lycurgus, Talbot, and Master Whitlock of the Storm Lords). The alliance basically divided up land and was used to keep food supplies ready.
Recently, Grandfather Josiah called a Conclave of 903. The Storm Lords did not attend. The party's attack forced Grandfather Bela and Lycurgus to flee. Benedict Blackwolf (emissary for House Talbot) was killed. This is a major setback for the Council.
The Midnight Conspiracy
Grandfather Josiah has formed an uneasy alliance with Lycurgus, leader of the Baneback. After failing to open the cyptex, he created the Book of Secrets and the taunt of King Ernie in order to get them to do the deed for him. He gave Lycurgus a substantial part of his cache of tokens in order to free the first of the pack. In exchange, they will help each other when the gate is opened. They want to make the Eastern Reaches into a new nation called Midnight.
The Heartwood
The Heartwood is a being of the druids - a neutral force that attempts to keep peace in the Wolfshaunt. As such, it is opposed to the vampires and humans entering the area. The Maze is its way of doing this. There are two entrances to the Maze. These are guarded by the vampires - for they cannot figure out how to pass under its branches. Beyond that are ways to keep good and evil creatures at bay. Neutral characters are unaffected - Hylax and Fuzzwort. Ernie, Vince and U-Gene will always be targeted.
Prologue
Things are missing from the castle - eye glasses, a whetstone, etc. Taken by the Grandfather - now at his castle.
Encounter 1: The Tunnel
IMPORTANT NOTE: Ask about Wolfshaunt tokens - several characters do not seem to have any. However, I have cards made up. Used up 4 last year.
Only the Waterfall Gateway is occupied.
The sounds do not appear to be getting louder as you stand and listen.
I am Pesha Moody. I will tell your fortune for a token. But my vision only works once - so choose wisely.
"I see yellow and black. Birds. No. Bees. You are fighting. Pain - the poison gives you sight. You will be hurt - but only by facing the Bees will your home be safe. Flee the bees and your home will be as dark as Midnight."
A puzzle on the Waterfall Gate allows passage.
"Look up and down before you enter here."
Encounter 2: The Emissary
Ring Bound to Josiah. Ring of Memory Manipulation.
- My master has lived for generations by being cautious. You hold a ring that can take his life. I do not expect you will meet him while the ring is still in your possession.
- Does not have the Heart on him. Will direct the party to the Exchange - an ancient way for exchanging items between the Houses of the Wolfshaunt. It is located to the north - past the village of Tween. An ancient stone building.
If the party attacks, Winston will flee - if possible.
He has the party items.
Encounter 3: The Exchange
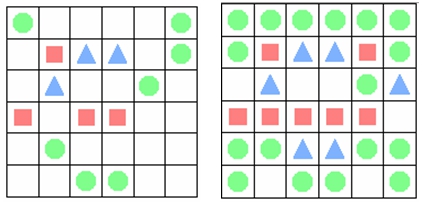
A grid of squares is carved into the top of the box.
A perfect deal needs a trusting pair,
Each row and column a perfect square.
If the party puts the ring in and enters the code, the Heart will materialize. The ring will disappear.
Shades do not know about the other side of the gate. They do know the location of the Hartwood, however.
The Heart is almost dead - its hold will be broken at the Mustering.
Encounter 4: Beware Wolves
As the party exits the Exchange, they are attacked by a dozen very large wolves led by Duncan Blackwolf. They were tipped off by Grandfather Josiah that the old Heart would be here.
- The old Heart is dying - thus turning black.
- A new Heart will be pulled from the Heartwood in two days time.
- Breaking the Heart will break the bonds for a couple of days - allowing Duncan and the independents to sieze the new heart and break the House of Baneback and the House of Blackwolf.
- They are freedom fighters!
- They do not know the location of the Heartwood - they feel only the Mustering pulling them to the woods to the south. In time, the Mustering will become a guide to the Heartwood.
Encounter 5: The Village of Sundown
The village of Sundown is along the road to the north. The party rescued a number of Sundown villagers including their leader, Jude Jenkins, from the Tween holding pens and the werewolves there. They will be recognized and welcomed to the village.
From a distance, a guard calls out to the party.
Jude Jenkins is there.
This is where the Bee Keepers - gnomes who actually tend to the Bee Gate live. They are pretending to be bee keepers - providing honey for the village.
The big bees come and pick them up to "take them to work" in the secret passage of the machine. The bee leader is Bilbik Berrysteel.
In the gnome cottage, the party will find one of the Twin Journals. The other will be in the honeycomb. "Attack. Vampires. Secret safe. Run."
Encounter 6: The Bee Gate Clearing
The Bee Gate is the other side of the Flower Gate. If both fall, then the Wolfshaunt will be open. This will play into the Witenagemot deployment zone.
Vanessa - Grandfather Bela - a fighter who is there to keep the centaurs distracted while two of her compatriots open the Bee Gate. In fact, they are already inside!
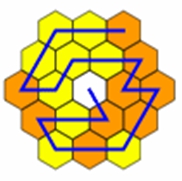
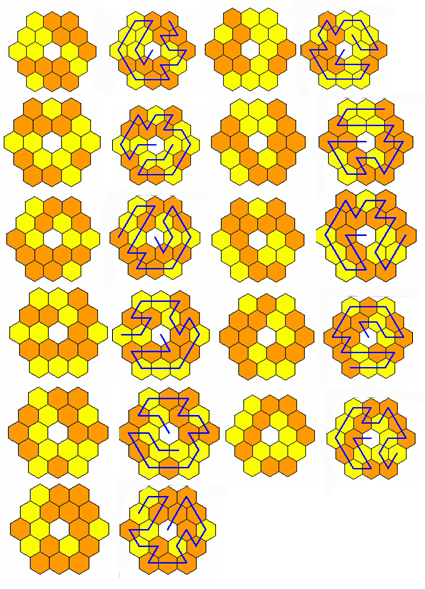
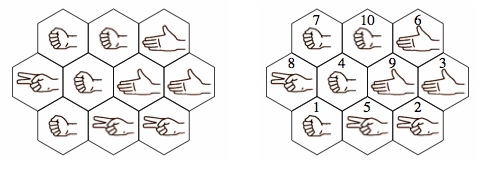
You recognize this as a children's puzzle popular throughout the Realm. You start on rock and visit each hex exactly once by jumping to a hex in the same row or sloping diagonal as the current hex. Each jump must follow the pattern rock → scissors → paper → rock, until you end on a rock. The jumps must never reverse direction, though you may jump over a hex multiple times.
If approached, the villager Quimby, will be incoherent saying, "It's so beautiful" over and over again. He is seeing the bee gate in all its glory.
The centaurs, led by Alo Darksong, are the Guardians of the Bee Gate. They will be suspicious of the party. In no case will they reveal the gate's location.
Alo may tell of the Guardians of the Puzzle Box in the Heartwood. A safe haven along the path to the Mustering. They are kindred forest guardians, although they have had no contact with each other in several generations.
Encounter 7: Bee Gate Entrance
There is one section of unsealed ones that correspond to the puzzle. The entrances to this cluster of combs are plain stone - not covered in bee pollen and honey. Going into the wrong hex will teleport the party several miles deep into the mountains.
The passage moves straight back into the cliff face for about 60 feet. It is clean and without markings of any sort.
A number of dead gnomes are piled neatly in the middle of the tunnel. The book reads, "Attack. Vampires. Secret safe. Run."
This is Grandfather Bela. He is confused that the machine is stopped. He didn't do it. He just killed the gnomes. If confronted, he will wave his staff and the gnome bodies will disappear to his castle for questioning.
This is the failsafe machine. The real machine is accessed through a secret ceiling access about 30 feet along the passage.
Encounter 8: Bee Gate Machine
Searching along the passageway, you find a secret lever - magically disguised - easily seen by those with bee venom in them.
Pressing the lever produces a click and a small panel of brightly colored symbols appears.
Palindromes bright and clear,
Open to the working gear.
Solving the puzzle opens up a passage moving up. As soon as the party enters, the panel clicks shut.
Encounter 9: Leggerman Rain
If the party attacks, the knights will defend themselves. If the party helps, they will gain a tentative ally of the men of the Wolfshaunt.
Tibbot the Undefeated
Gerrot the Heroic
Encounter 10: Radu's Cave
"It is not often that I get visitors to my abode. Welcome. Sit and have a glass of wine."
Radu will only attack if provoke. He is immortal and does not feel threatened by the party.
He will:
- You can have the girl when I am done with her. I do not apologize for the Hunger. I will leave her body on the ledge in two days.
- The chess board keeps track of the four houses of the Wolfshaunt. However, the board will be reset soon with the Mustering.
- More interesting is new forces that might enter via the Valley Gateway.
- Radu wants 4 tokens - to travel to the Reaches to check it out - and then back. He has no desire to leave his home. He is happy here.
- Will not get involved in politics.
There are several magic items here. The chessboard glows but is otherwise non-magical.
RING OF RADU
STAFF OF SPIRIT
RELIQUARY OF ST. SIMON
32 pieces
12x12
Encounter 11: Glade of Willowthorn
This will appear down the road from either entrance to the Heartwood.
The interior of the cottage is long overrun with vines. Shapes that were once tables, chairs and other furniture can be seen here. The party will find the BRIAN BLADE here.
Hylax and Fuzzwort feel at ease here - while Vince, Ernie and U-Gene feel a menacing presence - a lurking evil at the edges of the glade.
As you approach, six centaurs come loping from the trees - their bows trained on Vince, Ernie and U-Gene. "Be cleansed or Be gone, tainted ones." Hylax and Fuzzwort are invited to stay and rest in the House of Willowthorn (a long-dead druid).
If attacked, the centaurs will attack - as will 20 large ents that are standing around the edges of the clearing.
From the pool, three beautiful women - nude and alluring - beckon you to join them. They will periodically frolic in the pool. Attacking them will summon the shade of Willowthorn - who will curse the party. The party's skin will slowly start to become bark-like until they pay a penance to Willowthorn.
If entered freely, the pool will "cleanse" the party - making their alignment to Neutral until they undertake a good or evil act (or 24 hours).
NOTE: This can also be used as a wandering encounter in the Heartwood.
Encounter 12: Grandfather Josiah's Castle
This is the same castle as last year - see previous adventures if the party wishes to explore.
Encounter 13: Wolves vs. Vampires
This is a something of a tradition - killing wolves as they enter the forest - fewer to fight later.
It is also a diversion to get the party's mind off of their journey into woods. Attacked by vampire castle. Once they get into the forest, they are safe.
Encounter 14: The Heartwood Maze
When you enter into the Heartwood, they must make it through the Maze.
- Each player must work independently.
- Once you solve the puzzle, you can "find" and coach one other player. Verbal only - no sharing answers.
- Hylax and Fuzzwort take no damage.
- If Ernie, U-Gene and Vince are still non-neutral, then they take an escalating amount of damage each round.
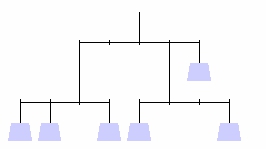
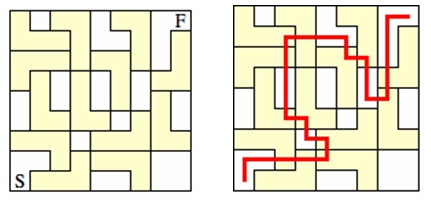
Find a path that moves horizontally and vertically from S to F. The path must pass through exactly one unit square of each L shape.
Encounter 15: Shadow Sneaks
Unseen to party, they will be tailed by a number of shadow sneaks. These creatures appear as insubstantial wisps of smoke.
They have been sent by Grandfather Josiah to make sure the party stays on the intended path - gaining the hands before entering the tree. They will move the magic items forward as needed.
Encounter 16: Guardians of Morgan's Tomb
The track moves on for almost a mile.
The centaurs are the Guardians of Morgan's Tomb. They are brothers of the Guardians of the Bee Gate - although they have not communicated with each other for several generations.
These centaurs are just about killed off - only 20 remain - 14 of them women and children. The treasure of the tomb must be moved or new guardians found.
The centaurs do not know the contents of the tomb - only that it is the final resting place of Azura Morgan - a wizardess of great renown. This is another path into Wolfshaunt: the puzzle box. This structure holds a relic - Morgan's Staff - that allows free travel between the Wolfshaunt and the Reaches. The staff was created by the same wizardess, Azura Morgan, that created the great gate - sort of a back door into the Wolfshaunt.
Greymane
Encounter 17: The Puzzle Box Entrance
Hylax recognizes the structure as a wizard's puzzle box. A series of tests and traps await any who enter. If they are successful, then they will be rewarded with the treasure. If they fail, they die.
With the centaur's blessing, the treants stand aside. They bellow a command in the low deep rumble of old entish, and the stone sealing the ziggurat entrance slide apart.
After entering, the stones slide back together. Hylax does not feel connected to the planes - nor is teleport possible. This is life or death.
Encounter 18: The Outer Corridors
Test 1
The walls begin to scrape in towards the party. 10 feet until they are squashed.
A set of lips appear to the above the door, and a woman's voice can be heard. "I am Azura Morgan, and you are either clever or dead. This should be fun."
She will converse with the party. The trick is that the players aren't the ones that have to say the password, the door is. They have to get the door to say it.
Once this is passed, the door will disappear, and a smaller room will appear in front of the party. This gives them 10 more feet.
Test 2
A single pane of stained glass - is illuminated from within.
Again, the female voice speaks, "Welcome adventurers. The chosen one must break the glass."
Once this is passed, the walls will disappear, and a smaller room will appear. 10 more feet.
One handout is different. That character must break the glass, revealing the next puzzle.
"Very clever. Have you ever thought of being a wizard?"
Test 3
A very small room again with a solid stone door. There is a stone button on the right hand side of the door. On the left hand, in Common, is the number 10. It starts to count down: 9, 8, 7, 6, 5...
The trick is to let it go to 0 and the door opens.
Encounter 19: The Inner Chamber
When the staff is taken, the party feels they have the ability to teleport, look in different planes, etc.
Test 4
This is, of course, ridiculous, the actual staff in the coffin with the body of Azura Morgan. Which looks identical, but the amber has a strange insect trapped within. The insect has seven legs remaining, although at some point it had eight.
Encounter 20: Sprites of the Hand
Five sprites - each wearing a silver chain with a hand grasping a tree are being attacked by a vine creature. Five more lie dead. The vampire vine should be easy to kill.
The sprite will thank the party and leave. If asked, they will say that the chains protect them from the confusion of the Heartwood Maze.
This is true. But, the chains have other powers. They were ensorcelled by the "personal items" stolen from Teufeldorf. This makes it impossible for the party to find additional information out about these items.
Grandfather Josiah created them to give to the party. If they are in possession of the party, then the Grandfather can "grab" the heart.
Encounter 21: The Heart of the Wolfshaunt
If disassembled, there will be two blackened teeth at its center. These are the teeth of Talbot and Lycurgus - who control the wolves of the Wolfshaunt. They were the "winners" at the last Mustering. Breaking the Heart will break the hold they have. If reassembled, any teeth in the heart will provide control. If the party puts in their own teeth, then they will be immune to wolf attacks for the next few days.
Encounter 22: The Mustering
This is the Heartwood.
Lycurgus and Talbot will be closest to the trunk.
The Mustering is coming to its climax.
The timer is ON.
Lycurgus will set off a MAGNETIC BOMB (-) to keep the party from the trunk.
The fruit begins to whither quickly with time. Those that have successfully solved the fruit puzzle, can enter the trunk.
Each party member must solve the puzzle in 5 minutes to get into the trunk - make this a fun contest. If they fail, they stay outside with the loser wolves. Note: the characters need to break off a tooth to be successful.
Encounter 23: The Heartwood
This is a player vs. GM challenge using the book of puzzles. Roll a dice to see who goes first. If the GM misses the puzzle, then the player has his tooth in the Heart moves to the Alcove . If the player misses the puzzle, then they are trapped within the tree.
Encounter 24: The Alcove
See Sealing of the Wolfshaunt for the exciting conclusion.
