The printable version is no longer supported and may have rendering errors. Please update your browser bookmarks and please use the default browser print function instead.
Old City Gods| Type |
Dungeon |
|---|
| Status |
Explored March 883 TA |
|---|
| Location |
Shadowkeep (now Dwarrowdelf) |
|---|
| Hex |
2313 |
|---|
| Campaign |
Shadowkeep Campaign #5 |
|---|
| Adventure # |
69 |
|---|
Introduction
Canto Five: Old City Gods
But lo my sight it does return,
The Stone God laughs, my soul does burn.
Of thirteen terrors pure and simple,
Number five is born of temples,
The avenue alone does stand,
Although its prayers are under sand.
Of Love and Dreams and Snakes and Wealth,
The key to Six does lie in stealth,
Beware the plague called down anon,
It seeks men's blood to prey upon,
Into the lap of luxury,
Seven times the gods will call on thee,
Some quick and clever answers make,
Seek the to rest, avoid the snake.
And past the dragon's sight so true,
Must you brave to see him too,
And to the seventh cold of deed,
Another voice will help you speed.
DM's Notes
After reaching the entrance to the fifth portal, the party may journey to the surface. There Goodhue will find the following information out for them:
Alti, the white rider, son of Harek, has commanded a circle of wizards, known locally as the Blue Hand, to locate the party by any means. From fairly reliable sources that have been watching the purchases of agents of the Blue Hand, Goodhue has determined that the wizards have created a scrying device of some power. The Blue Hand (thought to be about a dozen high level spellcasters) are then charged with killing the party.
DM's NOTE: It will locate the party if they are within the confines of the city or surrounding mountains. As soon as the party enters its sphere of influence, a picture will start to form in a large pool of virgin's blood. The picture will unerringly show the party and their surroundings, but it takes at least one hour to do so.
Alti has also commanded the Guild of Assassins to locate the party. They use their extensive network of spies and informants to keep on top of developments. The sewers used to gain entrance to the first level of the dungeon are now swarming with agents. Not to mention an angry blue dragon still flying about.
Gowen's pottery shop is being watched by the assassins. When the party shows up there, a conflict might ensue, depending on their arrival methods.
In order to gain entrance to the fifth portal, the party must venture to where the governor's bones are located. Luckily, all the governors of Paddington have been buried together. The strange building that houses their remains is found in a large graveyard near the town center.
After retrieving the poem and red disk from the Governor's library, the party will need to proceed directly to the crevice to continue their journey. There are four temples that have survived in the crevice: The God of Wealth, The God of Serpents, The God of Love, and The God of Dreams. The fifth portal leads directly into the Temple of the God of Wealth. The party will need to retrieve the next piece of the poem from the God of Dreams before continuing to the sixth portal and the Cave of Ice.
Old City Gods: Portal 5, Level 1
Old City Gods: Portal 5, Level 1
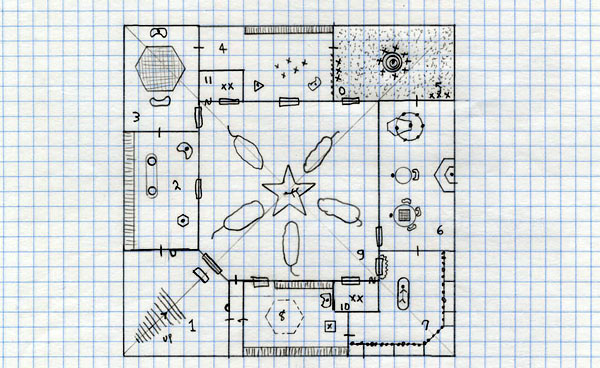
The Governor's Bones
Room 1: Entrance to the Governor's Mausoleum
This room is made of polished white and brown marble. A stairway leads up from the antechamber below. Facing the party is a large stained glass window depicting a man holding a book in his right hand and a sword in his left. He is dressed in rich garments and expensive leather boots. At his feet are two mountains with a small city between. A small green alter pillow sits in front of the stained glass. On both the north and east walls are wooden doors. The door do not have locks on them, although they are shut. Beside each door is a small offering bowl each containing five silver pieces.
The stained glass shows the governor wearing a key around his neck. Careful examination will show that the key is made of a shaft with six tiny bones protruding from it.
Room 2: William of the Cask's Chamber
This room is dominated by a huge rack of wine bottles on the western wall. Hundreds of bottles, many covered with dust, are neatly arranged. In the center of the room is a simple table made of two casks, flipped on their ends, with a wooden plank spanning the distance between them. In the southeast corner of the room is a hexagonal pedestal with the statue of William of the Cask, a recent governor of the city. The statue is made of a remarkably life-like waxy substance. He is of medium height, portly, and dressed in a deep maroon cloak with green silk pants and shirt. Around his neck is a small crystal amulet. In the northeast corner of the room is large leather chair. Upon the chair sits an old man dressed in a simple white robe, asleep.
Careful inspection will show that the man's amulet is actually a small crystal globe held by a silver beetle hanging from a silver chain around his neck. Also, the party will notice that all of the wine bottles have silver beetles over the corks.
The beetles will put a small puff of poisonous gas into the wine if opened by anyone except the old man. The beetle necklace will fill the entire room with poison if opened. In addition, the bone itself will be poisoned unless cleaned first. The poison is saving throw versus death for each round exposed.
The old man acts as a first level magic user without spells or equipment. His name is Spilbin.
Room 3: The Captain's Chambers
This room is dominated by a large hexagonal table in the center. The table is filled with small lead figurines brightly painted red and blue. They are partaking in a military battle, as other features are clearly marked: a blue ribbon represents a river and a small wooden cross represents a church. On the far side of the table is a large overstuffed leather chair. In the chair is the waxy statue of a military captain, a red tunic over his chainmail, a sword hanging at his side. His dusty brown hair is unkempt and his blue eyes stare at the battle in front of him. Opposite the captain is another chair, empty with a long blue crook staff leaning against it.
There appear to be about two hundred figures on the table, divided evenly among red and blue. Red holds the dominant position: a large hill to the north; a church, graveyard, and a small village just at the bottom of the hill, and both bridges over the river. Blue holds the pasture lands to the south and east of the river, and a forest in the extreme south of the board.
Close inspection shows that the graveyard is represented by a small bone.
Any player touching the board will disappear (into the board at the point they touched). Players may touch only blue pieces with the blue staff. The blue staff will pass through the red pieces and red held items. The party must direct the battle against the captain and overtake the graveyard to get the bone. There are four squadrons of twenty men (9th level), with two lieutenants (15th level), and a captain (21st level).
Room 4: Silvia the Sly's Chambers
This oddly shaped room contains a large rack of silk clothes on the north. In addition, a number of brightly decorated silk capes hang from pegs on the eastern wall. Finally, five wooden frames show off five silk outfits of the highest quality, complete with hats, gloves, and accessories. In a large silk covered chair in the southeast sits a gnome in a bright blue silk robe. On a triangular pedestal in the southwest stands a wax figure of a handsome woman in her later years. She is also dressed in blue silks. A window in the south looks onto a large central room.
Close inspection will reveal that one of the wooden frames contains a bright yellow scarf with red stars fastened by a small bone pin.
Each time something is taken from the room, it magically appears back again. The party must barter for the scarf with the gnome (Samuk the Silk Merchant). If the party asks a question, Samuk will reply, "What's that have to do with the price of silk in Sandal?" Cannot be charmed - will make mad. Will sell scarf for 5000 gold pieces.
Room 5: Barg the Blunt's Chambers
A small dwarven wax statue stands on a large circular dais surrounded by six nasty hill giants. Three more hill giants stand by each door. Other than a small stone offering bowl in the southwest corner of the room, the room is barren. The ceiling of this room is made of wood, hangs about one foot lower than the other ceilings in this part of the dungeon. Spaced evenly throughout the ceiling are hundred of one inch holes. Protruding from each hole is an arrowhead. The only places in the room without arrows are near the dais and beside each door.
Closer inspection shows that Barg is dressed in chain mail with a sword. From his ear dangles a small bone earring. The stone offering bowl contains 6 silver pieces.
If attacked, the hill giants will fight. If the statue is touched the arrows will be shot from the ceiling. Generally a man-sized adventurer will be hit by 12 arrows (1d6), and a small adventurer will be hit by 8 arrows (1d6).
Room 6: Gregor the Gambler's Chamber
This room has four notable features in addition to the small window in the southwestern corner. First, a large hexagon dais is pushed against the eastern wall of the room. On the dais stands a wax statue of a bald man dressed in black leather armor, one dagger hangs from his belt and another is in his left boot. There are three gambling devices in the room.
In the north, a wooden table carved in the shape of a coffin. Suspended on a large iron wheel above it are three swords and a large ruby. A lever can be released which will cause the wheel to spin. When it stops, either the ruby will drop onto the gambler lying on the table or a sword will be thrust into his chest.
In the center of the room, a wooden playing table has been setup. A small wiry man dressed in the same black leather with a dagger in his belt sits at the table. He has short black hair with a beard and mustache. He introduces himself as Culrick and offers a challenge to name your wager (and he will match it). He will play a game of Magic against any player, and he has several decks to choose from.
In the south, a circular table sits with a grid of sixteen squares. The squares are numbered 1-16. Around the edge of the table guilded letters read "God's Lot" with the number 0. On a small wheel mounted behind the table are the numbers 0 -16. A large red headed man dressed in the same black leather with a dagger in his belt sits at the table. He introduces himself as Baldrick and offers a challenge to name your wager (and he will match it). He will play a game of Wheel of Life against any player.
You can bet one square (16:1), two squares (8:1), four squares (4:1), or eight squares (2:1). You cannot bet on the God's Lot.
The players produce the wagers from black leather pouches at their sides. If they are killed and the pouches examined, they will appear to be empty. You see, Gregor kept his treasure spirited away unless needed to cover the bet.
The men will fight as 21st level assassins.
Room 7: Dracos Darkfinger's Chamber
This room is noticably cold. In cages along the east and south walls are scores of wolves, ghouls, and large rats. They howls and screech when the party enters the room. A window in the northwest corner is covered with a black cloth. The center of the room is filled with a large stone slab. On the slab is a wax figure of a skeleton, an ornate stake protruding from its chest.
Closer inspection shows that the stake has a small crystal compartment commonly used for holding relics. Inside the compartment is a small bone item.
If the stake is touched, the creatures will attack. If the stake is removed, Dracos is released. Although he lives in the lower levels. Monsters: Rats, Wolves, Ghouls.
Room 8: Bardius Maximillian's Chamber
This room contains a stone library with stone books resting on stone shelves that line the north and south walls. In the northeast corner of the room is a wax statue of an old man, dressed in gray robes reading a stone book. A single table stand in front of the east door. A small paper sign says, "HOMMAGE?". In the center of the room is traced a large hexagonal shape in blue. The shape seems well worn by foot traffic.
If the party leaves a writing utensil, ink, piece of parchment in the bowl, they will be teleported to an identical room where the books are real. There the old man will introduce himself as a servant of Bardius Maximillian the Clever and ask, "What is your boon?" After hearing the request, he will ask "Brain or Brawn?" The party must answer the following question correctly or fight a random monster. The old man cannot be killed, as attacking him will gain only a return back to the stone room.
Room 9: Central Chamber
This large room has a vaulted ceiling that apexes in the center, some thirty feet in the air. On a large star-shaped dais lies the body of the most recently departed governor. Around his neck is a hollow silver tube with eight small holes. One of the holes is filled with a small bone. At the man's side is a glowing sword, clutched in his fist. Around the altar are five large stone dragons, wisps of colored smoke pouring out of their nostrils. The smoke is blue, red, black, green, and white.
One of the dragons will breath when the key is removed or the body disturbed. The dragons are adults of the appropriate color doing 15d8 points of damage. They will also discharge if touched directly.
The sword is a magical Long Sword +4, Dragon Slayer.
Rooms 10 and 11: Guard Chambers
These small rooms have glass windows that show the goings on in the central chamber. The rooms are unadorned except for two small stools. On the stools sit two human figures dressed in splinted mail.
They each contain two guards who act as 12th level fighters. They will be on duty for eight hours before being replaced by their counterparts who live in the building at the edge of the park. They will attack only if the party does something suspicious.
Old City Gods: Portal 5, Level 2

Old City Gods: Portal 5, Level 2
Room 12: Anteroom to the Temple
This room is made polished white and brown marble. Two pillars stand in the northwest and southeast corners of the room. A large ornate staircase with carved marble dragons on the posts lead up to a second level. Pegs on the west and south walls hold the cloaks of visitors. There are two guards dressed in splinted mail with broad swords. They will not speak.
The dragon on the left side of the staircase is actually a secret door lock. If the skeleton key is stuck into his mouth, the stairs will swing up to reveal a ramp down to the lower level of the dungeon. The guards fight as 12th level fighters.
Room 13: Entrance to the Crypt
This plain stone room contains the following verse carved on the southern wall. The dialect of the verse is that of an Old Common (several hundred years ago). The walls of the burial crypts are lined with small symbols: a crown with a cross (king), a crown (queen), a bishops miter, a horse, and a castle. The one hundred and thirty two crypts are simple ten foot (or five foot) niches covered with an iron gate. In the crypts, the governors have been laid out in their finest garb on slabs. A number are now skeletal remains, several still contain the flesh, while a few seem to have an unnatural life-like quality about them.
The order of the symbols are on the left wall: KQBNNCQQCBKNKCNBCQKCNBKCNBKNCQCKBNKQCNBKCNBKCQKCNKNBKNCNBK
The order of the symbols are on the right wall: QCKNCKBNQKFNBKCNKBNQCDKQNBKNCKNQCKNKCNQKBCNKCNKBNCKNBQKCNQK
Three Knights move up to the Bishop's Way,
The Castle gates at the Low Cross lay,
The Sinister Man will find the pay,
At the Skull of Margold in the Old Hallway.
Room 14: New Construction
A loud pounding and scraping can be heard from this area.
An inspection reveals that six orcs are working to extend a tunnel. They will attack if approached (thinking the party is the dead coming to get them). They have been hired by a local stonemason to create a spot for the 133rd governor of the city.
Room 15: The Books of Office
This room contain two shelves of musty books, one dominating the northern wall and one the southern wall. These books are the registers of the City dating back to the time of it being a small village. They deal with every aspect of city rule, from water rights and local disputes to the holdings of the governor and other merchant families. A simple desk sits in the center of the room. A lantern, several flasks of oil, and a flint and tinder sit nearby. An ink well, pen, and several sheets of parchment are also on the desk. The chair behind the desk is unoccupied.
A close inspection will find that the most recent book contains the next verse of the poem and a small red disk.....
Room 16: Dracos's Chamber
This vault shows signs of recent activity. The gate that encloses the chamber has been pulled out of its moorings. The body is missing.
Close inspection shows a discarded stake lying nearby.
The orcs in Room 14 will be drained of blood if Dracos has been released. Dracos also holds the power to release the occupants of the crypt. These will fight as 100 skeletons (big rooms), 24 zombies (small rooms), and 8 mummies (very large rooms). They will attack the party unmercifully. Monsters: 100 Skeletons, 24 Zombies, 8 Mummies, Vampire - Dracos Darkfingers.
|
Monsters
Spilbin the Wine Merchant
Samuk the Silk Merchant
80 x blue soldiers (9th level fighters)
8 x blue lieutenants (15th level fighters)
4 x blue captains (21st level fighters)
80 x red soldiers (9th level fighters)
8 x red lieutenants (12th level fighters)
4 x red captains (21st level fighters)
hill giant guards (12)
Culrick and Baldrick (21st level assassins)
rats (28)
wolves (14)
ghouls (7)
human guards (6)
orcs (6)
skeletons (100)
zombies (24)
mummies (8)
Dracos Darkfingers the Vampire
|
Treasure
10 silver pieces
wines
silks
6 silver pieces
Long Sword +4, Dragon Slayer
300 gold pieces
piece of the poem
red disk
|
Old City Gods: Portal 5, Level 3
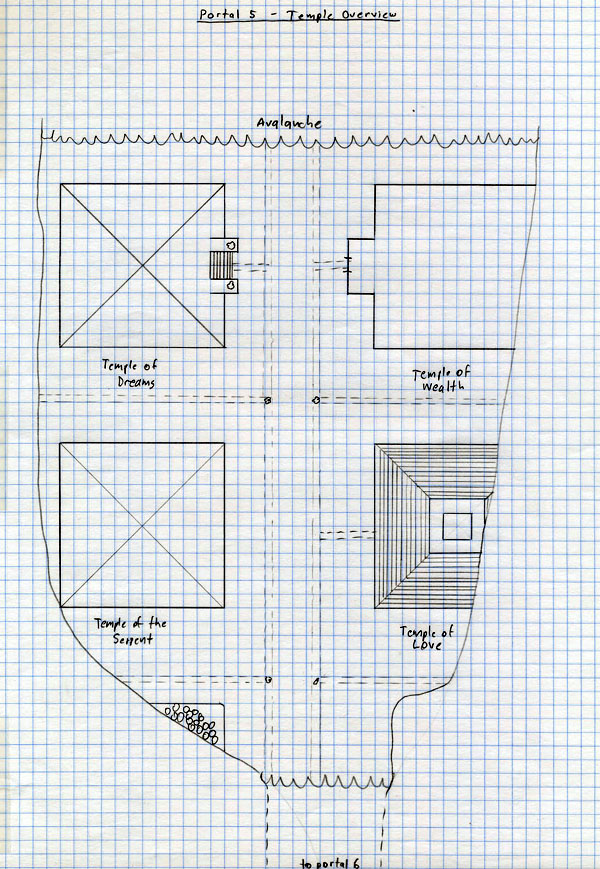
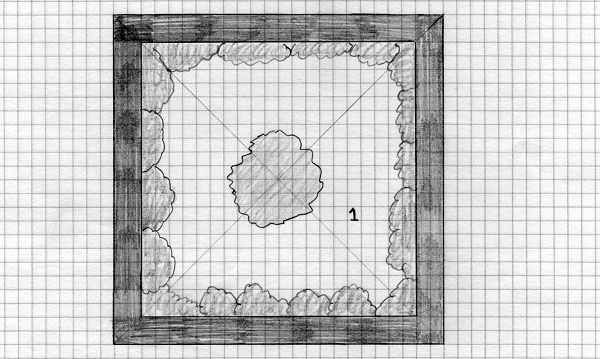
Old City Gods: Portal 5, Temples Overview
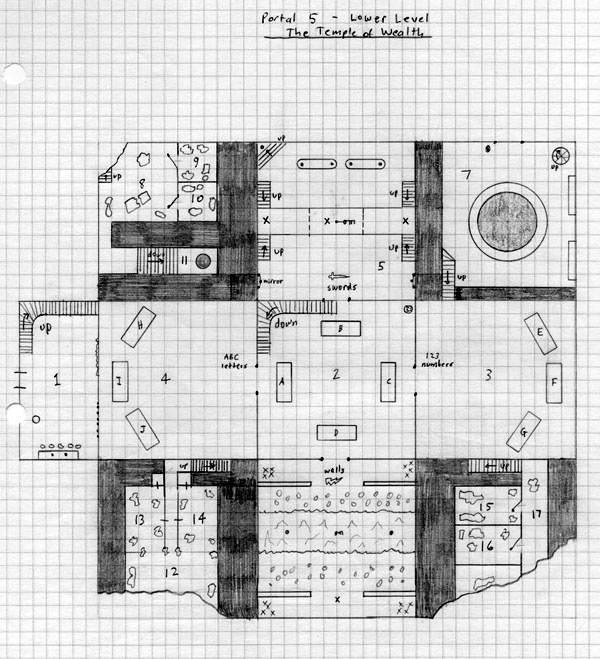
Old City Gods: Portal 5, Temple of Wealth
Old City Gods: Portal 5, Temple of Wealth
The Temple of Wealth
Room 1: The Entrance
The walls, floor, and ceiling of this room are made of a highly polished brown stone. A large staircase dominates the north wall. Along the south wall is a stone altar, its altar cloth faded with age, but its magnificence still shows in its gold trim and pearl beading. The altar is empty except two large candles of purple wax that stand unlit on top. In front, five purple pillows have been placed to kneel on. A small stone basin stands in the southwest corner of the room. Against the western wall are a number of pegs about five feet off the ground and a large mural of a rotund man dressed in gold and jewels on a litter being borne by six slaves. Around him are the scenes of city streets.
"Careful examination will reveal that the borders of the tapestry bear the following message."
By mystical numbers and runic letters,
By flashing swords and magical walls,
The Temple of Wealth does smile on you kindly,
If you have enough wit, moxy, and balls.
Room 2: The Game Room
The walls, floor, and ceiling of this room are made of a highly polished brown stone typical of the rest of this building. The ceiling of this room opens up into a second level where stadium-like benches have been built overlooking the room below. Standing at intervals around the walls of the room are four glass cases each about six feet long and four feet high. The cases are locked, but the contents within are easily seen. In the northeast corner of the room, a small wooden table has seven cup shaped depressions carved into it. The room is otherwise unadorned except for four arches leading into other rooms. Above each arch is a symbol, and beside each arch is a large keyhole. Within the archways themselves, a shimmering blue haze can be seen.
As the party enters the room, a loud gong can be heard from above. Almost immediately, a shimmering globe drops from the ceiling. Instantly a creature appears and begins to attack.
This room holds treasure that is easy to take, if the riddles can be figured out in time. The globe need to be put into the cups where they will spin silently with a ROYGBIV color until all are in place and the player is teleported to Room 8.
Every three minutes (of real time), globes drop from random parts of the ceiling of whichever room the party is in. The first time one globe drops, then two, then four, then eight, then sixteen, then.... The color of the globe is random based on the table below. The creatures will move to attack the nearest character.
Every three minutes (of real time), one artifact disappears from each case. In order to open the door and escape, the party must accumulate five globes. Each time a chest is attempted to be opened with the wrong answer or any other means, the offending character is zapped to a Room of Traps.
1 - Rust Monster (blue)
2 - Beholder (red)
3 - Pseudo-Dragon (green)
4 - Ghost (yellow)
5 - Basilisk (purple)
6 - Displacer Beast (black)
Chest A has the following riddle on it, and it contains the following nine items.
62: each circle is the target of a long and short arrow. short arrow + 2 * long arrow
Treasure: 300 platinum pieces, 6 very small topaz gems (250 gp), Chain Mail +2, gold bear statue (500 gp), string of pearls (400 gp), Ring of Flying, 300 silver pieces, crystal ball, a large brass key.
Chest B has the following riddle on it, and it contains the following nine items.
OPEN: first block of four has one open, second block of four has two open, ...
Treasure: 200 platinum pieces, 100 silver pieces, Great Axe +1, Ogre Slayer, Javeling of Piercing, onyx dog (100 gp), ivory boat with silk sails (100 gp), medium topaz (600 gp), crystal ball, a large brass key.
Chest C has the following riddle on it, and it contains the following nine items.
ANSWER: Number of vertical lines.
Treasure: medium sapphire (3000 gp), Boots of Levitation, Eyes of Charming, 2 large topaz (900 gp), 200 gold pieces, 3 very small sapphires (750 gp), crystal owl (500 gp), crystal ball, a large brass key.
Chest D has the following riddle on it, and it contains the following nine items.
ACREAGE
LEGEND
CARPENTER
MACERATION
CARMINE
SURFACE
TENANT
LIMITATION
ASHORE (made of two shorter words)
MANNER
NEED
Treasure: 300 silver pieces, 100 platinum pieces, 1 very small diamond (1000 gp), ruby necklace (5000 gp), small scroll tube, golden dragon statue (400 gp), Cloak of Protection +3, crystal ball, a large brass key.
Room of Traps
You finds yourself suspended in a web-like substance. It is warm and pulses slightly. You are unable to move, speak, or do any action except think. A puzzle comes to mind, something you've thought about before. However, now it is the sole thought in your head. You must solve it, but the web is so warm and inviting, perhaps just a short nap.... Suddenly, you realize that you are becoming weaker. You must keep your mind clear, and solve the riddle."
Every three minutes, the character loses hit points from the web. At the end of the first three minutes, the loss is 1d8. At the end of the second three minutes, the loss is 2d8. Then, 4d8 and so on. Four riddles must be answered before the character is returned to the main room. If he dies, his lifeless corpse is deposited on the floor.
Room 3: The Room of Numbers
This room is plain and unadorned. Standing at intervals along the eastern wall of the room are three glass cases each about six feet long and four feet high. The cases are locked, but the contents within are easily seen. The room is otherwise unadorned except for an arches leading into the main room. Beside the arch is a large keyhole. Within the archway, a shimmering blue haze can be seen.
The cases are filled with the following items and puzzles. All the same rules apply as in Room 2.
Chest E has the following riddle on it, and it contains the following seven items.
X: triangle, triangle +, triangle + down, ....
Treasure: 600 gold pieces, 200 silver pieces, small amethyst (600 gp), gold bracelet (500 gp), Cloak of Protection +2, Scarab of Protection +1, crystal ball.
Chest F has the following riddle on it, and it contains the following seven items.
30: each arrow adds two to the previous number
Treasure: 100 gold pieces, 500 platinum pieces, medium amethyst (800 gp), gold and emerald bracelet (5000 gp), Rod of Smiting, 6 Heavy Bolts +6, crystal ball.
Chest G has the following riddle on it, and it contains the following seven items.
17: to the right of each horizontal T is the product of the two numbers at the left plus 2.
Treasure: 100 gold pieces, 100 silver pieces, silver snake pendant (50 gp), small jar of ointment (to induce pregnancy) - 50 gp, Wand of Trap Detection, Scarab of Protection +1, a large brass key.
Room 4: The Room of Letters
This room is plain and unadorned. Standing at intervals along the western wall of the room are three glass cases each about six feet long and four feet high. The cases are locked, but the contents within are easily seen. The room is otherwise unadorned except for an arches leading into the main room. Beside the arch is a large keyhole. Within the archway, a shimmering blue haze can be seen.
The cases are filled with the following items and puzzles. All the same rules apply as in Room 2.
Chest H has the following riddle on it, and it contains the following seven items.
ADJUNCTIVELY
AMBIDEXTROUS
DEMONSTRABLY
GLANDIFEROUS
HYPNOTIZABLE
QUESTIONABLY
VERSIFICATOR
DIVARICATION
STENOGRAPHIC (does not have any duplicate letters)
EXPOSTULATES
Treasure: 600 gold pieces, 200 silver pieces, small amethyst (600 gp), gold bracelet (500 gp), Cloak of Protection +2, Scarab of Protection +1, crystal ball.
Chest I has the following riddle on it, and it contains the following seven items.
ADIEU
IDIOM
EIGHT
UNIPOLAR
PRODUCT
TRUCKLER
PAROCHIALISM (seven consonants)
EPISPASTIC
STRICTNESS
OSTEOLOGIC
Treasure: 300 silver pieces, 300 platinum pieces, silver earrings (30 gp), gold and sapphire cross (2000 gp), Shield +1, Bag of Tricks, crystal ball.
Chest J has the following riddle on it, and it contains the following seven items.
CODIFY
LAMINA
STOVE
RESET
JOKUL
QUIRES
REST (three consecutive consonants)
GRAIL
STOIC
ORDEAL
Treasure: 600 gold pieces, 300 platinum pieces, gold frog with emerald eyes (2500 gp), very small sapphire (750 gp), Flail +4, Helmet +4, a large brass key.
Room 5: Room of Swords
The ceiling of this room is twenty feet in height. The center of the room is dominated by a ten foot high arch with four sets of stairs leading to a walkway that passes over the arch. Hanging from the archway is a key, suspended about 7 feet in the air. Two large tables are in the northern portion of the room. In the northwest corner is a small globe sitting on top of a set of stairs. On the west and east walls near the southern end of the room are chained two young women, identical twins from their appearance. Each has a globe suspended from a silver chain around her neck. They seem to be oblivious to the action around them. Standing on the arch are three fighters. They see you and immediately jump into action. There is an arch leading into the main room. Beside the arch is a large keyhole. Within the archway, a shimmering blue haze can be seen.
The fighters will attempt to out maneuver the party, killing them by superior fire power. The three figures are 24th level fighters.
Room 6: Room of Walls
The ceiling of the room is 20 feet in height. The center of the room is dominated by a gaping chasm. This chasm is twenty feet deep and filled with fire, whose flames dance to the level of the floor. Suspended over the fires are two globes and a key. The key is in a small iron cage, and the globes are simply hanging in the air. On either side of the chasm is an area of the room where the ceiling is hung with razor sharp stalagtites. They are spaced every few feet across the entire length of the room. Several low walls are on the east and west side of the room. Behind the walls are the following items:
East Wall: 50 feet of rope, a large sack of cloth strips, piece of very light wood that it twenty feet long, one foot wide, and three inches thick, and a lantern
West Wall: 50 feet of rope, three flasks of oil, a net, and a bow with three arrows.
"Standing across from you is a mage dressed in flowing robes. He sees you, and begins to cast a spell."
The mage is a 30th level magic-user who will try to thwart your plans to get the key and globes. Trying to cross the pit is not allowed as only spells will traverse the distance.
Room 7: The Pool Room
The walls, floor, and ceiling of this room are made of a highly polished brown stone. The center of the room is dominated by a large pool of clear cold water. Several ornately carved benches are pushed against the eastern wall. An archway in the north leads into a blank stone wall. Next to the arch are shards of colored glass. A careful examination shows that these are the remains of several glass disks. A spiral staircase in the northeast corner of the room lead to an upper level, as does a stairway in the southwest cornet. The walls of this room are decorated with large tile mosaics of nude male and female bathers.
The party will be teleported into the this room from Room 42 of the previous level. Otherwise, there is little of interest here.
An underwater passageway to Room 11 can be found here, if the party swims in the pool.
Rooms 8, 9 and 10: Storeroom Complex
This room was a storeroom of sorts in years gone by. A hole in the northeastern wall has allowed the outside denizens in. A crumbled stairway leads to a hole in the room above. The room is strewn with debris: remains of tables, chairs, and the like. Two doors in the east wall hang uselessly from destroyed hinges. The contents of the room have long been eaten.
Careful examination will show that the doors were destroyed by large dogs.
Careful examination will show that the exterior damage was done by a large horned creature about the size of a tank.
Six devourer dogs have made their home in Room 11. They will attack if the party pokes around this room.
Room 11: Well Room
This room was originally the well that fed the temple's inhabitants. Now it smells strongly of dung and decay. If approached, twelve glowing green eyes will be seen from the top of the stairs. The room is otherwise unadorned.
After a warning growl, the six devourer dogs will attack unmercifully.
An underwater passageway to Room 7 can be found here, if the party swims in the pool.
Rooms 12, 13 and 14: Destroyed Bedrooms
This room was a set of private rooms in years gone by. A hole in the southern wall has allowed the outside denizens in. A stairway in the north leads to a barred door above. The room is strewn with debris: remains of tables, chairs, and the like. The contents of the room have long been eaten. The musty smell of decay is strong here.
A devourer beast has made its home among the wreckage here. It will attack and bellow if disturbed.
Careful examination will show that the doors were destroyed by large dogs.
Careful examination will show that the exterior damage was done by a large horned creature about the size of a tank.
Rooms 15,16 and 17: Destroyed Bedrooms
This room was a set of private rooms in years gone by. A hole in the southern wall has allowed the outside denizens in. A stairway in the north leads to a barred door above. The room is strewn with debris: remains of tables, chairs, and the like. The contents of the room have long been eaten. The musty smell of decay is strong here.
Six devourer dogs have made their home in these rooms. They will attack unmercifully if the room is entered.
Careful searching will yield a page from a logbook telling of the story of this temple's demise.
Careful examination will show that the doors were destroyed by large dogs.
Careful examination will show that the exterior damage was done by a large horned creature about the size of a tank.
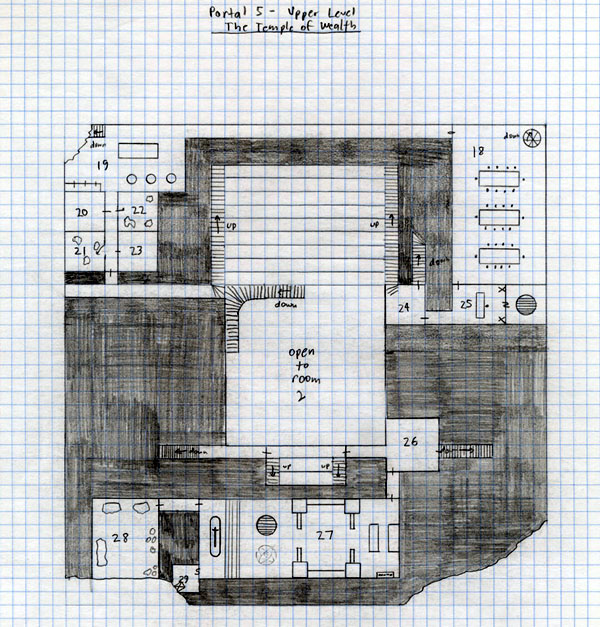
Room 18: Victor's Dining Hall
This room is luxuriously appointed. The marble walls are covered in large tapestries depicting men wearing golden crowns and flowing purple robes. They sit in feast at a table with their comrades while behind them is the body a large slain green dragon. The tables in this room are carved from stone and are covered with purple cloth of the finest make. Ten chairs surround each table, again carved from stone with soft purple pillows.
Everything seems quite normal except for the northwest door. A number of iron spikes have been driven into the door to keep something out. Beside the door are two burned out stubs of candles, and the door flickers with a blue light. A dried black pool can be seen puddled under the door.
The door will discharge a constant electric shock of 1d8 per round if touched. The party may smash it open in two rounds (with direct force). Removing the spikes will take five rounds.
Room 19: Kitchen
This room is the remains of a kitchen. A gaping hole in the northwest corner has destroyed a set of stairs that originally led downward. The large table at the center, three cooking pots in the southeastern corner, and three large pantries in the southwestern corner all sit askew. The musty smell of decay is very strong here.
A flock of fourteen Devourer Bats have made their home in the hallway at the southern end of this room. They will attack unmercifully if the room is entered.
Room 20: Servants Quarters
This room was used for servants quarters in years gone by. The door in the eastern wall has been destroyed by what looks like the claw marks of a large dog. The door hangs uselessly from its hinges. Two small beds, a table, and two chests are mostly destroyed. There is a foul stench in this room, and a black stain on the walls.
Rooms 21 and 22: Servants Quarters
This room was used for servants quarters in years gone by. The door is still intact, although the rusty hinges squeak loudly when opened. Two small beds, a table, and two chests filled with clothes and blankets stand untouched.
Inside one of the chests in Room 21 are 200 gold pieces.
Room 23: Servants Quarters
This room was used for servants quarters in years gone by. The door are still intact, although the outside shows the same claw marks as Room 20. Two small beds, a table, and two chests filled with clothes and blankets stand untouched. There are three skeletons in the room two lying on the beds, and one slumped against the door. A dagger sits near the right hand of the slumped skeleton. Three burned stubs of candles are melted into the center of the floor.
This is where the servants committed suicide before they could be taken by the devourers.
Room 24: Antechamber
The walls, floor, and ceiling of this room are made of a highly polished brown stone. A large staircase dominates the north wall, and two doors are unremarkable. The room most likely served as an antechamber in the past.
There is nothing of interest here.
Room 25: Hall of Payments
The walls, floor, and ceiling of this room are made of a highly polished brown stone. A large desk sits in the center of the room, its ornately carved chair is empty. Around the room are hung tapestries that show men dressed in purple robes among piles of money and treasures. Along the western wall, two large stone bears stand on their hind legs. A faint blue flicker can be seen tracing over the bears.
Careful examination will show that a violet glass rod is hidden a small compartment in the desk.
This is the room where the victor is granted his boon. For the party they would get any two items the most desired. If they ask, they will receive two items. If the party attempts to move through the secret door, the bears will attack. They fight like stone golems and will fire electrical beams from their eyes for 15d8 save to no damage.
The secret door in the west leads to a plain room with a large circular pattern with seven grooves in the floor. Six of these grooves are filled with rods of various colors and lengths arranged from north to south as:
Orange (short)
Yellow (long)
Green (longest)
Blue (long)
Indigo (short)
Red (shortest)
Rearranging the rods with Red first and Violet last will cause the circle to glow bright white. The party can then teleport to Room 27.
Room 26: Antechamber
The walls, floor, and ceiling of this room are made of a highly polished brown stone. Three doorways lead to various parts of the dungeon. The room most likely served as an antechamber in the past. Everything seems quite normal except for the eastern door. A number of iron spikes have been driven into the door to keep something out. Beside the door are two burned out stubs of candles, and the door flickers with a blue light.
The door will discharge a constant electric shock of 1d8 per round if touched. The party may smash it open in two rounds (with direct force). Removing the spikes will take five rounds.
Room 27: Temple
This room is an elaborate temple of sorts. It is divided into four sections. The walls and ceiling are carved with intricate patterns, although they do not seem to have identifiable meaning.
The eastern section of the room hold two large stone pews. Beneath the pews are purple pillows used for kneeling. A number of candle stubs can be found along a small table in the south end of this section of the temple. A large stone curtain separates this part of the room from the next.
The mid-eastern section of this room holds two more stone pews, these intricately carved with purple pillows for both kneeling and sitting. The ceiling in this room has been rounded at the corners. The pews face each other with large stone curtains on both ends to form a private feel to this room.
The mid-western section of this room has two large circular patterns carved in the floor. The northern pattern one has seven parallel grooves. This pattern is filled with tiny bits of colored glass that has been shattered and spread about. The southern pattern is a series of seven concentric circles. Someone has taken a chisel and attempted to destroy the pattern by chipping the stone. A large stone curtain separates this part of the room from the east, and a set of stairs lead up to a raised section of the room to the west.
The western section of this room is dominated by a large altar. On the altar is a spear of magnificent construction. It is tipped in blue steel with a large ruby set in its hilt. The spear does not glow, but it radiates a powerful aura of magic. A door in the northwest corner of the room has a number of iron spikes driven into it to keep something out. Beside the door are two burned out stubs of candles, and the door flickers with a blue light.
The door will discharge a constant electric shock of 1d8 per round if touched. The party may smash it open in two rounds (with direct force). Removing the spikes will take five rounds.
The spear is that to be used in the lowest level of the dungeon. Until then, it functions as a Spear +2, Life Stealer. It will speak to its owner, as needed.
Room 28: High Priest's Chambers
This room is the remains of the high priests chambers. The southern wall has been destroyed, pulling a bed and several tables down into the rubble below. There are eight black stains and crumpled robes are near some destroyed furniture in the center of the room. The musty smell of decay is very strong here.
A flock of fourteen Devourer Bats have made their home in this room. They will attack unmercifully if the room is entered.
"Careful examination will show a small brass key among the robes."
Room 29: High Priest's Treasure
This small room is simple an unadorned. A gaping hole in the western wall can be seen from the missing southern wall in Room 28. A chest teeters on the edge of the rubble. The chest is locked.
The small brass key from Room 28 will open the chest. Otherwise, the contents within are destroyed when it is opened.
The chest contains most of one week's offerings to the God of Wealth: 100 silver pieces, 200 gold pieces, 200 platinum pieces, gold harp (300 gp), three silver combs (20 gp), Potion of Heavy Healing, Eyes of Petrification, Potion of Stone Giant Strength, Cloak of Protection +3.
|
Monsters
Rust Monster
Beholder
Pseudo-Dragon
Ghost
Basilisk
Displacer Beast
3 Fighters (24th level)
1 Magic-User (30th level)
6 Devourer Dogs
1 Devourer Beast
6 Devourer Dogs
14 Devourer Bats
2 Stone Bears
14 Devourer Bats
|
Treasure
300 platinum pieces
6 very small topaz gems (250 gp)
Chain Mail +2
gold bear statue (500 gp)
string of pearls (400 gp)
Ring of Flying
300 silver pieces
crystal ball
large brass key
200 platinum pieces
100 silver pieces
Great Axe +1, Ogre Slayer
Javeling of Piercing
onyx dog (100 gp)
ivory boat with silk sails (100 gp)
medium topaz (600 gp)
crystal ball
large brass key
medium sapphire (3000 gp)
Boots of Levitation
Eyes of Charming
2 large topaz (900 gp)
200 gold pieces
3 very small sapphires (750 gp)
crystal owl (500 gp)
crystal ball
large brass key
300 silver pieces
100 platinum pieces
1 very small diamond (1000 gp)
ruby necklace (5000 gp)
small scroll tube
golden dragon statue (400 gp)
Cloak of Protection +3
crystal ball
large brass key
600 gold pieces
200 silver pieces
small amethyst (600 gp)
gold bracelet (500 gp)
Cloak of Protection +2
Scarab of Protection +1
crystal ball
100 gold pieces
500 platinum pieces
medium amethyst (800 gp)
gold and emerald bracelet (5000 gp)
Rod of Smiting
6 Heavy Bolts +6
crystal ball
100 gold pieces
100 silver pieces
silver snake pendant (50 gp)
small jar of ointment (to induce pregnancy) - 50 gp
Wand of Trap Detection
Scarab of Protection +1
a large brass key
600 gold pieces
200 silver pieces
small amethyst (600 gp)
gold bracelet (500 gp)
Cloak of Protection +2
Scarab of Protection +1
crystal ball
300 silver pieces
300 platinum pieces
silver earrings (30 gp)
god and sapphire cross (2000 gp)
Shield +1
Bag of Tricks
crystal ball
600 gold pieces
300 platinum pieces
gold frog with emerald eyes (2500 gp)
very small sapphire (750 gp)
Flail +4
Helmet +4
a large brass key
large brass key
crystal balls (2)
large brass key
crystal balls (2)
logbook page
200 gold pieces
Spear +2, Life Stealer
100 silver pieces
200 gold pieces
200 platinum pieces
gold harp (300 gp)
three silver combs (20 gp)
Potion of Heavy Healing
Eyes of Petrification
Potion of Stone Giant Strength
Cloak of Protection +3
|
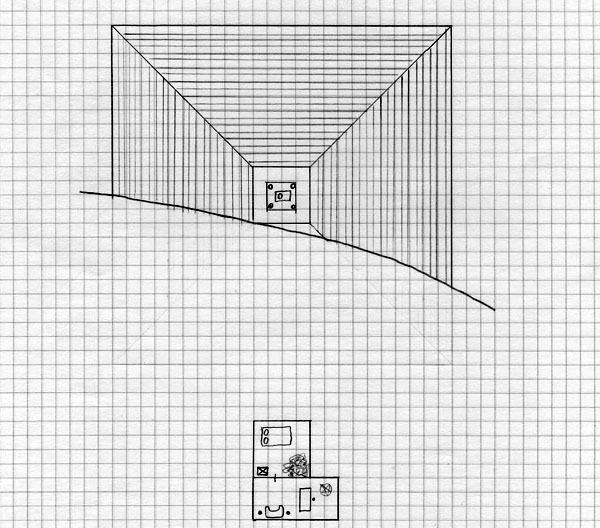
Old City Gods: Portal 5, Level 4
Old City Gods: Portal 5, Temple of Dreams
The Temple of Dreams
The exterior of this temple is a roughly carved sandstone. It is made of great blocks of white stone, and has only one entrance, all other sides being smooth. As you walk up the path, you can smell the faint odor of cinnamon. There are two statues on the entrance pillars. The first is that of a female angel dressed in flowing robes and carrying a sword. The second is that of a male devil with a forked tail and carrying a sword. This place radiates a powerful aura of magic.
Room 1: The Outer Chamber
This room seems an impossibly large cavern made of the same white sandstone as the outer temple stretching for hundreds of feet both north and south. There are entrances in both the east and west. You can feel warmth here and hear the sounds of laughter distantly echoing from the walls.
A closer inspection will reveal that the chamber is indeed empty and larger than the temple from the outside. You cannot determine the location of the laughter.
Room 2: The Inner Chamber
This room is almost as large as the previous chamber. It has several notable features: a large sunken "room" with a massive stone banquet table. The table is covered with a yellow cloth, and has pewter place settings for twenty five. Large flagons of wine and mead, platters of steaming meat, bowls of fresh bread and fruit abound. Four candelabras give the room a friendly glow, inviting the hungry to sit and eat. In the north end of the chamber is a large stone dais with three steps leading up to a throne - all made of the familiar white sandstone. In the throne a young man in yellow robes sits, smiling at the party. A closer look shows that he is simply an image, as it is possible to see the chair through him. On either side of the throne are two glowing sconces, both a warm yellow color. Circling the room are two levels of caves: 24 on the lower level and 18 on the upper level. There is no other sign of habitation here.
Closer inspection will show that the rooms are empty and clean. The young man will follow your movements, but does not seem able to communicate in any way other than gesturing you to sit and eat.
The sconces create the cinnamon and laughter heard in the previous rooms. The dream gas that is created will affect all who enter here, no saving throw. Once the party has started to eat, a fat man will venture into the room, and the party will notice that they are not themselves....
If you attack the God of Dreams, you will face your worst fear.... yourself.
You are sitting at the table in discussion about what to do next when a gong sounds and a fat man in chain mail wearing a yellow cloak enters the room from the eastern entrance.
"Greetings, my friends, the queen has asked me to make a request of you. I hope you will see fit to help her out in this matter."
Looking around, you notice that your companions no longer look like themselves. Glancing in the reflection of a nearby plate, you realize that you no longer look like yourself. In fact, everything is wrong....
"... and so she has been just beside herself with worry." The fat man continues oblivious to your discomfort.
The Golden Boots of the Giant Hero
- The Good Warrior - steal the boots and return them to your master, kill as few monsters as possible and lose as few characters as possible. You gain experience points by the following formula: 290 for the boots + (6 - characters killed) * 10 - (50 - monsters killed). The maximum number of victory points is 400 * 500 = 200,000
- The Traitor - steal the boots for yourself, kill as many monsters as you can, and kill the queen's spy without anyone else knowing about it. You gain experience points by the following formula: 150 for the boots + 150 for killing the spy + (monsters killed)* 1. The maximum number of victory points is 400 * 500 = 200,000
- The Bad Mercenary - steal the boots for yourself and kill all the other characters. You gain experience points by the following formula: (characters killed up to five) * 60 + 100 for the boots. The maximum number of victory points is 400 * 500 = 200,000
- The Healer - ensure that no characters die and as few monsters as possible are killed. You gain experience points by the following formula: (6 - characters killed) * 50 + (50 - monsters killed). The maximum number of victory points is 400 * 500 = 200,000.
- Gulian the Good Warrior: You have a primary mission to return the Golden Boots of the Giant Hero to the queen. You also have a primary mission to kill no monsters and no characters. You have a secondary mission to save Neysa the Queen's Daughter. You gain experience points by the following formula: 290 for the boots + (6 - characters killed) * 10 - (50 - monsters killed) + 50 for saving the queen's daughter. The maximum number of victory points is 450 * 500 = 225,000.
- Brockden the Bad Warrior: You have a primary mission to steal the Golden Boots of the Giant Hero for yourself. You also have a primary mission to kill Neysa the Queen's Daughter. You have a secondary mission to destroy a set of magical books that someone else in the party is seeking. You gain experience points by the following formula: 250 for the boots + 150 for killing the queen's daughter + 50 for destroying the magical books. The maximum number of victory points is 450 * 500 = 225,000.
Slater the Spy: You have a primary mission to find a set of magical books that are hidden in the dungeon and return them to their rightful owner (another party member). Also, you have a primary mission to find and kill a traitor among your party. The traitor is the one who wants to kill the queen's daughter AND destroy the Golden Boots of the Giant Hero. You have a secondary mission to kill as many creatures as possible. You gain experience points by the following formula: 200 for the books + 200 for killing the traitor + (monsters killed)* 1. The maximum number of victory points is 450 * 500 = 225,000.
- Thorndike the Traitor: You have a primary mission to kill the daughter of the queen. Also, you have a primary mission to find and kill a spy among your party. The spy has some involvement with finding some magical books in the dungeon. The spy also wants to kill you. You have a secondary mission to destroy the Golden Boots of the Giant Hero. You gain experience points by the following formula: 200 for killing the queen's daughter + 200 for killing the spy + 50 for destroying the boots. The maximum number of victory points is 450 * 500 = 225,000.
- Hasket the Healer: You have a primary mission to make sure that no characters or monsters die. You have a secondary mission to destroy a set of magical books that others in the party will be searching for. You gain experience points by the following formula: (6 - characters killed) * 50 + (50 - monsters killed) * 2 + 50 for destroying the books. The maximum number of victory points is 450 * 500 = 225,000.
- Walford the Wizard: You have a primary mission to find a set of books that are hidden somewhere in the dungeon. Other party members may aid you in the effort since they are rightfully yours, others may have alternate plans. You also have a primary mission to steal the Golden Boots of the Giant Hero for yourself. You have a secondary mission to kill as many creatures as possible. You gain experience points by the following formula: 200 for getting the books + 200 for getting the boots + (creatures killed) * 1. The maximum number of victory points is 450 * 500 = 225,000.
Your character has 10 points to spend on magical items. You may trade or bargain with these points as much as you like. Both parties must tell them DM their intention to trade, however.
- +1 weapon of your choice (1 point)
- +2 weapon of your choice (3 points)
- +1 armor of your choice (2 points)
- +2 armor of your choice (4 points)
- Potion of Heavy Healing - 3d8 (3 points)
- Potion of Critical Healing - 6d8 (5 points)
- Potion of Invisibility (7 points)
- Wand of Lightning Bolts (3 points per charge)
- Ring of Protection from Lightning (3 points per charge)
- Random Roll on the magic table (10 points)
A beautiful women enters the room. She is dressed in a formal black gown with a yellow cape. Her gold jewelry is simple but expensive. She is frowning.
"All rise for Queen Nila," the fat man exclaims.
"As the party rises to their feet, the Queen speaks."
"I am afraid that my daughter, Neysa, has been captured from the palace. The scouts have tracked her abductors to the Tomb of the Giant Hero Bruk. As you know, the tomb lies five days north of town just over the border of the neighboring kingdom of Dragonsmount. So, I am unable to send my guards to the Tomb and ensure her rescue. Instead, I have hired you six brave men to go to the dungeon and bring my daughter back safely. I can offer you nothing but my thanks for undertaking this dangerous mission. Please don't fail me. Your adventure begins now and ends as soon as you cross the small wall that marks the edge of our beloved town. In order to help you along, I have several magical items that I can provide. Good luck and Godspeed."
"With this, the queen turns around to leave, the fat man trailing in her wake. He looks back over his shoulder and whispers, 'May the best man win.' You are suddenly alone with five strangers who seem vaguely familiar in a way you can't quite put your finger on."
Overview
The tomb lies due north on a road that runs straight out of town. It takes five days of hard movement to get to the clearing where the dungeon is. Since the road is commonly used, there are four camps set along the road for travellers. The entire journey will be through a rolling forest of pine and cedar. Food and water are abundant along the way, so only minimal rations will be needed. You are to start on the journey immediately.
On the outbound trip, the party will encounter the following random monsters:
NIGHT TWO - 6 bugbears will attack the camp
NIGHT FOUR - 3 merchants (3rd level thieves) will share the camp. They will try to get any easy magic items from the party. They have the standard treasure plus a Dagger +3.
On the inbound trip, the party will encounter the following random monster:
NIGHT ONE - 2 owlbears will attack the camp
NIGHT FOUR - a scout from the queen will arrive to take news back to the village that night
The temple sits in a large circular clearing. A small stone circle marks the perimeter of the area. The temple is a ziggaraut about 50 feet high and 120 feet on a side. It is easy to climb up the sides of the structure, but there is no visible entrance from the road. The temple seems in good repair.
From what you know of the Giant Hero, he was a military commander in a recent war who died protecting his king. As a result, the giants have built him this temple. The temple is supposedly guarded to protect his magical golden boots which report to make him very fast. There are no details of his life.
Old City Gods: Portal 5, Dream Level 1
Room 1: Burial Chamber
This room is carved of roughly-hewn stone. The roof comes to a point some twenty feet overhead. The northern portion of the room is dominated by a large stone slab. On the slab lies the body of a stone giant dressed in full military regalia. A large sword lies in one hand, a shield lies in the other. Around the body are ten leucrotta statues and two anhkheg statues, lifelike in their appearance. The center of room is a shrine of some sorts. A hexagonal dais supports a pair of golden boots under a glass dome. To the east of the case are three sconces with flames of blue, red, and green respectively. To the west of the case is the large sitting statue of a dragon. The chest of the dragon has been removed and replace with a large metal dish which points at the case. Finally, the southern part of the room is dominated by two stone benches, an empty offering bowl, and a thin wooden screen which has been unfolded accordion-style to hide a stairway in the south.
If the body of the giant hero is touched OR the beams of light onto the dragon statue are interrupted, the twelve warriors will animate and attack (as ogres). Note that the case is not locked and the glass can simply be lifted off the boots.
Old City Gods: Portal 5, Dream Level 2
Room 2: Burial Chamber (servants)
This room is decorated with crude painting of a stone giant circled by throngs of servants and slaves. They all are looking towards their master with reverence and awe. Around the room are eight chairs, circling two tables. The chairs and tables do not look like they belong in the room.
Above the door in the north is the inscription: Here are entombed my slaves waiting to serve me again.
Above the door in the west is the inscription: Here is entombed my wizard adviser to serve me again.
Above the door in the east is the inscription: Here is entombed my war chief to serve me again.
This room will be filled with ogres if they have not already been cleared out. The ogres generally do not venture further into the dungeon than this point. From here, they feed the wizard and mostly play cards.
Room 3: Outer Burial Chamber (war chief)
The walls of this room are covered with pictures of the giant hero in battle. They are not unusual except for the fact the at the giants side is a huge hairy black and purple spider. At the northern end of this room is an altar made of sandstone with a bas relief of the giant and the spider. At the southern end of this room is a pit dug into the floor. A strange black flame spits up from the pit filling the room with a sulfur odor. The northeastern corner of this room is covered with webs.
This is where the giants dropped off the princess as a sacrifice to the war chief spider.
Room 4: Inner Burial Chamber (war chief)
The walls of this room again show the huge spider. This time, it is surrounded by scrolls and maps. Servants are feeding it small mammals, and the spider is reclining on a cushion. The northern end of this room is filled with webs. Some movement can be seen in the webs. A large table in the southwestern corner of the room has a small chair and a large cushion pushed up against it.
A giant poisonous spider lives here. It fights as a phase spider without the phasing ability. This is the war chief. Its children live in Room 5.
Room 5: Children's Room (war chief)
This room is filled with small mammal bones, mostly of those of small children. Several silver and gold pieces can be seen strewn within. The southern end of the room is filled with webs, but the eastern entrance is clear. The walls are again painted with scenes of battle.
The party can pick up 60 gold and 120 silver here. There is also a Potion of Flying here.
Four giant poisonous spiders live here. These are the war chief's children. The war chief lives in Room 4.
Room 6: Trap Room
The walls of this room are dedicated to the Giant Hero's children. He is shown in six drawings with six different wives. In each of the drawings, a brood of young stone giants can be seen. The center of this room is dominated by a stone giant fertility symbol. You can hear the sound of running water coming from the west.
Careful examination will show a deep groove in the ceiling in front of each of the doors.
Each of the entrances to this room are booby trapped by swinging axe. Characters in the lead must make a dodge throw for half damage. Full damage from the blade is 5d8. Once sprung, these are difficult to get around in order to gain passage to the hallway.
Room 7: Meditation Garden
This room has walls painted in woodland scenes. Around the perimeter are ten statues of naked women. They are made of a white alabaster, and would be of considerable value. They are very lifelike. In the center of the room is a fountain. Water springs from a central pipe, falling back gently into the pool.
This is where the wizard advisor bathes.
Room 8: Inner Burial Chamber (wizard)
This room is plain and unadorned. In the northwest corner, a stone slab has been covered with pillows to make a bed of sorts. On the bed, an middle-aged man dressed in blue robes is lying asleep. Near his hand, a staff rests against the slab. The eastern wall contains a small shelf with three items: a set of three leather bound books, a periapt, and a small coffer. In the southwestern corner a table is piled high with linens, shirts, and other such items.
The wizard is actually in a deep sleep, but he can attack if given sufficient time to wake up (9th level). His quasit, however, is wide awake. The coffer contains 300 platinum pieces.
Room 9: Outer Burial Chamber (wizard)
This room has walls painted showing the giant hero with a middle-aged man dressed in blue robes. The man is pointing to something on the horizon. Around him, servants are bowed in respect. At the northern end of this room is an altar made of sandstone with a bas relief of the giant and the man. At the southern end of this room is a pit dug into the floor. A strange black flame spits up from the pit filling the room with a sulfur odor. The altar is filled with dirty plates and cups.
This is where the giants drop off meals as a sacrifice to the wizard advisor.
Old City Gods: Portal 5, Dream Level 3
Room 10: Common Servant's Room
This large room is unadorned. Simple wooden coffins line the east and west walls of the room. In the center of the room is a large pile of bones, removed from coffins to supply wood for the denizens of the dungeon.
There is nothing of interest here.
Room 11: Artisan's Room
This room in unadorned except for a carved strip of bas relief along the top edge of the wall. This shows dozens of different universal symbols for artisans such as carpenters and masons. A large stone altar in the center of the room is surrounded by wooden crates. A deck of cards and an oil lantern sit on top of the altar.
Usually, there will be gambling ogres here. There is no other treasure here.
Room 12: Architect's Room
This room is shaped of the same stone as the rest of the dungeon. It's original purpose is unknown as the walls have been blackened by torches. A dozen filthy straw and blanket pallets line the walls. The smell of refuse is strong here.
Usually, there will be sleeping ogres here. This room was designed with an escape chamber for the architect. There is no treasure here.
Room 13: Rat Room
This room was once a burial chamber for the giant's pets. Numerous bones of large dogs and cats can be strewn about. Originally, there looks to have been eight stone blocks used to carry the remains of the dead animals. From the general debris, it looks like this room has been sacked. A lantern on the floor in the northeastern corner fills the area with light.
This room is filled with rats that live off the dead animals and scraps of garbage from the ogres. They will attack if the room is entered. There is no treasure here.
Room 14: Inner Burial Chamber (giant's wife)
This room is painted with scenes of a beautiful half-orc woman dressed sometimes in the garb of a warrior and sometimes in that of a courtesan. An altar against the eastern wall has been made into a bed on which rests the skeleton of the woman. A chair in the southwest corner sits near a table containing a whetstone and a polishing cloth. A small triangular table in the northwest holds a silver mirror and a low stool with a velvet cushion. To the south a narrow hallway leads to a statue of the woman. A golden necklace with an enormous ruby hangs from its neck.
The statue is a trap, and approaching it will cause a 10 x 10 block of stone to fall on the character, killing him instantly.
Room 15: Outer Burial Chamber (giant's wife)
An ogre can be found just outside the northern entrance to this room. A wooden shaft is protruding from his head. The shaft was obviously a trap set into the wall. The walls of this room are covered with drawings of a beautiful half-orc woman, obviously a consort to the giant. She is dressed in battle gear in the drawings on the western wall wielding a glowing sword. On the eastern wall, she is shown in more feminine clothing. An alter in the southern part of the room shows scenes of the giant and the woman.
The ogre still has his 40 gold pieces on him.
Room 16: Treasure Room (giant's wife)
This room has a wooden frame in the north end on which is hung a beautiful silk shawl and a string of large pearls. On a small table in the south are several vials of perfume. A glowing long sword is propped up in the southwest corner, and a large chest can be found in the northwest corner.
The large chest is unlocked and contains 500 silver pieces, silk shawl (50 gp), pearl necklace (200 gp), perfumes (5 gp), Potion of Serious Healing, Long Sword +4, Ogre Slayer.
Ogres have been hired to care for the temple. They will fight the party if they think they can win. Each carries 40 gp in treasure.
|
Monsters
6 bugbears
3 merchants (3rd level thieves)
2 owlbears
1 scout from the queen
10 leucrotta
2 anhkhegs
1 giant spider (war chief)
4 giant spiders (children)
wizard (9th level magic-user)
quasit
14 ogres
|
Treasure
Dagger +3
Boots of Speed
60 gold pieces
120 silver pieces
Potion of Flying
Periapt of Proof Against Poison +4
Books
Coffer with 200 platinum pieces
40 gold pieces
silver mirror
500 silver pieces
silk shawl (50 gp)
pearl necklace (200 gp)
perfumes (5 gp)
Potion of Serious Healing
Long Sword +4, Ogre Slayer
560 gold pieces
|
Unexplored Temples
Old City Gods: Portal 5, Temple of the Serpent
Old City Gods: Portal 5, Temple of Love
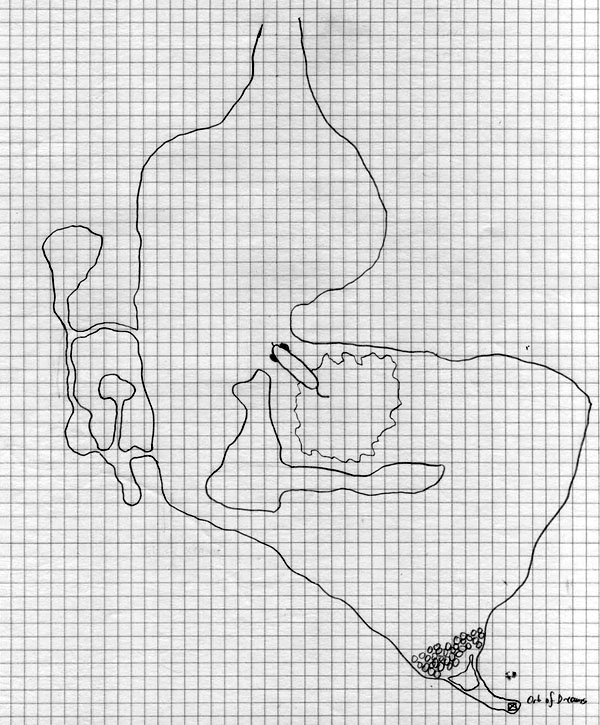
Old City Gods: Portal 5, Dragon's Lair


