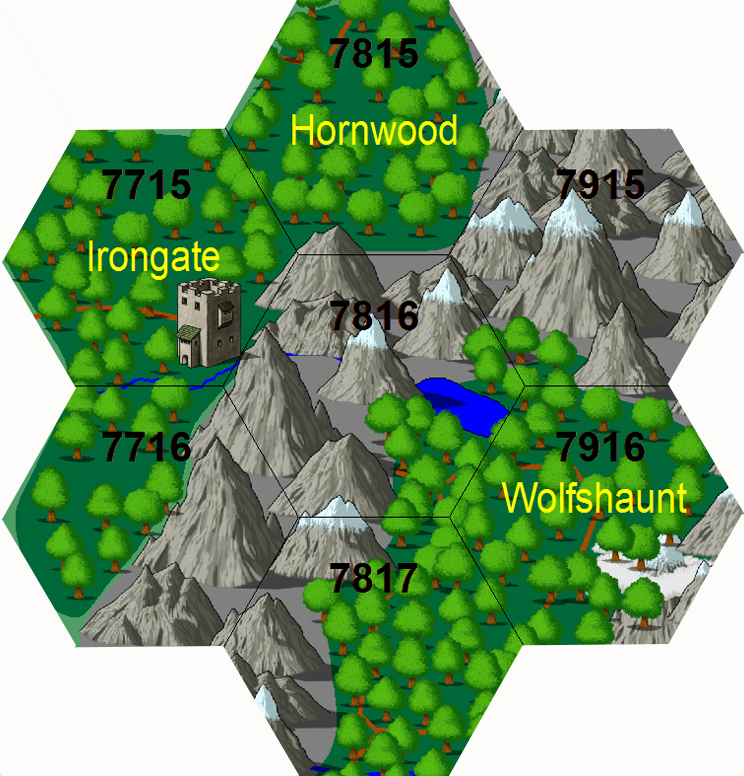
Sealing of the Wolfshaunt

From realm
Revision as of 19:44, 26 November 2016 by Cmatney (talk | contribs) (Pushed from realm.)
(diff) ← Older revision | Latest revision (diff) | Newer revision → (diff)
Jump to navigation Jump to search
Sealing of the Wolfshaunt
Type Dungeon
Status Explored March 906 TA
Location Wolfshaunt
Hex 7916
Campaign The Wolfshaunt Campaign
Adventure # 119
Map-wolfshaunt.jpg

DM’s Notes

You are not healed, spells recovered, etc. We will start with the final room and then a draft.

It is March 906 of the Third Age. A year has passed since the last adventure. It is the beginning of the campaign season.

60% of the tokens have been used up in the first 3 campaign seasons - maybe 1 more This could be the end of the current campaign season

Maybe an adventure to stop Grim's forces from picking up the dead bodies from last year's Witenagemot battles - start on Halloween 905 - for the first adventure.

The dwarven stone ship with two units of copters were lost. Nothing went wrong. The logbook reported back a single word: TRAITOR.

The emperor must sue for peace - Sandal is crushed.

Matcon 36 will reset to 918 TA - one hundred years of Third Age adventures!!!

On Grandfather Rings

Backstory for Awakening of the Wolfshaunt

The release of the Nephew – a vampire who was slew Booth and pretended to be him during the last adventure – was able to contact one outsider to let him know of his location before being recaptured and placed back into the vault. This outsider – Loomis – has been searching for the Forbidden Library his entire life – as his father and previous generations have done before. Calling themselves The Cult of the Shattered Moon – so named because their organization lies sundered by the Wolfshaunt Gate – Loomis stole the cyptex, used their remaining tokens to travel back to the Grandfather’s Castle, and are now trying to open the Wolfshaunt Gate permanently.

Unable to open the device directly, but suspecting where all the answers lay, the Grandfather created the Book of Secrets to “guide” extraordinary adventurers to find the clues, come to the castle, and open the cryptex. Then, he sent a pack of wolves through the gate and left the book on the chair in the Chapel of Udolf to be found.

The correct solution for the party is to find the cyptex and take it away without opening it.

Backstory for the Wolfshaunt Unleashed

Released from the Wolfshaunt, Grandfather Josiah seeks to leave the Wolfshaunt and establish residence in the Reaches. In order to do this on a grand scale, he must bring darkness to the land - which will weaken the people, starving them and making them more docile - and allow him free reign.

In order to do this, he is attempting to create a vast network of lightning rods (which are the real threat - not the storm) and activate them to create a powerful magical dimming of the sun. This requires thousands of lightning rods scattered around the area. He is getting the locals to help him by having the Hermit "selling" them rods and forcing them to protect them from removal.

The second task is to rescue his people from the Library - which will require an army which is currently coming out of the Wolfhaunt. In order to do this, he has enlisted the aid of the Tomb Kingdom - to bring back the Sandwurms to transport the army across the Sands of Time and into Sandal - where they will take the Library by force. The party must go to the Tomb Kingdom and stop the summoning of the great wurms.

The entire Wittenagemot campaign is centered around getting the Wolfshaunt army to Sandal in order to get to the Forbidden Library to release the other members of the Houses that are entrapped there. This would be a good change from the random kill cities campaign. This will be one of the short adventures – go to the Tomb Kingdom and keep the Sandwalkers from arising! Oh, Sandwalkers – actual Wittenagemot units which will transport units across the desert. Brilliant.

The final task is to return to the Wolfshaunt and subdue Father Joseph's line of kin and gain control of a Grandfather's Ring. THE NEPHEW + 12 OTHERS ALLOWED TO GO FREE!!! The Nephew will give them the intel report about what the Wolfshaunt is planning.


The Mustering

From MC 35: The Mustering

The forest here is impossibly thick - dark, dense trees cut out what little light the sky provides. The path leads down steeply, gnarled roots making progress treacherous and slow-going. Finally, the ground levels out and becomes swampy. The tree trunks disappear - and you realize that the canopy overhead comes from one single tree - whose impossibly thick trunk sits in the center of the swamp. The lowest branches of the tree are only 10-12 feet from the ground - creating a low ceiling that extends out across the swamp.

From the branches of the tree, strangely-shaped heart fruit hang - each piece identical and tempting.

This is the Heartwood.

Around the tree, hundreds of wolves circle - small fights breaking out here and there. Many of the wolves, however, are facing the tree in rapt attention. The larger wolves appear to be near the trunk - with the stragglers ranging near the outer branches.

Suddenly, the air becomes still - no sound except the buzzing of flies. One wolf begins to howl, then another and another. Soon, the baying is deafening - a cacophonous wail of dismay.

Lycurgus and Talbot will be closest to the trunk. The Mustering is coming to its climax.

Suddenly, the fruit falls to the ground. In a single scream, the wolves are all now men. Each frantically trying to pick up a heart and open it, sink their teeth into it.

The timer is ON. Lycurgus will set off a MAGNETIC BOMB (-) to keep the party from the trunk. The fruit begins to whither quickly with time. Those that have successfully solved the fruit puzzle, can enter the trunk. Each party member must solve the puzzle in 5 minutes to get into the trunk - make this a fun contest. If they fail, they stay outside with the loser wolves. Note: the characters need to break off a tooth to be successful.

As you step into the trunk, a sense of claustrophobia assails your mind. The wood is non-corporeal, but it provides a thick, sticky resistance. The scents of earth and wood are cloying. Moving towards the center, you are aware of another presence nearby - ancient and intelligent - a being of nature and balance.

"Are you worthy to control the wolves of the Wolfshaunt?"

This is a player vs. GM challenge using the book of puzzles. Roll a dice to see who goes first. If the GM misses the puzzle, then the player has his tooth in the Heart moves to the Alcove . If the player misses the puzzle, then they are trapped within the tree.

Encounter 1: The Alcove

You enter into a small alcove in what must be the center of the tree. It is dimly lit. You appear to be a shade - non-corporeal and insubstantial. Nearby, two shaggy men - one of which is Lycurgus - also hang dimly in the shadows. In the center of the alcove, roots twist from the ground to form a small, gnarled pedestal. Atop the pedestal sits the Heart - bright, clean and rejuvenated.

You can feel the heartbeats of a number of wolves in your chest. You can sense their hunger and their fear. You know that you can influence the wolves of the Wolfshaunt.

Suddenly three more figures appear, almost coming from behind you - gliding in easy measured steps. Dressed in black cloaks, you see bone-white hands, long pointed fingers festooned with rings reaching towards the Heart. Red eyes glow greedily.

"The Heart of the Wolfshaunt runs red with the blood of the weak."

Glancing about, you notice several cracks in the alcove - narrow at first and quickly widening like the maw of some great beast.

The two shaggy men exchange furtive glances and step into one - the crack closing behind them.

The cloaked figures hiss at you backing slowly into another opening. You are alone in the center of the Heartwood.

Encounter 2: The Endless Glade

Stepping into the dark split of the Heartwood, you move through the cloying stickiness with little effort. As you exit the trunk, you find yourself in the Endless Glade. The glade is carved from an impossibly dense forest of ancient trees. The clearing is roughly circular in shape with a bowl-shaped topography. A small black pond sits at the very center of the bowl.

No wind blows, but there is a low-pitched creaking in the woods. Creatures are coming from in all directions.

Ents from the trees.
Tentacles from the pond.
Any attempt to leave - fly, teleport - will return the character to the center of the glade.

Outside the tree, hundreds of wolves circle - many are howling and other growl menacingly. None move to attack. Rather, they seem to be waiting some signal to attack.

The players outside the tree have a new challenge: take the puzzle apart. The players inside the tree have to survive until this is done.

Encounter 3: Taking the Heart

The darkness of the woods becomes overwhelming - a swirling, nauseating feeling in the pit of your stomach. You close your eyes for the briefest moment and find yourself back in the alcove at the center of the Heartwood.

The Heart appears shattered on its stand. There is no sign of the shaggy men or the three black-cloaked figures.

Outside the tree, the wolves move to attack. Wave after wave, with seemingly without regard to losses or death.

The players inside the tree have a new challenge: put the puzzle together.
The players outside the tree have to survive until this is done.

As the Heart is placed to together, the cracks seal - and the large gem begins to glow with a pulsing red light. Your heart begins to pound - increasing in rate and intensity.

Through the tree, you see your companions outside. You sense your companions can step forward, suddenly able to pass through the Heartwood.

The wolves have backed off - now joined by the two ancient shaggy men - who stand watching from the front of the pack.

"Bind us, and we will serve minimally - assuming you can hold up your end of the bargain. Let us be free, and we will be eager allies. We have secrets of inestimable value to you."

The ancient woodland presence that you sensed upon entering the Heartwood has returned - although as more of a feeling than a flesh-and-blood entity.

"Do you wish to bind the Wolves or leave them unbound until the next Mustering? The choice is yours alone. Both have grave consequences and responsibilities - don't make your decision lightly. Take the Heart and they are bound. Leave the Heart and they are unbound."

Looking out, the wolves are loping off, following two large wolves up the dark and gnarled path.

The secret = the Wolves were tasked with gathering a bit of skin or clothing from each party member.

Lycurgus, Leader of the Baneback

A large man, clearly a werewolf from his shaggy appearance. On his back is a wicked serrated sword which glows with a dull reddish light. He is dressed in leather armor.

Talbot, House Blackwolf

A burly, hairy man - again clearly a werewolf. He wears a simple ironmonger's apron. In his hand, he carries a massive blacksmith's hammer which flickers with a blue-black lightning.

You are oath-bound to protect us - just as we are oath-bound to protect you.

Lycurgus tells the party of the Josiah and Bela's plans.

  • The vampires fear an invasion of the Wolfshaunt by the forces of the Eastern Reaches.
  • They know that Sandal, the Orc Nation, and now the Tang Empire have all been forced into submission from the aggressive forces of men, elves and dwarves.
  • The Grandfathers sent an emissary east across the great continent four years ago - when the Valley Gate was first re-opened. There, they sought a pact with the Old Kingdom.
  • Two years ago, now desperate, a deal was struck for a one-time invasion of the Reaches by the Old Kingdom forces. The price was high - one million gold pieces - paid to the Overlord. The invasion is underway - only the final payment needs to be sent to insure full cooperation. Tonight, this sum will be pulled from the darkest and deepest vaults under the mostly-deserted city of Everblack. The terms are simple. The Old Kingdom gets the fertile Western Reaches. The Wolfshaunt gets the tangled woods and sandy fields of the Eastern Reaches. The Shadowyarn Mountains will be the border.
  • You must protect us from the Families. Now, that we are bound to you, the Grandfathers will ally with the Unfettered Wolves and seek to kill our packs, exterminating us without conscious.
  • OR - You must protect us from the Families. Now, that we are unbound, the Grandfathers will ally with the Unfettered Wolves and seek to kill our packs, exterminating us without conscious.

Matcon 34 Wrap-Up

Hand out the Necklaces of the Wolfshaunt from faeries!!!

Briar Blade
Azura Morgan Staff
Twin Journals

Vince wants to release the souls of two beings trapped in his Raiments.

2= Mirri – a 1st level peasant girl who was the sacrificial lamb to test the weapon
3= Rindar Redfoot – a 6th level good fighter, farmer, and bar room brawler

This needs to be roleplayed at the beginning of MC35.

Encounter 4: The Vaults of Everblack

Two rogue vampire brothers - rumored to be younger siblings of Radu - have long worked as "bankers" to the Families of the Wolfshaunt. One is impossibly fat and quiet. The other is rail thin and is the face of the organization. They are known as Mr. Black (thin) and Mr. Sly (fat). Militantly neutral, these brothers provide services to vampire, wolves and men alike. Their stronghold in the city of Everblack is at the center of commerce. Their stronghold is completely run by automatons - sentient beings cannot be trusted.

With the roads being dangerous and unpredictability, the Everblack Bank uses the Exchange boxes found on the roads of the Wolfshaunt. Using a two-phase teleport, valuable artifacts and gold are exchanged without risk.

But for the payment to the Old Kingdom must be made from outside Wolfshaunt, so the money must be moved through the gate - the Loch Gate in this case. The money will be moved by mechanical spiders led by Mr. Sly himself. The party must figure out how to intercept this money in order to minimize the Wittenagemot attacks.

The ancient city of Everblack lies in the tangles of several rivers that twist through the fertile hills in the center of the valley. At the intersection of four roads, the city's decrepitude shows its best days are behind it. While the foundation of the city shows that thousands might have once lived and worked here, the current town of several hundred are centered around a large hill near the geographical center of the ancient city.

Atop the central hill, a strange building - shaped like an eight-legged spider straddling the hill sits black and foreboding. Each leg of the spider running down the hill ends in a small window-less building. Around a ring road at the bottom of the hill, shops and small homes circle the strange building. Beyond the ring of buildings, a few pubs and homes are strung along the roads leading into a now-overgrown jungle.

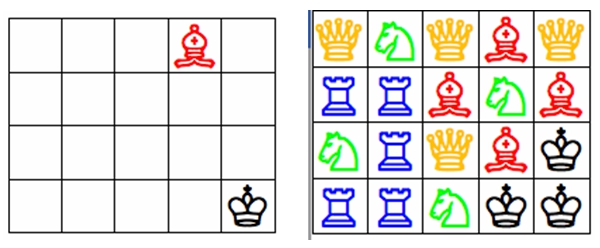
The legs are "cars" that allow a visitor to be moved up the main building. The main building is a series of eight private rooms - each which are serviced by a conveyor belt that will allow deposits and withdrawals. Chess mazes are used that allow access. The party could put themselves on the conveyor and use a code to get into the main room.

Sealing01.jpg

The entire building can move - by standing up and crawling like a giant mechanical spider.


Encounter 5: The Eastern Exchange

A small, squat, square building is buried under a tangle of white webs. Crawling all over the building are several dozen large mechanical black spiders. Each spider has glowing red eyes and a faint tracing of a red spider on its back. A single entrance has been cleared. This building is clearly centuries old - and of precise construction.

Entering, you go down a short flight of stairs into a small 20x20 room. On a table in the center of the room is a large box - wooden framed with glass panels. The box is divided into two compartments.

One part is closed - behind its glass hovers the flickering image of the treasure. The other compartment is empty. If the party puts in the other part of the bargain, the flickering object will materialize. The payment will vanish.

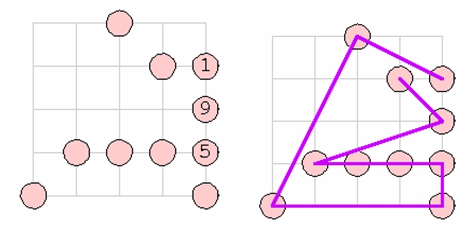
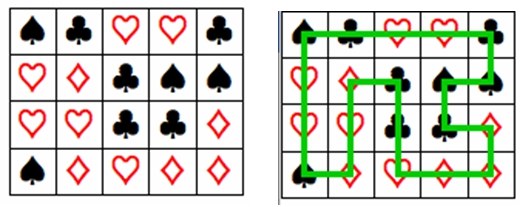
A grid of squares is carved into the top of the box. These are Square Crosswords.

A perfect deal needs a trusting pair,
Each row and column a perfect square.

Sealing02.jpg

During the transfer, spiders will enter one-by-one and get a load of gold. Thus, the gold is spread out among a number of very, very fast spiders. Each transfer is small. With a spider leaving the Exchange and immediately going to the Loch Gate.

Encounter 6: The Loch Gate

The journey from the Eastern Exchange to the Loch Gate is a mere 20 miles - about 15 minutes at super speedy spider movement.

A wide path moves east from the main road down into a low, long valley. The path ends in a long, narrow loch. At the far end of the valley, the loch enters into a cave. Trees with huge crimson leaves overhang the shores, and a few small tributaries feed the loch. The water is crimson red and placidly smooth.

A trail of spider prints lead directly into the water.

The water swirls when life is nearby. The spiders just walk along the bottom.

The cave is a natural cavern - low-ceilinged, varying in width from ten to thirty feet. The rough ceiling in only five to ten feet high. Like the lake outside the cave, the water here is still. There is a stench of death and decay about the water.

After several miles, the cavern walls and ceiling show signs of mining and widening. The water is still red and deep, however. Coming around a bend in the river, you see a natural stone ledge projecting about thirty feet into the water, a straight edge has been cut into the stone to make a make-shift dock. Several large iron rings have been set into the stone dock.

On the dock, a single man - exceedingly fat - waits - looking out from the dock. He is dress in a black cape with a sumptuous red lining. He leans on a large wooden staff. Suddenly, you seen the water begin to glow red. A spider emerges from the water, climbing adroitly onto the dock. The fat man moves to the back wall of the cave after a few seconds, a shimmering doorway is seen. The man and the spider move quickly through the shimmering doorway, and the wall returns to a natural cavern.

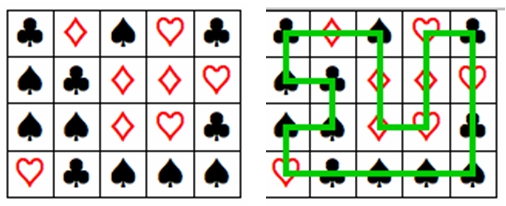
Mr. Sly. Puzzle with "donation" box to make the teleport active.

Sealing03.jpg

Encounter 7: Beyond the Loch Gate

You teleport into a small cave - approximately 30 feet in diameter. The domed ceiling is 20 feet high. Immediately noticeable is a sharp, cold wind coming from the cave entrance.

Looking out, you appear to be several thousand feet up the side of a mountain that overlooks a vast canopy of trees far below. Several rivers meander through the forest towards the southeast. There is no ledge outside the cavern and a path that might have wound down the side of the mountain was long ago destroyed by a rock slide. Now, the cave is accessible only by the air.

In the distance you can see two green dragons circling lazily in the sky.

The cave will be empty or Mr. Sly might be here.

Another puzzle, another token.

If the party needs to pass back through the gate.

Sealing04.jpg

The Forbidden Gate

Prologue: The Sleeper

DM's Notes: The Grandfathers are running out of tokens and realize that soon they will be trapped in the Wolfshaunt without a way to escape with their Families.

They are also worried about the armies of the Eastern Reaches invading the Wolfshaunt.

They make up a story of a great evil, slumbering in the Wolfshaunt Valley - the reason that they were drawn to this corner of the Realm. This, of course, is a great deception. They will parlay with the Party for a mutual terms to release some of them to the Realm.

When the Sleeper arises from slumber immortal
His tendrils pass through time and space
Those who follow his path can Journey
To far-away lands in a far-away age

The Grandfathers will open their tendrils by having their spies piggyback on the party entering the gate - via the necklaces.

Also, the "mustering" areas are surrounding the falls - in several large open areas. The party will see these if they fly over the forest in front of the Forbidden Gate.

The vast canopy of the forest is thick and unbroken - with the exception of six large circular areas - equally spaced in an arc centered on the waterfall.

Sealing05.jpg

The last missing throw will have 3 as the result. This is because, with each pair of the throws you can find that the total sum is increasing by three and then decreasing by one. Therefore the missing throw be 3.

My Ancient and Esteemed Family,

Just four short years ago, we celebrated the opening of the Valley Gate. The cryptex violated, the seal broken. Our scouts reported the human cattle of the Eastern Reaches had multiplied and grown fat from the soft life outside the Wolfshaunt.

Like many of you, I planned to establish a new stronghold outside the Wolfshaunt to grow my family to include a new generation bound in servitude. That time has not come. My assault on the infernal gnomish device at the Flower Gate has failed, and instead of triumph we are faced with a new threat from the Reaches.

I write to each of you to tell of my plans. I have sent my son and twelve of his most trusted comrades to the Forbidden Gate beneath the Square Lake. Do not try to stop me, for they have already made the journey through the Gate and await the appointed time to fulfill their mission. I recognize the dangers of awakening the Ancient One that slumbers there in the darkness. The risk may very well sunder the Wolfshaunt and even the Reaches. But, this desperate mission represents our last, best chance to release our Families, armies and households from this accursed Valley.

Muster at the Gate on the Vernal Equinox if you wish to join me in this expedition.

Eternally yours,

Joshiah.

Encounter 1: The Camps

The vast canopy of the forest is thick and unbroken around the shores of the square lake at the foot of the mountain. About a half mile away, six large circular areas are devoid of trees and vegetation. Each area is almost 200 feet in diameter. The most remarkable feature of these barren areas is that they are equally spaced in an arc centered on the waterfall.

These are the "mustering" areas for the armies that will be teleported to the Reaches for Wittenagemot.

The areas around these mustering areas is filled with werewolves and vampires - armed with the weapons of war. None will go into the circular area - until the teleport columns are established. The troops are at high alert.


Encounter 2: Fake Vampires

A small camp sits at the far end from the waterfall. Five small wooden structures are arranged around a strange campfire of blue-black flame. A line is drawn around the entire camp - it too flickers with a blue-black flame. Strange symbols are visible within the line. A small black dragon-like creature sits curled up in front of one of the huts.

The camp is, of course, a fake to get the party to believe that the vampires have already made their way into the dungeon.

The black dragon is real - and will spit metal disintegration acid (Level 35) at the party.

At the center of the hut sits a plain wooden coffin. Finely-crafted although without ornamentation commonly seen in the Wolfshaunt. Atop the coffin sits a small black candle - lit with a blue-black flame.

Inside the coffin, a sumptuous red lining sits atop a thick pile of dirt. The coffin appears to have been recently occupied.

Searching the coffin will reveal a note written in the spidery hand of Grandfather Josiah.

When the Sleeper arises from slumber immortal

His tendrils pass through time and space
Those who follow his path can Journey
To far-away lands in a far-away age

Each hut contains a single wooden coffin - now empty. Each appears to have been slept in by a vampire. There are signs of crates and boxes - impressions in the ground - now gone.

Encounter 3: The Entrance

A waterfall cascades down the smooth side of the sheer stone face of the mountain. Large slabs of stone lie fallen on either side of the waterfall, as if they were shaken loose from some great earthquake in the past.

A narrow lake leads straight out from the waterfall. Dense, dark trees line both sides of the lake which eventually ends in a series of small creeks that wander into the woods. The water in the lake is clear - revealing its deep, flat bottom.

Underneath the waterfall, the deep pool is hidden by the frothy waters. Occasionally, a glint of silver metal can be seen coming from its depths.

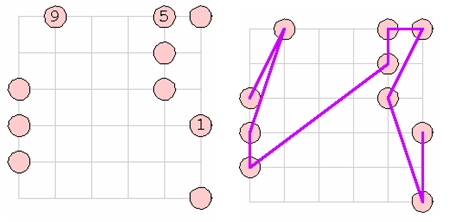
A set of silver doors with a strange octopus-like design encircles a silver metal panel with the following figure etched on it.

Sealing06.jpg

If the party incorrectly solves the puzzle, they will take a jolt of electrical shock from the door.

If the party takes too long to solve the puzzle, they will be attacked by non-corporeal octopii. These will jump the player ahead in time 1-6 rounds - during which they will be "frozen". The effect will of their hits will be a slow drain of beans (blue octopii) or hit points (red octopii). They ignore armor and pass through bodies.

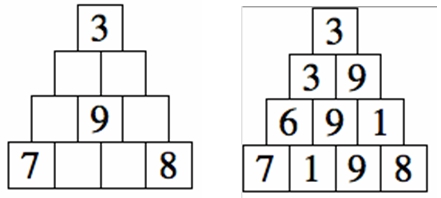
The door is an oculus which opens allowing passage in. After the party has entered, it will close. If they look closely, the door will have a different puzzle to exit.

Sealing07.jpg

Encounter 4: The Long Hallway

This long hallway is vaguely tube-shaped with periodic rings where the tunnel narrows for a few yards. The surface of the walls is smooth and white - although near the entrance moss has grown on the walls giving it a mottled green appearance. Despite a lack of light-sources, the hallway is dimly illuminated. The hallway slopes gently upward out of the water and is dry past the entrance.

When the party moves over the ridges, the walls of the long hallway will constrict slightly - moving with a faint undulation that follows the party along the hallway.

Along the hallway, the party will encounter a gelatinous cube that causes paralyzation - and mind control. It contains a strange multi-eyed creature in its center. The cube can become rock hard at command.

As soon as the oculus closes and the coast is clear, the vampires will jump out and try to get ahead of the party. This will be done via a darkness spell which is cast from a bead - silent and distracting.

At the top of the climb, the long hallway ends at a "T" with identical hallways running in a vaguely circular path.

A faint humming grows steadily louder - as if something is coming quickly down the hallway. A few moments later an impossibly bright light comes down the hallway moving exceedingly fast towards you.

The light is actually scan which is a charm spell without a saving throw. The charm will cause the character to move to the nearest door and enter the main chamber.

Encounter 5: The Mind Ticklers

A slight etched pattern in the inner wall of the hallway is centered in an oculus. A light traces around the pattern.

As the oculus opens, the room beyond is more a small alcove leading into a much larger room beyond. The walls of the alcove are clear - with a stark white light filling the space. Suspended in the walls are several strange multi-eyed creatures - their attention turned towards you.

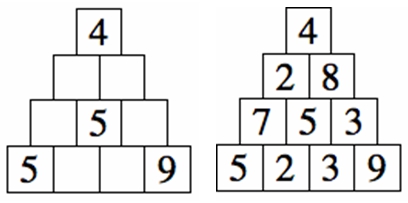
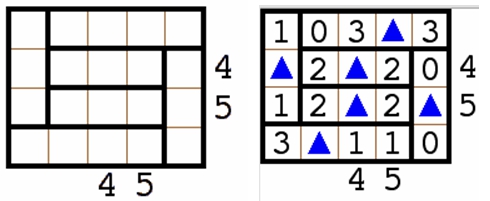
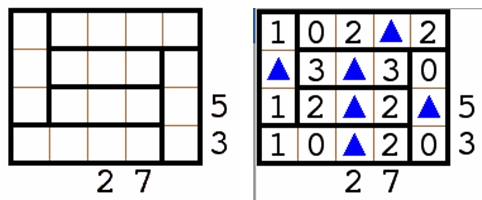
Each square below contains either a fulcrum, or a weight from 0-3. Each group of squares surrounded by black lines is a balance containing one fulcrum where it would balance, with equal torque on both sides. The fulcrum will not be at the end of a balance. Each number outside the grid indicates the total weight in that row or column, counting fulcrums as 0.

Sealing08.jpg

You get the strange impression that another mind is listening to your thoughts.

As soon as the party enters the alcove, five vampires will come from the shadows behind them - moving quickly across the small room and disappearing into the darkness beyond.

The creatures in the tanks will attempt to charm or confuse the party.

Encounter 6: The Map Room

This room is vast with a cavernous ceiling hundreds of feet high - lost in murky shadows. It has the feeling of a space long-forgotten. The walls are carved to resemble ribs of a great beast, curving down onto a stone floor. Persistent mist swirls along the black floor leaving eddies as you move across it. There are no pillars in the huge room, and no visible signs of support for the walls. The floor is slightly bowed to a crest at its center.

There is a sense of an ancient intelligence here - slumbering and only tangentially aware of your presence. As you move, the stirrings increase - only to settle as you slow down.

Somewhere in the room, a white flash strobes.

The ancient intelligence stirs and a blue-black tendril snakes from the source of light - reaching from the floor far until it is lost in the shadows of the room's ceiling. The tendril is rope-like, almost alive it is undulates in the air.

Looking down, you see the floor is now a map of the Reaches. This room overlays with the 120x200 the map of the Reaches.

Another flash. Another tendril. Outside, the armies begin to move into the Reaches.

No teleport out of the area. Each vampire will fight to the end to delay the party leaving.

Sealing09.jpg

Sealing of the Wolfshaunt

DM's Notes: This adventure is actually in three parts

  • The Chapel of the Lamp
    • Nagel Box
    • Buy at Bennett & Sons in Everblack
  • The Summit with the Grandfathers - get a piece of hair from each
  • Sealing the Wolfshaunt - new lantern, piece of hair, back to the chapel to bless

Encounter 1: Lycurgus and Talbot's Plea

Two familiar figures stand in front of you - slightly deferential with heads bowed. One is Lycurgus and the other is Talbot - both shaggy and looking haggard.

"The vampires have decided to punish us for their failure at the Mustering. As is their tradition, the vampires called our young - our children and those wives bearing young in their bellies - to the Chapel of the Lamp. The Chapel is warded by a force field - similar to that which surrounds the entirety of the Wolfshaunt. However, this is tuned to wolves. We cannot pass through its effect. We have tried digging under, jumping over - it is impossible for us to penetrate.

We beseech you to help save our young. They are our future. Without them, we are a lost race.

Lycurgus and Talbot will give the party an escort and a description of the Chapel of the Lamp.

Each mustering, when the vampires have bound the wolves, the prisoners are released. They can describe the interior of the chapel.

Encounter 2: Outside the Chapel of the Lamp

The Chapel of the Lamp is an odd building that sits atop a large rock outcropping in an otherwise ordinary field. A single path leads through the field and up a set of carved stone steps. The chapel is a grey, stone building of indeterminate age. It is small, perhaps only one hundred feet in width and length. The Chapel's windows have been stoned up - giving the place an abandoned look.

While small, the building is very tall - with a narrow stone tower jutting almost 100 feet in the air. At the top of the tower, where one would typically find a cross or bells, a bright light shines through vertical stone slits on each side of the tower.

Six ancient black dragons sit outside the Chapel - apparently asleep.

The Chapel door flickers with a protective rune.

The werewolves cannot pass within 180 feet of the chapel.

There is a slightly burned circle in the grass.

NOTE: If the dragons are not taken care of beforehand, they will slay the wolves running from the Chapel.

Encounter 3: The Chapel

The interior of the chapel is made of the same grey stone - simple but well constructed. Stone pews line both sides of the chapel. From the inside, the stained glass windows can be seen - although their details are lost without sunshine. The ceiling is 30 feet high. Towards the back of the chapel, a large stone pulpit hangs from a thirty foot wide pillar that extends to the ceiling.

Hundreds of sets of paw and footprints lead down the center aisle before veering to the right of the pulpit.

Once the party is in the center of the chapel, four giant bats will attack from the corners of the chapel. A vampire will pop up in the lectern and start casting a spell to hold the party.

Encounter 4: The Undercrypt

A set of stone spiral steps lead down about sixty feet - clearly below the rock outcropping that the chapel sits upon. The stairs are caked with dirt and mud from very frequent use. A single lamp hangs from the ceiling. The smell here is overwhelming.

The stairs end in a stone wall.

A large set of stone crypts spread out for several hundred feet in all directions. Here, hundreds of wolves are scattered. All appear hungry - some rabidly howling.

As soon as the wall is brought down, the wolves will attack - unless they are quickly convinced that the party is there to save them.

Puzzle to open wall.

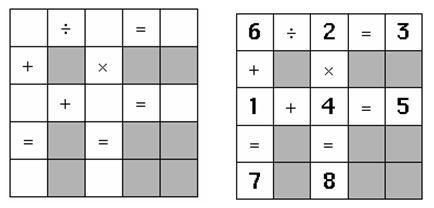
Each empty white square in the grids below contains one of the numbers 1 thru 8. Each of the horizontal and vertical equations should be true. Each number will be used exactly once.

Sealing10.jpg

Trap set to kill all of them. The key is the lamp - which holds the wolves in - even though the door is open. Careful examination of the lamp shows the flame to be produced by a strange globe with spikes.

You hear the rush of water. (which activates the poison)

Poison will start pouring in through the stone pillars throughout the cellar. Originally used to burn incense in order to keep the crypt smelling fresh. These are mundane and can be blocked.

Encounter 5: The Lamp Tower

A set of stone spiral stairs wind up a window-less tower made of plain, grey stone.

At first, you are blinded by a bright, white-yellow light that emanates from a black iron lamp that hangs suspended from a thick chain at the center of the tower. Adjusting to the brightness, you notice that the Lamp Tower is small - only 15 x15 feet. The ceiling is 20 feet tall. Vertical slits in the stone allow light to leave the room.

The lamp is an odd design - with a number of metal spikes that provide the impossibly bright light. There is no apparent way to turn off the lamp. On the bottom of the lamp is a stamp:

Bennett & Sons, Lampmakers
Everblack

The only way to get the wolves out is to break the lamp. Or take it apart.

Encounter 6: The Lampbearers

Approaching the chapel are a large number of vampires - flying in from the south. With them are several black dragons and a host of giant bats.

Of note, there is an inconspicuous vampire flying in the from the north carrying a large bundle - which happens to be another lamp. This one is tuned to the party specifically. A trap.

Try to capture the party by having lamp put in place by them. Brought by vampires.

Encounter 7: Freeing the Prisoners

The wolves stream from the chapel, hundreds of young pups and their mothers and siblings. They run as quickly as possible away from the chapel.

Lycurgus and Talbot approach slowly - as if afraid to enter the circle of the Chapel of the Lamp. They bow low.

"We thank you for saving our children from the Grandfathers. For this, we are in your service beyond our bond."

The dragons will attack them.

They will give the party information about Bennett & Sons, Lampmakers.

Encounter 8: Bennett & Sons, Lampmakers

The ramshackle long building at the base of the hill in Everblack looks as if it has stood in the location for a thousand thousand years. A black sign with bright gold letters reads "Bennett & Sons, Lampmakers". Windows at the front of the shop glow with warm, yellow light - several dozen well crafted brass and steel lamps flicker invitingly. Several light stones are on a small shelf, and a sign invites shoppers in - WELCOME.

Bennett is a rail thin man with dark hair and hawkish features - most prominent is his long nose. His eyes are bright and his teeth are bright white - straight and even.

Bennett's son is actually a daughter - very pretty with brown eyes and hair. She is wearing an apron over leather armor. She is bored and looking for adventure.

Bennett will try to interest the party in a lamp of mundane make. If they show him the magical lamp, he will deny making the lamp, try to make the party leave - glancing about furtively - slipping them a coded note to meet him in the wine cellar of the Pawn & Castle pub.

Meet me at the wine cellar of the Pawn & Castle pub at ten o'clock. Don't be followed.

Nvvg nv zg gsv drmv xvoozi lu gsv Kzdm & Xzhgov kfy zg gvm l'xolxp. Wlm'g yv ulooldvw.

Bennett will tell them that the lamp must be made from a personal item - gathered within the last few days.

Bennett will ask for 100 tokens for his family and friends. And a place in Dragonsford to open a lamp making shop.

As they are leaving, Will - Willamena - will tell them a secret for a gold piece.

I overheard a whispered conversation once that the secret of the grandfathers is hidden in Josiah's Library. And there's a poem.

I have a heart that never beats,
I have a home but I never sleep.
I can take a mans house and build anothers,
And I love to play games with my many brothers.
I am a king among fools.
Who am I?

The answer is: The King of Hearts in a deck of cards.

Encounter 9: The Proposition

A lone figure sits on the trail.

A wiry, thin man with alabaster skin sits atop a large, black warhorse. The man is dressed in flowing black robes. He does not carry visible weapons - his hands conspicuously sitting atop the pommel in plain view. His only visible adornment is a twisted silver ring on his left hand, and a small white gold ring on his right.

"Welcome again and congratulations. As you know, I am Winston - emissary of Josiah."

This is a way to gather a personal item from each to put into the Lamp.

Ring Bound to Josiah. Ring of Memory Manipulation.

• My master has lived for generations by being cautious. You hold a ring that can take his life. I do not expect you will meet him while the ring is still in your possession.

If the party attacks, Winston will flee - if possible.

Encounter 10: The Meeting

This massive stone room is cold and uninviting. A fire has been made in a large stone fireplace, but it gives the room little warmth or cheer. Two large overstuffed red leather chairs sit in front of the fireplace. A staff leans against one chair. A large table is set in the center of the room.

Two men sit at the table.

One is a frail-looking man dressed in red robes. His grey hair has mostly fallen out. He leans heavily of a black staff made of a shiny wood. His hands are festooned with rings - 10 to be exact.

The other is a striking man with silver grey hair, chiseled features and straight, white teeth. Middle-aged man - thin with grey short beard and close-cropped grey hair dressed in a black cloak and red-lined cape. He has no weapon, but has ten twisted rings on his fingers.

Grandfather Bela is the frail-looking man. Grandfather Josiah is the striking man.

The proposition is simple.

We will drop our attacks into the Reaches and establish a peaceful relationship with the Eastern Reaches. We will eat only prisoners and enemies of the Three Kings.

You will drop the wall that requires the use of the Gates to travel outside the Wolfshaunt - allowing us to establish a small trading village in the Hornwood. From there, we will establish normal trade relationships with the Reaches.

And, you will return the ring that you stole.

Encounter 11: The Library of Josiah

This ornate room is lined on all four sides with bookshelves soaring to the 20 foot ceiling. The wood is dark, old and well oiled. There is a smell of leather mingled with the mustiness of parchment and vellum.

The bookshelves are full - neatly arranged volumes - mostly novels and works of fiction, most are unfamiliar to even Fuzzwort. A number of painting are found in niches throughout the room.

A large, empty table is in the center of the room, and overstuffed green leather chairs surround the perimeter of the room.

The puzzle from Will - the King of Hearts - is the answer.

One of the paintings show the illustration for an entire deck of cards. Others are a seascape, a ship traveling stormy waters, a huge moon hanging over a moorish landscape, three beautiful women - a mother and two daughters - smiling in a formal room, etc.

Pressing the King of Hearts will cause the panel to slide silently aside.

Encounter 12: The Secret Passage

The bookcase slides back into the wall before sliding aside to reveal a man-sized niche. Just inside the niche is a suit of armor - clearly empty. The armor is plate mail etched with runes. The helmet has been fashioned into a crown. Both gauntlets have been fashioned into razor-sharp talons. The boots have been fashioned into claws. Even empty, the armor radiates a powerful aura of magic. You are slightly awe-struck by its presence.

The suit of armor blocks a passage beyond.

Moving the crown will cause the armor to step aside - allowing passage beyond.

The stone-lined passageway slopes down into the bowels of the castle. There is a very strong smell of ozone here. The passage ends in a hexagonal room.

Encounter 13: The Gateway

The hexagonal room has a large ornate crypt in its center. The crypt is made of a heavy black stone, the surfaces are traced with a flickering blue lightning. The smell of ozone is very strong here.

Around the crypt - on the other five walls tapestries hang. As with everything in the castle, these appear to be ancient. Each depicts a man never-aging dressed in garb of the First and Second Age. Each shows a growing family - also not aging.

On the top of the crypt is a stone effigy of the never-aging man. The carving is remarkable in its detail - although the effigy is missing a staff that should be in his hand.

The party needs to "borrow" one of the grandfather's staves.

Placing the staff in the hands will cause the party to teleport (with the staff) to the Great-Grandfather's room.

Alternatively, U-Gene can place the Staff of the Wolfshaunt here.

Encounter 14: Great-Grandfather's Chamber

You find yourself in a 20' x 20' room. There are no apparent exits from the room. The room has a large ornate bed in one corner - the curtains pulled closed. A fire burns in a fireplace - although the room is cold. An overstuffed chair faces the fire. On a small side table, a bottle of wine, glass, and a book sit. Another table has a chess set - the pieces arranged mid-game. The walls are filled with pictures - several dramatic landscapes and a number of paintings of young women in various stages of dress.

Several smoke rings float up from the chair.

A wizened man - his parchment thin skin wrinkled and grey - smiles from bright white teeth. His eyes are old and rhummy, watering and bloodshot.

You recognize him as the man in the tapestry.

U-gene will immediately note that the party is several miles underground - clearly a magical space.

The great-grandfather's staff is leaning against the corner of the fireplace.

Encounter 15: The Challenge

The old man frowns and looks at the chess set on the far table.

"I have lived for so very many centuries. Immortality courses through my veins, but there is a price to pay for what may seem to you to be a boon. My sons, Bela and Josiah are both bores. They are driven and smart, but they lack any appreciation for the simple joys of life. Radu - my grandson - he is a pleasure - a man who enjoys all that his position in this world affords. Ah, Radu - who never asked anything of me. He brought me purebloods for my Hunger. And, our chess games... pure bliss.

Great joy and also great disappointment. Our last game ended very poorly. That set over there, the old man points across the room, worth more than all the gold in the Reaches. Magical - plays against you when an opponent cannot be found. Radu stole the black queen. Why? Anger? No, to pay a debt to Tobalth - that damn dragon-folk.

You want my help? Bring me my black queen back. Go to the Cathedral of Dragons and take it from his hoard. The old lizard will never even miss it."

The old man doesn't care if he is bound. He is the proto-genitor of all the vampires in the Wolfshaunt. Binding him will bind them all.

The great-grandfather will give them two black beads - one to teleport them into the Cathedral of Dragons - very dangerous place. Don't linger or you will attract their attention. From there, he says you merely need to touch the statue of Tobalth to be taken to his hoard. Once back in the Cathedral, break the other to return.

Encounter 16: The Cathedral of Dragons

You find yourself in a large underground room carved from rough volcanic stone. The roof of the cavern is several hundred feet high. While only sixty feet wide, the room stretches as far as you can see in both directions. The room is quiet except for the deep, rhythmic breathing of many giant creatures.

In front of you is a huge statue of a dragon - carved from black basalt - eeriely life-like and sized as an ancient specimen of the beast. The dragon is curved, as if sleeping. The gem-like eyes from the dragon glow with a warm yellow light. A sign on the front of the dragon reads, "Tobalth the Collector".

A small chess board sits in front of the statue.

Sealing11.jpg

If the party takes too long to solve the puzzle, they will notice other dragon statues starting to move - every so slightly - the opening of an eye, a puff of smoke from a nostril, et.

Encounter 17: Tobalth the Collector

The air in this vast cave is fetid and cold. The walls are lined with thousands of small niches. Each contains an item - some are gold and gems - clearly valuable. Others are of questionable value - a crudely formed doll of straw, a piece of coal or a simple comb of bone. All are neatly arranged - although no pattern can be discerned.

In the center of the cavern is a huge statue of a dragon - carved from black basalt - eeriely life-like and sized as an ancient specimen of the beast. The dragon is curved, as if sleeping. The gem-like eyes from the dragon glow with a warm yellow light.

You hear the footsteps of a man-sized figure approaching. The clicking of a staff is the only other sound in the cave.

I am Tobalth the Collector. How do you like my little collection?

Can be bargained with - but will ask the party for an artifact of theirs for his collection. Will want something else of the grandfather. And something from Radu.

If attacked, he is a Vampire Dragon - breath weapon drains life. Also, the party must solve another puzzle to leave if the party attacks.

Sealing12.jpg

Encounter 18: Back to the Grandfather

Returning to the great-grandfather, the party notices that there is now some soft moaning coming from the bed - which is still behind the curtains.

The smoke rings coming from chair - just as before.

However, when the figure turns around, it's Radu.

I have brought my great-grandfather a snack. He was getting so weak and depressed. Even our elders need to satisfy the Hunger from time to time.

Pointing at Ernie - "I see you have found your head again. It looks better on your shoulders than on your feet."

Radu is a pale, thin young man with a small black pointed beard and long willowy fingers. His smile is disarming. He wears a single ruby ring. His dress is a night shirt over which he has thrown a red velvet smoking jacket. He carries an ornate jeweled staff.

I will help you in your quest - if I'm given free range of the Reaches. I have decided to start a family. After you destroyed my home, I realized that I had become too attached to my treasures and this dreary place has grown droll.

I will help you take the one thing that is most precious in the Wolfshaunt - the hoard of both family's tokens. They have recently been moved. I will help you take them. This will cripple any large-scale movements from the Wolfshaunt. For my part of the bargain, I want 100 tokens.


Encounter 19: Radu's Revenge

You find yourself back at the Vaults of Everblack - the house of Mr. Black and Mr. Sly. The building sits quiet and dark. Radu moves to an area near the "body" of the spider - a slight depression in the metal building is almost undetectable.

"This building is actually a giant machine. In fact, you may not know this, but it can actually walk like a spider. It is a remarkable machine. Even more remarkable that only Mr. Black and Mr. Sly run the whole place. It does have one weakness, however. It is a machine, and it can be overloaded with just the right application of power."

Pulling a small silver cylinder from his pocket, Radu, continues.

"This small charge will override the entire machinery - well, at least for 30 minutes. You will have to hurry and be clever. The defenses will be down, but you will still have to figure your way through the locks. Oh, and if you dwadle, the systems will come back online. And, you will be undoubtedly killed by Mr. Black and Mr. Sly's mechanical menaces."

"The tokens are in vault 162. Good luck."

Radu presses the end of the silver cylinder. A slight buzz, and the door slides silently open.

With this, Radu will "disappear" promising to meet the party back at the great-grandfather's room.

Encounter 20: The Hoard - Entrance

Start the clock.

The room beyond is dead quiet. The silver walls are dull. A door leading down the leg of the spider stands open. In addition, a thick glass window leading into a central chamber is open - the glass having slid to one side. There is no movement here.

Moving through the window and into to the central chamber....

This room feels more like it has been milled from steel - as it has a solid, polished feel. Four glass windows and four glass doors stand open. At the center of the room, a metal, spiral staircase leading both up and down is visible.

The upward staircase leads to the chambers of Mr. Sly and Mr. Black. Both are currently asleep - unaware that their bank is at risk. Mr. Black currently has the vault key.

The downward staircase leads down into a circular room. A small glass case sits on a pedestal against the wall of the circular room. A delicate device sits under the case. The device has three dials - set to 000. At one end of the device, a hole shows where a key should go. At the other end of the device, a small lever has a red handle.

The party can fashion a key. If they force the device to 162 and pull the handle, the room will begin to spin.

Encounter 21: Tokens!

As the room spins, the spiral staircase disappears - replaced by a puzzle lock. The machine in the glass case begins to smoke - clearly revolting from being manually forced.

As the puzzle fades, the chamber beyond simply fills the space of the spiral staircase. On the floor of the space are five chests - two large iron chests, and three smaller iron chests. All appear to be locked with mundane locks.

Inside are piles and piles of tokens.

Sealing13.jpg

Setting the locks back to 000 will bring the staircase back.

If there is time, the party can try another puzzle and another number. Roll a d6. On a 6, the mechanism overheats and the party is trapped.

Sealing14.jpg

If needed, Mr. Black and Mr. Sly will intervene. If the time runs out, the mechanical bugs will overrun the party.

Encounter 22: Splitting the Hoard

Returning, both the great-grand father and Radu are waiting by the fire. The chessboard sits between them, and both are deeply involved in a game. The great-grandfather is now much younger looking - resembling the man in the tapestry.

Radu and the Great-Grandfather will give the party their reward - the finger of the great-grandfather.

Time to make the Lantern!

ALTERNATE: Do you want to wager tokens on a quick game?

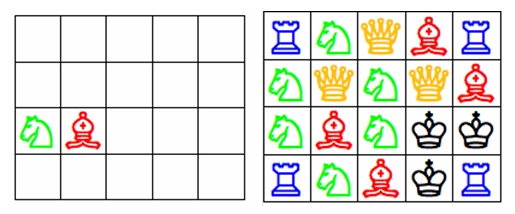
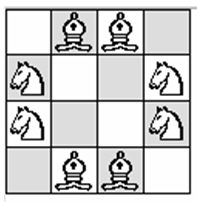
Place 4 bishops and 4 knights on a 4×4 chess board so that each bishop attacks 2 knights, and each knight attacks 2 bishop.

Solution:

Sealing15.jpg

Encounter 23: Gaining the Lantern

Mr. Bennett meets the party as a designated place. His shop?

He will exchange the Lamp for 100 tokens.

This was a tricky one - that I can tell you. You'll need a great power source in order to run the lamp. Only place I know with that much raw power is the Lonely Haunt - where the last Lamp was placed. Just hang it from the tree atop the ancient ruins on the moor. That should do it.

Encounter 24: The Moors

The moors extend for miles - a vast undulating morass of bright green swamps and thick tangled grasses. The ground is moist - impassable for horses or any heavy creatures. Near the center of the mire is a small stone hill - unassuming and unremarkable. On the hill, an ancient stone circle lies crumbling. From its center, a single large oak tree stands starkly. The tree appears to be dead - leafless - with branches shooting in different directions.

As you approach the stone hill, there is a sense of death here. You notice a single chain hanging from the branches of the tree.

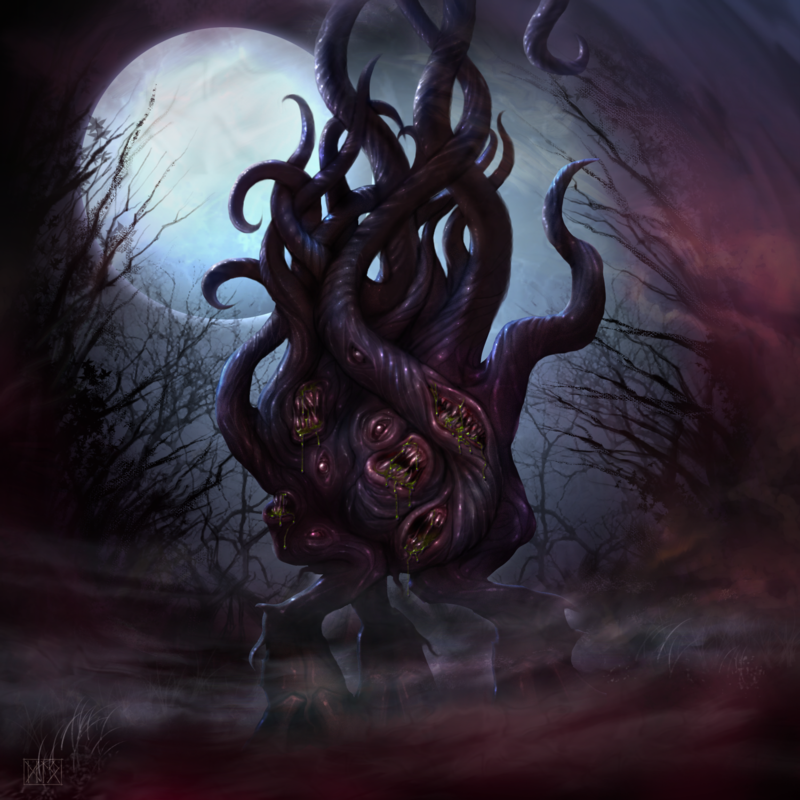
In Oblivion, the tree appears to be a living creature - with tentacles where the branches are. This is an Ancient One.

Ancient one.png

Mr. Sly and Mr. Black to intercept in giant spider - detect on the tokens that were stolen.

Encounter 25: The Lonely Haunt

The tree - known as the Lonely Haunt - is actually an Ancient One. It stands slumbering. Hanging the lantern on its branches will activate it.

If the lantern is complete - the Nagel box put back together, then the ceremony is simple.

If the lantern is incomplete - the Ancient One will activate and must be subdued.
The Lantern hangs from the ancient tree for a moment. At first, no light can be seen. Opening the shutter puts forth an impossibly bright light - creating a sphere of brightness several yards in diameter. As the shutter is opened more, the light spreads out quickly - hundreds of yards, a quarter of mile. As it moves out it gets dimmer, although clearly visible against the dreariness of the Wolfshaunt.

Fully open, the light extends as far as you can see in all directions. The evil seems a bit less oppressive - although it is still twilight compared to the sun-drenched lands of the Reaches.

The Wolfshaunt has been sealed once again.