Siege of the Shadowkeep
| Type | Dungeon |
|---|---|
| Status | Explored October 883 TA |
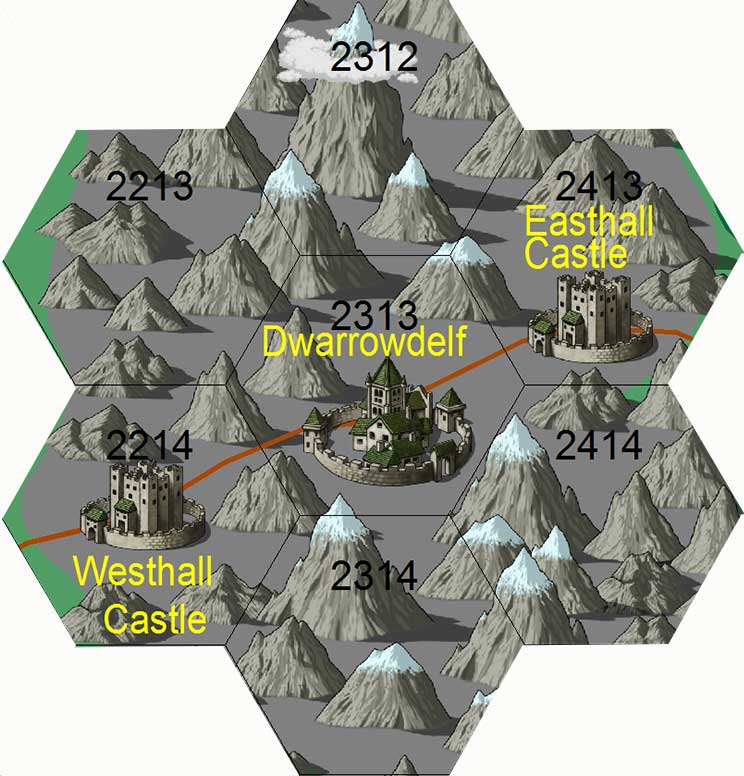
| Location | Shadowkeep (now Dwarrowdelf) |
| Hex | 2313 |
| Campaign | Three Kings Campaign |
| Adventure # | 88 |
DM's Notes
The Siege of Shadowkeep adventure consists of:
Temple of the Wait. This is just a hack-fest to get the blood flowing. Survival of any NPC's will be available to the group for the later dungeons. The party will get the three Warmaster coded messages, the map of the Shadowyarn Pass, and the map of the Shadowkeep. If they solve the coded messages, it will greatly help their situation.
Atli the White. This is the main adventure, as the party must defeat Atli the White in order to take over the castle. Atli is trying to discover the secret behind the Ancient Crown of the Dwarven Kings in order to rule the Dwarves of the Shadowyarn Mountains.
The Magi. This is really a sub-adventure that involves the finding the legend in the scriptorium, the three amulets from the magi, the box of the goblet, the dragon's blood, and the churchyard at midnight on October 31. The gain is huge (eternal life), but it is not necessary for the completion of the quest.
Hastur. This is actually another sub-adventure since the party will most likely only be able to contain Hastur by using Crystal of Protection. This will be a great ender in the bowels of the main keep. Hastur will flee to either of his sons if needed.
Warmaster Battles. These are three supplemental battles which should provide an army for the party to use as a distraction. Also, the army will be needed to guard the Crystal that holds Hastur. U-Gene will be named Dwarven King by Hauberger after retrieving Durin's Crown from Atli the White. He will try to convince U-Gene to rename the Shadowkeep after its original name (not the human abomination, Paddington) but Dwarrowdelf.
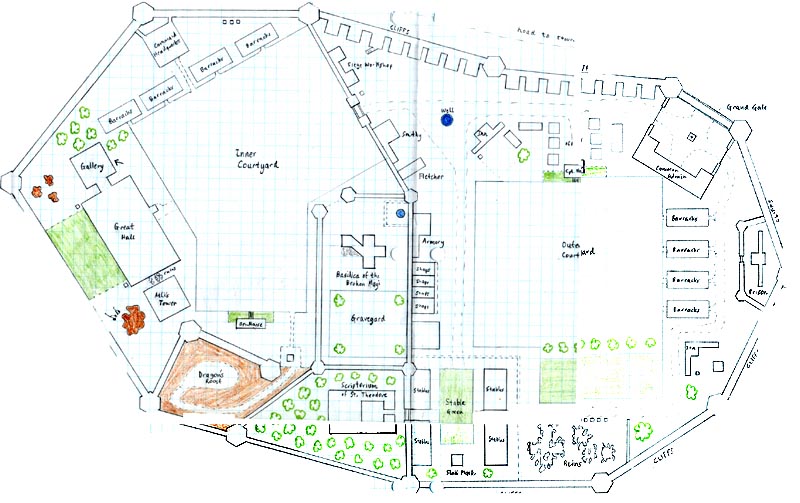
The Shadowkeep
|
Inner Keep
Atli's Tower |
Outer Keep
Scriptorium of St. Theodore |
The castle is protected by a sphere that sits under the well in the Inner Keep. The sphere works like the Crystal Heart in Dragonsford Castle. It prevents teleportation, illusions, charms, or like spells from being successful within the castle.
Hastur the Unspeakable. He Who Must Not Be Named, Master of Stone, Stone God. Green Horse, death, netherworld was in his train. Atli the White. White horse, rider with bow, crown, to conquer. Harek Bloodaxe. Red horse, rob the earth of peace by allowing men to slaughter one another for he was given a huge sword: the sword of war and violence. Grim. Zed, Black horse, pair of scales in hand. Famine, rationing, and high prices.
Atli's Tower
"From the outside, the tower appears to be the same age (or slightly older) than the Great Hall. It is of the same architectural style, although the roof of the tower is crenelated. Eight gargoyles ring the roof. The tower is fifty feet high with windows facing out over the Inner Courtyard. As such, it is slightly taller than the main structure, and because of its location overlooks the entire keep except the Dragon's Roost. In the past, it was connected to the Great Hall by a stone passageway. However, this passageway has been destroyed, and the only entrance is now a small wooden door on the same wall as the old entrance."
"Careful observation will show that there is movement on the roof."
Four guards will always be on the roof.
Room 1: Secret Entrance
"A magic mouth appears in the northeast corner of this room, speaking the following riddle."
Pronounced as one letter, and written with three,
Two letters there are, and two only in me;
I'm double, I'm single, I'm black, blue, and grey,
I'm read from both ends, and the same either way.
Answering the word EYE opens the secret door. Otherwise, the mouth will start screaming, and a large block of stone will drop from the ceiling doing 10d10 dice worth of damage. Dodging will halve the damage.
Room 2: Foyer
"This room is unremarkable, made of the same stone as the rest of the dungeon. Two doors are on the north and south walls. Two very large guards move to intercept the party."
Each guard is armed with a Staff of Atli. These are long rods which glow with a sickly purple light. Stiking a character has three effects: 2d12 x 10 points of physical damage (no absorption), 2d12 x 10 points of mana are lost, and a saving throw at 21st level must be made against poison (or the character drops into a catatonic state). These will shock any good character who handles them.
Room 3: Hallway
A single guard waits here to make sure the girls don't escape or nobody except Atli enters. He will flee for help if needed.
Room 4: Harem
"This room is divided into two sections by a light screen of silk. The screen can easily be moved to allow passage. The eastern end of this room is strewn about with large overstuffed pillows and carpets. A brazier in the northeast corner is lit with a very pungent incense. Nine young women are reclined on the pillows. From their glassy looks and lethargic movements, it is obvious that they are drugged. The western end of the room has a large four-poster bed with a small table nearby. On the table is a large glass decanter and a single small wine glass."
The decanter contains an antedote for the brazier's smoke. There are plenty of drafts available. The nine nubiles are totally stoned unless given drafts of the antedote. Otherwise they will be completely unhelpful.
Room 5: Storeroom
"This storeroom is lined with shelves, most of which are empty. A few boxes of incense can be found, along with fresh sheets, pillows, and other bedroom items."
Room 6: Storeroom
"This room is lined with shelves. There is nothing on the shelves. It is empty."
Room 7: Atli's Study
"This large room is a study of sorts. Unlike the rest of this level, this room is very richly appointed with a walnut bookshelf running along the entire northern wall. A large war table in the eastern end of this room is filled with maps and notes about the current campaign against the Dwarven army including maps similar to the ones that the party captured in the Temple of the Wait. In addition, the dancing men puzzle can be found here. Two large overstuffed chairs face a large walnut desk in the western end of the room. Several drawings of an ornate helmet are scattered on the desk. Two large magically locked chests are behind the desk."
This is the warroom of Atli the White. This is where he will most likely be found, unless he is checking on the progress of the research into the Dwarven Crown or the Dancing Men.
Atli the White. "Then I watched while the the first of the seven seals broke open, and I heard one of the four living creatures cry out in a voice like thunder, "Come Forward!" To my surprise, I saw a white horse; its rider had a bow, and he was given a crown. He rode forth victorious, to conquer yet again."
Atli fights as a 40th level fighter. He cannot be harmed by any spell or weapon except the Sword of the Elder Gods and illusions. His primary weapon is his bow which reloads automatically and fires Arrows +5 which has three effects: 2d12 x 10 points of physical damage (no absorption), 2d12 x 10 points of mana are lost, and a saving throw at 21st level must be made against poison (or the character drops into a catatonic state). He wears the Amulet of Dampening which allows him to control the Orb of Dampening. He wears the Ring of the Great Eye which allows him to see what all the other followers of the White Cloak see. He also has limited communication to them. He wears a Ring of Teleportation which allows him to blink around all over the place. The treasure chests contain: 250,000 gold pieces.
Room 8: Hall of Dwarven Heroes
"This short hallway has six niches on the north and south walls. These are filled with stone dwarf statues. At the western end of the hallway a spiral staircase leads up."
Room 9: Guard Room
"This T-shaped hallway has two guards sitting on stools at the intersection, a set of keys hanging from the pocket of one of the guards. Each carries a rod."
Room 10: Prison
"This squalid room has been converted from another purpose. A set of iron bars are across the only entrance to the room in the southeast. Inside a number of dwarves are huddled along the walls."
These are the dwarves that are being used to test the Crown of the Dwarven King. A number of them are dead, and the others are in bad shape for fighting.
Room 11: Laboratory
"This room has been converted from a more domestic use into a twisted torture chamber of sorts. A large stone chair has been fitted with leather straps to hold a subject motionless. Next to the chair sits an ornate golden crown, of ancient origin. Several tables are filled with various instruments, vials of different liquids, and piles of discarded notes. Shackles have been put up on the northern wall."
This is the chamber where experiments are going on to find out the nature of the Crown. The key is, of course, that the crown will only function for a true descendent of the Dwarven Kings.
Oona. "The witch hag Oona is working on the project. She is a fat, gnarled old woman dressed in a cloak of patchwork colors carrying a twisted wand made of yew. One of Oona's eyes is milk white, but the other is piercing green. Her silver hair is clumped, and her skin is a pallid chalky white."
Oona fights as a 21st level wizard. She carries a Wand of Disintegration. She will teleport if threatened.
Room 12: Storeroom
"This room is filled with boxes that contain various herbs, plants, bark, and the like. It has a foul stench."
Room 13: Oona's Bedroom
"This spartan room has a bed and a small table."
Room 14: Guard's Bedrooms
"These rooms contain two beds each with a small footlocker at the end of each. The beds are neatly made, and the room are in good order."
Room 15: Entrance to the Goblet's Chamber
"A large stone block sits in the center of this room. Two guards stand at attention near the block. In the northwest and northeast corners hang two alarm ropes. The room is plain stone."
The guards will move the block of stone to block an entrance if needed.
Room 16: Dance of the Goblet
"This room is carved of plain stone. In the center of the room lies a chest on a hexagonal pedestal. The chest is covered with a pattern of stars with a large sun in the center of the top. Around the chest dance five naked girls, choriagraphed so that their movements are identical. The room is lit with two floor sconces, and four burly human guards stand watch."
A secret chute to Level 0 is concealed on the south wall. The guards are eunichs, and they will only guard the chest.
The three amulets can be used as a key to open this magical chest. Inside is the Goblet of Eternal Life. The Goblet must be filled at midnight on Halloween with the blood of a dragon killed by a good, pure knight. Any player that drinks of the goblet may reduce the number of deaths he has suffered. The goblet contains three drafts, each will work on 1d6 deaths.
The guards will fight as 21st level fighters.
Room 17: Main Entrance
"The ornate marble floor of the room is checkered with black and white tiles blending perfectly into the grey marble columns that reach to the white plastered roof with gold filagree. Three sculpted archways lead from the room. Two guards stand front outside."
A guard dressed as a man-servant (robes over armor) roams the lower hall. Mostly, he sits reading a book in an oversized chair. He and Atli's double are the only occupants in this section of the tower.
Room 18: Sitting Room
"Four stuffed leather sofas are arranged in a circle in the center of the room. A fireplace in the northeast corner of this room stands empty. A beautiful vase of brilliant pearlescent material shaped like a swan sits atop a rosewood pedestal in the southeastern corner of the room."
Room 19: Library
"A long table and several bookcases are the only pieces of furniture in the room. A fireplace in the southeast corner is cold. Although there is quite a bit of dust in the room, it is obvious that several books have been read recently."
Room 20: Dining Hall
"A long cherry table with service for twelve stands at the ready, plates and silverware already laid out. Three exits lead from the room, and the fireplace in the northwest corner is empty."
Room 21: Game Room
"Animal heads hang as trophies here, and a wooden table sits in the northeastern corner, a deck of cards at the ready. Other than several large overstuffed chairs, a humidor, and a cold fireplace, this room appears to be empty."
Room 22: Kitchen
"A large kitchen is empty. The shelves are barren, and the tables are covered with knives, plates, and cups unused. Two large pots hang in the northern part of this room, while the oven in the southeast is unlit."
Room 23: Maid's Quarters
"This room has six small beds arranged around the perimeter. Each is nicely made, and the room is tidy, if not a bit dusty. An empty table sits near the unused fireplace."
Room 24: Butler's Quarters
"This room has four small beds arranged around the perimeter. Each is nicely made, and the room is tidy, if not a bit dusty. An empty table sits near the unused fireplace."
Room 25: Head Butler's Lounge
"This room has a single overstuffed chair and small table in it. Both face an empty fireplace in the southwest corner."
This is a favorite napping place for one of the guards.
Room 26: Master's Sitting Room
"This room is completely empty except for some furniture that has been left behind. A writing desk is pushed up against the north window and a bookcase sits against the south wall."
Room 27: Mistresses' Sitting Room
"This room is completely empty except for a low-slung fainting couch in crushed green velvet and a small empty chest pushed into the southeastern corner of the room."
Footprints between the north and east passages can be seen here.
Room 28: Mistresses' Bedroom
"Only a large canopy bed, empty chest, and large bureau are left in this room. Like the other rooms of this level, everything has been cleaned out and a layer of dust can be seen throughout."
Footprints between the west and north doors can be seen here.
Room 29: Closet
"This closet appears to be empty. However, footprints can be seen in the dust leading to this room."
Examination will show a trap door in the ceiling that leads to the roof.
Room 30: Master's Bedroom
"Only a large canopy bed, empty chest, and large bureau are left in this room. Like the other rooms of this level, everything has been cleaned out and a layer of dust can be seen throughout."
|
Monsters (Atli's Tower)
Eunich Guards (12) |
Treasure (Atli's Tower)
Atli's Bow |
Hastur's Rock
"A large volcanic rock roughly 40 feet in diameter sits behind Atli's tower. It appears to be the tip of a shaft of stone that protrudes from deep in the earth. The rock glows slightly and radiates a strong aura of magic."
This is actually the home of Hastur, the Stone God, who is resting until called into service by one of his sons.
"Touching the rock, an adventurer will immediately notice that it is much warmer than the surrounding air. The following verse suddenly comes to mind."
More beautiful than the face of your God,
Yet more wicked than a demon's forked tongue,
Dead men eat it all the time,
Live men who eat it die slow.
Speaking the word, XXXXXXX, will cause Hastur to be awoken and come forth from his hold.
When the fourth seal was broken, I heard the voice of the fourth living creature cry out, "Come forward!" Now I saw a horse sickly green in color. Its rider was named Death, and the nether world was in his train. These four were given authority over one quarter of the earth, to kill with the sword and famine and plague and the wild beasts of the earth.
Gallery
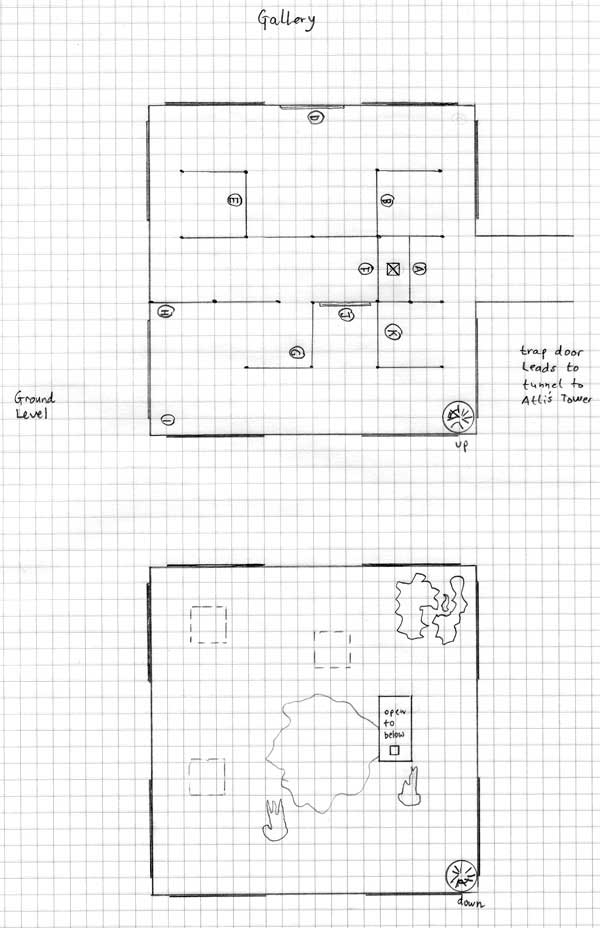
"From the outside, the gallery is obviously a relatively new addition to the castle. Although care has been taken to make sure that the stone and architectural style match the rest of the building. A one-story passageway connects the gallery to the rest of the castle. The gallery's most notable features are its sixteen very large picture windows: eight on the lower level, and eight on the upper level - painted black. The building peaks at about 40 feet high in a pyramid-shaped roof."
Lower Gallery
"The ceiling of this room is guilded in gold. The walls are ornately decorated with the gold filagree and white plaster, and the floors are made of the finest marble. The gallery is a single structure, divided off by 10 foot high movable screens, made of guilded iron and silk."
A = A marble altar tomb carved in marble with intricate shields above and below. The brasses on the back wall show the family at prayer.
B = A font cover of carved wood depicted to infant angels reaching towards a game bird that sits on top of a large mound of fall foliage, pine cones, and nuts.
D = A memorial brass of an unknown knight shown with his wife and two small children in a busy town square.
E = A collection of four golden plates and four golden chalises, obviously very old and of a religious background. All are plain in their design, with the plates having a long-worn seal in their center.
F = The carved wooden statue of a saint dressed as a pilgrim with flask and hat.
G = An ornately carved iron sword rest made to support a sword of state. A number of shields and heraldric banners are interwoven into the ironworks.
H = Stained glass window of a green dragon with a red tongue attacking a knight on white horseback.
I = An ornate grace cup made of ivory and silver gilt with the figure of a knight killing a dragon on the cover.
J = A bronze sculpture of a shouting horseman conveying a moment of extreme tension, perhaps even fear. The rider's sword blade and the horse's harness are missing.
K = A superb vase and cover in blue lapis lazuli with gold handles and an gold guilded acorn top set with a square base and a painted scene of a young woman in repose.
Upper Gallery
"The upper gallery is made of the same fine craftsmanship as the lower gallery. A fine wrought iron spiral staircase links the two galleries. Unlike its counterpart, however, a fire is burning here causing the apex of the room to be shrouded in smoke. Black soot clings to the walls, and the air is very warm, acrid, and smoky."
"The center of the room is filled with a large pile of sand, in which sits a large gold sarchophagus. Two small fires burn untended on the marble floor, fueled by a large pile of object de art that is piled unceremoniously in the northeast corner of the room. Three large cages hang from the ceiling. Inside, twelve dwarves sit dejectedly, covered in dust and dirt. A fourth smaller cage sits next to a hole in the floor cut near the pile of sand. All four cages are supported by chains looped over the guilded beams of the ceililng and tied off on iron hooks bolted to the floor."
The dwarves are the prisoners of the Moon Mage, and they are being used to dig the tunnel to Atli's Tower.
The Moon Mage
"The moon mage appears as a very wizened old man, his skin appears thin and dry, almost like paper. His robes are a tattered brown, and smell of dirt and decay. The mage has a few strands of wispy white hair, but he otherwise is very skeletal in appearance. He wears an amulet with a stylized sun and stars around his neck."
The Moon Mage fights as a 38th level vampire. The Moon Mage has no guards, but he will flee if cornered. The Moon Mage has the following items on him: Amulet of the Moon Mage.
General Kendell Praetor's House
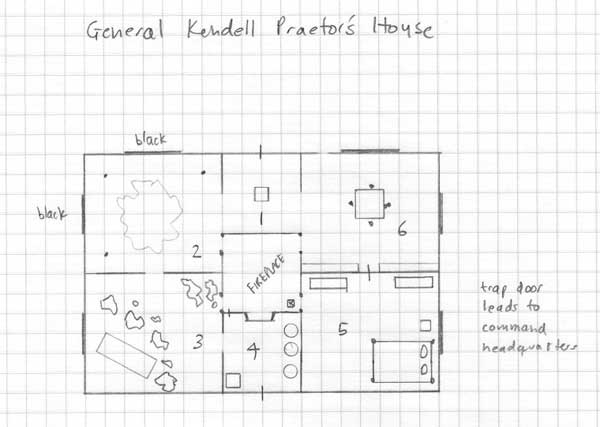
"This small house stands at the southern edge of the Inner Courtyard, in a place of prominence. Behind it the Dragon's Roost, a large volcanic outcropping, rises ominously overhead. A small garden in front has been impecably planted, but it looks as though it has not been tended for some while. There are two entrances to the house, one in front and one in back A large chimney is located in the center of the square building."
"Close inspection shows that all the doors and windows are outlined in a flickering yellow light which radiates a very powerful aura of magic."
Any person opening the door without saying the word, "Blackleggs" will be surrounded by a flaming aura which does 6d10 hit points per round for 2d10 rounds. A saving throw must be made each round. In addition, the aura will emit a very loud, high-pitched wail which will deafen the target and make it impossible to cast spells. A separate saving throw must be made for this effect.
Room 1: Foyer
"This room has polished wooden floors, and wood-trimmed walls, an unusual luxury for a military officer's house. However, the beauty of the workmanship is in stark contrast to a crudely built wooden scaffold that has been constructed out of broken furniture. Standing almost to the ceiling, this odd device is covered with a red-black liquid and smells of blood. Hanging from the scaffold are the charred remains of a dwarf."
"The house is unusually dark and hot."
Room 2: Front Room
"This room is appointed like the foyer. Archways lead to the east and south, and a fireplace can be seen in the southeastern corner. The fireplace is blazing, although the weather outside is pleasant. Whatever function this room had, it is not apparent as all of the furniture has been removed, the windows have been painted black, and a massive pile of sand stands in the center of the room."
The Sun Mage. "The sun mage appears as a very wizened old man, his skin appears thin and dry, almost like paper. His robes are a tattered brown, and smell of dirt and decay. The mage has a few strands of wispy white hair, but he otherwise is very skeletal in appearance. He wears an amulet with a stylized sun and stars around his neck."
The Sun Mage fights as a 38th level vampire. The Sun Mage is guarded by three mummies. The Sun Mage has the following items on him: Amulet of the Sun Mage.
Room 3: Dining Room
"This room is cluttered with broken furniture, discarded rugs, and other household items. They have all been thrown into piles in the southwestern and northeastern corners of this room. A path leads from an archway in the north to an archway in the east. A fireplace in the northeast corner blazes."
Room 4: Kitchen
"This room is obviously the kitchen. An oven in the north is roaring hot. Along the tables are strewn all sorts of odd items. bat's wings, bits of strange flowers, bark, several unidentified animal organs, and the like. Several cauldrons are bubbling in the corner. On one table six crystal vials stand filled with a steaming liquid. A door in the south leads outside, while a small door in the north leads into the fireplace."
The vials are the Potions of Vitality for the Star Mage. The Sun Mage is trying to cook up a potion to kill the red dragon (to get its blood), but he has been unsuccessful to date. A half-finished potion is in a vial on the counter. A secret trapdoor in the fireplace leads to the Command Headquarters.
Room 5: Bedroom
"This room appears untouched. A large four-poster canopy bed, nightstand, and two bureaus stand against the walls. A single door in the north leads from this room."
The bureaus are completely empty as is the nightstand. A secret compartment at the bottom of one of the bureaus holds a small chest with the following inscription on it:
Passed from father to son,
And shared between brothers.
Its importance is unquestioned,
Though it is used more by others.
By uttering the word, "NAME", the chest will open revealing the following treasure: 1200 gold pieces, Ring of Magic Missiles, Small Shield +3.
Room 6: Meeting Room
"This room has a single wooden table with four chairs in the center and two large bookcases on the southern wall. A door in the south and an archway in the west lead out of the room. It is well appointed like the rest of the house."
Careful examination reveals two complete sets of printing letters and parchment identical to the note that was intercepted. Otherwise, the bookshelves contain volumes about warfare, supply lines, and the like.
|
Monsters (General Kendell Praetor's House)
3 Mummies |
Treasure (General Kendell Praetor's House)
1200 gold pieces |
The Basilica of the Broken Magi
"This sizable building is cross-shaped like many churches of the day. Built of local grey granite, four towers stand at the four points of the cross, towering several stories above the cobblestones. A large tarnished silver dome rises from the center of the structure. A cross on the top of the dome is strangely bent askew, in stark contrast to the holy symbols found throughout the Realm. In addition, the walls of the nave have been shifted from their original foundations, skewing the form of the basilica into the same form as the cross. The area where the original nave would have stood is broken earth, strewn with headstones."
"Inside the basilica, the air is very cold and very dry. It is unnaturally dark. There is a strong smell of the ancient dead here. A wave of nausea rushes over the party when they enter."
Room 1: Narthex
"The massive doors to the basilica creak open as if not oiled for many months."
"This small room is piled with discarded tools, staves, and other common items. A path through the debris leads from the doors in the north to the south into the main sanctuary. A door in the east is blocked by a large mound of clothes."
Room 2: Guard Room
"This room is plain with a single round table and four chairs. A number of brown priest's robes hang from pegs in the south and west wall. A bell rope hangs in the southeastern corner of the room."
Four mummy guards will come out to investigate if the front doors are opened. Three will move to close, and one will attempt to rush south to warn their master. These mummies fight at 26th level. If attacked directly, they will ring the bell rope in the southeastern corner.
Room 3: Confessional
"Two doors lead into a confessional. The delicate wooden lattice work has been destroyed, and the benches in each have been overturned."
Room 4: Northern Nave
"The pews here are slid against the western wall, giving this part of the basilica a strange shifted appearance. It is very dark here as the stained glass has been covered with a thick black paint. A small candleholder is mounted to the wall near two doors in the northwest corner of the room."
"Close examination shows a candle with the imprint of a cross on it."
The cross on the candle has not been affected.
Lighting the candle will produce a thick smoke that gives the party a +1 on its initiative roll. Removing the candle will destroy it.
Room 5: Southern Nave
"The pews here have been broken and shoved to the sides of the aisle. A large iron cross has crashed to the floor near the southern end of this room. It has been bent into the same distorted cross as seen throughout this church. The stained glass here is also covered with a thick black paint. The southern area of this room is crossed by a large iron gate with a single thick barred door in the southwestern corner."
Room 6: The Altar
"High overhead a number of intricately carved stone arches soar to a height of almost forty feet. Between the arches, the plaster has been decorated with scenes of a beautiful women standing in an idyllic mountain setting."
"Three large iron gates have been constructed recently on the north, east, and west side of this room. Sturdy barred doors lead from the north and south, leaving the western transcept open."
"The floors of this room are littered with corpses showing various stages of decomposition. Many are headless, and the altar and floor are stained with blood and marred by countless gouges and scratches. It is evident that this room has been the ongoing site of some sort of deadly struggle."
"On the altar sits a large golden chalice, jeweled and glowing slightly. It seems untouched by the carnage that surrounds the party."
Approaching the Altar, the gate nearest the party will open. Once inside, the gates will magically close, and the party will be attacked by the Starshadow.
Room 7: The Western (Dwarven King's) Transcept
"This room is dark and foreboding. A large stone monument to a long-lost dwarven king is ringed by six smaller shrines along the north and south walls. The floors here are strewn with human debris and bones. Two statues of dwarven warriors are against the far western wall."
"Two small orbs filled with pinpricks of twinkling light can be seen in the center of the room near the dwarf king's marble effigy."
The starshadow appears like a large panther-like beast. It is jet black, and its features are very hard to discern. Its eyes have no pupils, but they dimly glow with the twinkle of hundreds of stars. It strikes very, very quickly, without mercy.
The starshadow fights at 26th level. His damage is a single bite at 10d10. Initiative is doubled. Can see through displacement, invisibility, etc.
On even rounds, he will appear for a brief number of segments near a random party member and swing. If he hits, then a random magic item will disappear.
On odd rounds, he will completely heal and drop the item (unless it is the chalise). He will always appear in the west transcept.
Room 8: The Eastern (Dwarven Queen's) Transcept
"This room is dank and smell of human bondage. Low moans can be heard coming from a dozen dwarven bodies chained to a large stone monument to a long-lost dwarven queen. The figures are in tattered robes or naked. They seem to be drugged but otherwise appear healthy. The edges of the room are ringed by six smaller shrines along the north and south walls. Two statues of dwarven warriors are against the far eastern wall. A stained glass window depicting the dwarven queen has been painted over."
The inhabitants will tell the story of a horrible creature that kills anybody who picks up the chalise. They will also tell of four mummy guards that enter through the secret door to the southeast. Finally, they will tell of a cloaked figure who sits in the choir stands and watches the deaths. The inhabitants will make enough noise to bring the guards if precautions are not taken.
Room 9: Choir
"A number of stone risers have been cleverly constructed to form a choir behind the main altar of the this chapel. Stairs have been built into the choir stalls on the western and eastern walls."
Room 10: Priest's Private Room
"Four overstuffed leather chairs circle a small wooden table covered with leather and adorned with large brass nails. The walls of this room have been painted with murals of mountain scenes."
Room 11: Priest's Bedroom
"A simple bed is pushed into the southwest corner of this room. On it lays the stone body of a man dressed in simple priest's robes. A small nightstand against the south wall has a small basin and pitcher on it. Two doors are on the eastern wall of this room."
Careful search finds an ivory and rosary in a hidden compartment of the nightstand (200 gp).
Room 12: Privy
"This plain room has a simple stool leading to a spout which dumps onto the grass outside the church."
Room 13: Church Treasury
"This room appears to be simple closet, filled with robes, boots, and cloaks."
Careful examination shows that a stone bench actually conceals a chest with the following inscription.
"All is equal in the eyes of the Gods."
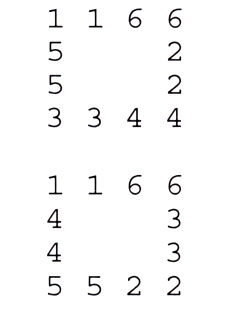
Six slidable tiles in the top of the chest are arranged in a four by four square.
Can you place the 6 'double dominoes' 1-1, 2-2, 3-3, 4-4, 5-5, 6-6 to form the border of a 4x4 square with equal sum of points for each of the four sides?
The chest contains: 600 platinum pieces, Manual of Quickness of Action, Horseshoes of the Zephyr.
Room 14: Priest's Study
"The outer room has a simple wooden table around which are placed six chairs. Sitting in four of the chairs are stone statues of dwarven holy men dressed in robes. All the figures are looking at the doorway through which you just entered. A look of surprise is on their faces. Four jeweled goblets, slightly glowing, sit on the table between the men. They are identical to the one on the altar, and they are identical to each other."
"These rooms look like ordinary chambers for priests or acolytes, as they are spartan - containing only a bed, small night stand with basin and bowl, and a simple wooden chest. What is unusual is that four of the rooms contain large piles of sand in their center. A fifth room contains the stone figure of a dwarf similar to the ones found in the outer room."
Four mummy guards will come out to investigate if there is any noise in the prison below. One is in each room standing among the sand, if the party is quiet enough to sneak up on them. Three will move to close, and one will attempt to rush south to warn their master. These mummies fight at 26th level.
Searching the room yields a meagre amount of coins. 120 gold pieces.
Room 15: The Star Mage's Room
"The original use for this room has been long lost, as it is now just a jumbled collection of boxes, crates, and debris shoved carelessly to the edges of the room. In the center of the room is a very large pile of sand, atop of which sits a massive golden sarchophagus. Four mummies, move to intercept the party, as the lid of the sarchophagus begins to open."
"Careful examination shows that there are hidden passages in the northwest and northeast corners of the room."
The Star Mage. "The star mage appears as a very wizened old man, his skin appears thin and dry, almost like paper. His robes are a tattered brown, and smell of dirt and decay. The mage has a few strands of wispy white hair, but he otherwise is very skeletal in appearance. He wears an amulet with a stylized sun and stars around his neck."
The Sun Mage fights as a 38th level vampire. The Star Magi will attempt to flee to his brothers if cornered, through either of the escape routes. The Star Mage has the following items on him: Amulet of the Star Mage, 6 Potions of Vitality (1d6 off of magical aging).
Room 16: Library
The smell of smoke is very heavy here, and the walls are scorched from a number of fires that burned almost all of the books on the shelves that once lined this room. Three tables and chairs in the northern end of the room are untouched.
The southern most bookcase has had the books pulled out of the case and burnt, and the northeastern-most table is missing.
Room 17: Bell Tower
"This room is filled with boxes and crates, mostly looted and empty. From the debris it looks as if they once contained wine, prayer books, and other items that would be typically used in running a small church."
"The center of the room opens up to a shaft leading upwards. Looking up the shaft, you see the bottom of a very large brass bell, complete with clapper, hanging suspended about ten feet up the shaft. Openings in the east and west show that there are rooms on either side of the bell shaft."
"This room shows signs of recent habitation. A makeshift bed of straw and wool blankets is in the northern corner of the room. In the southeastern corner, a small wooden desk and chair has been set up behind some crates. A pile of burned candle stubs are discarded on the floor near the desk."
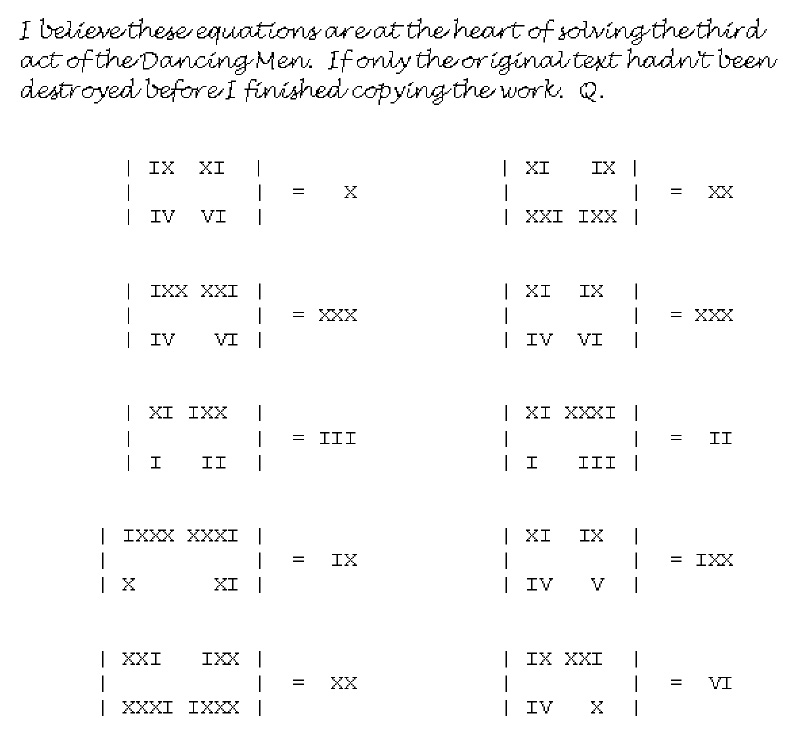
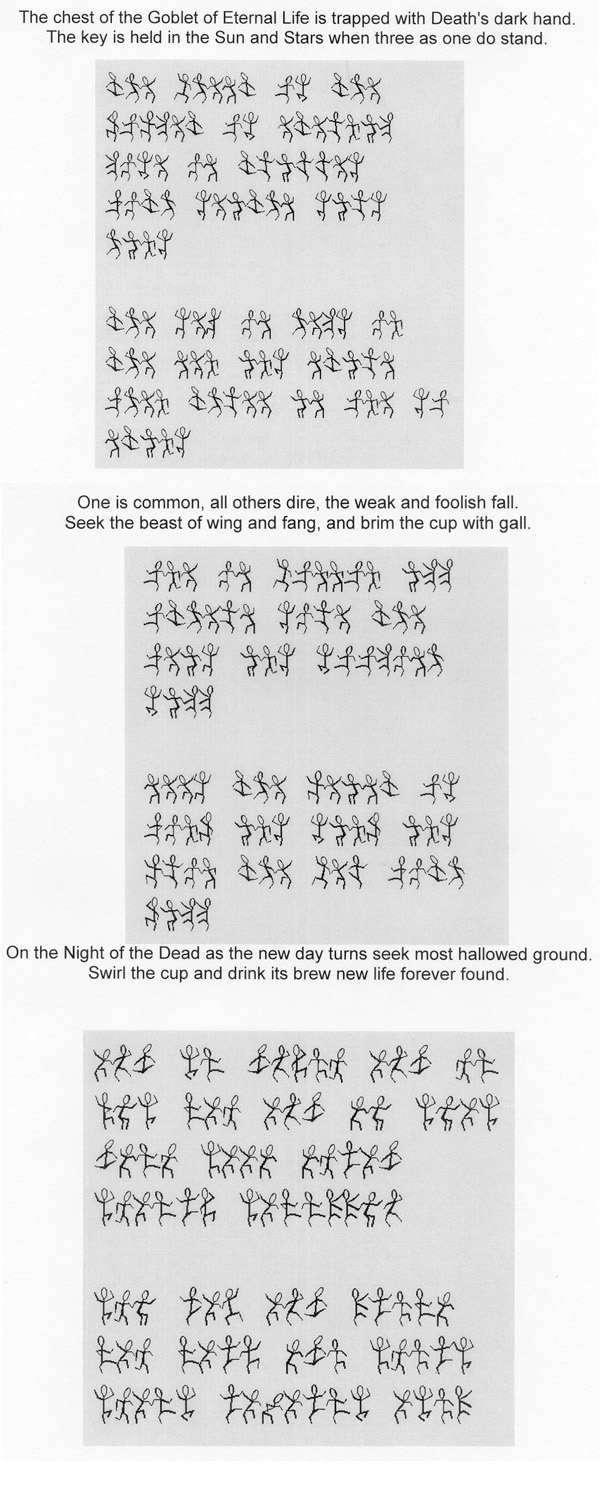
The bell tower is the home of Quinton, the bell ringer. When threatened, he climbs into the steeple that holds the bells. There he can hide unseen, although the noise of the bells has made him quite deaf. Quinton will act like the village idoit, but he is actually a scholar. He knows about the takeover by Atli, the killing of the priests and boading up of the church, and the arrival of the Star Mage and his activities in the basilica. Currently, he is trying to solve the following "key" to the third act of the dancing men.
Quinton acts like a 6th level fighter in combat. He has no spellcasting abilities, but he is handy with a sword.
I believe these equations are at the heart of solving the third act of the Dancing Men. If only the original text hadn't been destroyed before I finished copying the work. Q.
Room 18: The Crypt
"The floor of these rooms is filled with several feet of black, oily water. The walls are carved in very fine stone relief, showing a dwarven master's work. Two statues at the ends of the hallway are of the dwarven king and queen, although their likenesses have recently been broken by hammers."
"Each of the stalls has a simple stone kneeler along the south wall. In the northern end of each stall is a statue of a dwarf, each destroyed like the statues in the entranceway. The wall have been carved to depict mountainous scenes and dwarven heroics. In each of the reliefs all the dwarves have been hacked out, leaving the scenes scarred."
A giant water snake has made its way into this room, and it will attack any adventures walking along. It will attempt to pull them underwater and drown them. If threatened, it will attempt to pass through the concealed passageway in stall 5.
|
Monsters (Basilica of the Broken God)
4 Mummies |
Treasure (Basilica of the Broken God)
Ivory Rosary (200 gp) |
Well of the Orb
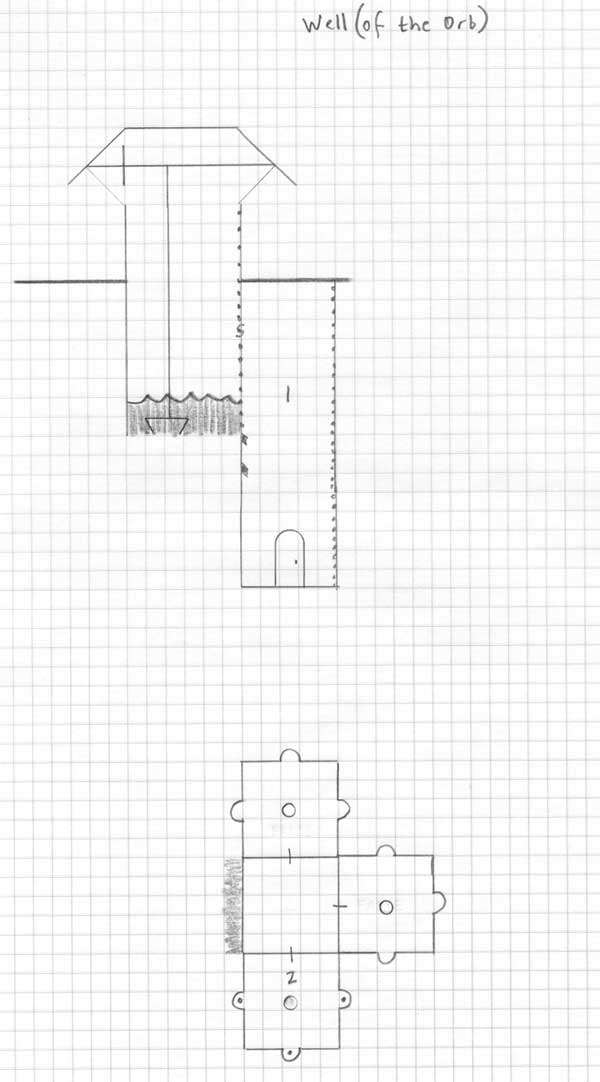
"A small wooden cover and single bucket retreival system has been built over the well that provides water for the Inner Courtyard. There are always three guards around the well."
"Careful examination shows that stone rungs have been built into one side of the well. The water level is about ten feet below ground level."
"Climbing down the rungs reveal a very cleverly hidden secret door. The high quality craftsmanship shows a dwarven influence."
One guard will have the following puzzle:
Room 1: Shaft
"A secret door at the top of the shaft is on the opposite wall from a set of stone rungs that lead down to the floor of this room. At the bottom of the shaft, there are three unusual doors on the north, east, and south walls. The doors have a wheeled handle, supposedly to make a tight seal with the frame."
"Careful examination of the ceiling when on the top rungs show that the ceiling is hollow (false). Also, faint vertical scrape marks can be seen starting at the ceiling and ending just below the secret door at the top of the shaft."
"Careful examination during descent shows that there are a number of small holes along the western wall. These are currently closed, so they appear only as small circular depressions."
"When standing on the floor of the shaft, the party will see that the doors are numbered 1, 2, and 3."
The correct door is 3.
Opening a false door will cause:
the other doors to lock
the secret door at the top to lock
the false ceiling will fall into place and lock
the vents will open, filling the shaft with water in one turn
an alarm will sound
These will continue until Atli shuts it off with the Amulet of Dampening.
Room 2: The Vault of the Orb
"This small square room has three alcoves with stools on the three walls opposite the door. Otherwise, the room is plain except for a stone pedestal in the center that contains a glowing yellow crystal globe. The globe does not radiate heat, but it gets hotter and hotter the closer one moves towards it."
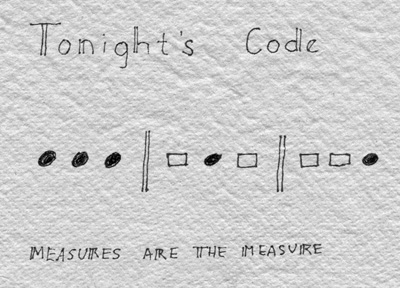
Knocking on the door with the correct code will cause the guards to relax and open the door without being ready. This will allow the party a free round against the guards.
The Orb of Dampening is controlled by the Amulet of Dampening. The orb has the following modes:
White: Off. No effect.
Yellow (current): The orb protects the entire castle from any teleportation, illusions, and mind-control spells. This centers around the orb and extends out to the edges of the castle.
Orange: The orb dampens any spell that is cast in the castle. This centers around the orb and extends out to the edges of the castle.
Red: The orb projects a prison-like field that will keep all creatures in a 100 foot diameter globe in suspended animation.
Dragon's Roost
"A narrow path winds up the volcanic slopes of this strange rock outcropping. Sheer walls make it impossible to see what is in the roost until the last turn of the path. The loose black soil makes footing treacherous on the path."
"From the air, it is obvious that a large bubble of magma formed a natural dome over a fairly significant portion of the roost. This covered area is large enough for one adult dragon and the four babies to hide."
A family of red dragons have made their home here. The mother never leaves her nest which contains four baby red dragons. The father is constantly going to get cattle from the west, although he has been known to swipe a soldier from the practice field on occassion. Atli has promised them free reign in exchange for protecting the skies around his castle. In addition, he sends up sheep, cows, and an occasional warrior to "walk the firey plank".
|
Monsters (Dragon's Roost)
Very Old Male Red Dragon |
Treasure (Dragon's Roost)
120,000 silver pieces |
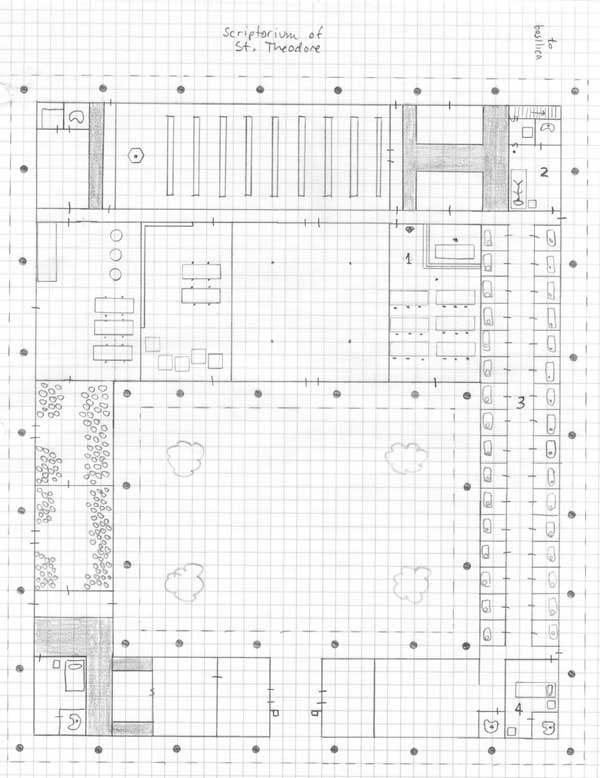
Scriptorium of St. Theodore
"This building is a low flat structure built of the same granite as the rest of the structures in the castle. It has simple columns and no windows. Around the scriptorium lies an orchard of apple trees. The trees seem to be in good health, but they have obviously not been tended to for a few months."
"Three stone figures can be seen in the orchard, all picking apples."
"Close examination show these to be monks of St. Theodore. Rotted fruit can be seen at the bottom of their baskets."
The Monks of St. Theodore are friendly to the party, especially U-Gene. In the past, they provided three services to the castle. First, they act as the official scribes to the King. Second, they tended horses in the stables. Third, they provided apples and cider for the castle. Lately, all their activities have been halted in order to figure out the riddle of the Dancing Men. To date, they have made no progress. They are alway under lock and key, since Atli does not consider them loyal to his cause.
Monks of St. Theodore. There were 36 monks in this scriptorium: Abbot - turned to stone, Master Illustrator - Sirizard, Master of the Orchards, Master of the Stables, 18 Illustrators, 6 Stable - 2 turned to stone because they were illiterate, 8 Orchards - 3 turned to stone because they were illiterate.
Room 1: Scriptorium
"This large room is unadorned except for a large statue of St. Theodore in the southwest corner. Raised steps lead to a platform in the northwest corner of the room upon which sits a long table and a single throne-like chair. The desk, like the others in this room is littered with quills, bottles of ink, and sheaths of parchment. In addition, the wax seal press of the Master Illuminator rests upon a small silver stand. The remainder of the room is filled with workbenches and low stools. Each has a number of writing instruments and ink, although there is never any work at these tables unless the monks are there." The Master Illuminator, Sirizard, is a crotchey old man who rules over the scriptorium with an iron fist. He has been commanded by Atli to solve the puzzle of the Dancing Men. As such, monks can be found here almost any time of the day or night. The monk that has been assigned to lead this project is Jephson Tuddle, the brighest student. He has been able to piece together five pages of notes on the matter, but at last, there has been no progress made. Jephson believes that the puzzle is a cipher, but Sirizard insists that it is a dance.
My most esteemed JT.
This is the only passage in Alizibar's Dream that mentions the Pharoh Nadob. I hope it helps with your research. The translation is literal, and it should be accurate. Although, the beauty of the verse is lost. As you know, this was written long before the Reign of Nadob, which is why it is considered a genuine prophesy. LT
A thousand deaths fall to the Pharohs before the Gods reclaim their gift.
A thousand years pass after Nadob before the Gods return.
A thousand leagues the Wise Ones travel to find the gift again.
A thousand dancing men must give their secrets before the Gift is given.
This appears to be the best account of the last days of the Pharoh Nabod. The source is unknown, but tests show it is of the proper age and style. Notice the three Magi and their amulets, maybe this is the missing piece of the puzzle. JT
And the Pharoh Nadob stood atop the rocky mount, overlooking his kingdom, there he danced the dance proscribed in the Book. Although his father died a mortal death, as did his father before him, Nadob was convinced that he would be granted the Gift. His penance to the Gods had been great, and his soul was chaste. Around the pedestal of gold and silver on which stood the Chest, he flew in the steps proscribed. Praying desparately that the Gods would descend and open the Chest and allow him to drink from the Goblet of Life. At his side, the three Magi waited, their Amulets reflecting the sacred pattern of the Chest. For a thousand years, they had guarded the Chest. The Heavens opened, and a flaming chariot rumbled from the sky pulled by a single massive green stallion. The rider was obscured in fire and brimstone. Towards the Pharoh it rushed. Believing that he was to be granted the most supreme Gift, Nadob raised the Chest above his head. As the chariot rushed by, Nadob's head began its slow rolling descent down the path towards his people. The Chest was gone, reclaimed by the Gods. The three Magi nodded, as if some great prophesy was fulfilled. They silently bowed their heads and descended the mount. Thus came the end of the Reign of Pharoh Nadob. So it is proscribed.
Here are the three acts of the ceremonial dance that was described in the last account of Nabob. It is a copy of the original, but my comparisons show that it is very accurate. To date, I have been unable to determine its meaning. JT
Room 2: The Abbot's Room
"This room contains a single bed and a nightstand. A door in the east leads into a hallway. A door in the west leads into a privy. On the bed is the stone figure of the abbot, his golden medallion of office still hanging about his neck. A statue of St. Theodore stands in the southwest corner of the room."
The monks are not allowed to have "an abbot" until they solve the puzzle.
Kissing the feet of the statue will open the secret door. Sirizard knows this, and he has been in the first secret room. He cannot figure out the solution to the puzzle on the chest, so the funds are well hidden.
"This small room contains a large iron chest that shimmers with a magical aura. The chest has the following carved on its lid."
1
11
21
1211
111221
312211
Four glowing numbers are raised buttons on the chest: 1, 2, 3, 4. The party can push these in any order. The correct answer is: 13112221. This is gotten as follows: 1 is one '1' => 11 11 is two '1's => 21 21 is one '2', one '1' => 1211 1211 is one '1', one '2', two '1's => 111211.
Opening the chest reveals the following treasure: 300 platinum pieces, 600 gold pieces, Small Helmet +3, Gauntlets of Dexterity, Luckstone, Scroll of Return From Stone.
"Another secret door leads to a set of stairs winding down into a natural underground passageway."
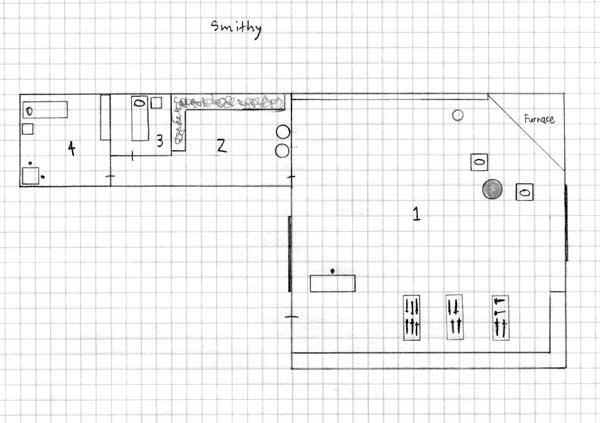
Smithy
"This low building has a large chimney in the northeast corner. Otherwise, it is unremarkable. Two hinged windows in the main room stand open. A sign outside depicts a hammer and anvil."
The smithy is in charge of repair weapons and creating new weapons for the army - mostly long swords, chain mail, and plate mail. The only two things of note about the smithy are:
Hauberger is the only dwarf that has been allowed to live. Mostly because Atli thinks that he is under his control. His apprentice, Byrnie, is under Atli's control and acts an automaton.
Two barrels of petrification potion are stored in Room 2. One barrel is in the main smithy. Once a weapon has been repaired, it is dipped in the liquid which gives the blade a blue-white tint. Any hit requires a saving throw versus petrification (6th level) or the victim is turned to stone.
Room 1: Smithy
"This large room has a plain stone floor and walls and a large timbered roof made of oak. Shelves line almost all of the walls, with two large hinged windows in the east and west for circulation. Three tables are laden with new swords in various stages of preparation. Two anvils, a barrel of water, and a large furnace are in the workshop area in the northeast. In the north is a strange barrel of a thick blue viscous liquid."
The liquid is petrification potion which needs to be worked into the iron to become active.
Hauberger fights as a 12th level fighter. Byrnie fights as a 6th level fighter.
Room 2: Storeroom
"This room is lined with shelves that contain mostly old silver items that need to be melted or repaired. This is obviously where Hauberger keeps his more valuable scrap. Two large barrels marked with a large "S" are pushed against the eastern wall."
The barrels are petrification potion.
Room 3: Byrnie's Room
"This small room has a single bed and nightstand in it. Several pegs on the western wall hold tattered clothes."
18 silver pieces are hidden in a small leather bag under the straw.
Room 4: Hauberger's Room
"This room is furnished with stout hearty furniture proportioned for a dwarf. A table with two chairs has a pipe and several pouches of tobacco on it. A bed, dresser, and nightstand are arranged around the northern wall."
A chest under the bed contains: 600 gold pieces, Arrows +4 (10), Small Chain Mail +2, Battle Axe +4.
|
Monsters (Smithy)
Hauberger, Dwarven Smith |
Treasure (Smithy)
18 silver pieces |
About The Castle
Barracks
All eight barracks buildings are identical with the exceptions listed in the chart below.
"These low stone building have two doors. Along each of the long walls of the barracks are arranged ten cots. At the foot of each of the twenty beds is a small wooden chest without any lock. On the wall above each bed is are hooks for armor, weapons, and packs. Each barracks has a single emblem for the unit emblazoned on the wall. Around these have been carved the names of fallen comrades."
Army of the White Cloak
"These men at first glance appear to be ordinary soldiers. However, casual observance shows that they move stiffly without even looking around, as if their every move is being coreographed by a puppeteer. While they wear a constant smile and glassy eyes, it is not clear whether there is any intelligence behind their eyes. The Army of the White Cloak are dressed in silver breast plates with chain or plate leggings, the symbol of a large unblinking eye the only color to the uniform. Each wears a bright white cloak."
Captains, Lieutenants, and Sergeants are all of normal intelligence. They command their troops around like automatons.
The eye is a direct connection to Atli the White. What a soldier sees, Atli sees. This enables him to have excellent intelligence. Atli still must act through normal means, but he is able to keep a very close watch on the proceedings in his castle.
Each unit of the army is actual a unit of en-Kor as long as they are under the control of Atli. The bottom man in each unit will take all the damage each round.
All the men are armed with petrification weapons. This includes a sword and arrows (20) tipped with petrification potion. Each hit requires a saving throw against 6th level petrification.
Soldiers fight as 12th level fighters. Sergents are 15th level fighters. Lieutenants are 18th level fighters. Captains are 21st level fighters.
The army is divided into 2 battalions with 4 units each. Each unit contains 20 men. These are led by Captain Jacoby, who is in charge of the army while General Praetor is absent. The total army that remained behind is 161 strong.
Guards Battalion: First Guard, Second Guard, Third Guard, Old King's Guard
Militia Battalion: First Infantry Militia, Second Infantry Militia, Third Infantry Militia, Elite Infantry Militia
First Guard (Inner Courtyard Barracks #1): Lieutentant Alaric, Sergeant Aloysius, Sergeant Arkwright, Sergeant Armar, 16 soldiers.
Second Guard (Inner Courtyard Barracks #2): Lieutentant Ballard, Sergeant Bardwell, Sergeant Bercan, Sergeant Birger, 16 soldiers.
Third Guard (Inner Courtyard Barracks #3): Lieutentant Colgan, Sergeant Chauncey, Sergeant Chittenden, Sergeant Calvert, 16 soldiers.
Old King's Guard (Inner Courtyard Barracks #4): Lieutentant Derval, Sergeant Doust, Sergeant Dwarkanath, Sergeant Dyneley, 16 soldiers.
First Infantry Militia (Outer Courtyard Barracks #1): Lieutentant Ector, Sergeant Endsor, Sergeant Ercan, Sergeant Ewen, 16 soldiers.
Second Infantry Militia (Outer Courtyard Barracks #2): Lieutentant Feargus, Sergeant Findley, Sergeant Flygare, Sergeant Furnifold, 16 soldiers.
Third Infantry Militia (Outer Courtyard Barracks #3): Lieutentant Garwood, Sergeant Gladstone, Sergeant Grindley, Sergeant Gutzon, 16 soldiers.
Elite Infantry Militia (Outer Courtyard Barracks #4): Lieutentant Halbert, Sergeant Healdon, Sergeant Hendrick, Sergeant Holger, 16 soldiers.
On Castle Security
General Praetor is on campaign with the Army of the White Cloak (see Warmaster campaign). In his absence, Captain Jacoby is in charge. There are four levels of alert in the castle, and the security will be as appropriate. This are signalled by the flag that flies from the Common Administration Building and the Command Headquarters.
White: Peaceful. One unit is located at the various guard posts throughout the castle.
Yellow: Caution. This is the current level. White security plus: one unit is always on patrol in the Outer Courtyard, one unit is always on patrol in the Inner Courtyard, curfew at midnight for all non-military personnel
Red: Warning. Yellow security plus: one unit is always searching the buildings at random, all non-military personnel are restricted to quarters, coded password required at every encounter
Black: Alarm. Red security plus: all non-military personnel will be shot at sight, all units will be searching building at random
"Rumor holds that a great red dragon has taken refuge on the rock, and that she and Atli are in alliance."
