Temple of the Amphisbaena
| Type | Dungeon |
|---|---|
| Status | Explored February 885 TA |
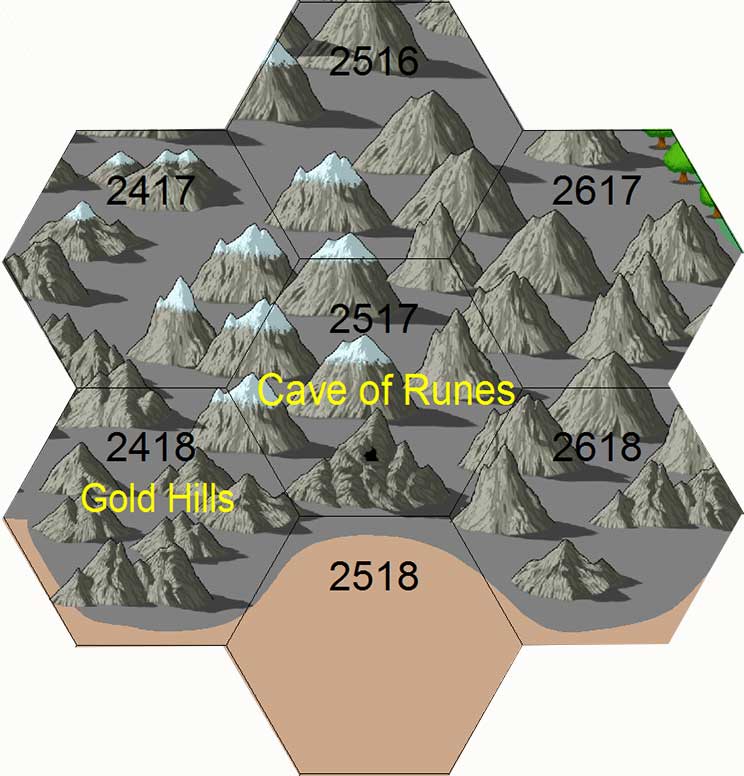
| Location | Sands of Time |
| Hex | 2517 |
| Campaign | Three Kings Campaign |
| Adventure # | 90 |
Prologue
The dwarven king, U-Gene, has spent many recent months studying the arcane arts. His skills with the axe are legendary, proving a natural ability for swordplay far beyond that of his peers. At the art of spellcasting, however, he is finding his talent limited. While progressing quickly through the minor spells, his tutors have been unable to cultivate the skills required to cast more complex and challenging incantations.
U-Gene has dispatched twelve of his best scholars to research any means by which the dwarven king can raise his natural talent for spellcasting. The Dwarven Histories of Durin have been recalled to Dwarrowdelf from their hiding places throughout the Shadowyarn Mountains. Researchers have been sent to accompany the volumes on their long treks, studying them by night to discover any secrets. Several of the scholars have been dispatched to the great libraries at Sarth, and even the Council of Wizards has been queried for information. At last, a report has returned from Sarth which holds some promise, if ever slim.
My esteemed King of the Dwarves.
I write to you with most promising news. Until now, we have uncovered a number of magical potions and the like which may have the effect that you desire. However, their effects are sadly temporary, and many reputed side-effects would prove distateful to your majesty. These typically include a loss strength or a prolonged period of recovery, although one account told of a wizard's beard falling off after imbibing one such elixer! There does exist a type of book which reputes to have the ability to permanently raise talent through a rigorous study of its magical pages. However, these are exceedingly rare and finding one may prove to be most difficult.
Two days ago, I stumbled upon a most unlikely source of information. It was a folk tale of the desert people who lived in what we today call the Sands of Time. The inhabitants were, naturally, a primative people with a strange pantheon of dieties reflecting their harsh life on the open sand. Very little survives about these people as they seem to have disappeared into the sand, leaving only a few books that had been traded to merchants and eventually found their way out of the desert. I have been studying the Legend of the Amphisbaena which tells of a temple where a strange snake god grants boons with the power you seek. Please see attached. More to follow.
Basil Stonepost, Historian of Dwarrowdelf
The Legend of the Amphisbaena
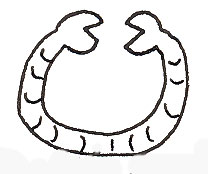
In ancient times, there was a small kingdom located along the rocky shores of the Great Sea. With a vast desert to the north and the vast sea to the south, the people managed a livelihood as a major port-of-call for surrounding nations. Silks from the Tang Empire were traded for gold from the Wilderlands, with the merchants of Moon Harbor earning their fees along the way. Wealth in the Barony of Moon Harbor grew even if the kingdom itself remained small, locked within the crescent valley that surrounded the harbor beaches. Women were allowed one child, two if they were very influential. No new buildings had been erected in almost a century. It was a major event when Baron Wolmar was blessed with the birth of twin sons. The royal crest was updated to include the mythical two-headed snake, amphisbaena1, symbolized by a crescent of gold on a purple background.
The twins were adored by all. In time, however, differences between the two boys began to appear. Cale, strapping and strong, was somewhat dim-witted, resorting to violence whenever he was bested. The other boy, Tasker, was as clever as they come, but thin and gaunt and sickly. He relied on magic to save him from his brother's reproaches. Soon, the boys fought constantly, much to their father's embarassment. It was some act of retribution that caused Tasker to weaken the ropes that bound the main sail of the Baron's yacht, thinking his brother surely to be stranded on the waters during his daily outting. In fact, it was the Baron who received the blow when the sail came loose from the mast and came crashing down to the deck. And there, laid out on his death bed, the Baron gave his children their final fate sealed by breaking the crown of his people. A curse that the two should become one for eternity or until each learned how to live with the other. As the crown broke, as the tale is told, the boys were joined together and transformed into a single enormous snake, the amphisbaena.
One head of this humble serpent grew to be a mighty warrior, and the other a powerful sorceror. Yet, their father's curse could not be broken. In time, the two-headed snake son of the Baron was driven from the castle into the desert north of the city followed only by a very small cult of priests who worshipped the "divine" transformation. The Barony fell into the hands of a greedy uncle, and Moon Harbor was destined for failure and obscurity. After more than a century, the legend of the amphisbaena was forgotten. Over the years, tales have been told of a strange temple dedicated to the snake god in the desertous areas known as the Sands of Time. Once each century, the tale is told, the snake god grants to two lucky souls strength, dexterity, constitution, talent, piety, or education, whatever they wish in an attempt to a good deed and break the curse of their long-dead father. Many have attempted to receive the gift of the amphisbaena, but its secret is well guarded by the priest-followers who have long-sought to keep the brothers from success.
1Amphisbaena: a mythical serpent having a head at each end of its body. Etymology: Common Tongue of Man amphibena, from Old Common amphisbaena, from the translated High Elven amphisbaina : amphis, both ways (from amphi-, amphi-) + bainein, to go.
DMs Notes
The party will start at the bottom of the dungeon and move up. There are two levels each the size of the playing mat. The dungeon will slowly fill with sand, making backtracking impossible.
Lower Level - Traps set by the last group to come through for a boon. These were goblins. Several of their kind were left behind to create test for the next set of adventurers.
Upper Level - High Priest area.
High priests are sleeping. They will awaken and try to get the party to undertake the ritual.
The priests need the ritual. They know the secret! Bad for the brothers.
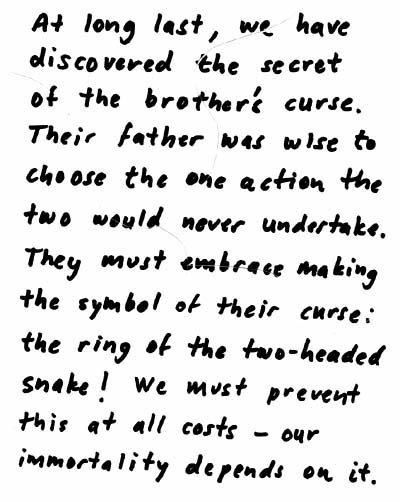
The answer is to have the brothers embrace and make up, joining them into a circle.
Clues: Elven ghosts that came before the goblins know the answer!, Poem with sections missing - ready to be filled out again., Research scraps.
The party must figure out how to convince the brothers of the answer and get the boon too! The ritual has always included having the next wave of priests sit in the chairs and be mummified.
Darkness within the Dungeon
NOTE: Each use of magic will decrease the light according to the following chart.
ALSO NOTE: The Undead are not affected by darkness!!!
| Level | Effect |
| 0-10 | A slight dimming can be detected. No effect. |
| 11-20 | Light levels have decreased to twilight conditions. Torches are normal. |
| 21-30 | Light levels are akin to candlelight. Torches are slightly dimmer than normal. |
| 31-40 | Darkness. Torches will provide only candlelight. Spells are normal. Ultravision is normal. |
| 41-50 | Unnatural darkness. Mundane fire gives out no light. Spells are half-brightness. Ultravision is half-brightness. |
| 51-60 | Crazy dark. Spells give only candlelight. Ultravision is very dim. |
| 61+ | Total darkness. No light. Period. |
A Sandy Grave
NOTE: The Dungeon will slowly fill with sand according to the table below.
| Time | Effect |
| 0:00 to 30:00 | No sand. |
| 30:00 to 60:00 | Sand begins to fill the level. |
| 60:00 to 90:00 | Level is really full, doors hard to open, etc. |
| 90:00 to 120:00 | Chest high, very difficult to move, etc. |
Bone Giant's Lair
"This large dark room is filled with piles of bones from countless bodies. Several openings in the ceiling are evident, but there are no doors or passageways leading out from the ground. The ground is made of sand which makes movement on foot difficult here. The sounds of large creatures quickly moving about can be heard, although it is almost impossible to determine any shapes amongst the piles of white."
Amphisbaena's Lair
"This oddly-shaped room is filled with piles of rugs and pillows. The sandy floor is soft and difficult to walk on. An enormously large snake 10 feet in diameter and about 200 feet long moves around the room. Its body is well-plated in bronze-colored scales. The amphisbaena has a human torso on each end. These are the brothers Cale and Tasker. One is dark haired thin and gaunt, the other is dark haired stout and muscular. They move incredibly fast given the size of their body."
Riddle of the Amphisbaena
Immortal brothers, serpent's womb
Sealed inside a sandy tomb
When ten times ten years forgotten
Another boon will be begotten
The snake's sweet bite is doubled blessed
But four times six are the tests
One man or two will see the light
The rest will stay to fight the fight
Urkdim the Goblin was the last
Into the sand, his men he cast
The Thug and Trickster block the way
The Adept and Deadeye hold all at bay
Steal their bones, the first test passed
But to gain the boon, your luck must last
Silver crowns hold bad luck back
The dice's roll must show a track
All other throws are death most swift
Send the one who'll be least missed
What lies behind you in the dust
Will signal that the seals are rust
Count to four, beware the trap
Your final step then leaves this map
The brothers wait inside their room
They seek to leave this cursed tomb
Your boon could finally break their curse
If not their anger will grow worse
Village of Skarit
"Shaped by the endless blowing sand, a natural hollow has been dug from the side of the mountain. In the hollow, a number tents have been erected. A single set of stairs have been carved from the rock of the mountain leading up to a large cave several hundred feet above the desert floor. From general appearances, the tent village has been in place for quite awhile. A number of scorpionmen figures can be seen moving quickly around area. Scorpionmen have the lower torso of a giant scorpion with plated exoskeletons and long barb-tipped tails. The upper torsos are those of men, wearing exoskeleton armor and carrying spears. Dark black in color, the scopionmen move very fast in short rapid bursts of movement."
Scorpionmen bury themselves in the sand to wait for trespassers.
Warriors - explode with poisonous gas (ammonia smell); tails tipped with poison that causes (blindness, deafness, dumbness, or paralysis).
Priests - explode with fire or lightning; tails shoot either streams of fire or lightning bolts
Villagers - tails tipped with a weaker poison that causes paralysis
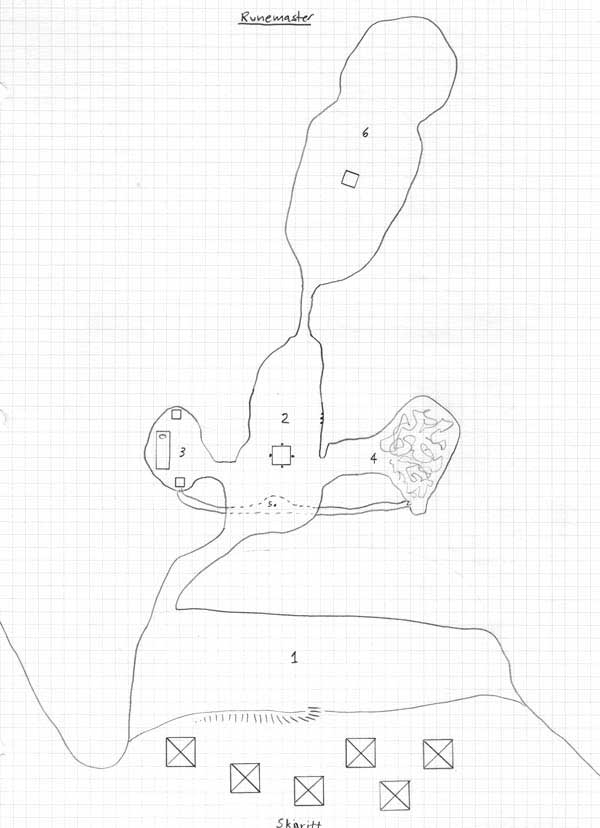
Room 1: Entrance to the Cave
"The ledge outside the cave is a simple stone outcropping. A set of stairs has been carved into the stone, leading down. A feeling of magical energy eminates from the cave."
There are four scorpionmen warriors here.
Room 2: Runemaster's Antechamber
"The outer room of the cave is most remarkable for it is covered with thousands of runic symbols, painted onto the wall and ceiling. Against the far wall, four blackened yew staves lean against the wall. A stone table and two crude stone chairs are in the center of the room. Three exits lead out of the room. The room is filled with refuse, apparently left by scorpionmen. Eminations of power come from the rear passageway into this room."
There are two scorpionmen priests and two scorpionmen warriors here. The staves will cause an uncomfortable "tingling" when touched.
Room 3: Runemaster's Bedroom
"This room was obviously a sleeping chamber in the distant past. A straw matress on a stone pallet, several small tables, and two small wooden chests attest to that fact. It is obvious that this room has not been used for years."
"Lying on the bed is the skeleton of a man. A spear is thrust into the bones, near where the heart would be. Tattered robes and bed linens have long-been ravaged by time."
"Careful examination will show that the skull has undergone significant advanced dental work. Several gold crowns and bridges are easy to spot."
This is the body of the Runemaster, killed in his sleep by scorpionmen many years ago.
One chest contains several finely crafted daggers and a short sword. These will cause an uncomfortable "tingling" when touched. They were the blanks for the Runemaster.
A secret passageway leads to the observation room above the anteroom.
Room 4: Storage Room
"This room is filled with bits of broken boxes, barrels and crates. Dried foodstuffs, cloth, metal tools, and the like are strewn about, obviously well picked over. This room is also musty with years of neglect."
A secret passageway leads to the observation room above the anteroom.
Room 5: Observation Room
"This room is more like a slight widening of a passageway. In the floor of this crawlway a small hole has been bored, allowing an unobstructed view of the anteroom below."
Room 6: Chamber of Runes
"A long narrow hallway leads to this large natural cavern. There is a feeling of a very powerful magical energy here. The cavern is brightly lit, although only a single candle is burning on a table in center of the room. From that candle's flame, hundreds of thousands of crystals blaze with light. Each crystal is carved with a fine delicate etching, a rune and a quick search proves that each is different. Other than the spectacular crystals in the walls and roof, the room is empty except for the table."
"Close examination shows that the table is actually a pedestal with a single candle burning. On top of the pedestal sits an ornate book entitled, "the Book of Runes". The cover is made of gold and inlayed with semi-precious gems. The clear gems on the corner of the book flash in a clockwise pattern which each gem remaining lit for several seconds. After several minutes, you notice that the candle is not getting smaller. Additionally, there is no heat or soot coming from the wick."
There are three scorpionman high priests here.
The book is actually a trap. Flash four rune cards if touched. Underneath the lip of the pedestal are two small buttons. The pedestal can be opened by pressing one button when its corresponding gem is lit, and pressing the second in a similar fashion. Doing this will open a secret drawer in the pedestal. The drawer contains: several bottles of black ink, a steel-tipped stylus, and a plain leather-bound book about one inch thick. The front of the book is entitled "Runic Musings".
The first entry in the book is dated March 15, 833.
It seems as if the inevitable has happened. The generators aboard the great ship have stopped, although I am at a loss to explain this phenomenon. It is of little consequence, as my research has revealed an innate magic in this world that was undreamed of on Pellum. The secrets of the power seem somehow centered on this magnificant cave. The energy is palpable, waiting to be tamed. Several configurations have proven successful, and I am confident that I will soon be able to recreate all the rune power that I have lost and more. As with all endeavors, one must start with the basics, so my first attempt will be to create a rune of fire..."
From there, the book goes into a detailed explanation of how the lines drawn perpendicular and parallel to the contours of magical energy can cause matter to be changed and energy released. A number of pages have been crossed out with layers of corrections and scribbled notes lining the margins. It will take months, even years, to understand all this tome has to offer.
A copy of the poem will be found here. It will have a rune drawn on the top of the page.
Rune of the Amphisbaena - this is the symbol of the two headed snake. There will be no mention of it in the book. The party must search for the symbol which can be found with some effort. Hopefully, they will not be in a great hurry.
Touching the runes will have a random effect.
Temple of the Amphisbaena
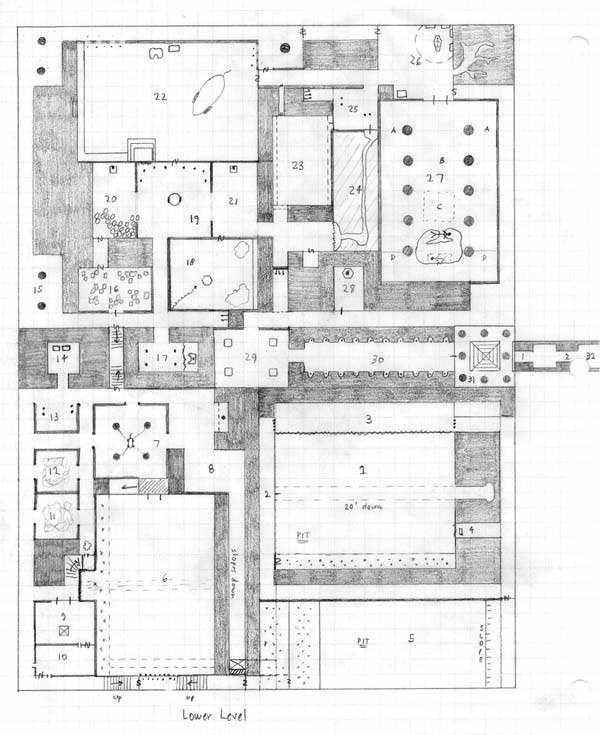
Room 1: Dusty Passageway
"You appear in a small dusty passageway. Behind you is a blank wall. Ahead lies a narrow passageway which opens up into a large room beyond. The walls are made of a soft sandstone which can be easily gouged with a dagger. 'Very unstable according to U-Gene. The stone is very light in color and glows with a yellow light that illuminates the chamber as if by torchlight."
"Careful examination shows a small bronze bell in the corner of the hallway, covered with dust."
"This room is actually a deep pit with no floor that can be seen. A narrow bridge crosses the room to door on the far wall. Several balconies are 30 feet above you on the south wall. These are filled with dozens of skeletons armed with bows that are aimed in your general direction. They are not moving, and it is impossible to determine if they are statues or animated from this distance."
"Entering the room, three apparitions appear in front of you, hovering over the open pit. The three figures are those of young elven girls. The ghosts move towards you stopping just short of your position."
They mimic the following: smiling (friendship), ringing a bell, and pointing between them and the party (to summon them). They repeat this three times slowly or until the party gets it. Then, they slowly float upwards eventually vanishing.
"This door is a trap which collapses the bridge with a great crashing rumble. If anything was sleeping, they aren't anymore. In fact, very large rumblings can be heard from the bottom of the pit. The archers open fire."
"Careful examination shows another door about 30 feet above the original one at the end of the bridge. There is a large portion of the eastern wall that is illusionary."
Bone giants live at the bottom of the pit, and they can be heard moving around.
Room 2: Hallway
"This small hallway leads both north and south."
Immediately a skeleton archer will fire several volleys into the party from the east. Then, it will run away trying to lead the party into the archer trap.
Room 3: Archer Trap
"This long room has a hallway leading from the west and the east."
A quick examination shows that the northern wall is filled with chips and gouges. A careful examination shows that the southern wall is illusionary, opening up into the pit.
As soon as the party get partway across the room, stone slabs will drop at the doorways and the archers on the far side will begin peppering the entire area with arrows.
"Two slabs fall from above with a crashing boom, sealing both hallways. Arrows start raining through the western wall."
Room 4: Pit Trap
"A short hallway runs west. At the end of the hallway is a small chest."
The chest is a simple trap. When approached, the plaster in the ceiling will break away and a giant maul will swing down knocking the victim through the illusionary wall at the end of the hallway and into the Pit of the Bone Giants.
Room 5: Archery Range
"This room is actually comprised of two ledges, one on the eastern wall and one on the western wall that overlook a vast pit. The eastern ledge is sloped towards the pit, and the footing is difficult. The western ledge is two levels filled with skeleton archers."
"Careful examination shows that mixed in among the archers is a small squat goblin-like creature in a dull brown cloak covering tattered leather armor."
The figure is that of Deadeye, the first of the four guardians of the Amphisbaena. Deadeye has a Short Bow of Speed. Around his neck is hung a double-sided silver coin with a crown on each side. Since this is the "back wall" of his trap, he will fight to the bitter end.
Room 6: The Thug's Court
"This room is composed of a lower level which has a simple sand floor. There is one set of doors at the far end of the room. The floor of the room has fifty skeleton warriors all armed with weapons, poised ready to move into action. Several of the skeletons hold odd objects: large spherical gems of different colors and shapes, small mirrors of various shapes and sizes. A second level is comprised of a balcony which stretches the length of the western wall. The balcony is filled with 20 skeleton bowmen and a bandy small goblin-like creature appears in a bright green cloak covering tattered leather armor. His barrel chest belies a great strength. A very bright beam of comes from the eastern wall. The southern wall is a portculis. The portculis is open."
"On the ledge is a small table, covered with a felt cloth."
"Welcome my prisoners. Fail my test and join the bone warriors of Urkdim's Captain. Here is my riddle short and sweet. I fear myself from near not far, As I am the strongest goblin there are."
The doors are a trap, of course. Solving the puzzle will cause the stone slab to slide open. The proper item to get is the concave mirror. The possible shapes are concave, convex, spherical, plane, and cube. The possible materials are: glass, colored glass (ROYGBIV), and polished metal.
Another exit is through the illusionary wall behind the Thug.
The Thug has a Broad Sword +3 and two small copper keys around his neck.
Room 7: The Scorpion Prisoner
"This room has arches in three walls. Four sandstone pillars have chains attached to hold back what resembles a very large scorpion. The scorpion moves around fluidly, although it seems limited in its range."
The scorpion will attack if the party moves between the pillars. If agitated, the pillars will break, crumbling the roof and loosing the scorpion on a roll of 12 on a d12. The scorpion will lose interest if the party is not in sight for 2 rounds.
Room 8: Coin Room
"This odd-shaped room has a small alcove in the northeast corner. On the alcove is a stone statue of a squat goblin. Around the goblin's neck is a silver coin attached to a silver chain."
The silver coin has a crown on both sides. It can be used in Room 31.
The hallway to the south is a trap. Touching the far southern wall opens up a sand pit which dumps back into the Pit of the Bone Giants.
Room 9: Temple Room
"This small room has a small gold statue of a laughing goblin sitting atop a small block of sandstone. If the party attempts to take the statue, they will be fired on by the skeleton archers in Room 10."
The gold statue is actually cursed. At first it will be very light. Then, it will become heavier and heavier, larger and larger. This will happen at the rate of 10 encumbrance points per turn. If the character who took it tries to dump it, the statue will reappear in his backpack/hands/whatever.
Once the curse is fired, careful examination will show the following riddle to break the curse:
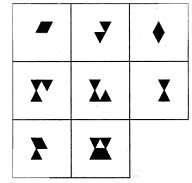
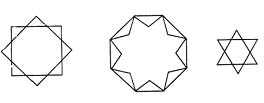
On the top of the block arranged around the statue are the following symbols:
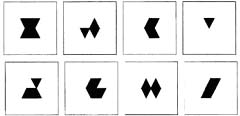
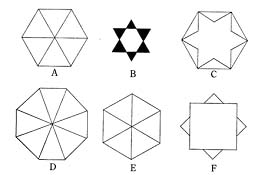
On the sides of the block are the following symbols, each seems to be raised slightly from the surface, allowing it to be pressed.
Pressing the right symbol releases the curse. The correct symbol is C (left pointing arrow). Looking both across and down, the contents of the third square are formed by combining the contents of the first two squares, except that where two triangles coincide in the same position in the first two squares, they are then canceled out in the third square.
Room 10: Archer Room
This simple room has six skeleton bowmen. Three are at the arrow slits. The others will advance and fight as needed.
Room 11: Refuse Room
"This room is piled with the discarded belongings of a great number of goblins. It includes some armor and weapons, but mostly mundane equipment: water skins, backpacks, camping gear."
Careful examination will recover 50gp and a small amethyst gem
Room 12: Scorpion Bits
"This room is filled with the carcasses of several large scorpions, now long dead. Armor and weapons seemingly designed for the scopions can found mixed among the remains."
Room 13: Guard Room
"This room contains four skeleton warriors. The warriors will animate when the party approaches."
Room 14: Goblin Treasure Room
"Two small wooden chests have been pushed up against the northern wall of this room. Both are locked."
Simple poison needle trap. Keys on the Thug. The chests contain: 250 gp, 2 small emeralds, and two Potions of Mana.
Room 15: Ghost Trap
"This small room has several large sandstone pillars and two archways leading to hallways. The northeast corner of this room is darker than normal, and you can sense a drop in temperature. A very faint wailing can be heard coming from the area."
Upon entering the room, three ghosts will immediately attack any human adventurer nearby. The ghosts are illusions.
Room 16: Store Room
"This musty room is filled with old crates, boxes, and barrels. At some point, this must have been a pantry of sorts. All the edibles have long since decayed."
Room 17: Discarded Shrine
"This small room has not been entered in many years. Four pillars have been carved in the shape of tree trunks. There is a feeling of peace here. A large tapestry of a woodland scene hands on the eastern wall."
Behind the eastern tapestry is a statue of an elven prince. Around the statue are three young elven maidens.
Room 18: Dwarven Smith
"This large room is mostly empty. On the eastern wall are piled scraps of bronze, iron, leather, and other materials. A small forge is in the center of the room. In the southwest corner of the room a very old dwarf sleeps on a straw mat. The dwarf is chained to the wall. A jug and plate sit nearby."
The dwarf is Maddensmith. He is quite mad, and the party will not be able to get much information from him. He is terrified of the undead. His job is to keep the creature in golem room running. He knows an off switch.
Room 19: Golem Room
"This room is home to a monsterous bronze golem which stands with two swords in its massive hands. The golem seems to be of fine craftsmanship. In the north end of this room, six robed figures with green staves stand in a semi-circle. There are hallways off three walls and a door in the north."
The golem will attack.
The cloaked figures will pretend to cast spells which cause a character to attack with frenzy.
Glassee in the northwest corner allows the Adept to cast the spells from Room 21.
Room 20: Rubble Room
"This room originally opened up into a larger room beyond. The ceiling in the southern end of this room has collapsed. A small bronze statue of a goblin sits on a short green pillar in the north end of this room."
There is a good hiding place in the southwestern corner of this room.
Room 21: Eastern Passage
"This room opens up to a larger room to the west. A passage leads to the east. A small bronze statue of a goblin sits on a short green pillar in the north end of this room. A silver coin with a crown etched on it hangs around its neck."
Room 22: Adept's Chambers
"This massive room has a strange stairway and ledge along the south and west walls. A sphinx is waiting in the eastern part of this room, and eight skeletons arm arrowslits. A simple throne and chest are pushed up against the north wall."
The Adept is a squat goblin-like creatures, tufts of hair and scars abundant over its misshapen body.
The chest contains: 500 gp, a medium ruby, and a Ring of Protection +2.
Room 23: Crushing Room
"This room is unadorned with a door in the northeast corner and a hallway in the south."
"The sound of very loud snoring can be heard coming from the door."
Careful examination will show horizontal scrape marks on the floor and ceiling.
Walls move quickly together for 16d6 per round when the northeast door is opened. Can be reset via the lever in the narrow hallway to the north.
Room 24: Illusionary Ramp
"The smell of burning leaves from this room is overpowering. This room has a deep pit filled with a dark bubbling liquid. Movement can be seen in the goo below. A single narrow ledge winds around the room to a door on the far northeastern corner."
The smell is actually opium. The real room is.
"This room has several braziers burning in it. These are filled with a powerful hallicinagenic drug which causes even True Sight to be tricked. Along the "pit" is a crevice which tumbles down about 60 feet to a spiky bottom."
Obviously, following the path would be a bad idea.
Room 25: Guard Room
"A simple room has a door on the south wall and a passageway in the northeast. There are four skeleton guards here."
A poisoned arrow trap to the north of the room will fire when the party passes by the illusionary wall.
Room 26: The Wailing Banshee
"There is a small chest in the southwest corner of this room. In the northeastern corner of the room is a small shrine consisting of a large sandstone funeral slab with the body of a handsome man laid out in a fine emerald green cloak with a ruby ring. The man is dead, although his body is well preserved by the dry conditions. Around the body are four coffins in the shape of women their exteriors decorated in guilt gold and red."
When the shrine is approached, the Wail of the Banshee will be fired off. All hearers will need a saving throw or be stunned/killed. The room will be filled with heat mites from the cave to the east.
The chest is not locked and contains a silver coin and two Daggers +3.
Room 27: The Trickster's Throne
"This large room has ten columns supporting a massive roof. The room is unnaturally dark, and brights lights only increase the illumination to that of a torch. At the southern end of the room is a very large golden statue of a demon with crossed arms. The eyes of the demon are glowing red gems. Across the arms lie thes the body of a goblin dressed in studded leather armor. The goblin is asleep or dead."
If the party has silenced themselves from the last room, the will not hear the tell-tale traps fire off.
A: Whirling poison blades (lose 1d6 constitution for 24 hours) plus 12d6.
B: Deathblade Wall Scythe. Poison 18d6.
C: Camouflaged pit trap (50 feet deep) 15d6.
D: Spiked Trip Wire.
Whirling, Swinging, Falling, Trip
Death to all that make a slip.
The statue is filled with oil which will pour out when the body is touched. The eyes will flame up and ignite the oil. Ouch. The body is fake. The trickster is in a secret compartment in the rear of the statue. He will have a silver coin in his pocket.
Room 28: Orange Crystal
"This small room has a black stone pedestal with a glowing orange crystal perched on a bronze stand. The crystal radiates a very powerful aura of magic."
This device drains 2d4 levels for 24 hours for each saving throw missed.
Room 29: Antechamber
"This simple room has four square pillars. There are two entrances to the east and north."
A poisoned arrow trap to the north of the room will fire when the party passes by the illusionary wall.
The ghosts will re-enter this room to help the party if needed.
Room 30: Hallway of Heroes
"Twenty niches line the sides of this long hallway. At one end is a large bronze door. A faint shimmering glow of magic traces around the door. Each of the twenty niches is filled with a bronze statue of a skeletal figure carrying a bronze sword. The swords are strangely notched."
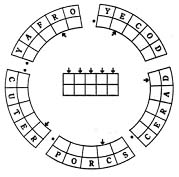
The door has a very large keyhole in the center of a strange puzzle.
FORAY
DECOY
CADRE
CORPS
TRUCE
PEACE
One of the figures will have a sword with a peace symbol carved on it. Taking that sword and using it as a key will open the door. The figures animate (with a blink spell) if the puzzle is botched.
Room 31: Seal of the Die
"This room has several outstanding features. A stepped pyramid about 12 feet in height is in the eastern part of the room. The top "step" of this strange altar is higher than the others creating a table-like top with enough room for several people to stand around. A number of large pillars rise to support the domed roof of the room. On the eastern wall is a round portal, sealed with a large bronze disk. The center of the disk shows the portrait of a goblin-like creature."
"Examination of the table reveals that it is covered in a soft green felt, now somewhat tattered by time. An ivory dice cup sits in the middle of the altar."
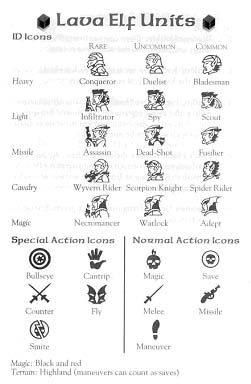
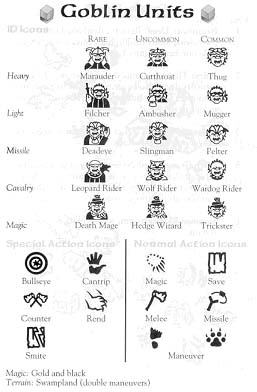
The seal room has a large "dice tray". Rolling the dice with the maneuver symbol will cause the appropriate seal to open. Seals hidden behind other seals will cause a grinding noise as the seal opens. Once rolled, a dice may be left where it is or touched. If a maneuver symbol is touched, the seal will close. If a bad symbol is touched, an effect will happen to the character who touches the dice. Afterwards the party can roll the dice again. Clever adventurers will roll all the dice, hearing the rumblings, and leave the good dice. The dice can be found on the current four low priests of the amphisbaena.
| Thug | Trickster | Adept | Deadeye |
| Maneuver | Maneuver | Maneuver | Maneuver |
| Melee | Magic | Magic | Missile |
| Melee | Magic | Magic | Missile x2 |
| Melee x2 | Magic x2 | Magic x2 | Save |
| Save | Melee | Save | Save |
"The disk splits into a number of wedges, each receding into the wall until only a band of bronze shows where the disk originally was. The movement of the disk is slow, and a loud grinding sound can be heard clearly in the silence of the tomb."
Room 32: Hallway of Seals
"This hallway slopes upward and travels east for several hundred yards. The hallway is round. Every 150 feet a "band" of copper shows where a seal has been retracted."
At the end of the hallway is a false "fifth" seal which is trapped. Clever adventurers will search the last segment of hallway for a secret door which opens up on the upper chamber.
The trap will send a wall of sand down the chute. This will cause massive damage, and suffication in 1d6 rounds unless something clever is done.
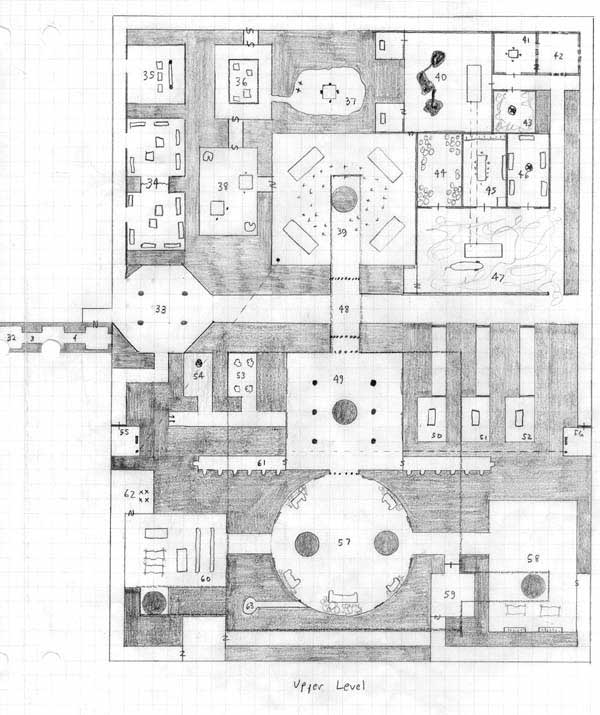
Room 33: Octagonal Entry
"This oddly shaped room has three hallways leading from it. The walls are adorned with paintings of the amphisbaena twins. They are shown at war with one wielding mighty spells and the other swinging a deadly sword. There are four sandstone pillars supporting the domed ceiling of this room."
Careful search will reveal Note #3.
Room 34: Dormitory
"This room is a dormitory of sorts with scores of beds built bunk fashion along the walls. Tables are arranged in the center of the room, and a curtain divides the north and south halves of the hallway. It does not appear that these rooms have been used in many years."
The party will be "housed" here, if appropriate.
Room 35: Temple
"The walls of this room are painted a bright red. Several gold cushions are on the floor in front of a giant gold ring-shaped symbol of a two-headed snake."
This room radiates a slight magical aura.
Room 36: Treasure Room
"This room has a number of chests sitting on top of a very large pile of silver and gold. Two staves are pushed into the coins, and there are several potions visible as well. Around the perimeter of the pile, a faint red line flickers on the floor."
This room is guarded by a glyph which will summon the lichs and do some damage.
20,000 sp, 8000 gp, Staff of Healing, Wand of Trap Detection, Potion of Gaseous Form (2), Potion of Speed, Potion of Flying. In the pile, the party will find the 2nd piece of the note.
Room 37: Hidden Cave
"This room seems oddly out of place since it is literally carved from the sandstone in a rough-hewn fashion. A single table and four chairs are in the room's center. A skull sits on the table."
Careful examination will reveal the 1st piece of the note. The skull is that of one of the elven princesses.
Two ghouls guard the room.
Room 38: The Lich's Study
"This room has several tables and large overstuffed chairs scattered about. Several bookcases line the walls, and numerous scraps of paper and writing utensils mark this as a library or study of some sort."
On the table, the party finds a perfect copy of the poem with several verses missing.
Riddle of the Amphisbaena
Immortal brothers, serpent's womb
Sealed inside a sandy tomb
When ten times ten years forgotten
Another boon will be begotten
The snake's sweet bite is doubled blessed
But four times six are the tests
One man or two will see the light
The rest will stay to fight the fight
<missing verses>
The brothers wait inside their room
They seek to leave this cursed tomb
Your boon could finally break their curse
If not their anger will grow worse
Another scrap of paper contains a single word: "Sandstorm"
This is the password to get into Room 55 and 56.
Room 39: The High Priest's Chambers
DM's NOTE: The High Priests are sleeping. They will try awaken and try to get the party to undertake the ritual. The priests need the ritual. They know the secret! Bad for the brothers.
"Four liches lie on gold gilded slabs of intricately carved ivory. The walls of this large room show the four men in their lives, each agrandized in their moments of glory. Light beams slant through clouds giving the painting an unearthly quality. In the center of the room, a large circular shaft has been cut into the floor. About the four altars, fifty mummified worshipers bow in prayer and adoration. A portculis in the south of this room is open."
Careful examination will reveal a small elven child's head in the northwest corner (Iris).
The portculis goes into the floor, stopping passage down the snake hole.
Liches: Viscera, Brann, Gril, Molo
Room 40: Sacrificial Chamber
"This room has served for sinister religious rites in the past. A large sandstone altar is in the eastern part of the room. On it, there is the skull of a small elven child (Violet) sitting on top of a piece of parchment."
"I have researched the symbols on the Elven Witch's tombs. Of the multitude of symbols, there is one unique on each door. From right to left:"
The appropriate symbol to press on the tomb is A:
"Three interconnected pools are dry, although a discoloration on the sides of the pool show that a dark liquid once flowed here. There is a door in the northwest corner of the room."
"A small room contains a bronze chest. It is locked."
This chest is a trap. The real treasure chest is in the small secret room in the southwest corner. The chest contains: Potion of Critical Healing, Potion of Mana, 100 gp, Note #4
Room 41: Guard's Common Room
"This room has a simple table and chairs. There is a single door on the south wall, and there are a number of arrow slits on the east wall."
Room 42: Guard Room
"This room has arrow slits on all sides."
There are eight skeleton bowmen here.
Room 43: Storage Room
"This room seems to have been a storage room in the distant past. Crates and boxes have been destroyed and pushed against the walls. The room is unremarkable except for a hexagon drawn in bronze paint and blood."
This room can be used to feed the vampire.
Room 44: Collapsed Kitchen
"This room was obviously a kitchen in the very distant past. The ceiling of the room has collapsed filling the room with rubble."
Room 45: Dining Hall
"This room has crude dining furnishings, a long sideboard, dining table and chairs, and several small serving tables. Several bronze goblets and plates are still on the table. It is obvious that this room has not been in service for a long time."
The skull of a small elven child (Rose) is inside the long sideboard.
Room 46: Dormitory
"This room is very cold and light cannot penetrate more than that of a dim candle. Voices can be heard coming from the room, although it is impossible to determine what they are saying."
The room is filled with a grim ghost which cannot be harmed by mundane weapons. A number of vaguely humanoid forms seem to be stretching out from a central cord of clear liquid that is attached to the ceiling of the room.
The ghosts will attempt to grab one character and pull him into the liquid. If so, the character will disappear along with the ghost.
Examining the ceiling, the party will notice a hexagon drawn in bronze paint and blood. There will be no trace of magic here.
The voice of the character can be heard. He will describe himself as being in a clear sack surrounded by a cloaked figure who keeps licking his lips over blood red fangs.
Room 47: Bone Giant Room
"Bones are scattered from the doorway of this room into the hallway."
"This room is very dark and very cold. There are an amazing number of bones, many gnawed on, scattered around the room. A very large stone bench is in the center of the pile of bones."
A secret passageway leads between Room 40 and Room 47. These are gained by flipping a secret switch that moves the table and reveals a subterranian passageway.
This room has a bone giant in it.
Room 48: Crossroads
"This crossroads has two portculises, one north and one south."
Room 49: Anteroom
"This large room is of plain construction, although the walls are decorated with scenes of battle. One wall shows a large snake with six arms each heavily weaponed with swords and scimitars. The snake's head is that of a young man, helmeted with intense black eyes and forked red tongue. The other wall portrays a similar creature, armed with several wands, casting a bolt of rainbow hued lightning. The far wall of the room is filled with a massive black portculis. Beyond the portculis, an elaborate throne room can be seen."
The portculis can be lifted only by simultaneously pulling the two levers in the lever room.
If the party tries to force their way through the anteroom, two doors will open and skeletons will continue to pour through the door until the levers are activated (which closes their door). This is somewhat like a skeleton generator.
Room 50: Tomb of the First Elven Princess
"This room is sealed with a large bronze disk carved with thousands of strange runic symbols, letters and numbers. The seal radiates an aura of good and sheds light of a bright torch."
"A narrow hallway leads to another seal similar to the first."
"This small room has a large sandstone slab, sprinked with the now dried flowers of the meadow iris. Amongst the flowers is the skeleton of a small elf. The skeleton is missing its head."
The ghost of Iris will protect the party in this room if her head is returned. This room can then be used as a sanctuary. She will also show the party a hidden compartment with a crystal vial. Potion of Resistance to Poison.
Room 51: Tomb of the Second Elven Princess
"This room is sealed with a large bronze disk carved with thousands of strange runic symbols, letters and numbers. The seal radiates an aura of good and sheds light of a bright torch."
"A narrow hallway leads to another seal similar to the first."
"This small room has a large sandstone slab, sprinked with the now dried flowers of the purple violets. Amongst the flowers is the skeleton of a small elf. The skeleton is missing its head."
The ghost of Violet will protect the party in this room if her head is returned. This room can then be used as a sanctuary. She will also show the party a hidden compartment with a crystal vial. Potion of Resistance to Poison
Room 52: Tomb of the Third Elven Princess
"This room is sealed with a large bronze disk carved with thousands of strange runic symbols, letters and numbers. The seal radiates an aura of good and sheds light of a bright torch."
"A narrow hallway leads to another seal similar to the first."
"This small room has a large sandstone slab, sprinked with the now dried flowers of the purple rose. Amongst the flowers is the skeleton of a small elf. The skeleton is missing its head."
The ghost of Rose will protect the party in this room if her head is returned. This room can then be used as a sanctuary. She will also show the party a hidden compartment with a crystal vial. Potion of Resistance to Poison
Room 53: Pod Room
"The hallway of this room is unnaturally cold and dark. There is a sense of evil about this area."
An arrow trap will shoot from the end of the hallway.
"Four large sacks hang from the ceiling, each filled with a clear jelly-like substance."
One will contain a character, if applicable.
Room 54: Lair of the Vampire
The room has a sandy floor which has been recently disturbed. The room is cold and dark, but otherwise unadorned except for a hexagon drawn in bronze paint and blood on the ceiling.
Room 55: Western Lever Room
"The hallway ends in a bronze door. Several slits in the door are about five feet high, and each slit is about the width of a dagger blade."
The door is locked. Tapping the door reveals that it is several inches thick.
Speaking the password "sandstorm" will cause the four skeleton warriors within to unlock the door and open it for the party. The skeletons will stand motionless until the door is closed again. At this point, they will reanimate and attack if possible.
"Other than the skeleton warriors, this room has only three notable features. The first is a very thick bronze door in the northern wall. A rope hangs from a small hole cut in the ceiling of the room. Finally, a large lever four feet high, also made of thick bronze, is in the floor near the eastern wall."
Pulling the rope will sound the bell in the other lever room. This is used to signal when the lever is to be pulled. They must be pulled simultaneously in order to work. The levers must also be pulled forward to back to raise the portuculis. Back to forward will lower the portculis. If only one lever is pulled, it will just snap back into its original position.
Room 56: Eastern Lever Room
"The hallway ends in a bronze door. Several slits in the door are about five feet high, and each slit is about the width of a dagger blade."
The door is locked. Tapping the door reveals that it is several inches thick.
Speaking the password "sandstorm" will cause the four skeleton warriors within to unlock the door and open it for the party. The skeletons will stand motionless until the door is closed again. At this point, they will reanimate and attack if possible.
"Other than the skeleton warriors, this room has only three notable features. The first is a very thick bronze door in the southern wall. A rope hangs from a small hole cut in the ceiling of the room. A small bronze bell is attached to the rope. Finally, a large lever four feet high, also made of thick bronze, is in the floor near the western wall."
The bell is used to signal when to pull the lever. They must be pulled simultaneously in order to work. The levers must also be pulled forward to back to raise the portuculis. Back to forward will lower the portculis.
Room 57: The Throne Room
"This room is circular in shape with a very high domed ceiling supported by several large sandstone pillars. A large portculis in the north leads to an anteroom. Two circular passageways in the east and west. A bronze throne in the south is of a strange construction, it contains two seats with large snake shaped arms. The high back of the throne is shaped like serpent coils. Spaced evenly along the walls are four sandstone chairs of the same serpentine design, although less detailed in workmanship."
"Careful examination shows that all the chairs have a coil which opens a spout just above the head of any person sitting in the chairs."
Two of the pillars are actually the amphisbaena. Their common body is under the floor, and each head is near the ceiling. The brothers will swoop down when someone sits in the throne. The brothers will assume that the other four members of the party are the "replacement" priests. The ceremony requires the party to sit in the six chairs. The brother disappear into the ceiling where they release their venom into several large bronze funnels. One set of venom tubes leads to the bronze throne - bestowing the gift. The other pours onto the sandstone thrones zombifying the occupants - readying them for service as the next priests.
"Welcome adventurers. It has been almost twelve score years since we last bestowed our gift on Goblin Prince Urkdim. You are certainly more clever and deserving than Urkdim, so our father's curse will certainly be broken this time. Please take your seats and the ceremony will begin."
Room 58: Cale's Chamber
"This room is covered with pillows and thick rugs. Two racks of weapons sits against the southern wall. The northern end of the floor is empty. A large hole in the floor open into a deep tunnel. A single opening in the eastern wall leads to a circular hallway."
The hole allows Cale to enter this room, and the northern end are cleared for practice.
Room 59: Servant's Quarters
"This room is filled with brooms, buckets, and other butling items. A single hallway lead from the south."
Four ghouls wait for their master's summons here.
Room 60: Tasker's Chamber
"This room has several large bookshelves and tables ringing several rugs and a number of pillows. A large hole is in a niche in the southern wall. A hallway leads to the east, and a single door is in the northwest corner. The tables are filled with strange-looking bronze equipment and alien-looking tomes."
The large hole in the floor allows Tasker to enter this room.
Room 61: Hallway of Skeletons
"This hallway is filled with a number of nooks running along the walls. Each is filled with a grey swirling mist that smells of sulfur. Every few seconds, a skeleton steps from the mist and moves through the doorway."
If the door is closed with the party inside, the north wall will start to move in on them to crush for 16d6.
Room 62: Servant's Quarters
"This room is filled with brooms, buckets, and other butling items. A single hallway lead from the south."
Four ghouls wait for their master's summons here.
Room 63: Temple Exit
"This small passageway leads to a tiny room. On the far wall of the room is carved a small rune, a cave with a small pile of gold and two crossed claws."
Dragon's Lair
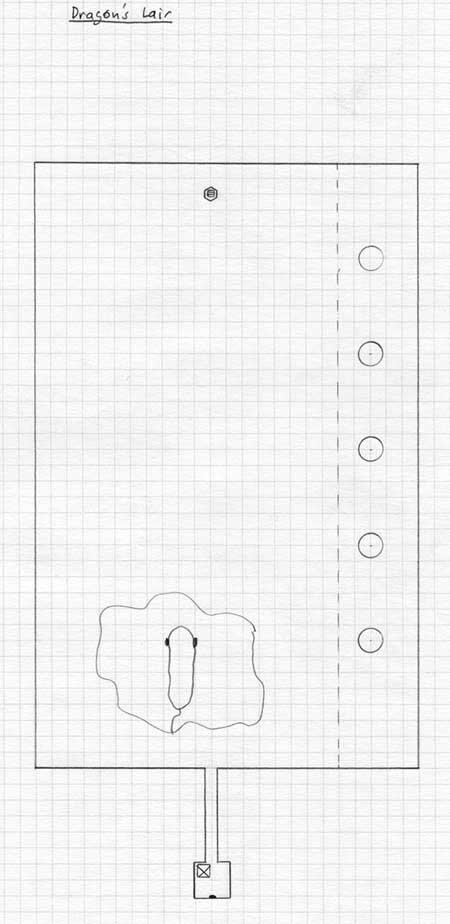
"The party teleports near a dias at the far edge of a massive room. On the dias is a small metal cage containing an odd-shaped gem. The northern wall of this large room is built with two ledges, supported by sandstone pillars. The rest of the room is open. At the far end of the room a zombie dragon sits atop a pile of treasure. The dragon has noticed movement at the far end of the room and has started to move."
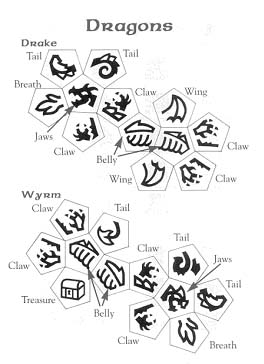
The dragon dice in the cage. The dragon dice is a weapon that can be used to defeat the zombie dragon. By rolling the dice, the wielder is teleported to that area of the dragon (or treasure) and has a free melee round. Then a normal round occurs. Then another free round. If there is no treasure symbol on the dice, then the it can just cause damage at that location.
The dragon will cause terror, but it will not cast spells or breathe. Or will it?
"Careful examination of the far end of the room shows another small rune carved in the stone. The rune resembles a cave with a rune in its center with two crossed staves (carved with runes)."
Treasure horde: Helm of Teleportation, Potion of Mana, Potion of Critical Healing, Shield +3, 10,000 gp, 30 sp.
|
Monsters
Scorpionmen Warriors (12) |
Treasure
Blackened Yew Staves (4) |
