Difference between revisions of "The Burning of Teufeldorf"
(Pushed from realm.) |
(No difference)
|
Revision as of 18:01, 20 September 2016
| Type | Dungeon |
|---|---|
| Status | Explored October 889 TA |
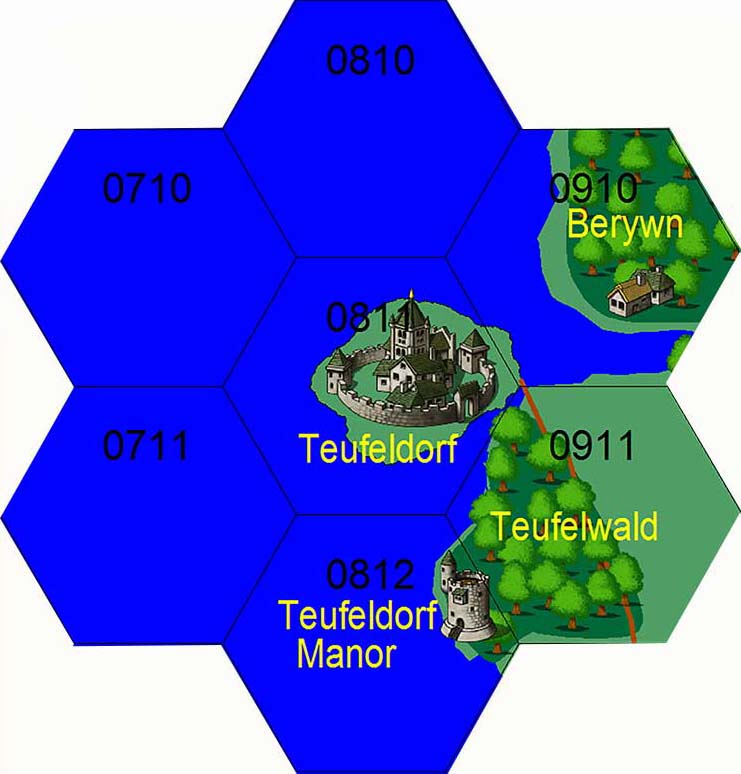
| Location | Teufeldorf |
| Hex | 0811 |
| Campaign | The Elven Watch Campaign |
| Adventure # | 101 |
Introduction from Evil's Perspective
Since the knights departure into Oblivion eight months ago, nothing has happened at the stone statue in Duskwallow. After several months, it is determined that the mission has failed. However, the city of Teufeldorf has fallen to the orcs, and so the commanders of evil have a new target.
A trap has been constructed around the statue. In case Nightshade makes it back, a puzzle trap has been created to allow him to quickly pass through the structure and report back to Baron Valedmar. Otherwise, it is meant to keep the party at bay and at least warn the Baron of their return to the Realm.
The Trap
The room is silenced and anti-magicked.
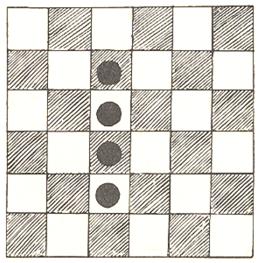
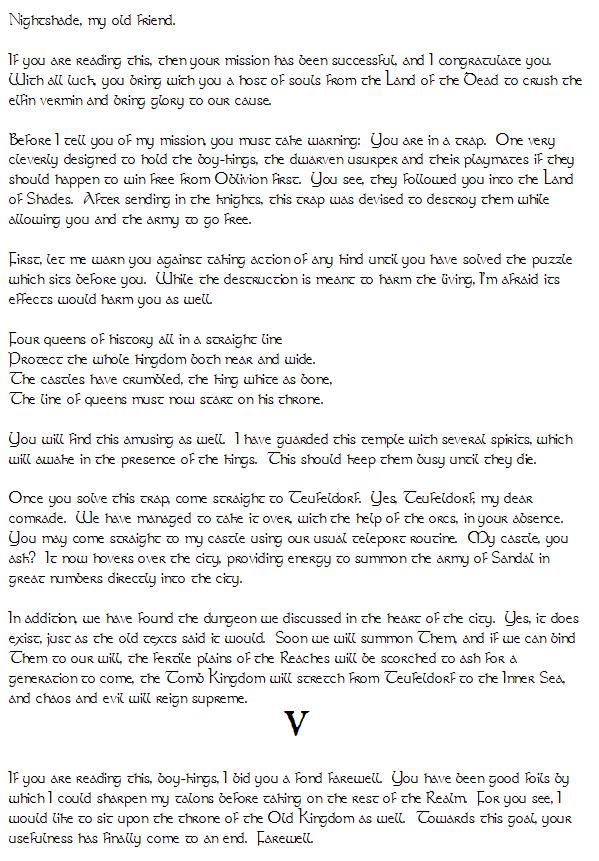
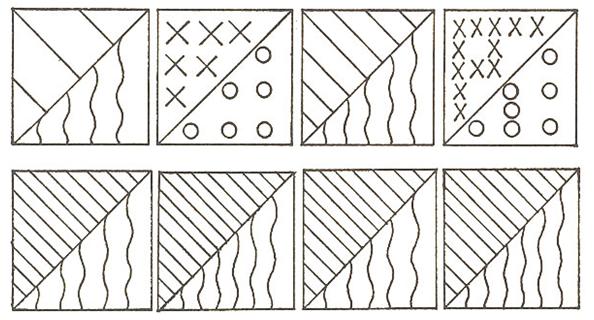
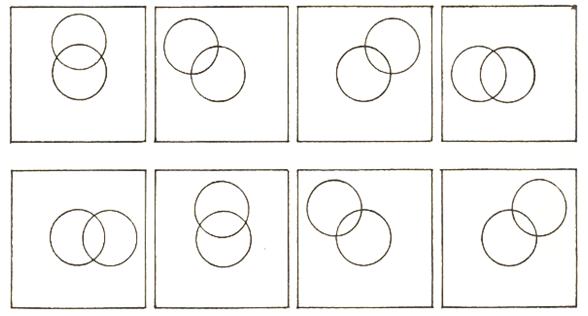
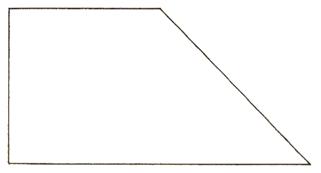
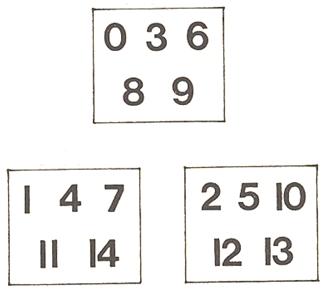
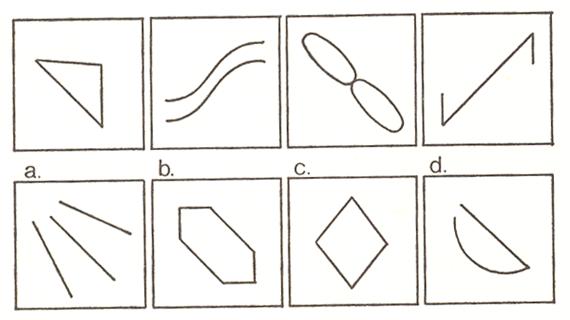
The only irregularity of the room is a small stone ledge jutting out from one corner of the room. On the ledge are a number of items. One is a small silver tube with a parchment rolled up in it. On the ledge is painted a board of six by six squares alternating black and white. On the board sit four chess queens. A small piece of parchment is next to the board. The parchment reads:
Upon reading the note, the person that picked it up will be poisoned.
The room is an elaborate trap. Upon solving the puzzle, a passageway will open. Unless rushed, the party will notice that the 60' hallway is filled with a clear, gelatinous substance. The substance eats away flesh at an astonishing pace. The entire "cube" is surrounded by a layer of goo that flows throughout the trap.
Once touched, the goo will warn the guards on top of the cube of the party. They will break teleportation beads and return to Teufeldorf.
A few minutes after the party enters, several serpent spirits will enter the room:
Non-corporeal spirits attack by flying through party members to drain beans. These beans are immediately used to open up a number of small stone "cages" along the wall. The creatures are all level 21.
(low) GREEN = rust monsters, (high) YELLOW = spore clouds - choking and gagging, (med) RED = su-monsters (mind control), (top) BLUE = flesh goo from the ceiling
Six Sandalese warriors have been camped on top of the cube waiting for something exciting to happen. They have supplies, a small fire, etc. They will teleport at all costs.
Standing on top of the cube, the party will notice that the town's inhabitants have been killed, their heads put onto pikes in the form of a giant letter "V". From the decay, the party can determine that it is late in the winter of 889. Almost eight months have passed since our heroes departed.
Description of the City of Teufeldorf
NOTE: The snow is actually detecting movement, flying, etc.
The red - necromancy, The orange - evocation
Every week, the beams brighten and a loud humming fills the air. Magic virtually crackles from the sky. The globes flash simultaneously. In the red globe are dead bodies. In the orange globe are several hundred knights of Sandal - looking around slightly dazed. The globes flash for a few minutes, and the knights ride from the orange globe. A cloaked figure in black enters the red sphere and utters a spell which cause the dead to rise, a new unit of skeletons appearing. Then, the orcs start to herd villagers into the red sphere.
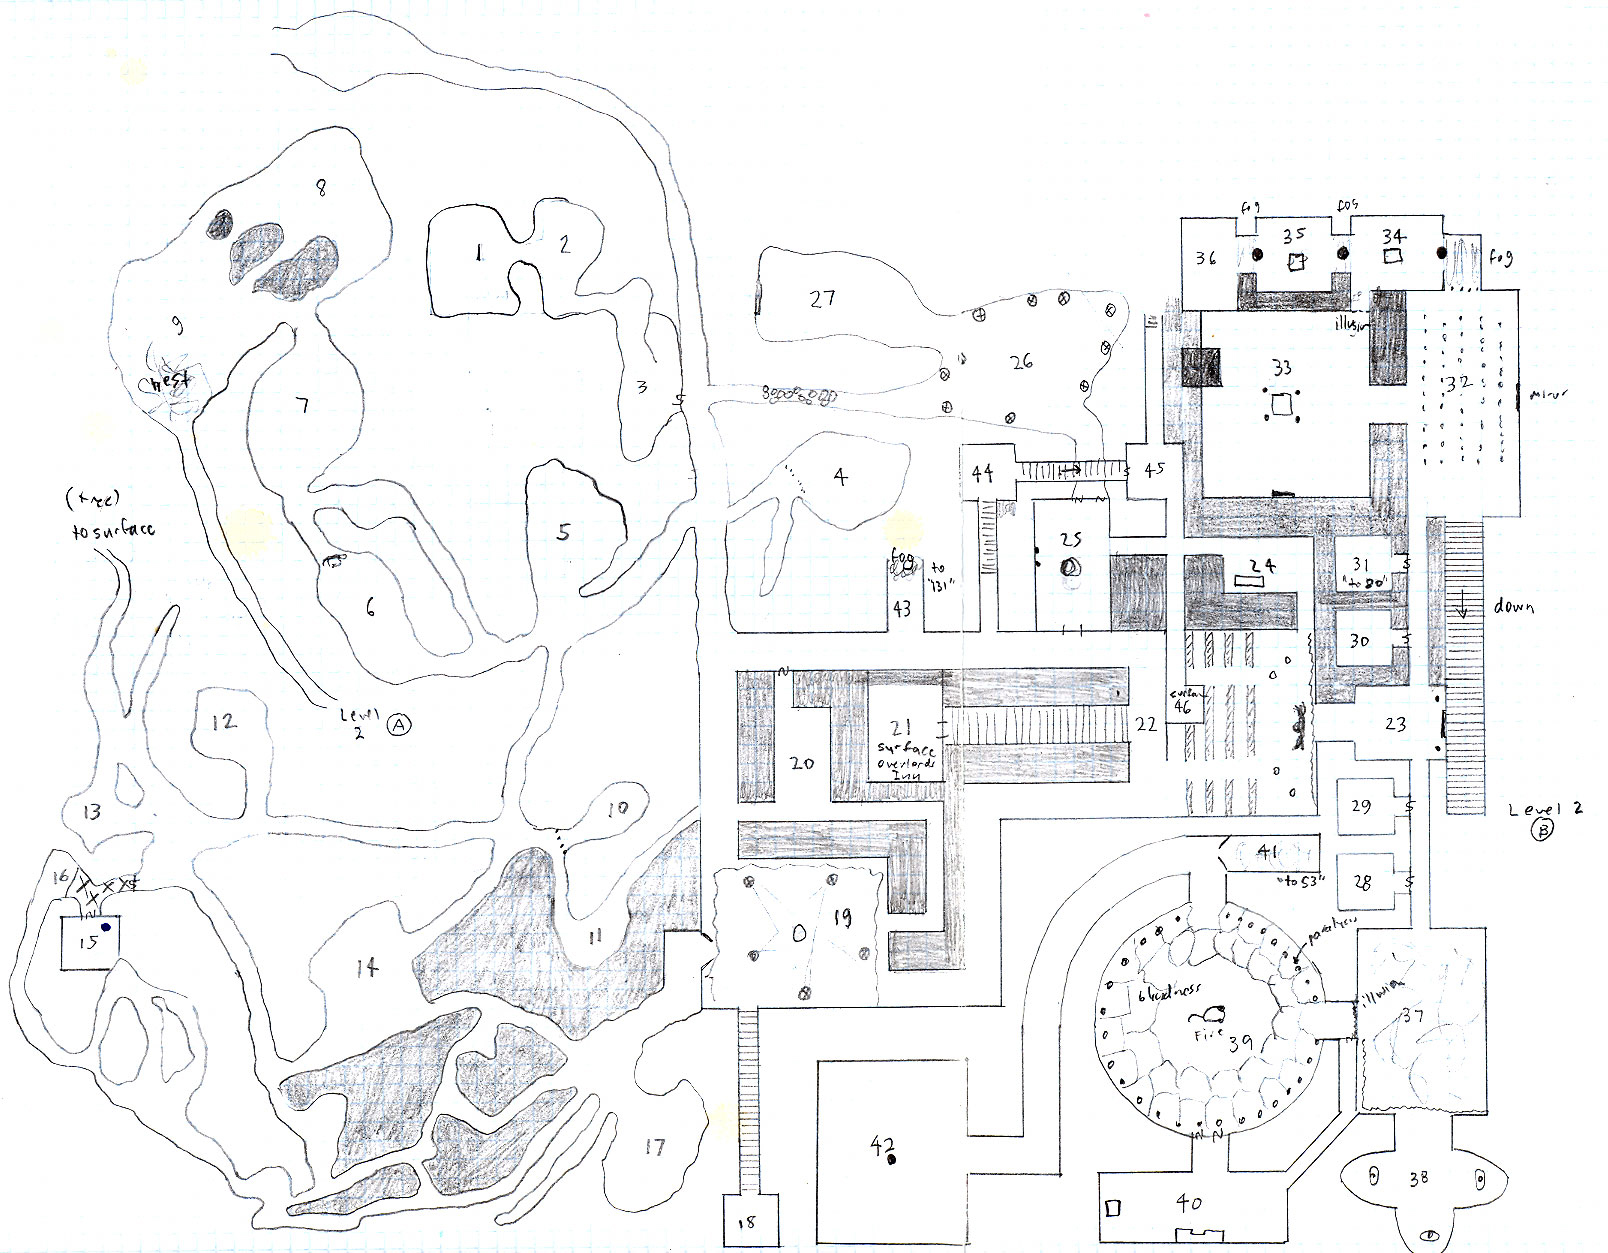
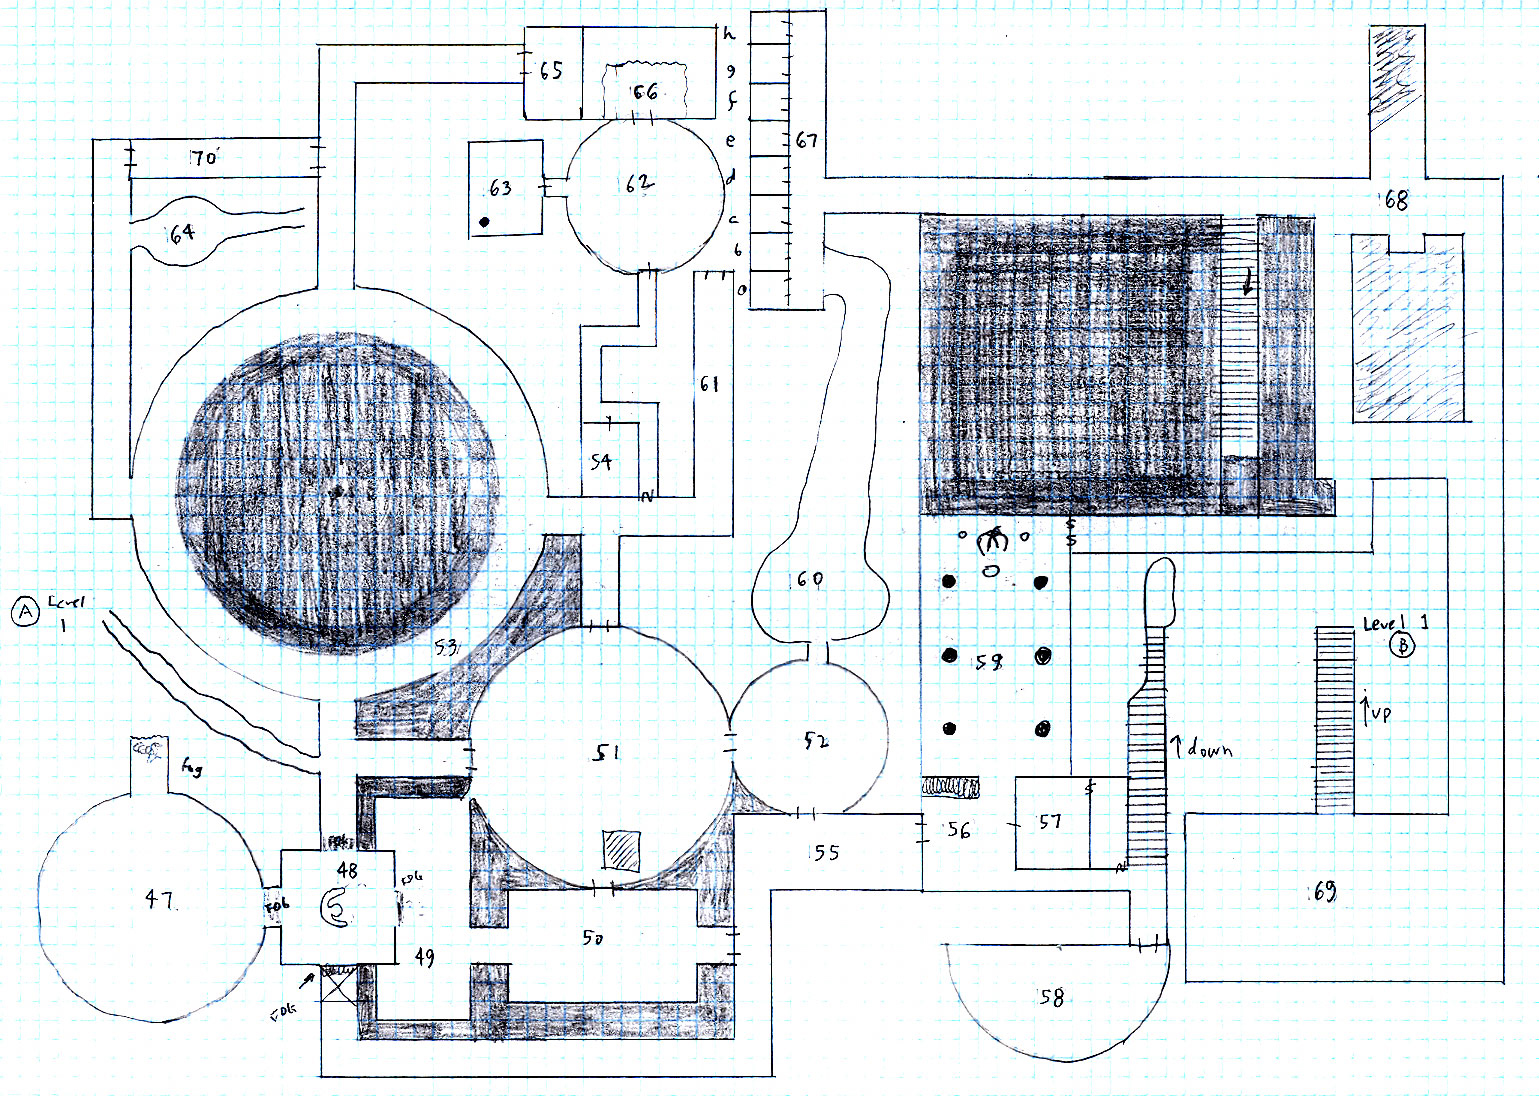
Tower of the Evokers: Level 1
Near the junction of the red and orange spheres is a square where there is a ring of Knights. In the center, a lone house sits, surrounded by giant guards. There is clearly some activity going on in the house. Periodically, dead bodies or buckets of stone are brought out and dumped in the street.
Rooms in the Evoker's Tower are not lit unless humanoid occupants are specified and then it will usually be by torch or fireplace. The tower is very dusty and gloomy. Spooky is a good description.
The Tower of the Necromancers is constructed of coarse, dense black stone, cunningly set as to require no mortar. All rooms, except where indicated are magically darkened. There are no wandering monsters in the Necromancer's Tower.
Room 1: Ransacked
This room has been ransacked, although it is clearly an ancient temple of some sort. Careful examination shows that it once contained a reliquary on an ornate white marble base.
Room 2: Mechanical Giants
Four mechanical giants stand guard in this room. They move to attack any good character. These guards are made of a black metal and very well hidden.
Room 3: More Giants
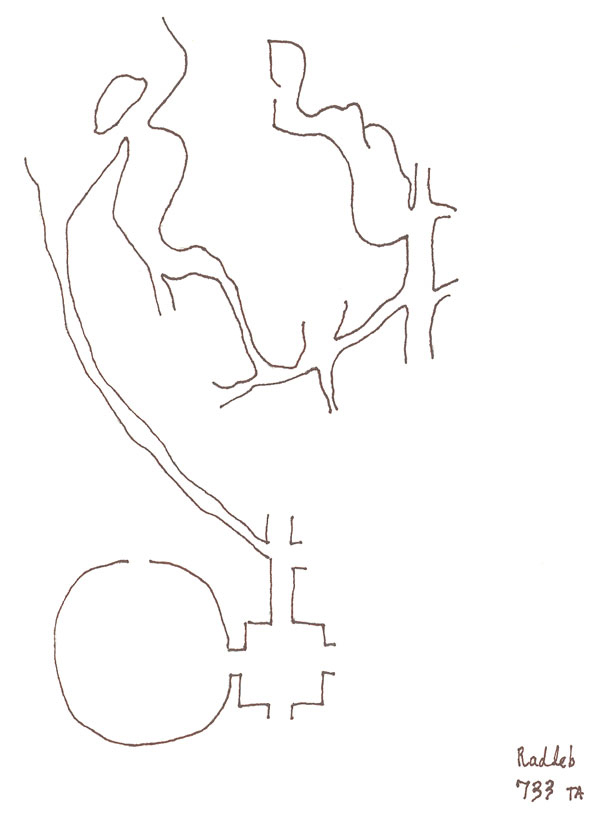
Three more mechanical giants wait to attack. Several thousand gold pieces lie about the floor, spilling out of overturned chests. A life-size silver statue of an Evoker (300 lbs) holds a scroll tube in one of its hands. The statue has a permanent Protection from Evil spell on it. The scroll contains a map of the location to the cells where the sacrificial victims are held (Room 67). It doesn't show the secret door and the trap. It is dated 150 years ago and bears the signature Radleb. Also in the case are several invisible large rubies.
AREA NOTE
Dire rats led by Sinstar the Sly, wererat, will be encountered here. Sinstar is a thin, wiry man of sour disposition. Sinistar leads assassins that are watching the area for the necromancers. Sinistar has a rusty key to Room 10.
Sinistar's men will include in each group: 2 assassins, a hasted rust monster and a hasted dire rat. Each of these will be on a leash with a collar. The collar will have jewels that absorb magic. The jewels will "pop" when activated. They will let loose their monsters and attempt to throw poisoned daggers. The rats can smell magic. The rust monsters can smell metal.
Room 4: The Metal Spider
An illusionary wall makes this room appear to be just a corridor that bends west. The corridor seems to be strewn with wire. Characters need to make a dexterity check to keep from tripping each round. The room is the lair of a huge web-building metallic spider. A creature of apparently living steel, its web fills the room and touching it will cause entrapment. A strength check will be needed to escape. Scattered among the withered web bundles are 60gp. It will take several turns to cut enough webs away to get the treasure.
Room 5: Corpses and Communications
This room contains a half-eaten, female corpse. Careful inspection shows that she has had her heart removed and has been gnawed on by dire rats.
Room 6: Significant Skeleton
The north exit has the rotted remains of a wooden door blocking it. A human skeleton is crumpled just outside the room in the north corridor. It is wearing rotted, but rich clothing. It wears a small signet ring (120 gp) that a merchant may identify as that of the House of Brown, a wealthy merchant who disappeared on a caravan, reportedly after discovering a sword of great power.
Room 7: Chains and Bones
The south wall is set with rusted chains and shackles. A few skeletal arms lie in one or two. The chains will rattle if passed.
Room 8: Man-O-Mist
The floor of this room is covered by two feet of mist. The mist will form into a man-shape that will gesture towards Room 9, then walk into that chamber, point at a basilisk's nest and finally walk through the nest and seemingly disappear into the wall. A round later, the mist will come pouring out of the nest and flow back into Room 8. This will irritate the basilisks and allow for no surprise against them.
Room 9: Lair of the Basilisks
The nest hides a low entrance to a sloping passage down to Level 2. The nest is made up of human and rat bones, fur and rags. Also, 120 gold pieces and ten eggs are in the nest.
Room 10: Rat Holding Pen
Behind a rusty iron gate, piles of crates have been destroyed. The sound of voracious gnawing can clearly be heard in this part of the dungeon. Sinistar has the key to open the gate and let the rats out.
Room 11: Rust Monster Room
Ten rust monsters are tied up with ropes here along the south wall.
Room 12: Assassin's Lair
Twenty-four sleeping mats have been put down here. There is a small table with several boxes pulled up as chairs. A fire pit and pot form a rudimentary kitchen. In a small pile on the table is the following: 60gp, a belt with a snake head clasp and studded with amethyst (120gp) and a silver figurine of a griffin (600 gp).
There is some chance that assassins will be sleeping here.
Room 13: Assassin Guards
Five assassins. The left-hand tunnel leads out of this lair surfaces into a tree in a nearby park. As the party goes up the tunnel, the walls become made of a yellow wood, eventually ending in a leafy door.
"The woods bear sons who later lay them low." Axe handle.
Room 14: Dung Pile
This room is filled with dung, although no monsters appear to be nearby. There is a long sword +2 with serpent's head on pommel buried under a dung pile. It was carried here inside of a giant basilisk. This is the Weatherby family sword, lost 50 years ago. The ghost of Stovell Weatherby still searches the dungeon for it. He, of course, is looking in the necromancer's section of the dungeon. A Potion of Lich Control is hidden here too.
Room 15: Lair of Sinstar the Sly
Sinstar the Sly (wererat thief) will most likely be here.
In the corridor, outside of the lair's north secret entrance is a 30' deep pit. It is disguised to look like the dirt floor. It is so touchy as to open almost all the time. At the bottom of the pit are various swords and spears and sharpened stakes that have been set to do as much damage as possible. The pit will do 6d6 points of damage to any falling in.
If the room is entered, Sinstar will be celebrating with his mistress Natasha (necromantic cleric). They are celebrating the theft of the Eye of The Evokers from the tower. Natasha wears the amulet around her neck. The pair will be in human form and drinking from a cup of carved malachite and embellished with silver and three diamonds (5100 gp).
Natasha is the daughter of Nicholas Weatherby and appears to be in her early twenties. She is very attractive. Since both are wererats, they will be able to summon dire rats to their aid.
Room 16: Assassin Guards
A pair of assassin guards is always here.
Room 17: Empty
This room is empty.
Room 18: Cellar of the Manor Arms Hotel
The Manor Arms Hotel is run by Nicholas Weatherby, a wereboar of a nasty disposition. They have been delving into the matters of the dungeon for too long. His daughter is Natasha Weatherby who has hooked up with Sinstar the Sly (a man of Baron Valedmar).
Room 19: Pentagons and Passwords
This room has a 30' ceiling. It is lit by 5 braziers. Rich, fairly new curtains line the walls. A gold bowl (500 GP) sits midway between the pentagon framed by the braziers. If the perimeter of the pentagon is passed without the passwords "MERCHANT OF DEATH, LET ALL THE WORLD FEEL YOUR SOUL-CHILLING BREATH", are not said (The Weatherbys knows the passwords, but there is a 30% chance that they will misquote it), a line of blue flame will race out along the floor from each brazier to the gold bowl. There will be a puff of smoke and two liches will appear.
Clerics will notice that turning is slightly weaker.
Room 20: A Converted Crypt
This was once the crypt of an early patriarch of The Evokers who led the construction of the shrine above. His bones lie in a jumble in a comer.
His coffin has been converted to store treasure. In it are 5000 GP, four small emerald in a silk pouch, a silver Lion mask and a + 1 Shield embossed with the lion of The Evokers in red and gold. If a detect magic is cast on the shield, it will glow green for one minute, showing a map of the location of the Heart of the Evokers.
The spell may be cast twice. After that, the map will fade forever. To let players copy the map, one minute real time for the duration of the spell and let them copy for that length of time. Again, realize that the map is 350 - 400 years old and will not show the dungeon accurately as it is now. Each individual detect magic spell will work but once.
Room 21: Basement of Overlord's Inn
Two large wine casks, boxes of food and a side of beef hang from the ceiling. A locked eastern door leads to the temple below.
The Masden Family uses this room, although they can't solve the puzzle to get down the stairs.
Room 22: Upper Temple of the Necromancers
There is a 10% chance that a service will be going on. This is the worship hall of the evil sect. The walls are artfully painted in scenes depicting the deification of The Necromancers. Most of the pictures are gross and nauseating. The curtain tapestries at the south end of the hall show the death of The Evokers showing them to be weak, senile and perverse. In all scenes The Necromancers are depicted triumphantly.
The pews are of varnished oak and some of the rear pews have been gnawed on by rats. The floor is of inlaid black marble. The four braziers are of gold (500 GP each) and silver. The statue of a Necromancer is solid serpentine with 1000 nalachite eyes set into the stone (each eye, 25 GP), each seems to glow. The statue is a heroically proportioned male, 8 feet tall. Any attempt to pry loose gems from the statue will result in it becoming animated.
Any humanoid death in the room has a 2% cumulative chance of summoning the presence of the Merchant of Death.
If the Merchant of Death does appear, he will possess the dead body and polymorph it into a 7 foot tall fighter with a muscular body. The Merchant of Death will then go about destroying every living thing in the room. It may shape change to any evil creature of equivalent hit dice. It may also summon one minion per round for every three levels of experience possessed by corpse. Minions appear as fighters in plate mail and shield with long swords (AC -2).
If the host corpse is destroyed, there is a 20% chance that the Merchant of Death will possess another corpse. Chance increases 10% each time a new creature is possessed up to 90%. Failing to do so, the Merchant of Death will disappear along with his minions.
Room 23: Entryway into the Crypts
A mirror with a death's head design hangs directly opposite the west entrance. Two skeletons stand guard.
If the skeletons guarding either passageway are not shown either a Necromancer's Ring or a wax seal containing its impression, the Skeletons will attack. If dealt 8 hit points of damage on the first blow, the skeleton will split instantly into two skeletons, each having the same properties as the first. This will continue until the mirror on the south wall has been shattered, whereupon the creatures turn to dust.
Room 24: Another Ancient Patriarchal Crypt
This crypt contains a stone sarcophagus. In addition, a new wooden chair and table are sitting in the room. A low bench is against the far wall.
This crypt has been converted to a robing and meditation room for the High Priest. In the sarcophagus are ceremonial robes, a green cape (800 GP), a collar of jade (1200 GP), an obsidian dagger (360 GP), and a skull-headed staff (1200 GP). These things are all locked in the stone sarcophagus that has a poisoned crossbow trap set up to it (1d6 damage plus 3d8 poison damage), and a poison pin lock (4d8 poison .... slow, 1 die damage per turn).
Room 25: Purification Room
This is a purification room for the priests. A bowl containing continually warm, non-coagulating blood sits on a pedestal in the room's center. A pair of large eyes is painted on the west wall. If the blood in the basin is sipped and a dab placed on both eyelids, the eyes become clairvoyant and the person may gaze into any one room so desired in the entire dungeon complex not protected by protection from evil. Performing this ritual can be considered as a chaotic evil act since the blood in the basin is human. If the blood is drunk or sipped, the character doing so must will save or go berserk; dispel magic or remove curse can reverse the effects.
Room 26: Chamber of the Undying Elven Swordsmen
Ten statues of Elven Warriors circle this room.
This chamber and the one beyond it are unbeknownst to the forces of Evil. If anyone tries to enter room 27, the statue to the right of the entrance will become flesh and blood and block the passage. "WHAT IS YOUR REASON FOR ENTERING YON CHAMBER?" he will ask. He wears strange glassy lenses over his eyes that give him True Seeing. If the reason given is satisfactory and the speaker is of good alignment, the elf will let him pass. If not, the elf will whistle and the other statues will come to life.
They will fight to the death, but upon dying they revert to stone for one turn, regenerating hit points and coming to life again if any intruders are still present in the room. Undying swordsman are magically created humanoids from the lost souls of the dead. They are dedicated to holding an area in stone statue form and when activated they will query the persons or creatures about their intent. They fight as 36th level fighters and will fight to the death. When they are slain they will turn back to stone and one turn later they will reform and be back at full strength in hit points etc. This resurrection is automatic. It can not be stopped. They will resurrect indefinitely.
Room 27: Marvelous Gate of Teleportation
A large stone archway has flickering runes about its edges. The archway is filled with shimmering gold light and radiates an aura of good.
It is a teleporting door into a room where the secret of the entrance password into the necromancer's tower is written. Evil beings may pass through this door but they will be disoriented and confused for a full Turn (no saving throw).
Room 28: Crypt of William Weatherby
Crypt that contains a wight. It is Nicholas's oldest son, William. William was killed by small pox in a short skirmish in the evoker's tower. Any images on the walls have been clawed off.
Room 29: Crypt of Shamling, the Wine Merchant
A wraith, Shamling is sealed into a sarcophagus, which is tied shut and has a Necromancer's signet seal set into wax on the knot.
Room 30: Empty Crypt
This room is empty.
Room 31: Teleport Trap
Locked in a wooden box is 30 GP. Minimal damage will break the box. Inside is a fragile glass vial filled with a poison gas. Touching the chest will teleport the contents of the room to Room 80.
Room 32: An Army of Undead
A guard of 40 undead soldiers stands at attention in this room. They carry broadswords and wear plate mail, although some of it is falling into disrepair. Their liveries show that they are from Teufeldorf and the surrounding regions, but some of the liveries are of an ancient design. Nicholas's signet ring will allow passage by the creatures. A wax seal will also work.
If dealt 8 hit points of damage on the first blow, the soldiers will split instantly into two soldiers, each having the same properties as the first. This will continue until the mirror on the south wall has been shattered, whereupon the creatures turn to dust.
Room 33: The Puppy
Locked in a cage in this room's center is a small, cute, puppy dog. The cage hangs from the ceiling, about 10' off the floor. Emanating from the cage is a permanent silence spell. Four fighters stand guard at each cardinal compass point around the cage.
The puppy dog is in reality the shape-changed form of Murkaganth (Murkey), an adult Bronze Dragon. Murkey was captured a number of years ago. The dog form has been kept so ever since (300 years). During that time, he did not age because a temporal stasis had been placed on the cage. The spell must be removed before the dragon can awaken.
Murkey speaks Bronze Dragon, Common, Lawful Good, and any animal form that he may be in. In the northwest comer of the room is a black pyramid that radiates a strong aura of necromantic magic.
Room 34: The Flaming Guardian
The passage to this room is hidden from view by an illusionary wall from Room 33. A wall of fog will block vision from Room 32.
The door is blocked by a 2' tall, red statue of a fighting man. A Magic Mouth will speak: "IF THE ROOM BEYOND YOU WISH TO SEE, THEN LAY ON HANDS AND PASS BY ME." Each character must do this or the statue will form into a wall of fire (duration 12 turns) blocking the entrance. If the statue is attacked or hit kicked it will form into a 7 foot tall animated, hasted, flaming stone statue. Tipping statue will not shatter it.
In a chest in the center of the room is a bag containing 100 tiger eyes. The chest is actually a part of the stone floor and has a crossbow trap that will fire 4 bolts vertically from the ceiling directly at the chest. If a dispel magic is not cast on the gems within 10 turns after they are removed from the chest, they will explode causing 1 hit point of damage per gem to every character within a 10 foot radius.
Room 35: A Second Guardian
The entrance to this room is similar to the entrance to room 34. A wall of fog blocks vision.
A gray, 2' tall statue of an athletic man blocks passage. Magic Mouth: "IF THE ROOM BEYOND YOU WISH TO SEE, THEN LAY ON HANDS AND PASS BY ME." Each character must do so again and if any but a good character touches it, a wall of stone will spring up that will block passage to all who wish to try thereafter (duration: 18 turns).
Any attempt to attack the statue or chip into the wall will cause the wall to form into an 8' tall blue stone statue. Tipping the statue will not shatter it. The room itself is constructed of blue-gray stone.
In the center of the room is an iron-bound wooden chest containing 100 blood stones. If the gems are taken without first casting a dispel magic upon them, they will act as a slow spell to all friendly characters and creatures within a 40' radius of the character bearing the gems (no saving throw). Characters so affected will notice that their enemies seem to be moving much faster than they are.
Room 36: Diamond Ladies and Golden Bones
Again, the door to the room is obscured by a wall of fog. Blocking entrance into the room is a 2' tall, clear, colorless gem-like statue of a well-formed woman. Magic Mouth: "IF THE ROOM BEYOND YOU WISH TO SEE, THEN LAY ON HANDS AND PASS BY ME." Each character must do so to pass.
Only lawful evil characters may enter. Any others will be blocked by a wall of force that will prevent spells and physical things from going through, including breath weapons. If an attempt is made to attack or steal the statue, it will form a 7 foot tall Statue of solid diamond. If destroyed, it will turn into a wall of force for 24 turns (after this, it becomes broken glass). Entry through the trap door in the ceiling will cause the statue to attack. The 5 foot square closet in the northwest corner of the room is disguised by a permanent illusion. It is a vertical shaft going up to the fortress tower in the village. The top is mortared shut, and will take 60 hit points of damage (AC: 6) to break through.
In the center of the room is a golden chest (500 GP) upon which sits a golden skeleton who will cast a Hold Person spell upon each adventurer and a quest spell. The quest spell will cause each character to answer truthfully, the following questions: "WHAT IS YOUR TRUE NAME AND IDENTITY? WHAT IS THE REASON FOR YOUR BEING HERE?" Each character affected must answer each question out loud and truthfully or take 8d8 points of damage per lie. Any attacks upon the skeleton will cause it to become ethereal, but the questions will continue. After all questions are asked and answered, the skeleton will crumple into a pile of golden bones (4800 GP value). In the chest are 100 aqua-marines and a lion headed mace head (which will raise a cleric's undead turning power by 3 levels).
Room 37: Room of Carrion
This room's floor is covered with human skeletons and rotting human corpses. The smell will gag those not making a save against nausea. Failure indicates loss of stomach contents and weakness equal to 50% normal strength for 1d4 Turns. Scurrying about the debris are several dozen carrion crawlers. They are attempting to feed while avoiding the advances of a small black pudding. Scattered about the floor are 200 gold. The passage to room 39 has a permanent illusion over it to look like the rest of the wall. However, it has actually been boarded up, although the lower edges of the boarding have been eaten away a bit by the pudding. The drapes have also been pudding damaged.
Room 38: Alcove of the Three Images
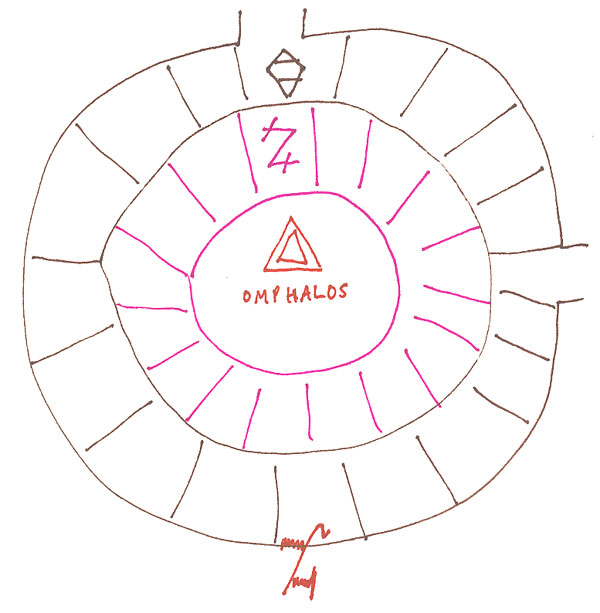
Three much-desecrated statues of The Evokers are in here. In each statue, it is depicted with the Ring, Amulet and Belt of the Evokers. The north-facing statue bears a stone copy of the Mace from Room 36. Any character of a good alignment standing between the statues for more than a few seconds will be healed of 20% points of damage (works only once per day per character). At the feet of the north-facing statue is a box containing a scroll that lists the names and locations of the Glyphs of Warding in Room 39. It is in the form of a map showing the Glyphs in their positions. In the center of the map it says "OMPHALOS". The map is in common.
Room 39: The Chamber of Omphalos
This chamber is done in the "deteriorated ornate" style. The floor is tiled with golden-colored marble and the walls depict the earthly life of The Evokers. An evil person or creature will see only dust, cobwebs, and cold, gray stone (no saving throw). A guardian naga, named Omphalos, and 30 skeleton warriors line the walls armed with maces. They will not trigger the glyphs of warding.
Glyphs of warding are transcribed on the floor, although they are invisible. Each black dot on the map represents a glyph that protects the 10 foot square it is centered in. Entry into that square will fire off the glyph. The door glyph will cause electrical damage. The outer ring will cause paralysis. The next ring will cause blindness. The inner two glyphs will give off 12 points of fire damage each. Omphalos is not affected by the glyphs.
Room 40: The Tomb of the Evokers
This room is empty.
Room 41: Teleporting Mists
The two glyphs of warding in the door to this area will do 12 points of fire damage. Room 41 is a misty area that teleports persons coming within 15 feet of the south wall to a random room in the dungeon.
Room 42: Home of the Ring of the Evokers
The room is draped in white velvet. A lion-headed ring cut from a single topaz gem floats 4' off the ground, rotating slowly. Quiet, gentle music can be heard and the air has a healthy, outdoorsy scent. This is the location of the Ring of the Evokers.
Room 43: Another Misty Teleport Hall
Victims will feel that they can see as far as possible down a 60' hallway. They are transported to Room 47.
Room 44: Empty Room
This room is empty.
Room 45: The Wine Cellar
A secret door is hidden behind two casks of wine. Most of the time, a henchmen will be in here sampling wine.
Room 46: Entrance Into Constabulary From Tunnels
If room 45 is determined to be empty, then there is a 70% chance that the door in the ceiling overhead (approximately 10') will be bolted shut. Up to four characters may attempt to force the door simultaneously. The walls are of earth shored up with timber.
|
Monsters
Rust monsters (12) |
Treasure
Invisible large rubies (2) - 6000 gp each |
Tower of the Evokers: Level 2
Room 47: Room of Baleful Blackness
This room will receive teleportees from corridor Room 43. However, it does not work in reverse. The room is intensely dark and no spell, sword, torch, or lantern will illuminate more than 5' radius. Infravision has a half range in here. In the north east section of the room is a Gelatinous Cube. In a metal tube is a scroll with a Water Breathing spell on it.
Room 48: The Pointing Ogre
A statue of an ogre stands on a very low, circular pedestal. In its left hand is a stone club studded with 100 rhodonites. The right hand points toward one of the four entrances. All four doors are obscured by a wall of fog. If the room is occupied for two or more melee rounds, the ogre statue will pivot swiftly and point at random to another one of the four doors. A 3 inch thick wall of stone will form there instantaneously blocking the door (duration: 4 turns). Anyone standing in the doorway may be trapped as the stone surrounds them. Every two rounds the statue will point randomly at another unblocked door until all doors are blocked or the room is empty. If the room is emptied before 3 doors are blocked then the statue will stop. If not, it will block all four doors. The room will then fill with water in two turns. The water will gush out into adjoining halls and rooms when the walls of stone disappear after 4 turns, flooding those places.
The pit in the west hall is hidden by fog. It is 20' deep and has 3' of water at the bottom. If the room empties out its water, the pit will be full to brimming for two weeks thereafter.
Room 49: Goblins Lair
All goblins are armed with two flasks of oil, unlit torches and fire starting kits. On their shields the goblins have the emblem of a jackal's head. The goblins are led by Gnorsh Bloodtongue, a hobgoblin in the service of Nicholas. Goblin patrols will include dire wolves. Lying about the room are 45 various piles of sleeping rags.
Room 50: Another Goblin Room
The wall is decorated with 30 shields. 25 of them are worthless, battered or rotted beyond usability. Five are actually in good shape. The room is filthy with various piles of rags, Goblin dung and refuse are abundant here.
Room 51: Empty Room
This room is empty save a large pit in the southern end of the room. Several dead goblins are at the bottom of the pit.
Room 52: Basin of the Wonderous Water
In the center of this room is a 5' diameter basin containing a musty smelling, brackish water. The basin is made of silver (much tarnished) value 200 GP. 3 bloodstones of 100 GP each are set into the rim. Drinking the water once will raise a character's prime requisite by 1d6 points for a day. Drinking twice will lower that score permanently by 1 point. Curled about the base of the basin is an amphisbaena. The creature will not attack unless approached within 10 feet.
Room 53: Horrible Hall of the Silent Ball
A 10-foot diameter ball with a permanent silence spell cast on it moves continually around a circular hall at a speed of 19 feet per round. The ball makes the circuit each minute. The players may make a spot skill check to see the groove that the ball has worn in the wall 5 feet above the floor. The players can make a spot skill check to see small amounts of whitish powder near the edges of the walls. This powder is crushed bone, make a knowledge roll to figure it out. Proper reactions are; RUN! (A character in normal or heavy gear may out run it). FALL AND ROLL ASIDE; GET TO THE CEILING; SPEAK THE WORD: "REVERSE". (The latter will cause the ball to immediately roll in the other direction).
Room 54: Goblins in Waiting
Three goblins with heavy crossbows and scimitars wait in hiding here. There is a small firing port in the wall facing Room 51.
Room 55: Hall of the Glowing Procession
This room has a powerful permanent darkness spell along with a permanent silence spell on the entire room. One melee round after entering the room, a group of ten glowing humans (dancing lights) in long robes will pass from the north to the south end of the hall.
Room 56: Black Marble Room
The floor of this room is polished black marble as are the walls and ceiling. If the entrance to room 59 is approached within 5' without bearing a Necromancer's Ring, a wall of fire will spring up.
Room 57: Laboratory of Berkam-Shem
In the northwest comer of the room are 4 invisible goblin guards. These are very powerful goblins. In the back part of the room, behind the secret door, are eight additional goblins, armed exactly as those above. Berkam-Shem has a tendency to duck out the back way and send his bloodthirsty bodyguards "up the middle" while he pulls flank attacks.
The secret door at the rear of the room has a permanent illusion cast over so that it always looks like blank stone wall even if the door is opened. Also, next to the secret door is a cage containing a small live lizard; however, the lizard has Invisibility Sphere cast upon it and so it is invisible, and so is anything entering the radius of the spell. Thus, it will appear that Berkam-Shem has just disappeared from the room. He also tries to be showy by pretending to go through the motions of a teleport spell. If he has the time, Berkam-Shem will cast a haste spell on the goblins in the back room before they attack.
In the main room is an iron chest containing 400 gp, 50 pp, Oil of Etherealness and a scroll of Protection from Spells. The chest itself is a magic user. The chest's name is Hingest. There is a hole in the ceiling that exactly fits Hingest. He will levitate up there and appear to be part of the ceiling. Hingest is immune to fire including magical fire, The potions, scroll, gold and platinum are in a false bottom that is only detectable from the rear of the box. 1500 cp are in the main portion of the box. If the box is about to be opened, Hingest will cast a fake gold spell upon the copper. The box is trapped with an electrical puzzle.
Room 58: Empty Room
This room is empty.
Room 59: Lower Temple of The Necromancers
The walls are mosaics of human sacrifice and various unnatural acts. If anyone studies them closely, they will be subject to fits of nausea and depression This is where victims are sacrificed to the evil god. The ceiling of the room is 30' high. The statue of the Necromancer is 20' tall and is inlaid with jade and has alexandrite stones embedded into it as scales. Two glowing topazes are it's eyes. The areas of the room that are not painted (the floors and ceilings) are of black marble with gold tracery inlaid. A bloodstained altar is before the statue. Two braziers sit on either side of the statue. Attempting to remove valuables from the statue will bring it to life as a greater stone golem. The statue will not pursue beyond room. Any humanoid death in the temple will have a 4% cumulative chance of summoning a Merchant of Death.
Room 60: Trap of the Red Hot Wires
Across the floor are strung or lain 20 long, hair-like wires. If stepped up on or touched, they will coil about the victim. The wires do no damage the first round but by the second round they are red-hot and 1d8 damage per round to the victim.
Room 61: Teleportation Hall
At the end of this hall appear to be two doors. They are locked. In reality, they are teleportation doors that take victims to room Room 81, coming out through the west wall. Approaching within 15' of these doors will seal the hall with a wall of force. A heavy poisonous death gas will begin to fill the room at knee level and rise one foot per melee round. The gas will not teleport.
Room 62: Empty Room
This room is filled with piles of bones and refuge.
Room 63: The Belt of The Evokers
This is the location of the Belt of The Evokers. The room is draped with a black velvet curtain. A belt formed in the head of a lion with a topaz in its mouth floats about 4' off the ground, glowing and rotating slowly. Beautiful, but changing music can be heard in the background. The air is perfumy, but a little thick.
Room 64: Gargoyle Ambush
Hidden among the rocks are four gargoyles. In a pile amongst the rocks are 140 gp.
Room 65: Empty Antechamber
This room appears to be empty. The walls are scorched.
Room 66: The Tomb of Racox
The room appears to be about 15' square with black, draped walls. On the pedestal is the body of a long dead Paladin named Racox. Carved on the pedestal are the history, great achievements, war song, prayers and genealogy of the dead man. If the body is removed or disturbed, a curse will fall upon all transgressors in the room (if you're in the room when the curse is cast you're a transgressor).
Opening the pedestal (sliding the top off), will cause the curtains to drop to the floor and reveal 10 skeletal warriors in chainmail with long swords holding back 10 skeletal dogs. Hidden in the pedestal are a small ornate box (30 gp) containing a 500 gp amethyst, a gold and gem encrusted mirror (200 gp), a +1 broadsword with a finely worked golden, be-gemmed hilt (500 gp), a black leather, gold studded sword sheath with a black onyx mounted on it (800 gp).
If the sword is drawn from its sheath, the corpse of Racox will animate. He cannot be turned and regenerates.
Room 67: The Cell Block
This is the block of cells for all prisoners. The bars are old and rusty. Possessions of the characters that are not of great value will be found in cell" A". The guards are goblins.
Room 68: A Large Pool
10' deep is in this room. The water has continual flame cast upon it so that it glows and is the source of light for the room. In the water is a water weird. A Necromancer's Ring or a wax seal of it will stop its attack (however, the wax seal must be cast into the water and the ring touched to it). In the pool are 800 gp.
The water weird is a life form origination in the elemental plane of water. It attacks all living things, feeding from their essences in some unknown manner. The water weird can inhabit almost any area of water, from pools to lakes and even streams. When a water weird forms it takes the shape of a giant snake in the form of water.
Room 69: Three Hill Giants
This room is a sort of guard post manned by 12 stone giants.
The three of them are kneeling in a comer casting dice for a pile of gold coins (1000 gp). The dice are 3" across. Occasionally they take swigs from a bejeweled bottle containing a powerful giant wine. One swig of this wine will reduce a human's Dexterity and Wisdom by 1d6 points each for 1d12 turns. The 2' tall bronze bottle, carved to look like a cat has 2 aquamarines and yellow glass set in it and is worth 1600 GP. If any persons come into the room, the Giants will come to attention quickly. They will attack, unless the ring or a wax seal of it is shown.
Room 70: Hall of the Warring Doors
At the north end of the hall is Hargrove, an intelligent door. At the south end of the hall is Sydni, an intelligent door. Each has the following abilities: speak, make a face appear, give off alignment damage as per a sword, lock and unlock itself, change its temperature + or - 100 degrees C (182 degrees F), regenerate 2 points of damage per melee round, cast spells as an 18th level mage, change color.
The two doors are antagonistic towards each other and currently are quibbling as to the ownership of a large diamond situated halfway down the hall. Each door has a small pile of treasure in front of it. Although the doors are aligned, they will help any who procure the gem for them or help in their constant battle. Even though they are enemies, neither door will actually kill the other, just try to damage and bully it Hargrove's treasure: 100 gp; Sydni's treasure 60 pp.
|
Monsters
Gelatinous cube |
Treasure
Scroll of Water Breathing |
Tower of the Evokers: Level 3
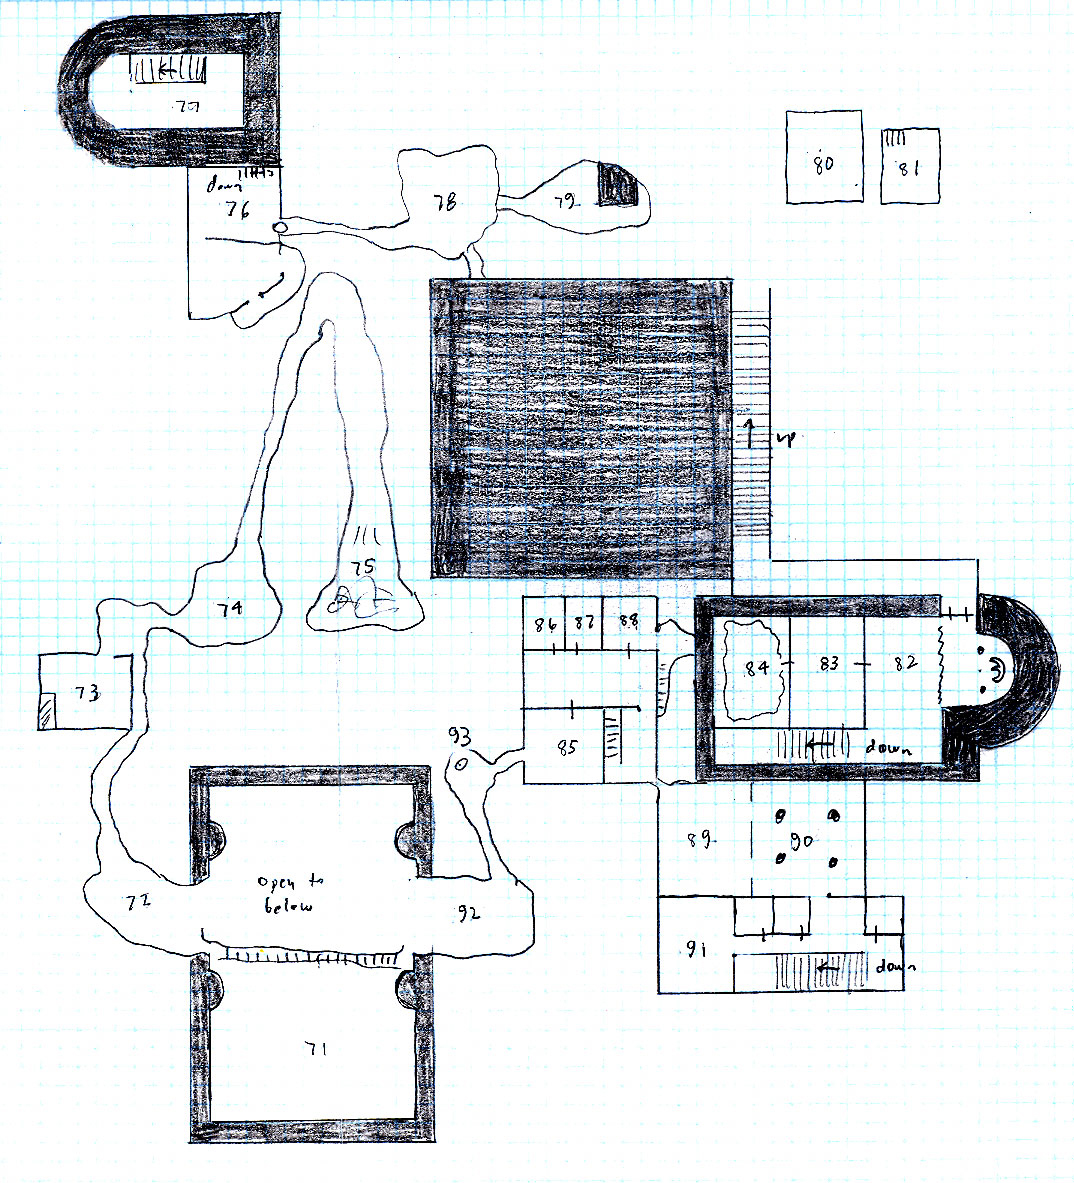
Room 71: Upper Rafters of the Temple of The Evokers
Dire bats flit through the air if any enter here. A rope bridge crosses from Room 72 to Room 92. If attacked while on bridge, roll a dexterity check or lose balance and fall 25' to the floor of the temple below.
Room 72: Bear Lair
The floor in this room is covered with straw. The ceiling is 25' high. There is a mangled goblin carcass on the floor. Against the back wall are three dozing brown bears. They are pets of Xor. If left unmolested, they will watch or snuffle around and even seek to be petted by intruders. But, if any try to go down the passage to room 73, the three bears will attack.
Room 73: Lair of Xor the Evil One
Xor is not a dungeon resident. He has stealthfully gained entrance to the dungeon and seeks to procure funds for a war he has brewing on the sly back home. If properly rewarded Xor may join a party, but it will be to further his own purposes and should be played as such. Xor is an evil 40th level fighter.
Xor has a puzzle-trapped chest containing 1200 gp worth of dungeon artifacts (non-magical), Potion of Mana, Potion of Serious Healing (2), three large pearls. Xor has a +2 sword.
Room 74: Another Bear Lair
The floor in this room is covered with straw. There are two of Xor's pet brown bears here. If left unmolested, they will watch or snuffle around and even seek to be petted by intruders. But, if any try to go down the passage to room 73, the three bears will attack.
Room 75: Ghouls A hallway slopes downwards into a large pile of bones. Twenty ghouls farm the piles for food. Xor has taken the treasure from this room.
Room 76: Rust Monster
A rust monster is munching on an old suit of armor. This is the downstairs to an old dry goods merchant shop. Several (dead) skeletons lie amongst the broken furniture and dishes.
Room 77: Cloth Wrapped Horror
A mummy is entombed in a stone crypt at the west end of the room. In the sarcophagus with it are 200 gp. The mummy was once a priest of the Necromancers, but a disagreement developed and he was wrapped up and entombed alive in this crypt, with magic to change him to his current state.
Room 78: Empty Room
This room appears empty.
Room 79: Prison for a Paladin
Trapped behind the wall is Glorfingol Goodman, Paladin of The Evokers. He is chained to the wall and has not been fed for 7 days. Because of this, he is not healing well. All of Glorfingol's goods are on a table on the north side of the stone wall. These include: iron rations, a flask of wine, plate mail and shield, a broadsword, and a mace. Glorfingol knows the exact location of the three Evokers artifacts and is being tortured for that information. Six goblins are always here.
Room 80: Receiving Room
This room receives teleportees from room Room 31. A 5' square hole is in the floor in the southeast comer. After one melee round, four wraiths will float up from the room below and begin to attack. If these wraiths have already been destroyed, they will not appear here.
Room 81: Yet another Receiving Room
Teleportees from Room 61 arrive here. However, they may pass back into the west wall and arrive back at Room 61 again. The walls of this room glow slightly.
Room 82: Small Chapel to The Necromancers
A black, 8' tall basalt statue of a Necromancer stands between two unlit braziers. The north wall is a black drapery. The statue has glass eyes. If the statue is passed without a low bow and showing the Necromancer's Ring (no facsimiles here), it will begin to fire magic missiles from its eyes at a rate of two per round, affecting up to two targets. If physically attacked it attacks once per round doing 8d8 points of damage, plus continuing to fire magic missiles. It will not pursue up or down the stairs. The two braziers will flare into life on the second round of melee and begin letting off a vapor that will put to sleep those not making wisdom saves and slow spell on those who do not then make a saving throw. If the eyes can be salvaged, they each can be used to form a Wand of Magic Missiles with 50 missiles each, minus those already fired, of course.
The west wall has a permanent Illusion cast upon it to make it appear that there is no door or stair in it. The door to the room is arcane locked. Trying to open the door will fire off a magic mouth spell: "GO NO FURTHER MANLING! BEYOND LIES THAT WHICH WOULD DEVOUR YOUR VERY SOUL AND BEFOUL GREATER MOTIONS THAN YOUR FEEBLE MIND MIGHT KNOW!" A second attempt to open the door will fire off another Magic Mouth: "YOU WERE WARNED!" and a spear trap will fire. A third attempt to open the door will cause a Wall of Fire to spring up directly before the door. Magic Mouth: "STUBBORN, AREN'T WE!"
Room 83: Spirit Naga Guardians
The nagas will most likely let loose with the main artillery as a first shot. Both nagas are already invisible and at first crack of the door, Harshasha will have levitated himself to the ceiling (20') in the northwest corner. Both will then fire off 10' wide, 45' long Lightning Bolts for 5d6 of damage. Ishping Waha will be on the ground, invisible, in the south west corner.
The north wall of the room is protected similarly to the door in room Room 82. The door has a permanent Illusion cast over it to make it appear that no door exists. A Magic Mouth will again warn: "YOU HAVE BEEN WARNED MORE THAN ONCE! BEYOND LIES THAT WHICH WOULD SEEK TO HINDER THE PURPOSES OF MEN! GO NO FURTHER!!!" The door is arcane locked. A second attempt to open the door will open up a passwall in the floor, 8' wide from east to west, for a drop of 25'. Magic Mouth: "SOME PEOPLE NEVER LEARN, DO THEY? HA! HA! HA! HA!" A third attempt will bring down an Ice Storm in the area of the door.
Room 84: The Missing Amulet of the Evokers
This room is draped in gray velvet. Normally, the amulet would float 4' off the ground in the center of the room, rotating slowly. A fanfarish music can be heard, and the air is slightly antiseptic smelling.
Room 85: Communal Room and Barracks
For Dreneth the Seeker's personal bodyguards, the undying warriors, 6 cots and war chests furnish the room, along with a small stove, a few cook pots and a table and 6 chairs. Some rather explicit drawings are scrawled on the walls. Although usually only 1-2 men will be in the room, all are within calling distance if necessary.
Room 86: Stores
This room contains fresh stores of dried meat, dried fruit and jerky.
Room 87: Dreneth's Apartment
This is the apartment is used by Dreneth for study. A desk and chair are pulled up in the center of the room. A fire-trapped book lies on the desk. It is a journal of Dreneth's efforts to find the artifacts.
Room 88 and 89: Empty Rooms
These rooms are empty, although a taint of necromancy can be detected here.
Room 90: The Nefarious Globe Trap
The ceiling of the room is 60' high. Four lotus blossom columns stretch upward. Torch light will reveal a glistening about 45' or so up in the air. A l' diameter crystalline globe is delicately suspended on four thin lines. Any (repeat any) jostling of the wires will send the globe crashing down to the floor. It contains an extremely volatile liquid that will explode for 8d8 of damage to all within a 10' radius. Inside the sphere is a bag containing a flash gem, a large ruby that if struck sharply will emit a flash of laser light for 2d8 of damage, range 30', from its front face. It has 20 charges in it and can be re-charged to a total of 30 charges by exposing it to the sunlight for one hour per charge. If dropped, it will randomly fire 1 - 8 times in random directions. Characters must make a saving throw to avoid being hit. Smoke and/ or dust in air will reduce range to 10' and damage to Id8.
Room 91: Lair of the Lich
Inscribed on the wall is the following: "AT HIGHEST PEAKE, THERE EVIL DWELLS LONG DEAD BUT NEVER DYING!" Of bones (human) and rotted foodstuffs are lying around the room.
The snacks are three humans are tied up in the small northern rooms and kept asleep by the vapor of a small incense burner (10 sticks of sleep incense near by). They have been asleep for several weeks. All their weapons and supplies are long gone.
A lich lies in the final room. He will awake if disturbed. His slab is made of gold.
Room 92: Owlbear Lair
Two very ornery owlbears (mated pair) have made their lair here. They are guardians for Xor. Four eggs are in a nest in the southwest corner of the room.
Room 93: Shaft to Level Below
This room or wide spot in the corridor has a shaft in it that leads down and the small stables that open up on to Room 107.
|
Monsters
Dire bats |
Treasure
1200 gp |
Tower of the Evokers: Level 4
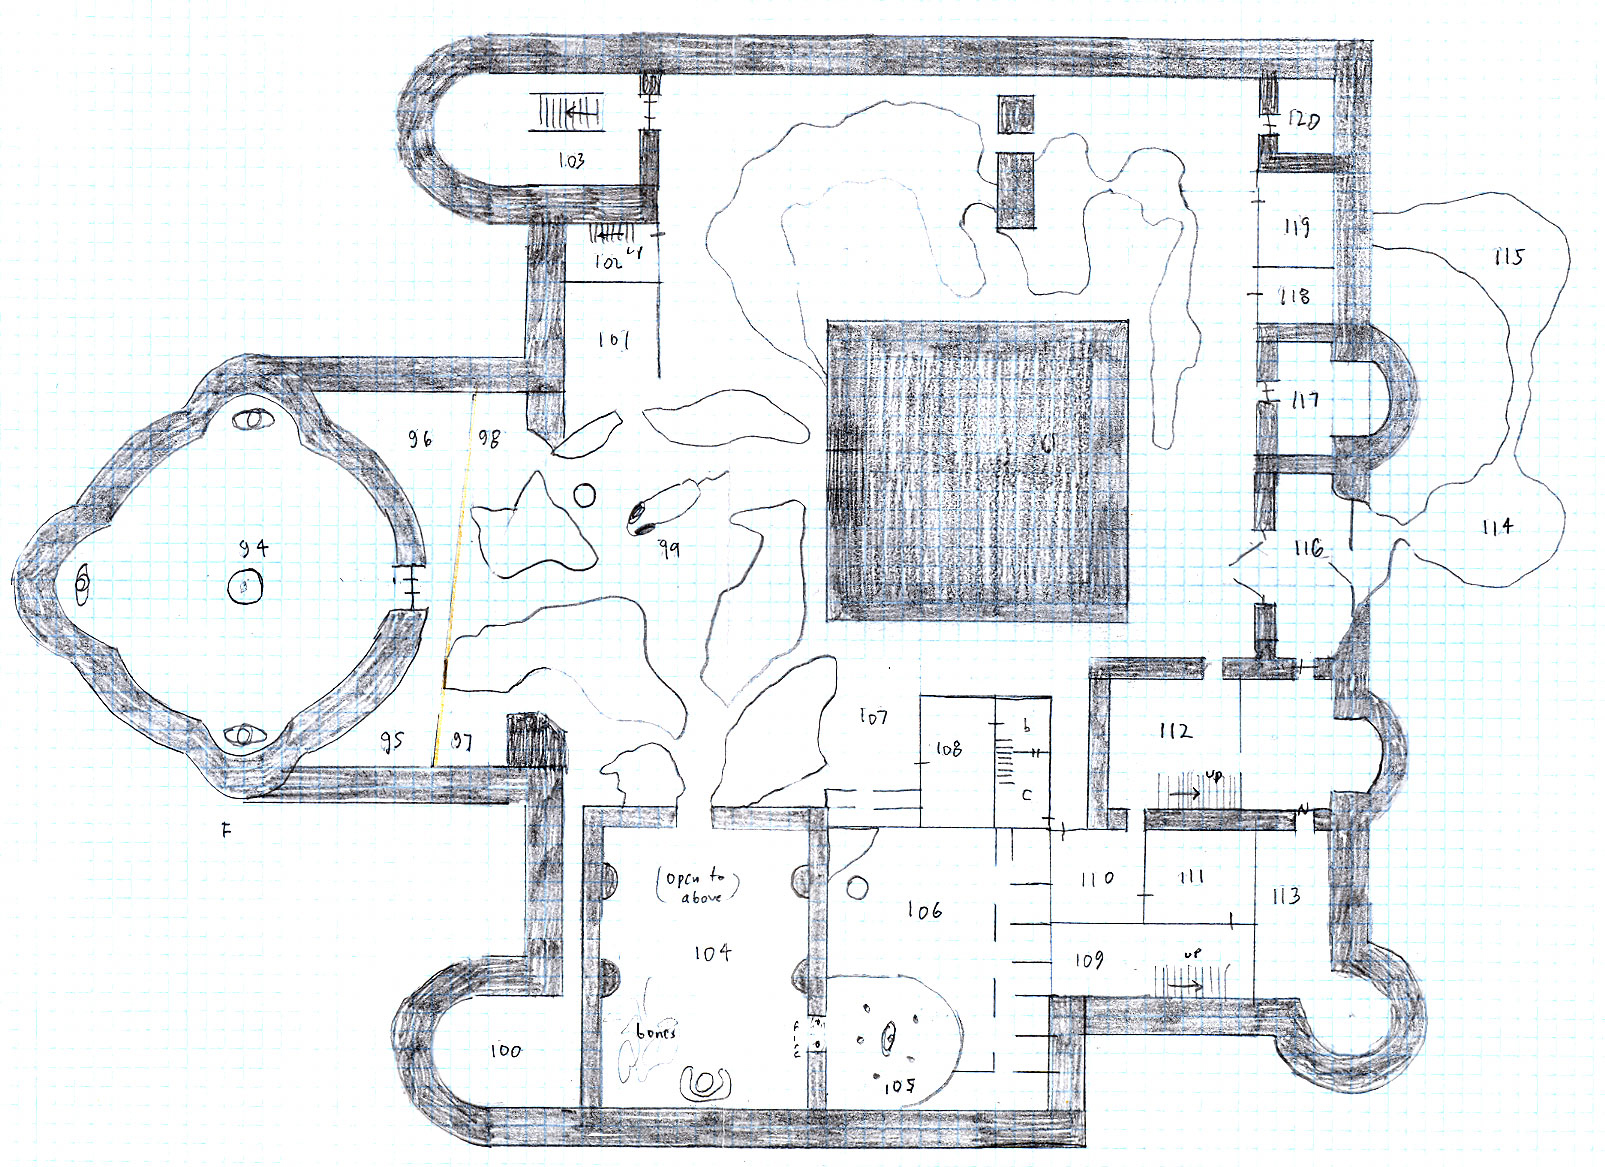
Room 94: Main Hall
The room itself is constructed of ornate, white marble, delicately worked with many good creatures portrayed in the decorations. Three statues, approximately 20' tall, are located at the north, west and south compass points. This was originally the main hall of The Evoker's Tower
Rooms 95 and 96: Safe Haven
This area is protected by a Protection from Evil that radiates out from the base of the tower.
Rooms 97 and 98: Empty Rooms These areas are currently empty.
Room 99: Argun the Conflagrator, Ancient Red Dragon
The ceiling in this room is 40'. The pool contains fresh water. It is the home of Argun the Conflagrator, an ancient red dragon.
Room 100: Two Spectres
Two specters guard a crystal ball of clairaudience that is permanently mounted into a small stone pedestal.
Room 101: Red Dragon's Treasure Value
Potion of Diminution, Oil of Etherealness, Poison, Potion of Alter Self, Potion of Animal Control, Flame arrows +5 (20), scroll of Stone to Flesh, 40,000 gp. These items are kept in a puzzled chest.
Room 102: Empty Room
Any noise made in this room will draw the rust monsters from upstairs Room 76.
Room 103: Ten Mummies
This room was formerly a stable. Ten mummies guard this chamber to keep intruders from disturbing the mummy lord upstairs. Turning is very difficult here.
Room 104: Formerly a Chapel of The Evokers
The statue of the god has been desecrated and it is hard to distinguish what it originally depicted. The bones of a long dead bronze dragon lie in a pile near the altar. The room smells as if much flesh had once rotted away here. The walls are scorched and blasted and several of the bones are charred.
A gray ooze is in the northwest corner.
Standing in the doorway are two crudely carved stone statues of men. The door is blocked by a Wall of Fire. A Magic Mouth will speak: "TO PASS, ONE OF YOU MUST FIGHT AND WIN". When a champion is chosen, he will suddenly find himself in an arena facing one of the stone men, somehow changed to flesh. If the champion wins, he will find himself in room Room 105, the statues and the Wall of Fire will disappear until all pass by. If the champion loses, another must be chosen. Haste, True Sight, Vorpal Weapons, Very Fast Regeneration
Room 105: Small Chapel of the Evokers
The golden statues of the Evokers here depict them as handsome young men. The statues are of solid gold. On the walls are various pictures of holy men performing acts of healing and blessing. Staying in this room for at least one turn will act as a Cure Grievous Wounds. One of the statues has an Amulet of True Seeing about its neck.
Room 106: Garden
This was once the garden of the monastery. Along the east wall are various cells once housing the holy brothers. Now the place is the lair of a nasty family of wights.
Room 107: Guardian Beast
This is one of Dreneth's guardian beasties. It is an undead six-headed hydra named Hex. Only Dreneth or his assistants may pass this way in safety. The door into room 108 is arcane locked.
Room 108: Dreneth's Laboratory
Various spell research components are lying about this room on overladen tables. On a shelf are about 20 odd bottles. Five are magical: Oil of Slipperiness, Potion of Red Dragon Control, Potion of Haste, Potion of Clairvoyance.
An invisible, puzzled chest is set in a secret trapdoor in the floor along the north wall. In it is a Wand of Magic Detection and 3000 GP.
Room 108b: Larder
Also lit by Continual Flame, this room is a sort of larder. The shelves are stocked with enough rich food for 4 weeks for 15 persons.
Room 108c: Dreneth's Study
A rather ornate bed is set along the south wall while a bookshelf covers the east wall. In the center of the room is a desk and chair with a candlestick topped by a glowing stone (continual flame). Invisible in a drawer of the desk is a Dreneth's spell books, 500 pp, and 5000 gp. On a bookshelf are various books about magic, religion and history. Disguised as a book about a particularly boring period of history lies a Manual of Stealthy Pilfering. The drawers to the desk each have a Firetrap on them and one drawer has a pair of permanently Invisible daggers in it.
Rooms 109-111: Zombie Lairs
Ten zombies lair in here. They will pursue up stairs or down halls but will not quarrel with other dungeon residents. They will not attack any who bear a Necromancer's Ring. They are also retainers of Dreneth.
Room 112: Haggling Room
This is a normally empty room, but right now Nicholas's son, Aphris is haggling over the value of some treasure to be used as payment in a plot to kill his father. Aphris is guarded by two henchmen. The items belong to the occupants of the cells in Room 67. Aphris will have a copy (non-magical) of his father's ring. Treasure: plate mail, chainmail hauberks (2), a gold hilted scimitar (200 GP), a +2 Mace, an agate, a peridot stolen from a Necromancer idol, three quartz gems, a gold necklace (800 GP), and a pair of silver slippers sewn with pearls (900 GP).
The back room is empty. Many cobwebs fill it. Both doors into the room are boarded over.
Room 113: A Tomb
Entombed within this chamber is the ghost of Vresnor Agalla. He guards 900 gp, and three potions: potion of mana x2, potion of clairaudience. Potions are all packed in a locked box in the circular part of the room. The gold is divided evenly into two large iron boxes.
Room 114: Snurgi's Bonfire
There is a roaring fire going in this room. The smoke seems to curl up and disappear into the ceiling. Actually it is Dimension Doored into the floor of Room 118. The spell works both ways, so any who unwarily wander into smoke filled room Room 118 may find themselves unexpectedly dropped into a blazing fire. A haunch of meat (actually half a cow) will be roasting over the fire and curled up around the fire will be from eight hell hounds. There is a 50% chance that Snurgi Hellstrom, a Fire Giant, will be in here tending the meat and rough-housing with the Hell Hounds. On the wall is a 4' diameter shield. At Snurgi's waist is a 6 foot long sword.
Room 115: Snurgi's Sleeping Area
If Snurgi is not in the bonfire room, he will be in here. A large leather sack at the rear of the room contains: 5000 gp, 3 orange rocks (worthless, but weighing about 10 lbs. each), a l' square piece of flat marble with a tic-tac-toe board scratched on it. (Stealing the rocks or the board will infuriate Snurgi to berserkness.)
Room 116: A Noisy Entrance
The floor is covered with straw. The large doors will creak ponderously when opened unless silenced, and will warn the occupants of Room 114. (Snurgi will be waiting in ambush for anyone he hears.) The doors are so large that they halve the door opening score. In the center of the room is a 10' square pit trap, 20' deep, with spikes in the bottom. The door into room 114 is boarded up. Scrawled on the door in Common is "KEAPP OWT".
Room 117: The Lair of the Vampire
The room is filled with human bones, rags, and rent armor. In a pile in the circular part of the room are 2000 gp, a white marble crown (1700 GP) and an electrum crown (450 GP). It is also home to a vampire.
Room 118: Smoking Area
This room is filled with smoke from Room 114. The dimension door in the floor will let anything but smoke pass back down through it into Room 114. Anyone falling through will find themselves in Snurgi Hellstrom's cooking bonfire. The room is filled with dense, choking smoke that will do choking lung damage. Characters may hold their breath for up to two melee rounds. Gear will be coated with a thick, black soot. Unprotected eyes will be blinded. If the door is open, it will draw the Vampire.
Room 119: Four Wraiths
The door to the room is locked and sealed with a wax seal having the Necromancer's signet upon it. There is a 5' square hole in the south east corner of the room's ceiling. In avelvet lined box are: a gold lion mask, studded with 90 amethysts, topazes, garnets and tourquoises that was one of the original treasures of the shrine of the Evokers (13,200 gp), a mithril spear (600 gp), a steel bottle (1000 gp), a silver sword sheath (1200 gp), a dragon mask of iron (100 gp), a gold cat figurine of aquamarine (1900 gp), electrum ring (10 gp).
Room 120: Old Storeroom
This room appears to have once been a storeroom, although it is empty except for some scraps of wood and cloth littering the floor.
|
Monsters
Ancient red dragon |
Treasure
Crystal Ball of Clairaudience |
