The printable version is no longer supported and may have rendering errors. Please update your browser bookmarks and please use the default browser print function instead.
Overview
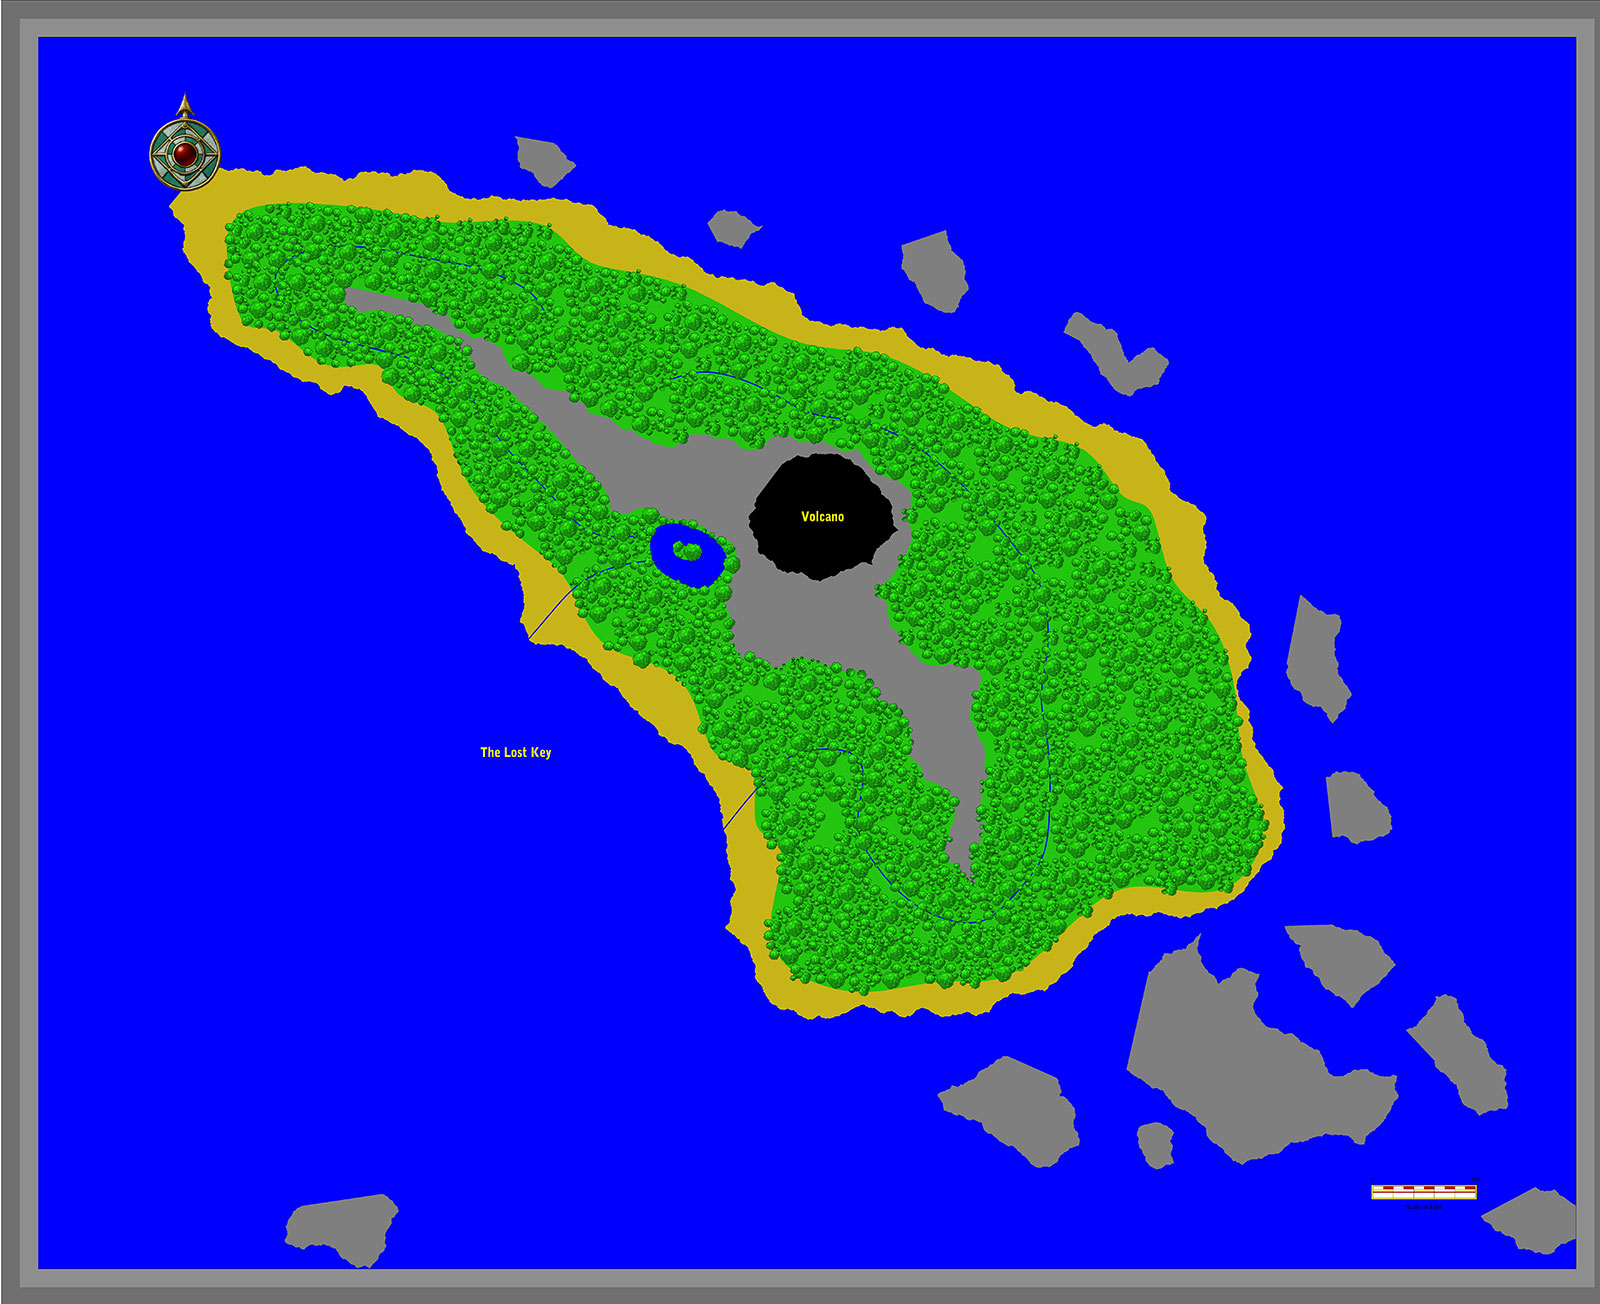
Surrounded by jagged rocks, this small island is well protected by its large, sharp sentinels. Additionally, the large island at the center of this minefield is shrouded in fog and mist obscuring its coast and the forest that rises from glimpses of beach. The only feature that can be clearly seen is a cone-shaped volcanic crater that rises above the clouds. A dark smoke drifts from the crater.
The beaches surrounding the island are surprisingly white and fine powder. A dense forest of trees comes almost to the edge of the island. There is no sign of civilized occupation on the island.
DC 25: A small set of steps wind up the side of the cone from the northwest. The stairs look old. It looks like they might end at a stone landing near the peak of the volcano.
DC 28: A small natural path - more of a slashing scar - winds up the east side of the volcano entering into a natural crevice in the mount.
Lost Village of the Dragonrider
A few black, stone buildings lie in ruins in the jungle on the northwest side of the mountain. It is hard to tell much about the inhabitants except that they were probably wee folk - gnomes, hobbits or goblins - as the structures are too small for humans, elves or dwarves. The small black buildings look several hundred years old.
In one area, the small black building have been cleared away revealing the foundations of a much more impressive structure - little more than foundations - now carefully marked by a red rope wound about four stakes - creating a square area of about 200 sq. ft. A small pile of modern tools - shovels, trowels, hammers and the like are piled neatly near one corner of what appears to be an excavation.
DC 25: Further examination uncovers some long-rotted food refuge and several empty bottles of gnomish wine dated 905 TA. It has been lying here undisturbed for months.
NOTE: This was the archeological camp of an unfortunate gnome from the Land of Bogs and the Little People. The archaeologist, Gradbell, is still in the mountain. Gradbell's wife, Gertie, is in the Land of Bogs trying to get an expedition to rescue her husband. The dragon swapped the wife for several tinkerers to put the wings on her son.
This is described in Henry Hyde's Log Book.
Secrets of the Lost Key Dungeon
There have been three civilizations on the Lost Key over the ages.
- First Age - a race of fire-based Dragonriders made this ancient temple; the western entrance is theirs; only the brass men remain
- 7th Century, Second Age - a race of goblins inhabited the area - digging out Rooms 1-7. This was their burial ground, as most lived in the village at the base of the volcano; the eastern entrance is theirs; Bledsow is their last priest
- 907 TA - a gnome archaeologist and his wife came here to dig; they were following in the footsteps of another adventurers (see Room 1). They picked a bad time since a brass dragon mother brought her son here (as his wings were malformed and his father would have killed him); when the Wanton Wench arrived flying - a plan was hatched; swap the wife for a couple of tinkerers and attach the dragon's wings!
The Lost Key Environs Map
The Lost Key Dungeon
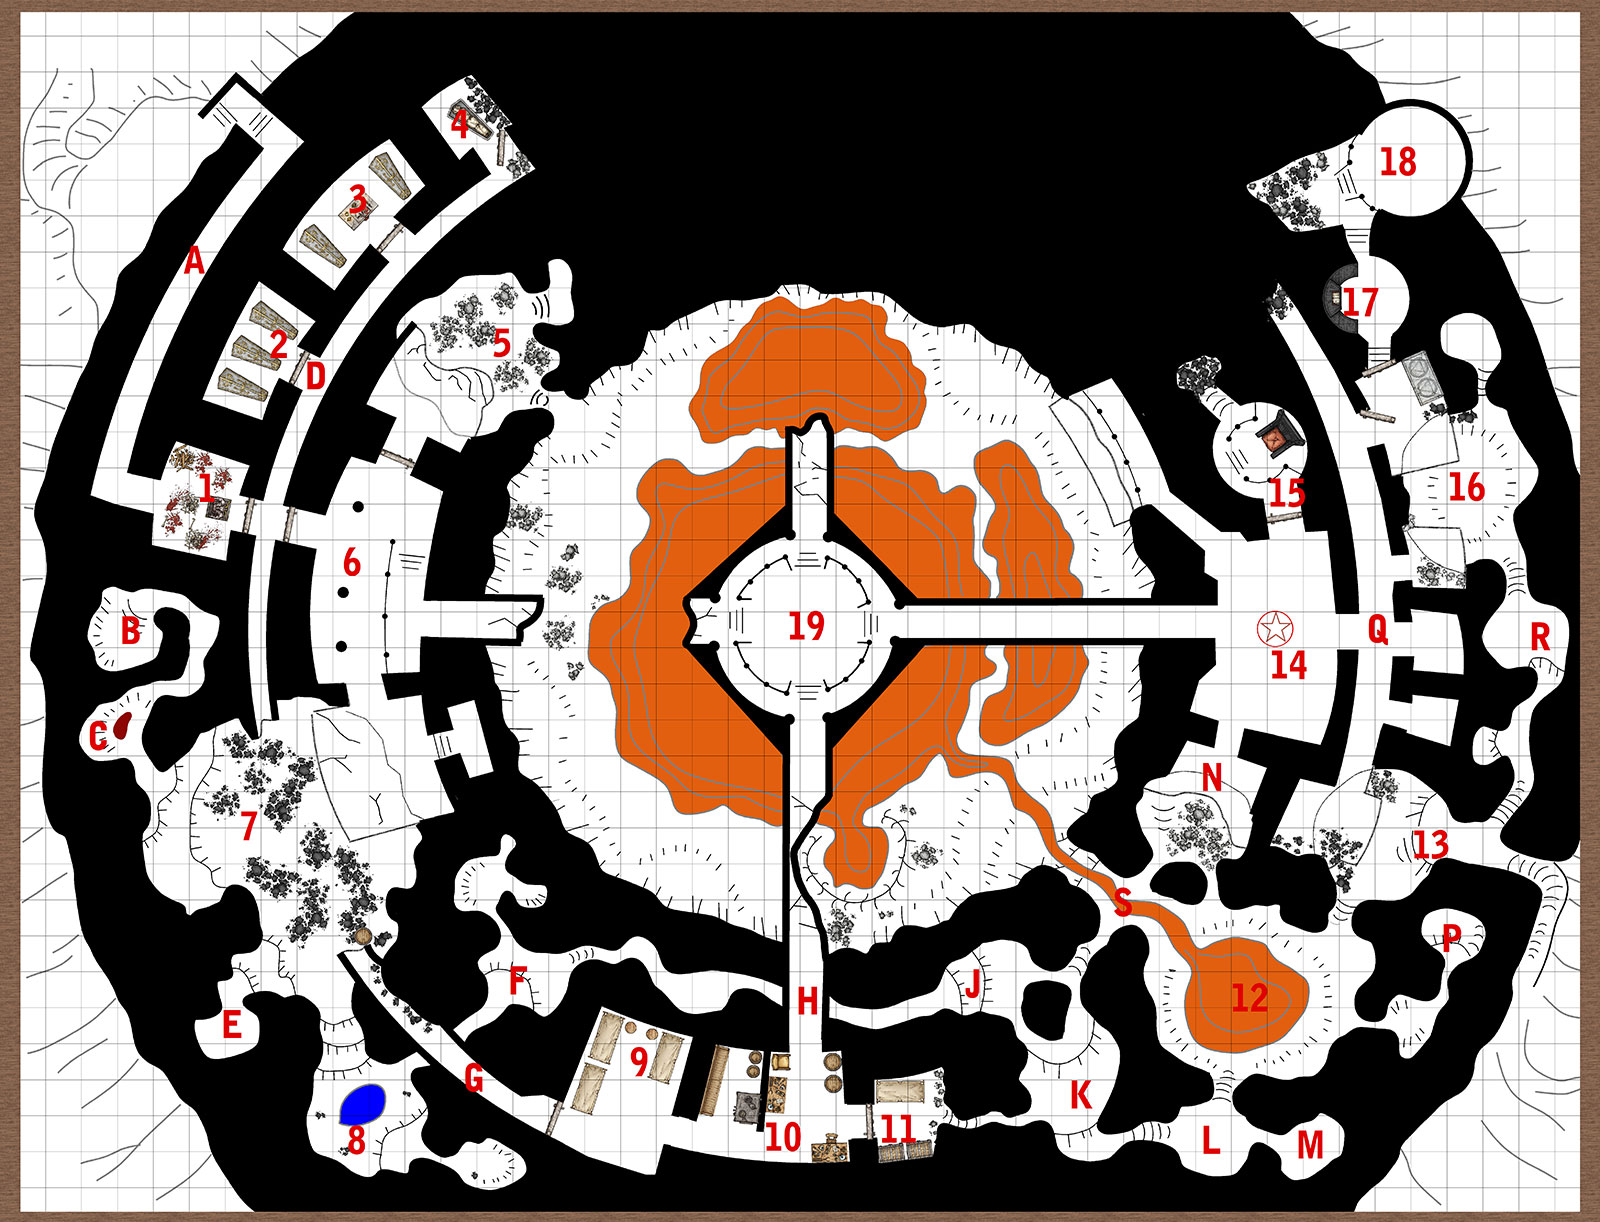
A stone entrance is carved into the black volcanic rock. While crude by dwarvish standards, the walls are decorated with scenes of a great fire beast - resembling a large toad-like creature breathing fire from its gaping maw while its tail sweeps goblins (presumably unbelievers) from a cliff into a sea of molten fire.
Room 1: The Goblin Door
This small room seems to have been an altar of sorts. Ancient blood is splattered about the walls and floors. A pile of burnt wood in the northwest corner shows that some unfortunate adventurer attempted to camp in this room.
The statue is of the same fire beast from the walls. It is made of black basalt. The statue is terrifying but not particularly well crafted. One eye socket has a red ruby in it. The other eye socket is empty. It has some writing carved into the base of the statue.
Behind the statue is an ornate stone wall - covered by a mosiac of patterns. At the intersection of each line is a small gem - a variety of colors and sizes - yellow, blue, red, green, black - squares, circular, oval, etc. There are probably 100 gems in the black stone.
DC 25: The back of the empty eye socket is actually a hold bored through the statue. Scratches on the floor show that the statue can rotate.
DC 28: A small door in the back of the statue opens to a small fire place. Ashes are at the bottom. Several small holes are in the top of the fire place.
In goblin:
When the light of fire comes from the master's eyes, then path to salvation will be revealed.
DC 20: The fire remains are years old. A small, partially charred gnomish pipe can be found in the ashes. Also a small red ruby (eye) can be found here.
Starting the fire will cause the statue to rotate. Placing the rubies into the eye sockets will cause the light to fall on the ornate door - lighting two rubies to open the door which slides into the ceiling with a slow, grinding sound. This will alert the guards in Room 9 who will come and "reset" the door and look for intruders.
The door will stay up until the fire is extinguished, at which point it rotates back into place and the door shuts.
Room 2: Tomb of the Three Priests
Down a dark, basalt curving hallway, several nooks have ancient stone doors set into large lintels.
The first door is decorated with three skeletons, each holding a staff with a strange pointed hat and a voluminous cloak.
Behind the door is a burial crypt with three stone sarcophagi. These are made of black basalt, fitted with silver hinges and handles. Again, the quality is fair to good. They appear to be undisturbed for hundreds of years. The figures appear to be of different goblins, although their raiments are identical.
Room 3: Chamber of Animation
Second door shows a table with a skeleton rising from a table. Two skeletons watch on - all three are wearing the strange pointed hats and have cloaks and staves.
Two stone coffins flank a central basalt table. On the table are a silver dagger. A book bound in silver has disintegrated into a pile of paper shreds. A silver chalice is crusted with what looks like dried blood.
There is a musty smell of death lingering here.
Room 4: Bledsow's Tomb
The hallway ends in a collapsed pile of rubble. A broken stone door lies ajar.
If Bledsow detects approaching humans, he will cast silence.
If a living creature approaches, a small wizened creature approaches - a goblin of sorts. He is dressed in robes with a pointed hat and staff.
Bledsow will use his Staff of Invisibility to disappear and follow the group. If they have descrated the tombs - especially if they have stolen something, then he will attempt to get it back.
Room 5: Bat Lair
This door to this room is sealed and must be broken down.
If done with noise, it will alert the fire bats - who will make bat noises as they leave the room through the passage to the crater. Most of this room has fallen off and forms a rough room. The smell of dung and sulfur are overpowering here. From the ceiling hang hundreds of bats. The bats live off food given to them by the guards. On occasion, they will fly around the dragon to provide it with a cloak of protection of sorts. The bats may come out to protect the dragon, if needed.
Bat Swarms - Hundreds of high-pitched squeaks fill the air as a mass of small, carnivorous bats surges forth, all of them hungry for blood.
Fire Bat - A fire bat looks like a flesh-and-blood bat, two feet long with a wingspan of over four feet, totally engulfed in flames. Indeed it appears to be made entirely of living fire until killed, when its flames extinguish and its charcoal-like true body is revealed. Unlike true bats, fire bats do not usually flap their wings; they are propelled by jets of heated gasses expelled from tiny tubes along its wingtips.
Room 6: Goblin Temple
This room is made of the same crudely cut black basalt. It appears to be a temple of sorts. Several pillars support the ceiling. A door in the northern wall is sealed while the southern door appears to have broken off and fallen into the room beyond.
Oddly out-of-place is a smooth polished set of stairs leading down from an intricately carved black railing - made with finely filigreed silver leaves. The workmanship of the stairs and railing are significantly better than the other items in the room.
Beyond the stairs, a polished black hallways leads out. From beyond, you can hear a bubbling sound, albeit much deeper and resonant that a pot of water.
DC 25: Show that there is ancient goblin script west wall of this room. It is a story telling of a temple to a "fire beast" of terrible power who demanded sacrifices from the goblins of the forests to the west (Dreadwood, Goblins of the Bloody Claw).
Room 7: Lava Weird's Lair
Two distinct rooms have been carved into the mountain at some time. In the north, the crude carving of the black basalt forms a landing with several rooms off of it. In the east, a finely polished hallway leads into the depths of the stone. In the east, a large barrel sits just off the edge of the hallway. There appear to be a pile of wet rags on top of the barrel.
It is clear that some event in the past has caused the room to collapse into a much larger cavern. In addition to the carved hallways, three natural passageways wind into the dark. To the south, the sound of water dripping can be heard. The floors here are very rough, rubble-strewn and filled with small ledges and slopes. The ceiling here is natural with several large cracks exposed.
DC 20: A path of fresh footprints lead between the hallway (G) across Room 7 and into Room 8. (Presumably to gather water).
If the party lingers here at all, the lava weird from Area C will attack. It snakes through the room like a rope of lava. It will not approach anyone soaked in water. But it is hungry for those that venture off the path.
The lava weird will retreat to its pool if outmatched (and to regenerate).
Room 8: Well Room
Several passages lead from this room. A number of terraces lead down to a natural pool of water. A number of natural lava tubes in the ceiling drip with water gathered from the outside.
Room 9: Gnome Sleeping Quarters
The door at the end of Area G into Room 9 is locked with a well oiled lock. The lock is of an unusually clever design. DC 23 to unlock. Made by gnomes, you know.
This room is neat and orderly. Three cots have been pushed up against the walls. Each has a blanket and pillow. Two small wooden stools sit nearby. The room is clean swept. On the wall is a picture of a middle-aged gnomish woman. She is dressed in a scholar's robes and is beaming with a wide, infectious grin.
The picture is that of Gertie, wife of Gradbell the Archaeologist. Hidden in a clever slot in the side of the picture is a small black metal key. It opens all the doors in the Dragonrider area of the dungeon.
- Gradbell Gwilliam - archaeologist
- Glynis Tew - tinkerer
- Glendower Banes - tinkerer
Room 10: Gnomish Workshop
This room is partitioned into several areas.
A very small kitchen area has a rudimentary stove and several barrels - one filled with fresh water, the other half-filled with ale. Wooden shelves behind the cooking area has bags of flour, sugar, and other dried goods.
A larger area has a workbench piled with tools and a tinkerer's kit. Several small models of dragons have been built along with mechanical drawings of flying beasts. There are a number of brass gears, rods and mechanical parts here. A chair, more tools and several barrels containing what looks like grease fill the rest of the room.
There is a locked door in the east and two passageways (north and west) that lead from this room. From the northern hallway, a hot air blows and the sounds of large bubbling can be heard.
Room 11: Jadeling's Lair
This room is sleeping quarters of sorts. A pile of cloth, blankets, and pillows are pushed up against the north wall forming a very small nest.
Against the south wall of this room are two chests.
Both chests are locked. One is a mimic, left here to guard the other chest. It will sound the alarm if anything is touched.
The other chest contains: 2000 gold pieces, a Grounding Rod, and a Piece of Boundary Chalk.
Jadeling can be found sleeping here, watching the gnomes, or ordering the brass men to work. As long as a man’s leg, lithe and scaly, the emerald lizard fans its wings, slender tail flicking. Its clawed forefeet resemble hands, one of which is wearing an intricate bracelet made of brass and steel.
Room 12: Lava Pit
This room is has a large lava pit in the center. It is a natural cave with five exits radiating from the room. The walls have an odd splattered appearance - somewhat like dripping scales. It is very hot here.
Every few minutes, a large lava bubble forms. It bursts, showering the room with bits of magma. During this event, the pool overflows and a fresh rivulet of magma flows over the edge of the pool and down into the main chamber of the mountain.
Characters in this room when the lava bursts will take 2d8 points of damage.
The edges of the room are super hot and hard to traverse.
Area S: the party can jump over the lava stream to move from Area K to Area N. It takes a DC 10 Jump skill.
Room 13: West Entrance
The western entrance to the volcano is a winding set of ancient steps carved into the basalt. The steps are filled with rubble and the dust of centuries of accumulation of fine basalt detritus.
Sweeping a bit of rubble off, the stairs appear to be ancient and in almost perfect condition. The craftsmanship is outstanding.
The entrance room is an odd mix of cut stone - this room was once a round room with a domed ceiling of perfectly spaced ribs. Now, the western edge of the room has collapsed into rubble.
Two natural passageways lead to the north and south. A carved hallway is in the northwest corner of this room leading out, although a gap of about 8-10 feet has opened up. It is possible to climb down the rubble to get to the other exits to this room.
A brass man will be located here if the party has made their presence known.
Room 14: Teleport Room
This room is exquisitely carved of black, polished basalt - although the rock seems to be more marble-like in quality. Carved images on the east wall show two dragons each with a single rider on its back. The dragons are soaring into the sky. Near the floor, on the ground of the frescoes are the crumpled bodies of beasts and creatures of folktales. The carving is exceptional and radiates an aura of power and fear.
In the center of the room is an intricately carved brass rune.
A central exit in the east of the room requires passage through the carved image of a great dragon - his gaping maw providing the passage into a hallway beyond. An orange glow and waves of heat come from the dragon's mouth.
Hallways in the northwest and southwest pass are made of carved stone.
The northwest, a large black stone door - of the same polished material as the rest of this room is sealed. It does not appear to have been opened for years. A trace of runes shows this door to be magically sealed.
NOTE: This room was the central teleport for the Dragonriders of the First Age. Dignitaries would have entered the mountain here before being escorted west to the Lava Throne. The magic no longer works.
The brass men come back here when not in use elsewhere. They are numbered 2,4,7, and 9. Orders must start with a number (i.e., 9 come and protect me).
Room 15: The Dragonrider's Throne
A riddle is required to pass into the room beyond.
The air in this room is musty, almost thick with dust. It clearly has not been opened in hundreds of years. The room beyond is dark, although the faint outline of a throne can be seen on a dais in the middle of a round room.
A black basalt throne of ancient First Age design sits atop a small circular platform. The most noticeable feature of this room is a mural painted on the west wall. It depicts a woman wearing intricate brass armor sitting atop a magnificent dragon. The painting is done from the rider's perspective as she appears only in the reflection of the dragon's scales. The rider carries a lance in one hand, and a three-balled flail in the other. She is striking the beast with the flail - used like a horseman would use a riding crop. Her lance is in the strike position. The dragon's eyes are wide and both figures appear intent on their quarry. The painting gives the illusion of unbridled speed and power.
The throne has two large circular holes in the arms - near where the hands of the occupant would rest. One is empty. The other holds a large three-balled flail.
This is the Dragonrider's Crop.
A secret compartment below the throne looks as if it would hold a book. The compartment is empty.
The hallway beyond the throne is filled with rubble.
Room 16: Entrance to the Control Room
This room was originally carved a fine basalt, although a large sinkhole has opened up causing a collapse in the center of the area. From the rubble, it looks like this room might have been two rooms originally. Several lava tube passages lead from the area.
The southern door to this room is missing - it appears to have been removed carefully. The northern door is open.
The only remaining feature of this area is a large metal desk in the northeast corner it has several round symbols on it - etched in copper.
The desk is solid (no drawers), and it does not appear to be magical now - although it might have been in the past. The disks can be spun. Spinning one causes the other to spin.
NOTE: The magic is gone here.
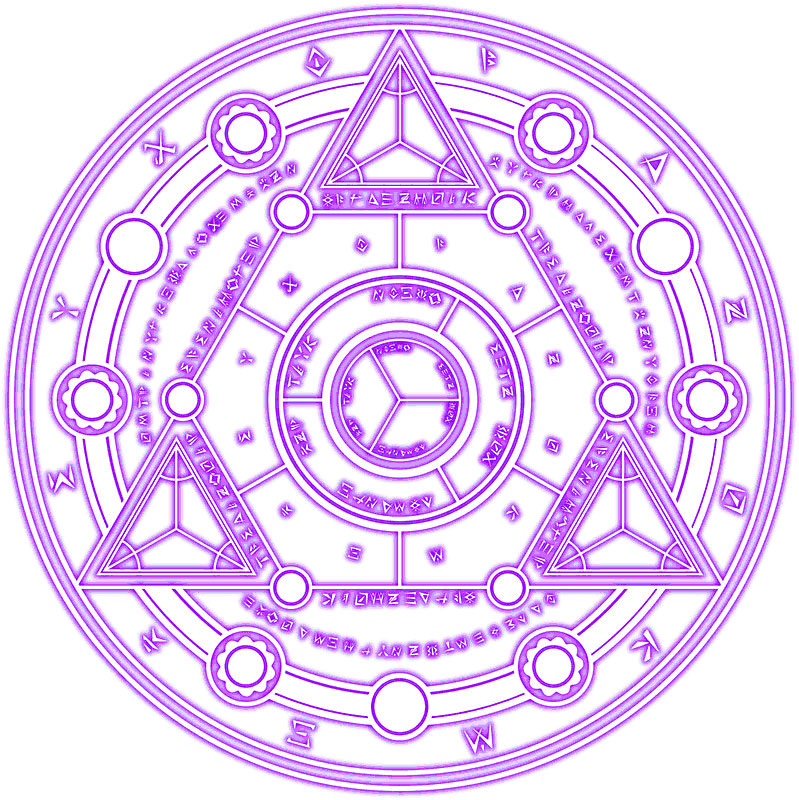
A black stone door in the north is marked with glowing runes:
Room 17: Control Room
Unlike the rest of the dungeon, this room is cool. A strange machine sits against the west wall. It is filled with buttons, gears, levers and other unintelligible items. The machine is curved to fit the circular shape of the room. It is dark except for blinking lights above a series of levers. The floors and ceiling are made of the same polished black rock.
DC 25 Mechanical (or with the help of the gnomes): There are nine levers here - all in the up position. They are numbered 1 through 9.
These control the brass men. Pull them down, and the brass men are deactivated. Nothing else on the control panel seems to work.
Room 18: Viewing Room
Polished steps lead to a round room with a domed ceiling. The air in the room is cool and crisp. The western portion of the room has collapsed in a large pile of rubble - although there were clearly rooms beyond at some point.
All attention is on the eastern edge of the room - however. There, a clear glass globe looks over the island like a giant bubble-shaped window. The view is breathtaking over the small island and out to sea. From this vantage point, you can see that a storm of immense size and strength is approaching. Flashing of lightning show the storm extending from one horizon to the other - towering thousands of feet in the air.
You can also hear the sounds of the waves crashing - as if the wall allowed the passage of sound. Even a faint smell of salt air can be detected.
Room 19: Galbraith's Lair
The central shaft of the volcano is massive - more than 100 feet across. From the summit of the cone, the shaft descends vertically about 120 feet to a set of four black man-made walkways that converge in a central platform about 30 feet in diameter.
Three of the walkways lead into the mountain, although one of these is broken off and another is badly damaged. The northern entrance into the mountain is completely collapsed, the area filled with rubble and spewn magma. At this level, several caves can be seen leading into the mountain as well. A lava waterfall in the southeast is particularly spectacular.
The central shaft continues down another 200 feet to a sloping floor polled with glowing orange lava. The smoke and heat are overpowering here. You doubt humans could live long at the lava pool level of this shaft.
The most startling feature of this impressive room is, however, the figure in the center platform of this room. There, resting on a large pile of gold is a sleeping copper dragon. He is young or at least small, although his claws and teeth belay a dangerous countenance. The odd thing about this dragon is his wings. They appear to be mechanical - large constructs of metal tubes between which is stretch sailcloth. Watching as the dragon shift, you notice that its own wings are just stubs - to which the mechanical wings have been attached by a series of levers and pulleys.
Near the dragon are several piles of brass odds-and-ends. A large carcass of a cow is also here, although the meat is almost all gone.
This is Galbraith. His mother, Grixana, is out hunting for food. She will return with another cow for Galbraith. The wings don't work yet, so the dragon cannot fly. It needs its mom to help.
He will cast invisibility, alarm, and magic missile if cornered. He knows that he will be killed - rolled into the lava - if the wings don't work. So, he will not give them up for any reason. He will try to stall the party until mom gets back, however.
The gold is actually several hundred thousand brass coins - which are pretty valueless but might be a bargaining chip. He knows of this place as an outpost of the Dragonriders of the First Age, although he doesn't really know anything about them.
Galbraith is clever, but weak physically. His father Gillead has abandoned him, although Galbraith will try and trick the party into fearing his wrath.
Finale: The Storm
Ideally, the storm will appear at the Lost Key when the Wanton Wench gets there.
You see before you a massive thunderstorm – blackening the entire eastern sky. A wall of dark and ominous the clouds form an almost physical barrier. The darkness of the storm is absolute punctuated by blinding flashes of white-yellow lightning - snaking tendrils that move through the sky as if seeking a new victim to strike.
The lightning flashes give you a brief glimpse of what must be impossibly large beasts floating in the air – not sleek and streamlined like dragons – but more like jellyfish floating in the storm.
Floating – unhindered by their surroundings are a number of large blackish purple protean shapes – large jellyfish trailing impossibly long tendrils of crimped pink tentacles. The bodies of the beasts are some sixty feet in diameter – and the tendrils are another several hundred feet in length. With a pulse of the jellyfish head, the beast moves quickly through the air.
NOTE: Careful inspection will show weapons, armor, staves, etc. floating about inside the head.
These are the “flesh of death” - the Shantaks. These are alien creatures that devour the abilities of devoured victims. Each victim adds a new tentacle with their knowledge and power. When there are enough tentacles, the beast splits into several – which can also happen if they are done enough fire, electrical, etc. damage. Each tentacle can cast a spell or attempt to grab a victim. They cause both mental and physical paralysis before thrusting the victim into the head of the jellyfish.
They will sense new life within the storm and move quickly to absorb it. They can teleport if outflown – usually to point in front of their victim.
The Eye of the Storm
As you approach the center of the storm, the darkness is absolute except for a spinning glow coming from a strange object hovering mid-air. Water appears to be rushing from the object.
Adjusting to the darkness, the object appears to be a steel archway - closed on the bottom to form a square - 4 feet thick and 20 feet on a side. Indeed it is spinning slowly, spewing water into the storm's clouds. Circling the archway are large purplish-black eels. Periodically, you see one move quickly to capture a large fish that comes through the archway.
These are acid lamprey. The spew acid from glands near their hind quarters - causing the acid rain. They will continue to make a more and more toxic environment until the party is killed.
When summoned by the Shantaks, the acid lampreys will come to their aid.
Breaking Whitlock's Storm staff will destroy the stone archway.
Grasping the staff in your hands, you twist the metal - which gives way slowly at first. Then, SNAP and a flash of bright white light pours from the staff. Below you, the screech of twisting metal rends the air - creating a noise that impossibly pierces even the raging storm around you. You feel a pull as the ocean rises around the spinning gateway and suddenly drops - sucking the gate and thousands of gallons of water down into the void.
The Wanton Wench is pushed upward as the storm reacts to the loss of its power source. Winds batten the ship and you are unable to steer - now being simply pulled upward by the gale. As the ship passes through the top of the storm, you can sense that the storm is collapsing into the watery vortex. The large protean beasts are pulled down into the maw. Then, suddenly, the gate closes - a final swirl of waves.
You notice a lessening of the winds. Already, the ferocity of the storm is receding. The eye of the storm has collapsed. You regain control of the ship, moving higher to escape any last remnants of the gale. There is a sense of normalcy to the storm now. It will run its course and be gone.
