The Ranger's Gate: Level 1
| Type | Dungeon |
|---|---|
| Status | Explored March 908 TA |
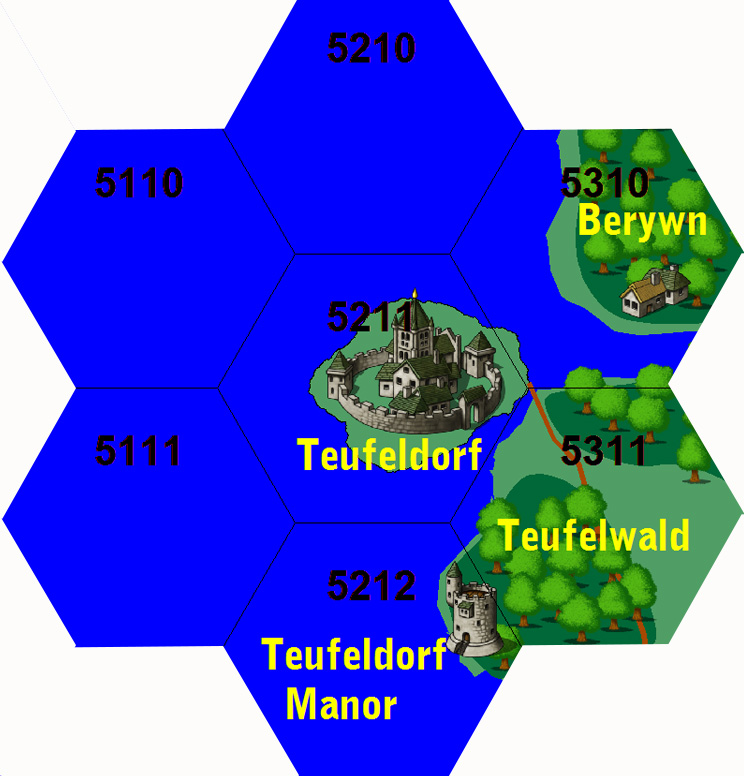
| Location | Teufeldorf |
| Hex | 5211 |
| Campaign | The Ranger's Gate |
| Adventure # | 143 |
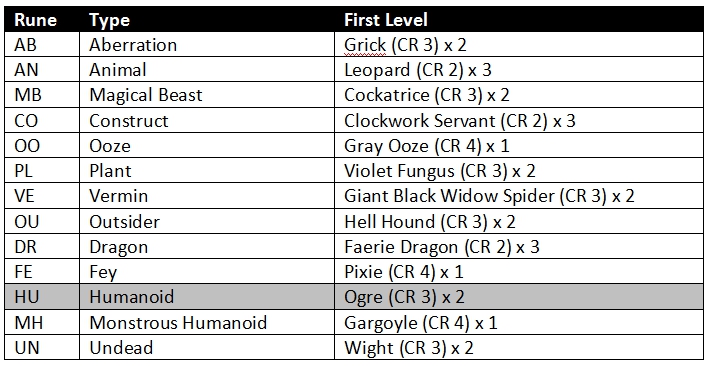
The Ranger's Gate leads to the 13 trials - an arena to fight all the different monster types in the Reaches: Aberration, Animal, Magical Beast, Construct, Ooze, Plant, Vermin, Outsider, Dragon, Fey, Humanoid, Monstrous Humanoid, Undead. This is the first step for any recruit that has accepted The Trek.
There are a number of "keys" to the Ranger's Keep - Walking Key, Wooden Key, Windward Key, Wailing Key, Whistling Key, Wicked Key, Wayward Key
Gate Room
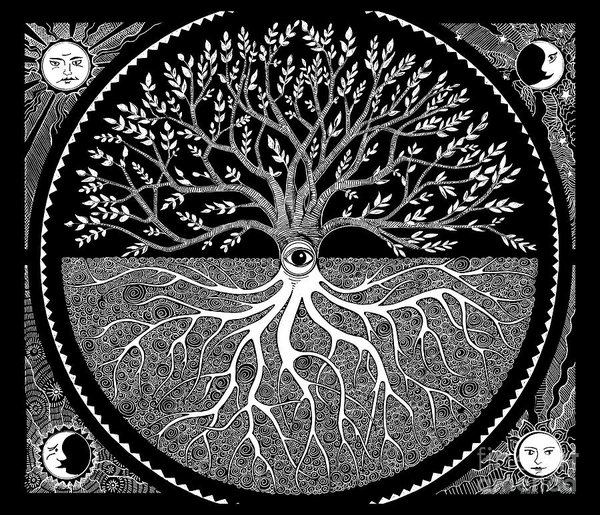
The tunnel ends is a stone room 30 feet square. The tunnel is made of the same ancient stone as the rest of the corridor. However, the room glows with a warm yellow light. The source of light is an intricately carved wall at the end of the tunnel. The wall depicts the sun and moon around a central image of a tree - its roots pushing underground. Most notably, the door has seven keyholes along its right edge. In the center of the wall is an eye - which suddenly blinks.
NOTE: The door has sharp edges around the circles and at intersections of the straight lines - more like it is inlaid stone than it is painted.
If a ranger's key is brought near the door, the appropriate keyhole will glow. NOTE: This is the second from the bottom for the Wooden Key, and the top key for the Wayward Key. If the key is inserted and turned clockwise, the eye will blink several times.
"Welcome Wooden Brothers. It has been a long time."
The door begins to twinkle with faint lights and new runes.
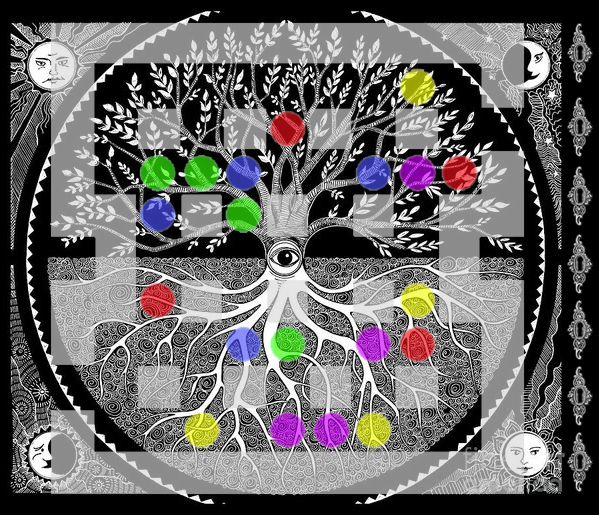
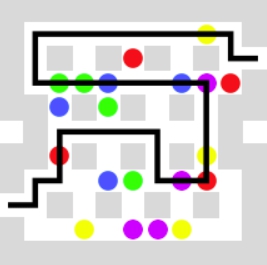
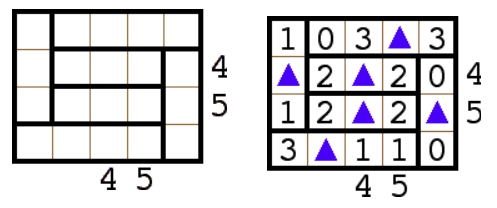
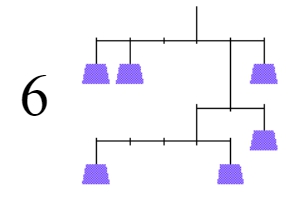
Oakentree's garden has bright birds to delight,
Enter from the left and exit to the right,
Two and only two of each bird must you see,
Your path never crosses, then heed the Ranger's tree.
Tracing the pattern on the door returns it to its "plain" state.
"Where do you seek to go Wooden Brothers?"
If the party picks somewhere they shouldn't, the door will prompt, "Very well. What is the password?" Which, of course, they don't know. "You should have been given a password during your training."
If they pick "entrance" or "training room", they will be teleported to the training room.
Training Room
Getting Down
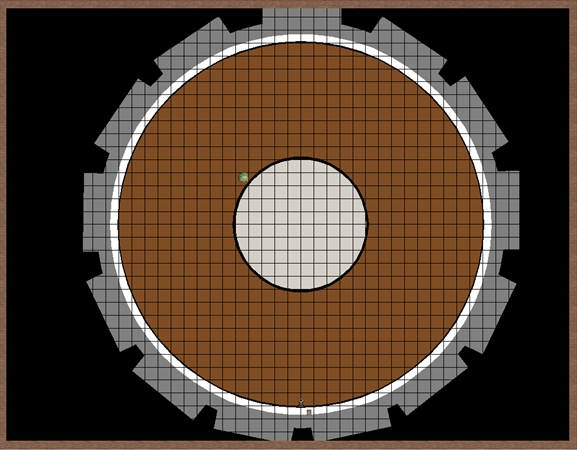
PERCEPTION: The appearance of this room gives you the feeling that it is a battle arena.
Notice DC 15: A small black iron box is near a ring near the floor. It is labeled, "A TEST". You are 160 feet off the ground. Looking over the edge, another ring protrudes from the wall about 80 feet below you. The box contains a 120 foot coil of very thin rope, a knife, and a flask of water.
SOL: Cut into an 80 foot piece and a 40 foot piece. Make a loop with the 80 foot piece that is 40 feet long. Tie off the 40 foot piece. Go down 80 feet. Tie off one end and pull it through to climb down the last 80 feet.
Reward: Rope of Climbing - 80 feet
As you get down, you notice a number of glyphs flicker on the wall, although they are fleeting and it is impossible to discern any patterns or meanings.
The First Trial
"Welcome to the 13 trials. You may leave now - just speak the word. If you accept the trek, prepare your weapons and walk to your foe."
The Ranger's Gate leads to the 13 trials - an arena to fight all the different monster types in the Reaches:
Ranger's Gate: Level 1
If defeated, the gate opens.
You feel a rumbling beneath your feet, deep in the earth. Then, the sound begins - a deep bass, a scraping sound that shakes your soul. Slowly, the dais begins to rotate - slowly turning in a counter-clockwise direction. Like a screw, the dais begins to slowly sink into the ground, the sound lessening as the centuries of rust are scraped from the gears.
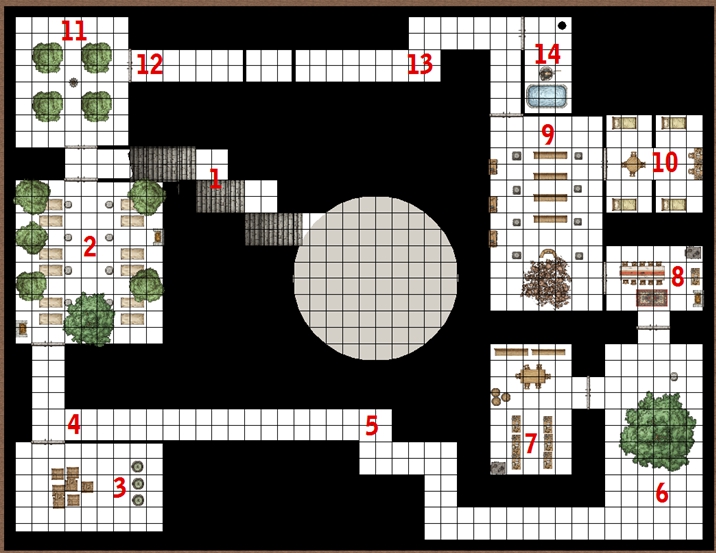
Room 1: Descent
After 40 feet of descent, the gears grind to a halt as the floor stops dropping. In front of you is a 10 foot wide hallway with 15 foot high ceilings. After a very short landing, the hallway descends into the darkness. Light sources? Important.
NOTE: DC 15 can hear a buzzing noise coming from the bottom of the steps. It is coming from the north room. A yellow light comes from beneath the door.
Room 2: Nature's Dormitory
This room is odd in that it appears at first to be an ordinary dormitory. Twelve bunks line the room - six to a side. The room is musty and smells of decay.
NOTE: Doors swing shut.
The unusual thing about the room is that it is canopied with large trees that stretch across the ceiling creating a canopy of leaves overhead. Several stone columns push through the verge, but it the effect is quite powerful.
PERCEPTION: There is a body lying in one of the cots. It is clear that the figure was once human. Discarded leather armor and several daggers are at the side of the bed. The body appears to have been eaten as there are bite marks on the bone.
PERCEPTION: When the doors in this room are shut poison gas leaks from the branches of the trees. The characters will feel dizzy. Then, they will start to take 1 point of damage a round. Both doors need to be jammed open to make the gas stop.
NOTE: This room is the final resting place for the leader of five thieves that tried to rob the place decades ago. There is a note as to their plight in the pocket of the leader.
| We have found the third and final piece of the cross, just where Baron Weremouth said it would be. I'm not sure why the Rangers thought this damned relic is so interesting, but it will fetch a pretty...
Crap. The central pillar has moved back up. We heard it rumbling but were too slow to get out of this labyrinth. Our teleport failed. Shit. We might die down here waiting for a way out. Shit, shit, shit. I don't want to die down here. |
Room 3: Fireworks
Opening this door produces a rush of dryness and a strange green-yellow light. In the center of the room are a number of crates. They are marked DANGER. Three large urns, about 4' tall, sit off to one side.
The crates contain fireworks packed in sawdust. The party will have to search to find useable fireworks. It seems like these are not dynamite level, but still useful at making lots of smoke, bright lights, and noise. No damage, no blindness.
6 charges of flash powder, 8 roman candles, 4 skyrockets, and 12 strings of small firecrackers.
NOTE: Urns - two empty (water evaporated), one sand. Useful if a fire breaks out. The room contains 3 fire stalk beetles.
Rooms 4 and 5: Hallway
A 10 foot wide hallway with 10 foot ceilings is dark.
Room 6: Tree Statue
This room has a high domed ceiling - some 30 feet in height. In the center of the room is large tree. A figure is reclining against the tree - unmoving. It appears that two spear have pinned him against the tree.
NOTE: The spears came out of a nearby stone pillar - which is a sprung spear trap.
The figure is that of another thief. His body has also been eaten. Both his arms along with one leg are missing.
Knocking on the tree, it is apparent that the tree is hollow. Opening a secret door (DC20), a ladder leads upward. Climbing up the ladder (60') will find that it goes up and ends in a small metal platform. From the platform a window looks out onto a strange cavern, lit by large mushroom-like creatures giving off a pale blue-green light. A number of small robed figures stand immobile facing you.
PERCEPTION: A special speaking tube which allows the speaker to act like the gods. A small hatch at the top will allow fireworks to be fired out. There are also a number of levers used to move parts of the statue (arms, head, eyes, and so on).
PERCEPTION: The trunk of the tree actually extends into the ceiling.
Room 7: Special Storeroom
The room appears to be a workshop of sorts. Six desks at the southern end of the room are cluttered and dust-filled.
This room holds spare parts for the machinery inside the statue. There are three large covered barrels holding oil to lubricate the machinery. The oil has almost evaporated over the years, even though the barrels are sealed. The party can recover 6 flasks of poorly-burning oil which mostly makes thick clouds of smoke.
Room 8: Kitchen/Mess Hall
This room appears to have been a mess hall and kitchen in the distant past. Cooking utensils and plates, bowls and cutlery are strewn about. A large pot sits over a now-cold fire.
NOTE: The cook pot has human bones - neatly hacked in it.
Room 9: Lecture Hall
This room was clearly an instructional room. Several benches are pointed at a lectern that is set up on a small pedestal. Three bookcases along the edge of the room are filled with multiple copies of basic books on forestry, hunting, and armed combat.
The southern end of the room is a large rubble pile. A shaft in the ceiling goes out of sight.
This room has 2 cockatrice. Two more are up above.
Room 10: Instructor's Bedroom
This room is unnaturally dark. It was once the officer's bunk. It is now the home of the cursed fifth thief, Vincent Webb. Webb is now a crypt thing and can teleport the party to random parts of the dungeon.
He has the broken cross.
Room 11: Bee Room
The northern door here seems to buzz.
Opening the door, the room is flooded with yellow light and it is warm here. Four trees are evenly spaced in the room which has a natural roof.
Flying about the room are several large 1' long bees. A wire mesh cage hangs in the center of the room. At the top of the cage is a large beehive.
The killer bees will attack any who enter. Smoke will keep them from attacking. If attack is successful, the bee will die, although the character will continue to take damage until the stinger is removed.
The queen bee can attack multiple times.
The honey acts as a potion of healing if eaten.
Room 12 and 13: Hallway
At the far eastern end of the hallway, a dead thief lies slumped over, his left arm is swollen and black.
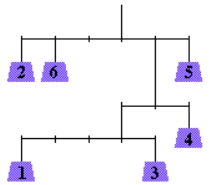
In the middle of the hallway is a section about 25 feet in length. The floor is a series of metal ramps which are tilted randomly. A pile of weights labeled 0-3 sit nearby. On the walls and floors numbers flash.
Room 14: Bath
The door to this room is rusted shut and requires a DC20 strength to open.
This room is very humid. A well and large bath at the south end of the room appear to be sole source of water. There is a strong smell of human refuse here.
Goblin Temple
The room has several interesting features which are illuminated by several large mushroom-like plants that glow with a green light that casts eerie shadows about the walls.
- In one corner of the cavern is a campfire and blankets. A small cookpot sits in the fire.
- In another corner, a large tree juts from the floor of the cavern. Standing about 20 feet tall, it looks unnatural in the cave. Its limbs appear roughly like arms, and a clearing in the branches provides the framing for what appears to be a face.
- Finally, six small figures - all dressed in brown robes face the tree. None of them appear to be moving.
NOTE: The stone figures are goblins - whom the rangers used to train at fooling into believing the tree to be a god. There is a small stone altar at the base of the tree. This is where food was delivered and the goblins were freed once they were converted and had given homage to Oakentree.
Teleport good goblins out. New, bad goblins in. Since they never completed their mission, the trap was never reset.
The room has been overrun with cockatrice. These entered via a small crevice opened up in the northwestern corner.
Secret Door
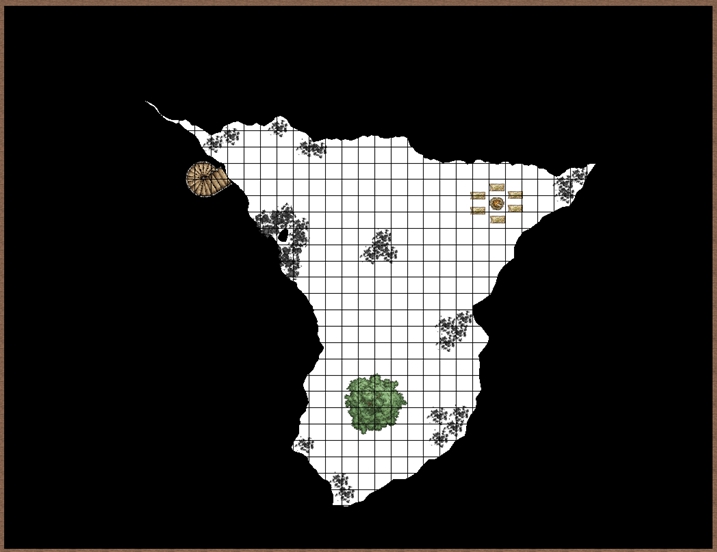
A secret door in the northwestern corner leads to a spiral staircase that leads up. It is partially blocked by rubble, but it can be cleared in an hour.
The stairs climb for about 40 feet and come through the center of a small 20 foot diameter room. The room has an odd, cloying feeling like being wrapped too tightly in a blanket.
There are no exits UNLESS the party extinguishes all lights.
Malika - you sense three passages from this room, each moves through the shadows as if you are at a crossroads in the darkness.
Ahead, you sense the Ranger's Training Room with its large stone dais and looming portals.
First Trial Ends
As you step into the shadows, you feel a rustle of air about you, a feeling that makes the hair on the back of your neck stand up. It's an odd, cloying feeling like being wrapped too tight in a blanket.
And you are back in the Ranger's Training Hall. The large circular slab has returned to the surface. In the center of the slab is a small round table around which is arrayed several racks of weapons. Several small objects sit on the table.
Twelve openings remain - runes flickering above them. One opening is now stone - with the bas relief of two ogres carved life-like into its surface.
The rope still hangs from the iron rung that leads to the catwalk about the surface. Next to the rope, a shaft of glass rises to the catwalk - a new feature to the room.
IMPORTANT: All characters get +2 to SURVIVAL
NOTE: Close examination will show that there is 1 gold whetstone and 6 silver whetstones. A player may select a weapon - after which all other weapons are ethereal. Or, they may use their own weapon. Using the gold whetstone gives the weapon a +2. Using a silver whetstone gives it a +1.
The whetstones may not be removed - appearing back on the table. Once all the weapons have been chosen, they disappear.
The glass shaft is hexagonal shaped. An opening in the glass at the bottom and the top (near the catwalk) can be seen. Inside the glass tube is a iron cage about 8 feet in diameter. It is connected by a series of ropes and pullies to the top of the shaft some 180 feet in the air.
Balance is key in all things.
Six weights labeled 1 thru 6 are on a small iron shelf. Behind the shelf connected to the ropes is a iron balance with six empty hooks. The weights can be hooked onto the iron balance.
Reward - Belt of Justice
