The Runebound Warriors
| Type | Dungeon |
|---|---|
| Status | Explored March 900 TA |
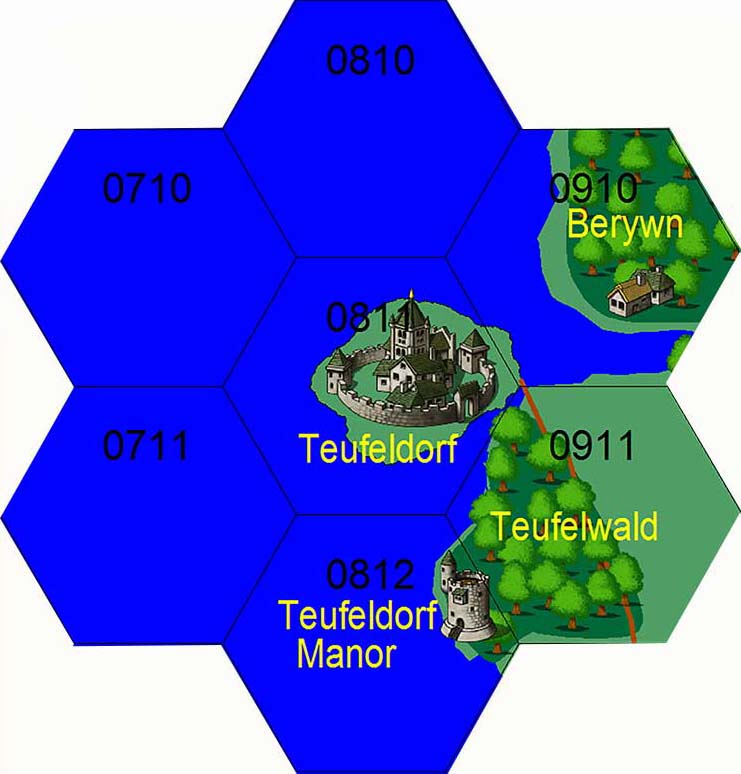
| Location | Near Teufeldorf |
| Hex | 0811 |
| Campaign | The Tang Empire Campaign |
| Adventure # | 112 |
Introduction
The arrival of the Grandmaster of Chaos has shaken the Tang Empire. The empire is in upheaval with the breaking of the Code of Honor and Law. Most recently, the use of warpstone dust has begun to be practiced in the streets of the Tang cities and villages. This is the dust of chaos, which provides great power and insanity.
The Masters of the Wind are the rulers of the caste known as the Runebound Warriors – the greatest fighters of the Tang Empire. Shrines across the Tang Empire are imbued with the spirits of ancient warriors – bound by the runes carved into the temples.
In desperation, the Emperor has broken the seal on the four temples of the Masters of Winds. The Winds are the source of Chaos in the Tang Empire – unpredictable and wild. The Emperor, under the advisement of Baron Valdemar, has ordered these warriors to destroy the Reaches.
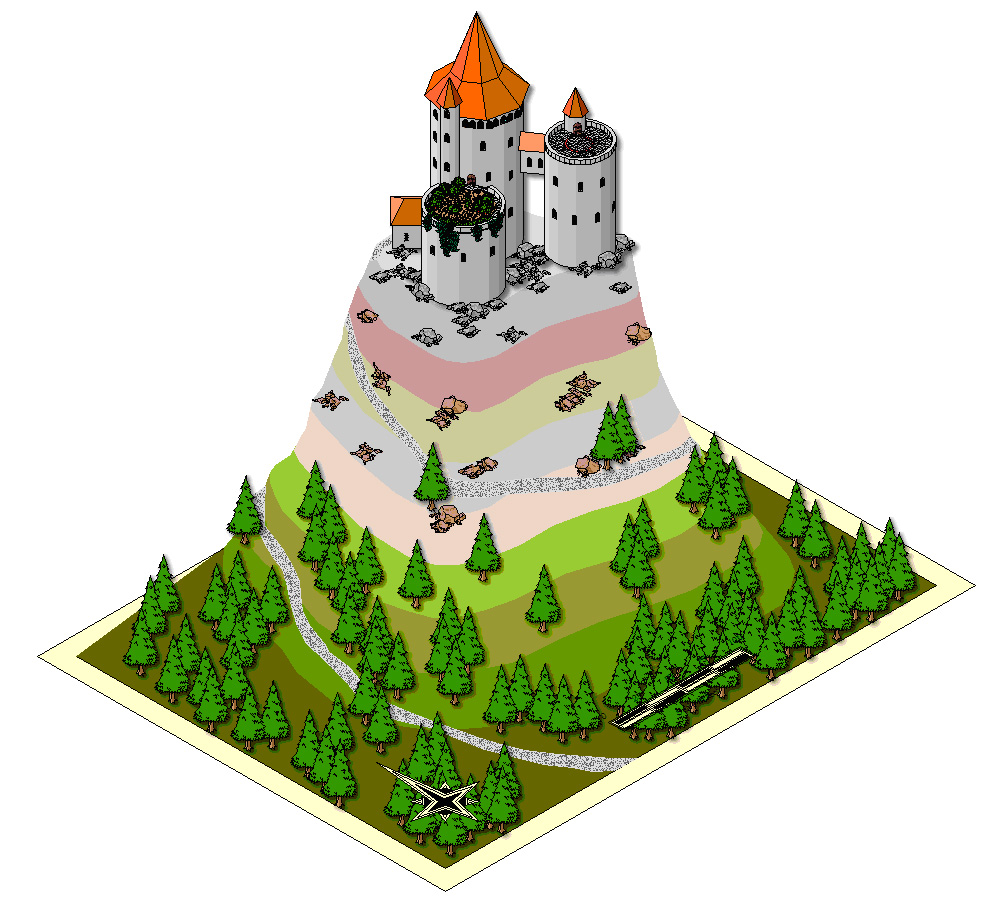
The Masters of the Winds appear as wizened ratmen dressed in robes that shimmer with runes. Each will teleport their castle into the Reaches and begin to summon their armies. Surrounding the Masters of the Winds are both Rune Marshals (generals) and Grey Mages.
This action is supported by Win Lu, Grandmaster of Chaos, as it promotes a Realm-wide war between nations – providing an excellent opportunity for wanton destruction.
The Masters of the Winds are gathering at Teufeldorf for a final showdown and the Great Summoning of the Forbidden – dragons, of course.
The Arrival of No Cha, Grandmaster of Thieves
It is the last day of March in the year 900 of the Third Age. Each of you has received a note, written in the hand of U-Gene, summoning you to Dwarrowdelf for a meeting. There was no reason given, but you felt a compulsion to come.
U-Gene didn’t send it. Actually, you can’t find it. Hmm, how did it arrive?
Into your midst walks No Cha, Grandmaster of Thieves.
“Greetings, my friends. In just one short year, life has returned to my weary bones – I am infused with energy. A thousand years behind that damned Gate – so much has changed. There are so many things in the Realm that I have found, hmm, interesting.
I bring you two things today my friends. The first is information:
First, as the Tang Empire has been stirred to Chaos, so I’m afraid will be the Reaches. An invasion may have already begun. The seals of the Temple of Winds have been broken by Emperor, and the Runebound Warriors are headed your way. There is rumor that they seek to summon the Forbidden to bring terror to generations of your ancestors to come. My only advice to you lies in an ancient riddle: “The wise hunter does not shoot all his arrows at the first buck he sees.”
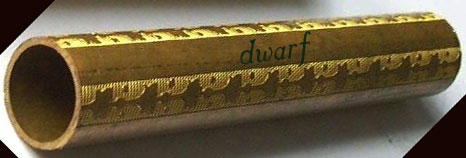
Second, I bring you a mysterious device - this copper rod. It is rumored to be from an ancient Artifacer. I, errr, found it along my way, but I cannot seem to open it. It has the magic of summoning about it. The owner told me that only the clever and patient will be able to open the rod and gain the Raiments – a gift that is said to be well worth the struggle. A word of warning, however, once you put the rod down, you will forget all you know about it. I wish you the best. Remember, patience is key – whole life.
The Arrival of Ambrose Dall, the Artifacer of Raiments
Ah, so you six are the newest Grandmasters. Tell me what your domain is, and I will begin work upon your Raiments.
The Artifacer will offer to outfit the group with their Raiments – artifacts that will be used to combine magic items. He will tell the party that he doesn’t work with Runes – which are a different type of magic, but that Runes will be important to the party.
The Discovery of the DWARF Tube
After the treachery of the orcs in 899TA, U-Gene’s warriors adopted a practice of raiding rebel camps on a regular basis. During mid-winter at one such camp, in the village of Drodden deep in the plains of Wintershriven, a simple brass tube was discovered. The tube had the word “dwarf” written on it and was empty. After an examination by the mages in the employ of the Dwarf King, it was set aside.
Until yesterday, when a young dwarf fancied melting it down and discovered a note had mysteriously appeared inside the tube. A secret code. The code made its way through the brightest dwarven scholars, but has landed on U-Gene’s desk unsolved. Certainly a clue for the upcoming campaign.
The Tomb is Awoken. The South rises against the Oppressors. The Northern Fleet is a Decoy. The Castles of the Winds will be Our Secret Weapon. The Orcs are Uncertain.
thetombisawokenthesouthrisesagainsttheoppressorsthenorthernfleet isadecoythecastlesofthewindswillbeoursecretweapontheorcsareuncertain
w4ebtpxiafzbkvsw4eatxgh9nv1srld5nayw4e6useeaxresbmhao9yk1r5ko1eb nvwdvhrltyjfwsbqhfowyk1wzsgfwzqoxe6zufetwhgwvfsbnbmhbrtxdeecsf1rbfla
The Arrival of Rutland Guildford
A messenger, Rutland Guildford, a mere boy is brought before you. He stammers and tells you his tale:
Falstaff Has Been Captured
| Vincent Fleetwood, Ranger-King of Teufeldorf
I trust this note finds you well. I have been working in the Loftwood, acting as an emissary between the elves of the Radiant Dawn and those of the Shimmering Twilight. I would not write except that our long-time acquaintance Falstaff appears to be missing. While his studies into the true nature of Oakentree have made the Archdruid, well, less than dependable, he would never have missed such an important meeting between the elven peoples. His grove is empty and my elven scouts could find no clues there. He was last seen leaving Teufeldorf heading north from Bryn Mawr into the Loftwood on foot. I hope this doesn’t bode poorly for our dear friend. Laura, Lady of the Elves |
Adventure One: The Arrival of the Master of the South Wind
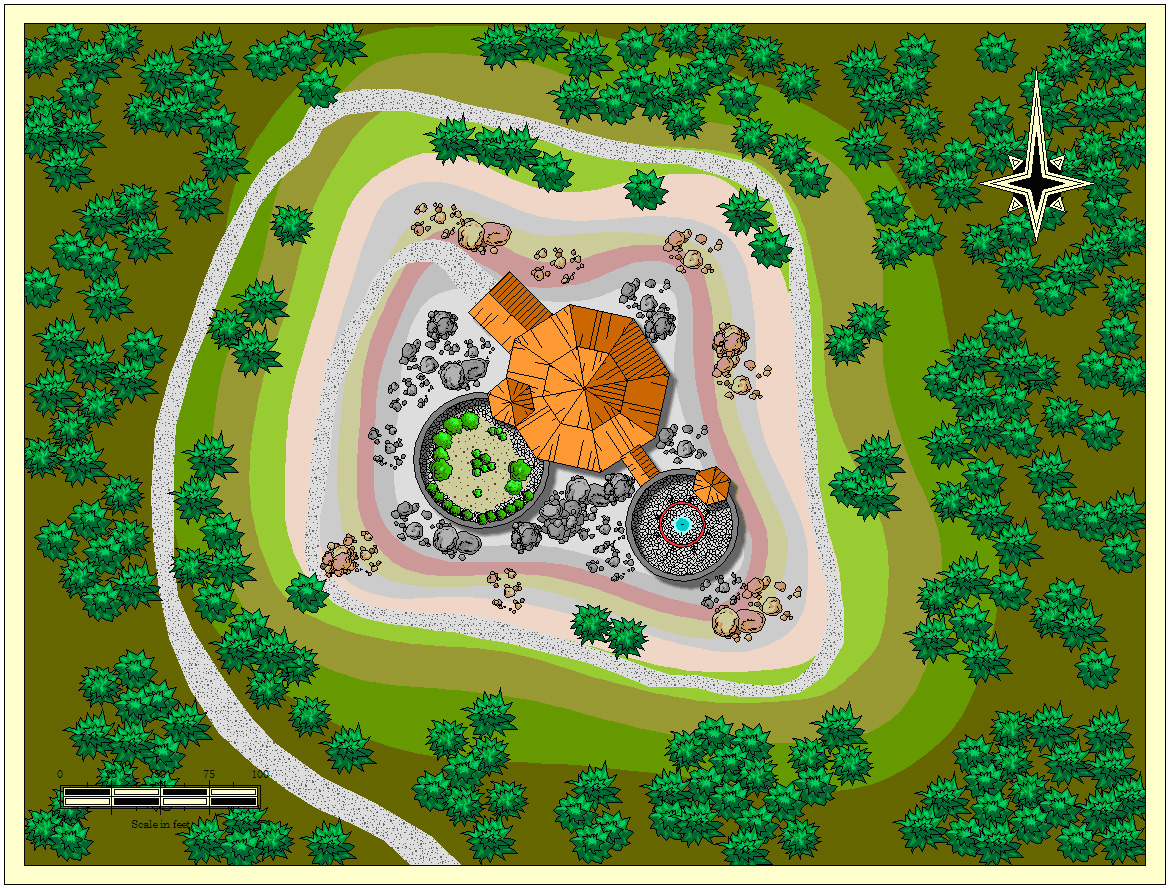
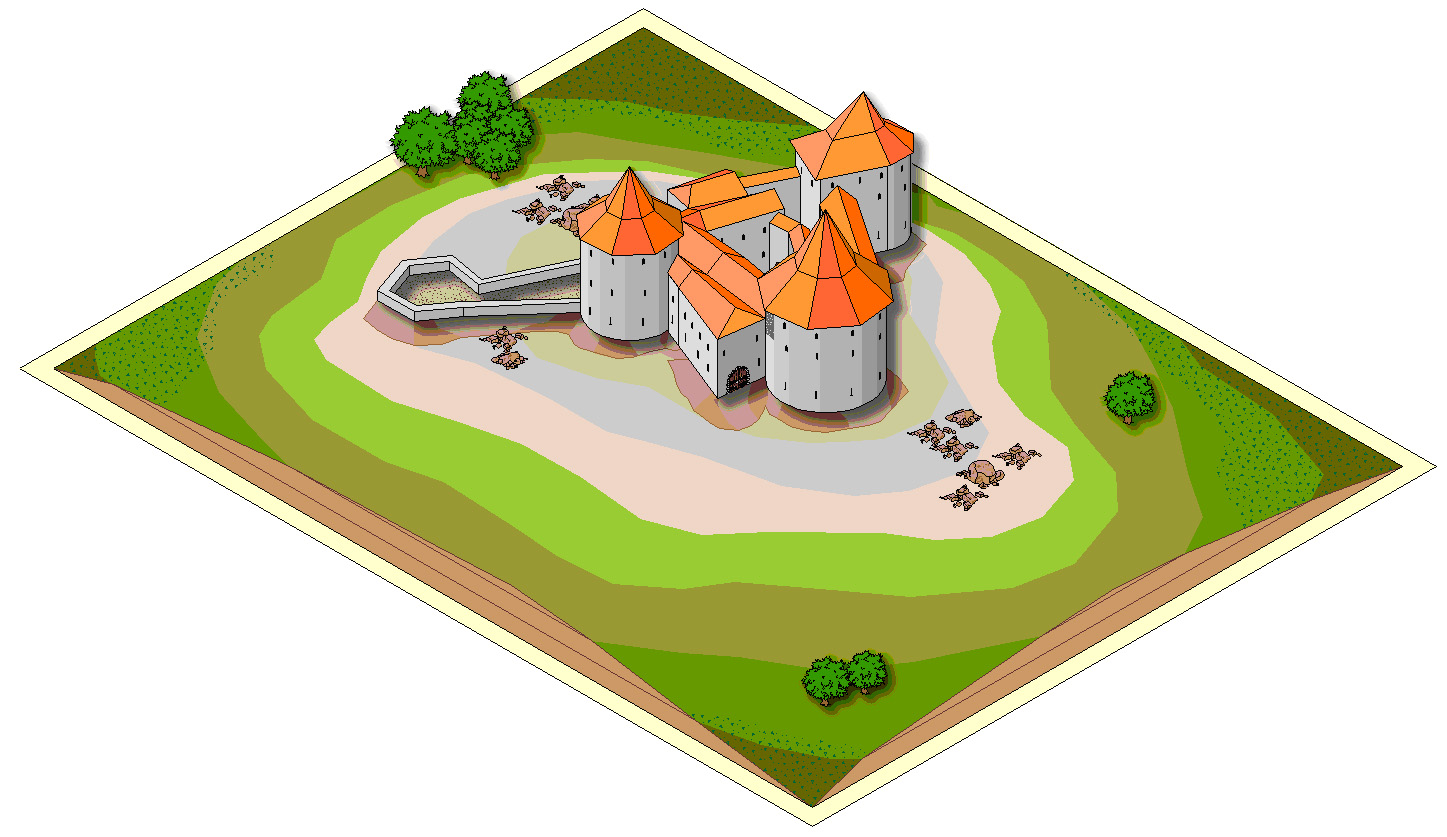
Plants can be seen growing from the top of one of the towers. An overhead flyby will show that two ancient green dragons are nestled in the trees.
A flash can be seen coming from the third level windows in one tower.
The Master of the South Wind will be using airborne poisonous spores to attack the dwarven defenders in Dwarrowdelf. The troops will be used to make sure that nobody escapes. The poison clouds could have a variety of effects - a form of germ warfare, spreading pestilence and corruption by means of noxious vapors and poisons.
Coming down the path are ranks of warriors, strange mutations between rats and humans.
If killed by an area of effect spell, the necklace will explode into the bevy of ancient green dragons.
Whenever a spell is used against the castle or the Master of the South Wind or his minions, a new rune will glow on their cloaks – granting immunity from that effect. This immunity will pass along to each warrior, apprentice, etc. This is also true of the castle itself. It is this instant adaptability that is the secret to the Masters’ success.
There are four types of warriors:
NOTE: Most carry a small bag of warpstone dust.
- Rat Swarms – are just that - huge masses of ravenous rodents. Tang Masters are said to have the power to speak to and direct rats by force of will. In the case of the South Wind, the rats are infected – releasing contagions into human cities to spread disease.
- Clanrats – this encompasses the workers and overseers, the miners and warriors, and the lowest of all - the slaves. Their lives are as nothing in their masters' eyes – mere fodder to be expended for the greater good. They wear little armor and carry an assortment of hafted weapons and shields emblazoned with Tang runes.
- Storm Vermin – the largest and bravest clanrat warriors form the bodyguards of the Clan rulers and are called Storm Vermin. They are usually armed with halberds.
- Plague Monks – are fanatical minions of the Master of the South Wind and masters of disease and pestilence. They are dedicated to spreading disease via the corruption of their own bodies. Their plague-ridden necrotic flesh is immune to pain and their deranged minds are alien to fear.
- Apprentices (Grey Seers) - they are mighty sorcerers who inhale dangerous mind-destroying warpstone powder to enhance their magical powers.
- Runebound Warriors – these ratmen are huge, heavily armored in glowing plate mail with giant swords. The surface of their armor appears to be gold and glitters with the tracings of dozens of runes which flicker across their surface. If destroyed, the armor is simple plate and the warrior inside turns into wind (or an air elemental).
The castles are actually living creatures – with veins running through the stone. They can be hurt and will react to having holes drilled in them, etc. They will open and close doors upon the whim of their masters. If threatened, they can teleport or fly (very slowly). They have a brain which can be destroyed, thus killing them. They might have a retributive strike. They are Uru, an ancient race of outsiders.
All the stones here are warm to the touch, although they appear to be of regular grey rock. There are very few decorations on the walls, except where noted. The Three Apprentices are Grey Seers. They appear as younger rat men, all in the primes of their lives. They are dressed in simple gray robes with a necklace of green beads about their necks. Those from the south are diseased with sores and rashes evident on their skin.
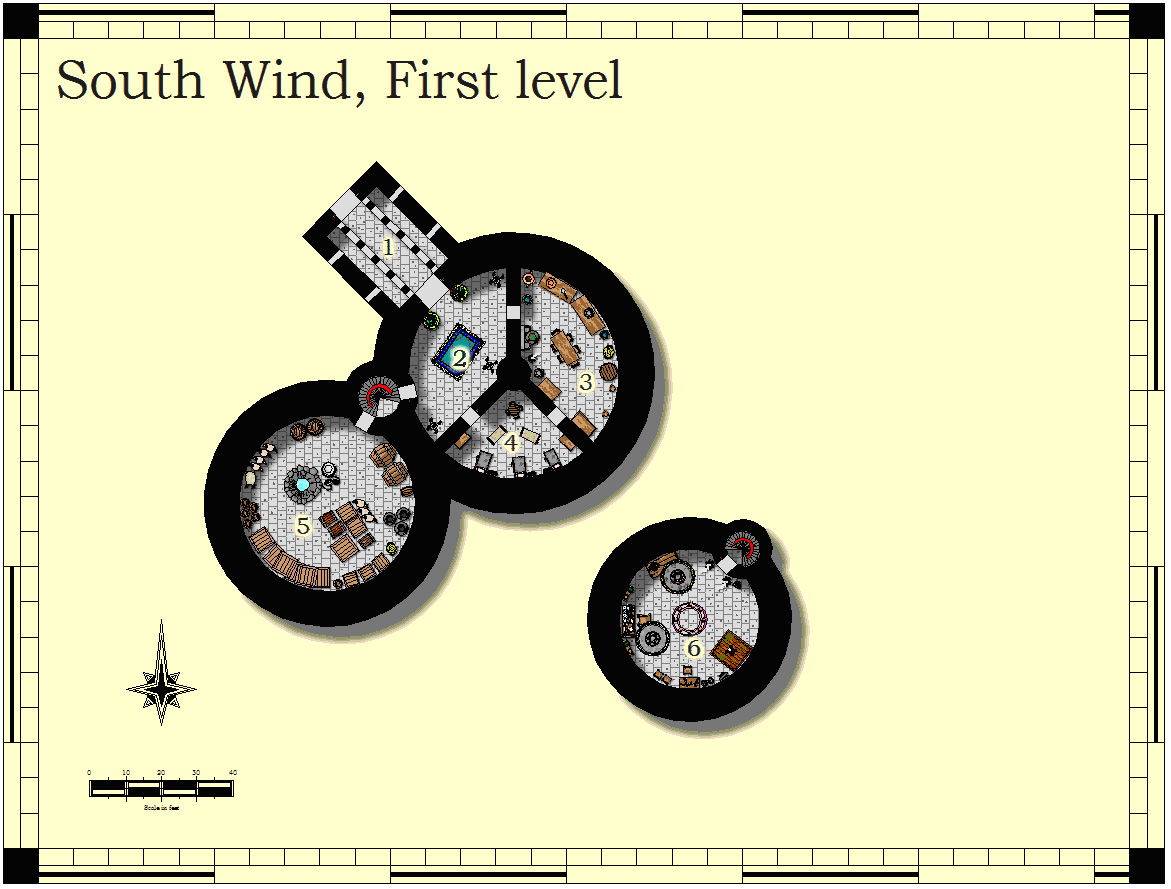
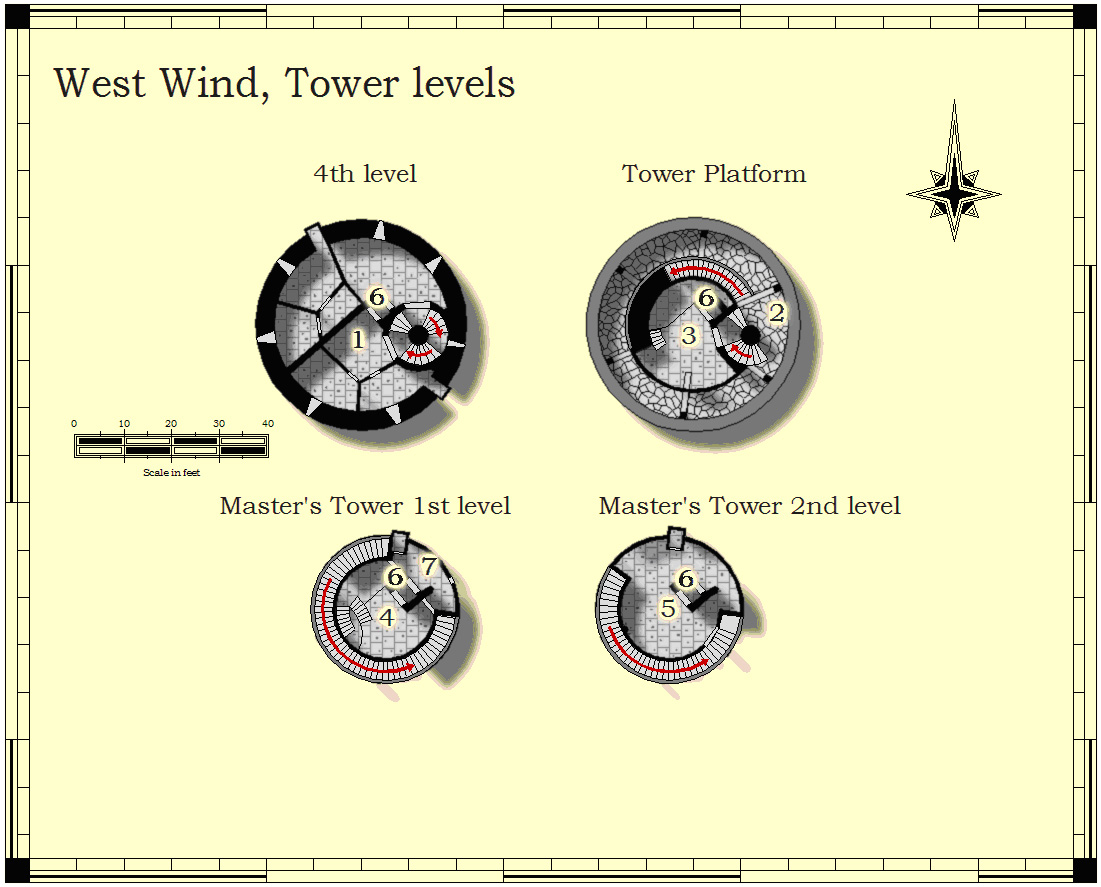
South Wind, First Level
Room 1-1: Entrance
A simple stone entrance leads past a number of arrow slits in the wall. The passages on either side are filled with mechanical ratmen who fire in impossibly rapid progression as things move down the hallway.
Room 1-2: Hall
This large room has a table in its center. At the table sit the Marshal and one apprentice. The Marshal is giving instructions to the ratmen as they come down the stairs in the northwest. He is telling them a direction to head and the fact that they will meet up in one month’s time outside of the newly-constructed Balinsgate and Durinsgate Castles.
Room 1-3: Kitchen
Cooks hurry over a never-ending pot of stew – taking portions out to the men in the Hall.
The stew is, of course, poisonous. It is made with small pinches of warpstone powder which is brought by an apprentice from the stores.
Room 1-4: Apprentices’ Room
Three beds line the walls here. They are simple without adornment. A number of grey cloaks hang on the walls. Linens and personal items can be found on small tables, and a number of chairs are scattered about the room.
An apprentice will generally be sleeping here.
Room 1-5: Storage and Well
A secret door is activated to allow passage into this room. It is filled with boxes and crates, neatly stacked against the walls. While some contain spices and various cooking herbs, most are filled with a fine grey dust. A table near the door contains hundreds of small leather pouches.
The dust is warpstone. Inhaling a pinch of dust causes great strength and insanity.
Room 1-6: Room of Runes
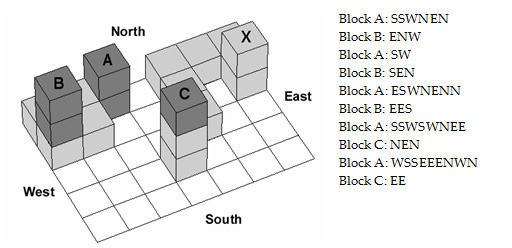
Against a wall at the bottom of the stairway, on a table is a strange board with several blocks of different size nearby.
- Each of the dark blocks (A, B, and C) can roll in any one of four directions, using one of its base edges as the axis of rotation. The light colored walls are barriers, not blocks, and do not move.
- A block cannot roll if it is obstructed by other blocks or barriers, if it would fall outside the edge of the maze, or if the new base would not be fully supported from below.
- The blocks can never change levels. Block A must always rest on the floor of the maze, block B must always rest on the first level, and block C must always rest on the second level.
- For example, block B and C cannot move first. Block A can only roll South. After that, block B could roll East, partially supported by block A. If instead block A rolled South twice, block C could roll West, supported by block A. The goal of the maze is to move block C on top of space X.
Inside the door, the room is filled with runes – carved on every surface as if some madman was trying to adorn everything. On the floor of the room, mists swirl in the vague shape of a human. On a nearby table, a large crate of grey dust sits open.
Periodically, an apprentice or the master will come in the room and throw in a bit more dust. This will cause the Runebound Warrior to become more substantial. Eventually, he will be summoned and another summoning will begin.
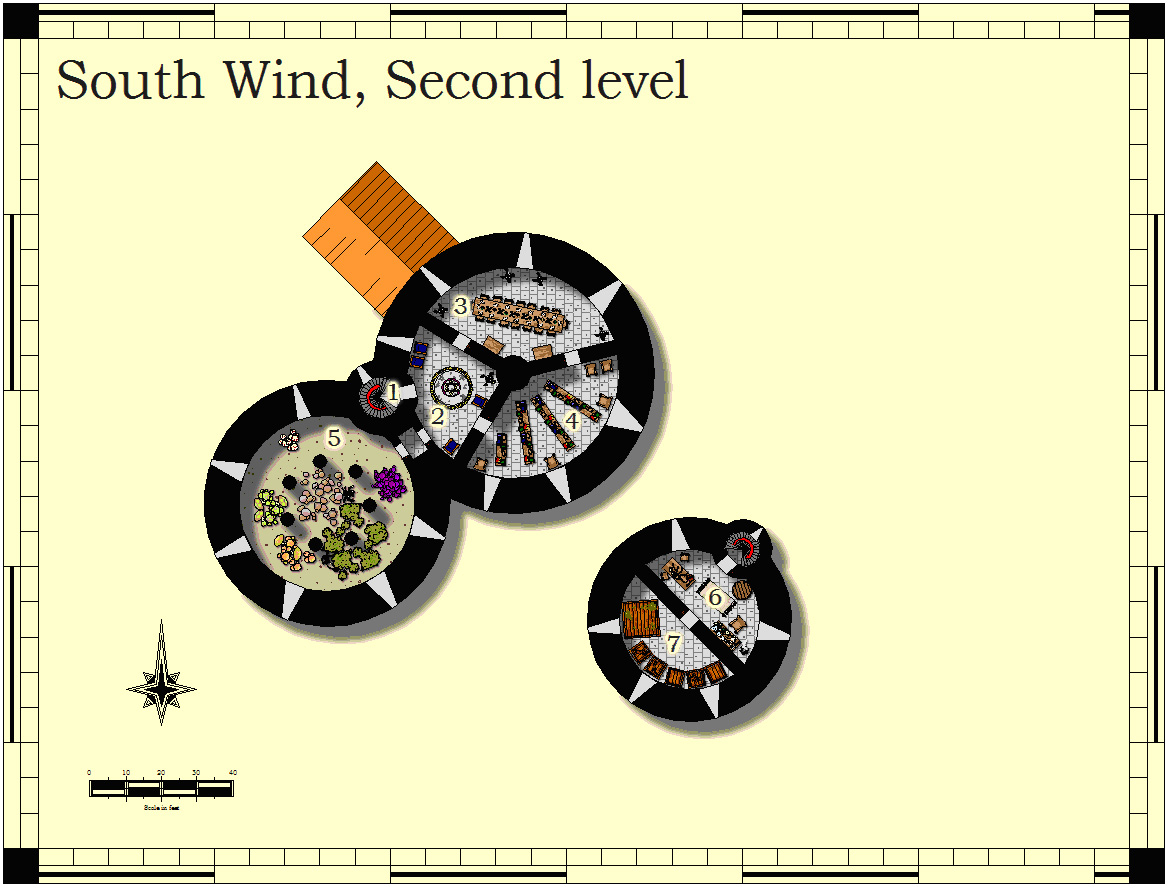
South Wind, Second Level
Room 2-1: Stairwell
This spiral staircase leads up and down. Troops are moving from the third level to the first level.
Room 2-2: Puzzle Room
There are three doors into this room. A circular table sits in the middle of this room, flanked by two chairs. On it, an antique gaming board has been placed, a number of blocks piled on each other are on the board.
Solving the puzzle opens the secret door to Room 2-5.
A secret door in the southwest corner is hidden behind a tapestry with the following verse on it. “The wise man never looks down, but completes the maze of life rolling along with certainty.”
s-wwww-n-w-nn-ee-nn-w-n-ee-s-w-ss-e-s-ee-n-e-n-w-n-www-ss-ww-n
Room 2-3: Apprentice’s Dining Room
A long wooden table with benches crosses this room. Two cupboards stand against one wall, each containing a dozen sets of utensils, bowls and cups. These all appear to be very old.
Room 2-4: Library
Bookcases radiate outward from the center of this library. Each bookcase is filled with scrolls, parchment and books. This seems to be both a library of history and research. Most of the history books are from the First Age, although a few recent additions have been made. There are also many books on poisonous plants, diseases, and the like.
Room 2-5: Brains of the Castle
This room is filled with sticky strands of flexible material, like a giant spider’s web. The strands are vaguely flesh-colored, and the room is filled with the odor of rotting meat. Among the strands that hang from the ceiling, near the center of the room, is a large bulging sack. The sack moves. A careful examination shows an eye-like appendage at the end of many of the strands.
If threatened, the brain will work against its current masters. In the case of the South Winds, the castle is tired of decay and disease and is looking for a new master. It cannot communicate directly, so the party will have to be careful how they act.
Room 2-6: Upper Laboratory
This room appears to be an alchemical laboratory of sorts. There are plant and animal parts strewn around, along with glassware, knives and other implements of botany. Three large pots seem to be distilling brown, yellow and orange liquids – all foul smelling into kegs.
Room 2-7: Animal Cages
A number of cages hold ordinary barge rats. In addition, there are an assortment of other animals here – birds, lizards, frogs, cats and the like. Some look like they have been experimented on. Others appear to be unharmed.
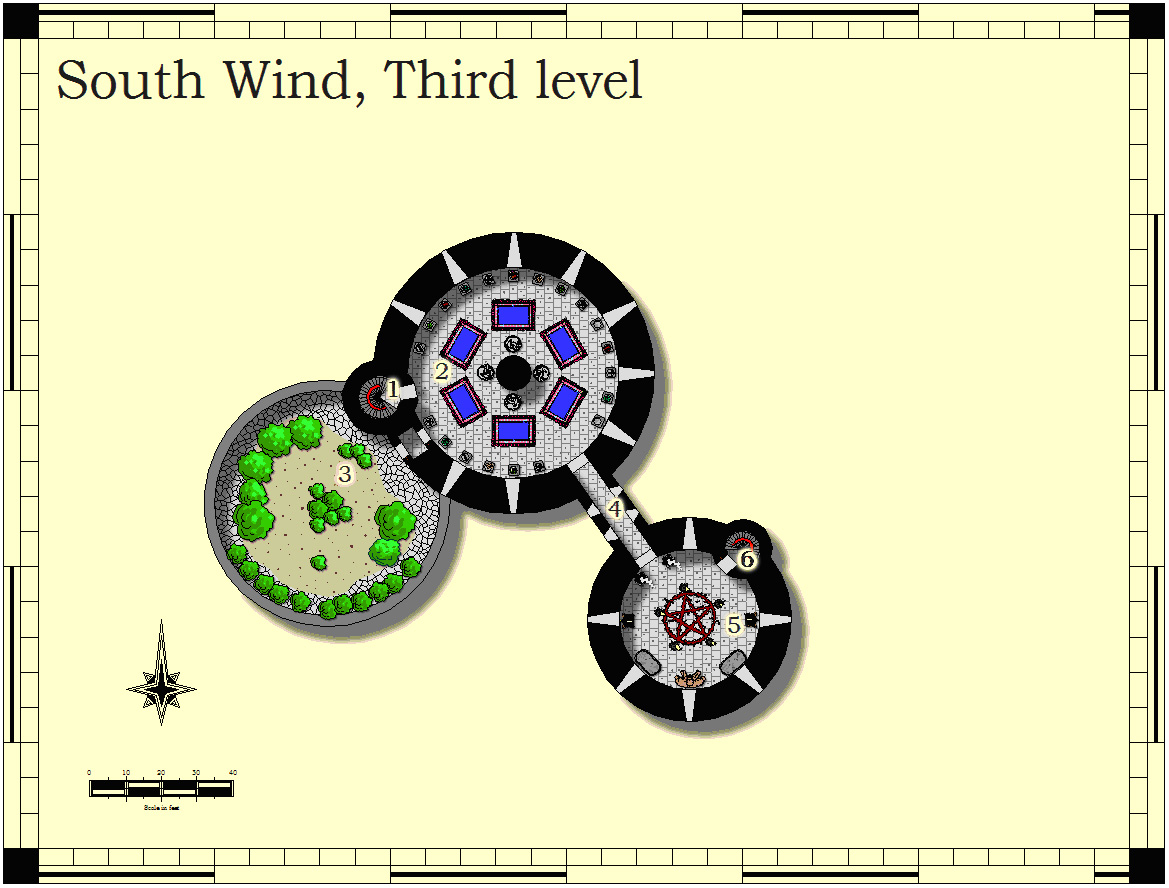
South Wind, Third Level
Room 3-1: Stairwell
This spiral staircase leads up and down. The door here is open and a stream of warriors is leaving – heading down.
Room 3-2: Gallery
This room has a nine arrow slits with mechanical statues looking out. Another dozen statues look in on the room. Each is armed with a bow. At six tables, soldiers hand weapons, shields, and armor to the constant stream of vermin coming from the southeast. These depart via the stairway to the west.
Room 3-3: Garden
The rooftop garden has a number of strange vines growing. Each vine looks like a root, twisted and gnarley, ending in a tapered end and filaments. Two ancient green dragons are always on guard here. Periodically, the apprentices or master can be seen here taking a break. The green dragons are actually poison cloud dragons – capable of belching out gargantuan clouds of toxic gas (producing toxic rain as well). The use of this super-breath weapon exhausts the beast which must then rest for a full day.
Room 3-4: Bridge
This is simple stone bridge between the towers. A stone portcullis at either end is currently UP, but it can be dropped by the castle.
Room 3-5: Teleport
This room is dominated by a large glyph in the center. Every few seconds, a bright flash can be seen. And a new regiment of warriors comes through. The arrow slits are guarded by six mechanical statues of ratmen, facing outward.
The rat men move to the northwest, down the bridge, and into the gallery.
A door in the northeast is guarded by a puzzle.
“To mark ones life as a century is a great honor – for it denotes wisdom and perseverance. One must be disciplined to make it to 100. Digits before and digits after, each row and column must be a century.”
There is always an apprentice and maybe the master here.
Room 3-6: Stairwell
This spiral staircase leads up and down.
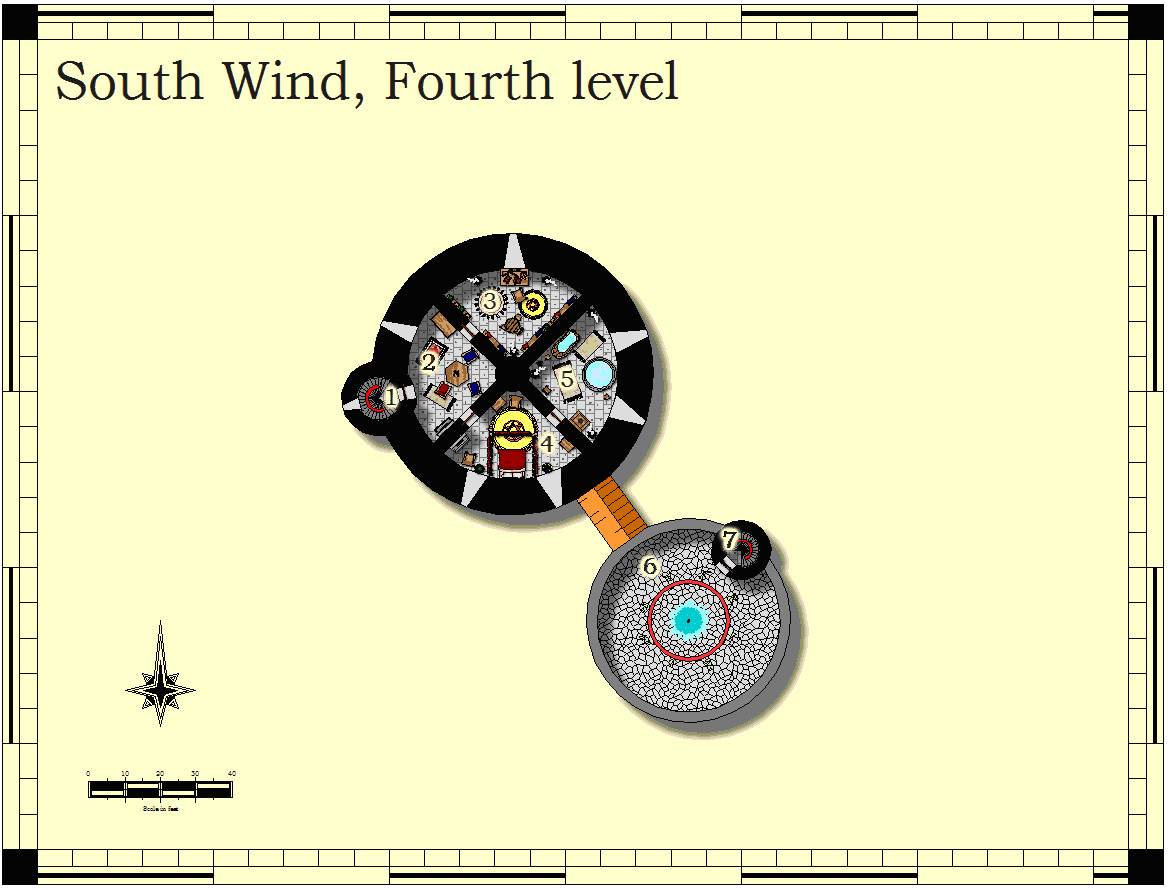
South Wind, Fourth Level
Room 4-1: Stairwell
This spiral staircase leads up and down. There is little traffic here.
Room 4-2: Common Room
This room is comfortably appointed with a table and a number of overstuffed chairs. A sideboard has a crystal decanter with rice wine and several goblets nearby.
Room 4-3: Marshal’s Room
This room is sparse with only a bed, table and chair. Several books sit on the table – including the Art of War. A whetstone and other tools for care of weapons are also on the table.
Room 4-4: Master’s Room
An ornate platform has been built here with cushions and a canopy draped across a four-poster bed. There are several First Age Tang dressers here, all of the finest craftsmanship. They contain several green robes and personal items.
Room 4-5: Bathroom
A claw footed marble tub is filled with a bubbling, black viscous goo. The stench is overpowering here. Several vials of unknown origins sit on a shelf nearby.
The “bath” works to keep the Master of the South Wind from rotting to death. It has regenerative powers – at a price.
Room 4-6: War Room
This large windowless room has a single door in the northeast corner. A round table with ten chairs is centered in this room. In the center of the table, a large bowl sits. Above the bowl, a swirling bit of air can be seen.
The bowl is used to communicate with the other Masters.
Room 4-7: Stairwell
This spiral staircase leads down.
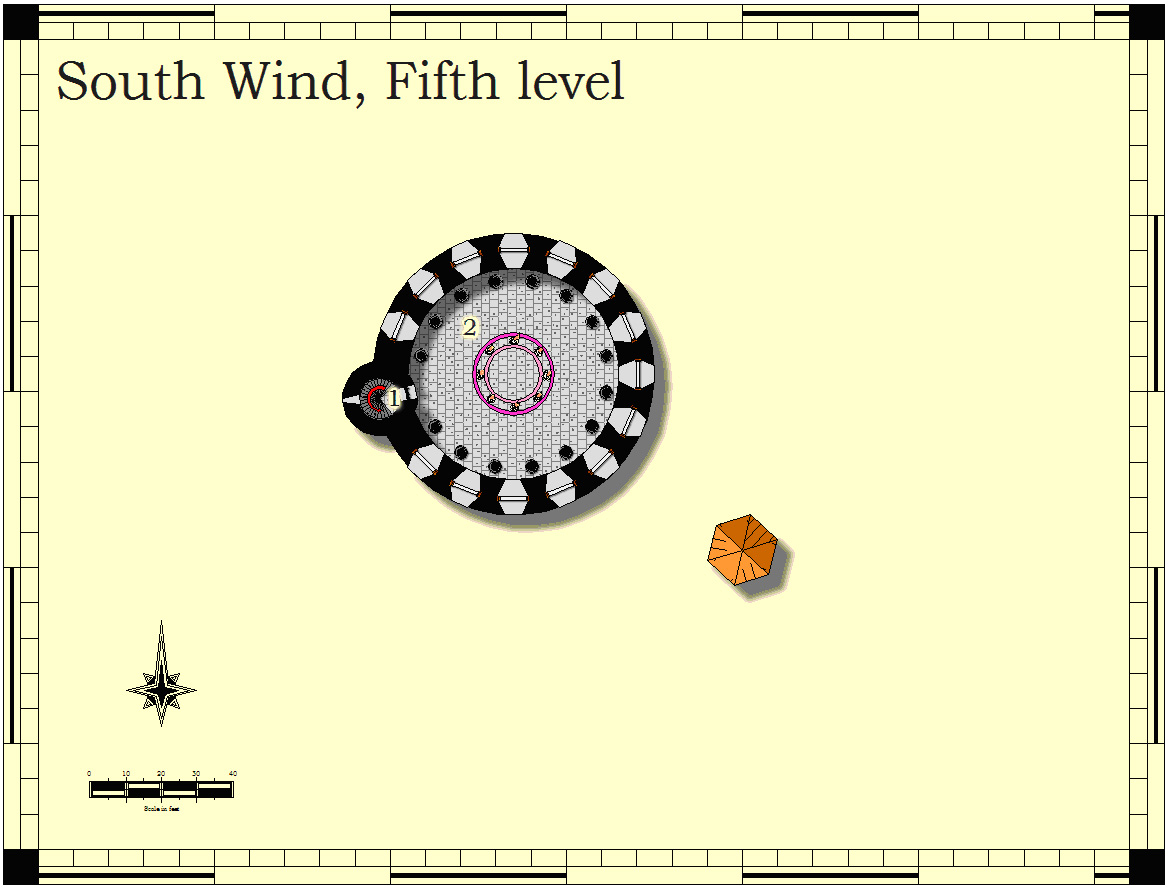
South Wind, Fifth Level
Room 5-1: Stairwell
This spiral staircase leads down. There is no traffic here.
Room 5-2: Observatory
This room is open to the heavens, although the crenulated walls are 15 feet high. In the center of the floor, a strange device sits covered in dust. It looks like a giant astrolabe, with globes and spinning stars circling a central sphere. A number of statues encircle the area. These look like ratmen warriors.
|
Monsters
Master of the South Wind – Room 3-5 |
Treasure
Robe of Pestilence - Master |
Adventure Two: The Arrival of the Master of the East Wind
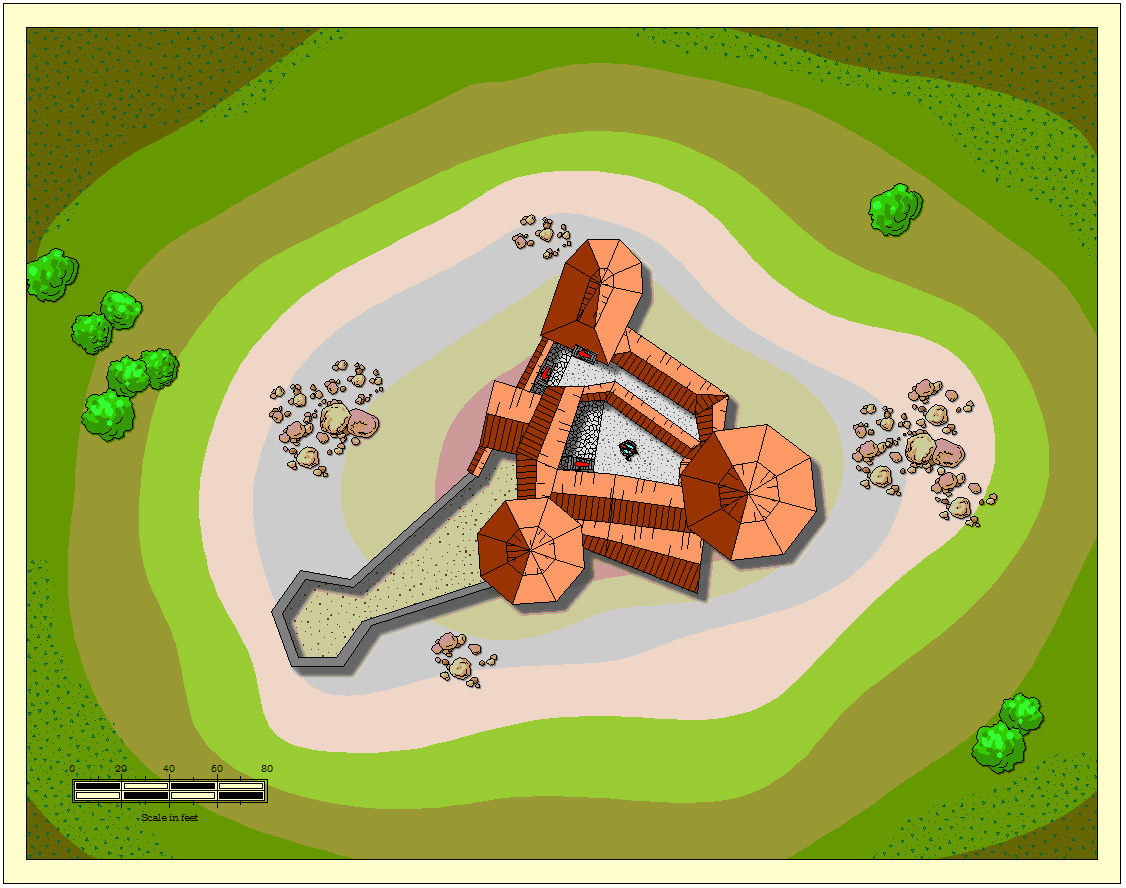
There is no activity moving in or out of this castle, although it is hard to make out the details in the darkness.
In fact, there are massive creatures moving about the yard.
The Master of the East Wind attempts to cover the world in stormy darkness and crashing sound – both of which hide the activities of his assassins. He is the master of subterfuge whose agents scuttle over the rooftops of human cities on their secret missions of sabotage and intelligence gathering. He also has the power to speak to and direct rats by force of will. His primary attacks are: blindness, deafness, muteness, lightning, darkness.
If killed by an area of effect spell, the necklace will explode into the bevy of ancient black dragons.
He can walk through walls.
There are three types of warriors:
NOTE: Most carry a small bag of warpstone dust.
- Rat Swarms – are just that - huge masses of ravenous rodents. Tang Masters are said to have the power to speak to and direct rats by force of will.
- Gutter Runners – are the agents of espionage and assassination. They are highly skills warriors who use their skills to infiltrate areas of ruin and destruction where they lie in wait to ambush the foe.
- Runebound Assassins – these ratmen are small, armored in leather with jet black stone swords and stone daggers. The surface of their armor appears to flicker with the purple-black tracings of dozens of runes across their surface.
If destroyed, the armor is simple leather and the warrior inside turns into wind (or an air elemental).
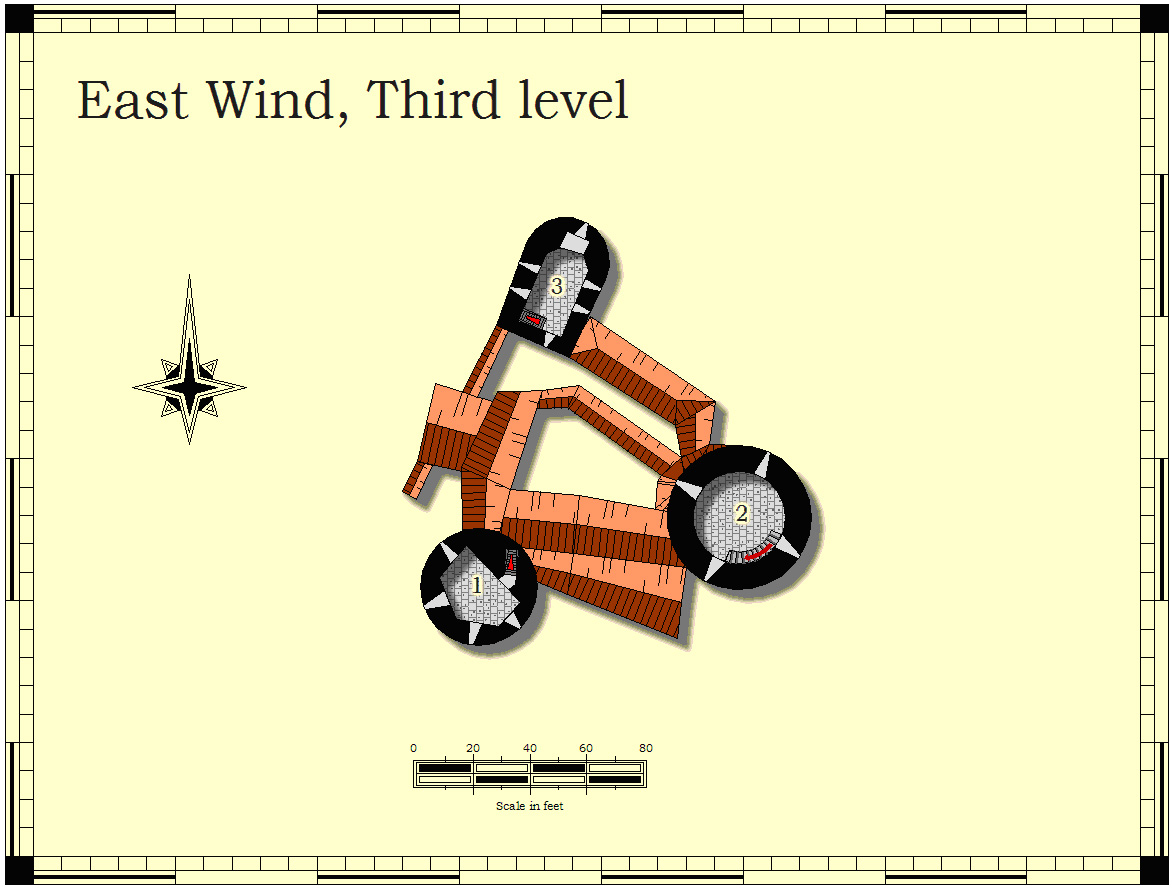
East Wind Castle, First Level
ALL ROOMS in this castle are DARK.
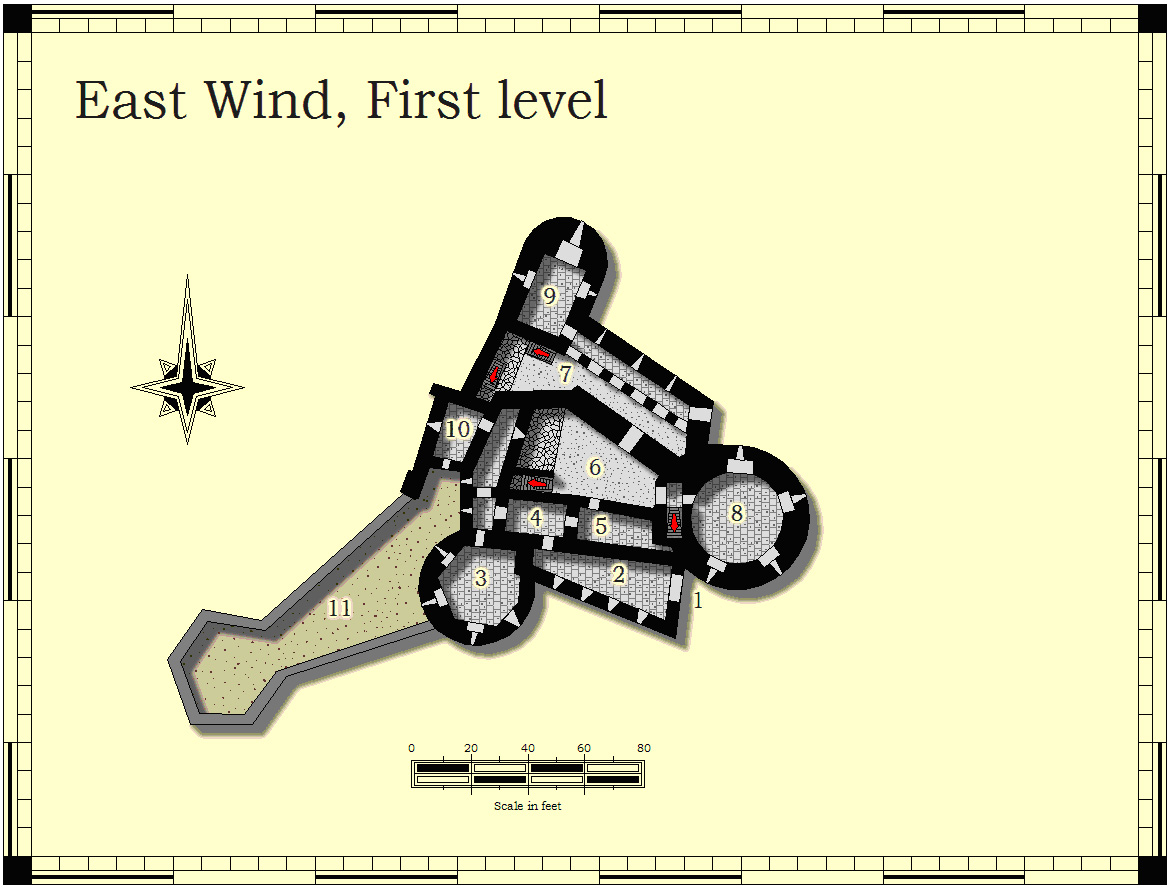
Room 1-1: Main Gate
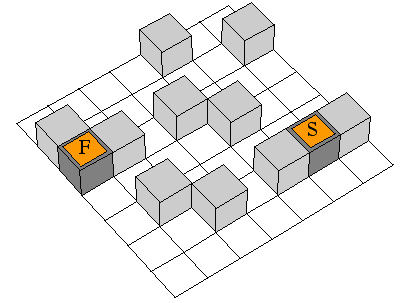
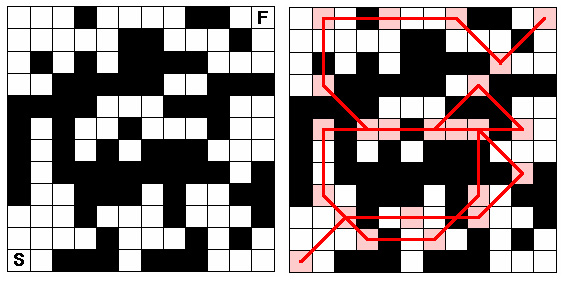
The door to the castle flickers with eldritch light. It is heavy bound oak, impossibly ancient with a single brass ring beside which sits a riddle seemingly carved into the wood. A note is stuck to the door with a dagger.
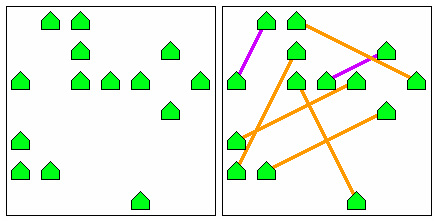
“A warrior’s path is always a maze. He must avoid the darkness and plan carefully ahead. The forms that you have to work through this test are simple and yet enough, my apprentice. Jump up or down three, side-to-side three, or diagonally two. Start at the S and find the F. Be bold.”
The note is signed simply “H”.
Room 1-2: Guard Room
Near the arrow slits in this room flicker several shadows. They will move to attack any that enter. This room appears to have been unused for decades as cobwebs can be seen in every corner.
Room 1-3: Lightning Trap Tower
The door to this tower is locked. A purple lightning flickers around the edges of the metal bindings of the ancient oak. A crackling sound – like static electricity – can be heard coming from within.
If approached, the “castle brain” will detect the interlopers and open the door. Each round electrical bolts will travel throughout the castle seeking metal. None of the items in this castle are metal.
This room contains a giant metal sphere hanging from a stone shaft in the center of the room. The shaft clearly extends beyond the ceiling. Otherwise, this room contains bits of bone and charred armor and weapons.
A high-pitched whining signals another charge.
Room 1-4: Corridor
This corridor is teeming with rats –which move to attack any living thing touching the floor. They are not particularly intelligent, but they are aggressive.
Room 1-5: Hall
Rats move between the two doors here.
Room 1-6: Inner Ward
This area is open to the night sky above. The area is teeming with rats moving from the eastern to the southern door. From here, the black purple lightning seems to be particularly strong.
Room 1-7: Outer Ward
This area is quiet – without rats. A small meditation shrine stands at the far end of this area with stairs leading into the second level of the castle. The shrine is that of a rat-like creature, sitting on its hind legs. Two huge diamonds glow dully in the statue’s eye sockets.
At times, an apprentice will be here.
Room 1-8: Brains of the Castle
This room is filled with sticky strands of flexible material, like a giant spider’s web. The strands are vaguely flesh-colored, and the room is filled with the odor of rotting meat. Among the strands that hang from the ceiling, near the center of the room, is a large bulging sack. The sack moves. A careful examination shows an eye-like appendage at the end of many of the strands.
If threatened, the brain will work against its current masters. In the case of the East Winds, the castle is well-maintained and not likely to switch allegiances.
Room 1-9: Summoning Room
Inside the door, the room is filled with runes – carved on every surface as if some madman was trying to adorn everything. On the floor of the room, mists swirl in the vague shape of a human. On a nearby table, a large crate of grey dust sits open.
Periodically, an apprentice or the master will come in the room and throw in a bit more dust. This will cause the Runebound Assassin to become more substantial. Eventually, he will be summoned and another summoning will begin.
Room 1-10: Kitchen
The smell emanating from this room is overwhelming – rotting meat and vegetable and other carrion. Several carrion crawlers can be found among the carcasses. A simple door to the Lower Bastion stands ajar.
There are sounds of something large beyond the door.
Room 1-11: Lower Bastion
Several large dragon-like creatures can be seen here, although they appear more as shadows than actual dragons. Their forms are shifting as they roil in and out of existence.
These are the nightwing dragons – phase spiders of the dragon world. They are able to change shape and move anywhere very quickly. Their breath weapons cause blindness. Their roar causes deafness. And sight of them causes fear which mutes victims.
East Wind Castle, Second Level
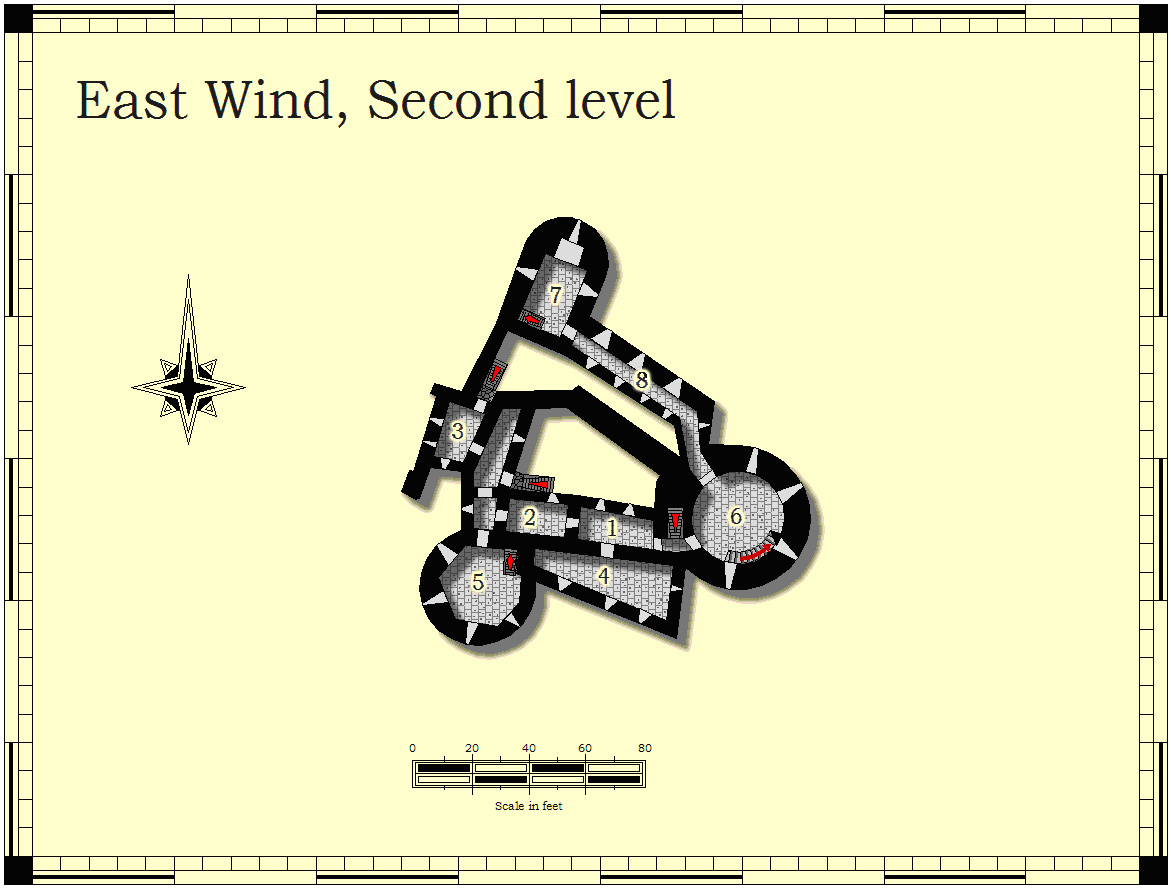
Room 2-1: Dining Room
This room has a large banquet table with a number of black chairs surrounding it. Simple stone cups, plates and utensils are set on the table. They look as if they have regular use.
Room 2-2: Guard Room
This room is filled with statuary; all dressed in dark garb – sort of an arrangement of wax museum tableau. Ten settings are strewn about the room, showing different assassinations and other grisly murders.
An assassin who is well hidden is waiting for a chance to catch an intruder.
Room 2-3: Marshal’s Chamber
This small room is furnished with a bed and small table. A single chair is pushed up against the door in the northeast corner.
Room 2-4: Master’s Chamber
This room is hung with black tapestries and glows from the eerie light of a hundred black candles. The candles are arranged to form a path from the door to the bed. Four statues sit along the walls, facing outward.
Room 2-5: Generator
The door to this room is trapped with intricate carvings. On the floor in front of the door, a corpse dressed in leather armor has a small scrap of paper in his hands.
“A leader finds battlefield matches which suit the strength of his men. And his timing must be solid. Match each of these warriors in pairs so that only two different distances occur.”
Opening the door reveals a set of whirling metallic plates. Stone shafts protrude through both the ceiling and floors of this room. Several naked ratmen are tossing handfuls of grey powder into the space between the plates. These crackle and pop and generate billows of dust and an acrid smell. The ratmen will not move to attack, just attempt to flee from intruders.
This is the machine that generates the electricity that courses through the castle. By destroying it, the lightning traps can be avoided.
Room 2-6: Teleport
This room is dominated by a large glyph in the center. Above the glyph, black smoke swirls in a continuous tempest filling the edges of the room with smoky tendrils. A constant stream of rats swarm from the room. Periodically, a gutter runner will emerge and be shuffled by an apprentice up the stairs to the east. Mainly, rats emerge and are sent along the passageway to the southwest.
The arrow slits are guarded by six mechanical statues of ratmen, facing outward.
There are always two apprentices here.
Room 2-7: Communications Rooms
This room has a small square table in it. In the center of the table, a large bowl sits. Above the bowl, a swirling bit of air can be seen.
The bowl is used to communicate with the other Masters. The Master is usually here.
Room 2-8: Gallery
Although the castle is almost unadorned with pictures, tapestries and the like, this narrow hallway is filled with paintings – mostly of dark, subject brooding and evil. Almost all are portraits or pictures of murder and vice. The gallery produces an uncanny sense that the portraits are watching any who pass down its length.
East Wind Castle, Third Level
Room 3-1: Lightning Trap Tower
The door to this tower is locked. A purple lightning flickers around the edges of the metal bindings of the ancient oak. A crackling sound – like static electricity – can be heard coming from within.
If approached, the “castle brain” will detect the interlopers and open the door. Each round electrical bolts will travel throughout the castle seeking metal. None of the items in this castle are metal.
This room contains a giant metal sphere sitting atop a stone shaft rising from the floor in the center of the room. The shaft clearly extends beyond the floor. Otherwise, this room contains bits of bone and charred armor and weapons.
A high-pitched whining signals another charge.
Room 3-2: Orders Room
Sitting at a small table, the Marshal gives orders to his Gutter Runners. He hands them stone swords. Each sword has a pommel that has been carved in the form of a human head – the next victim to be sought out by the minion.
Room 3-3: North Tower
This small room is clearly a training room of sorts. Dummies hang from chains and ropes suspended from the ceiling. Several vats of liquid are near the door, and chips from the walls and floor are slightly sticky to the touch. It is clear that this room has been used recently.
|
Monsters
Sing Li, Master of the East Wind – Room 2-7 |
Treasure
Staff of the East Wind |
Adventure Three: The Arrival of the Master of the West Wind
There is a strange musty smell to the air here. Any spell cast will require a saving throw or the caster will turn into a small rodent – which will be attacked by any rats around OR controlled by the Master.
The Master of the West Wind attempts to mutate all living things into rats under his control. He is a master of mutating magic – having created many vile monsters by feeding them warpstone. His most successful creations are the Rat Ogres - gigantic Tang monstrosities many times the size of an ordinary Tang.
The Master will summon his guardian creatures which are three-headed dragons. One head (dragon) can morph into any color to spew its breath weapon, one head is that of a cateobleopas, and the third is that of draggone (roar).
The Marshal of the West Wind is a doppleganger – currently taking the form of the Arch Druid Falstaff.
There are two types of warriors:
NOTE: Most carry a small bag of warpstone dust.
- Clanrats – see above
- Rat Ogres are employed as bodyguards and shock troops. Large and clumsy, and not especially intelligent, they are nonetheless very strong and few would-be assassins would dare to face one.
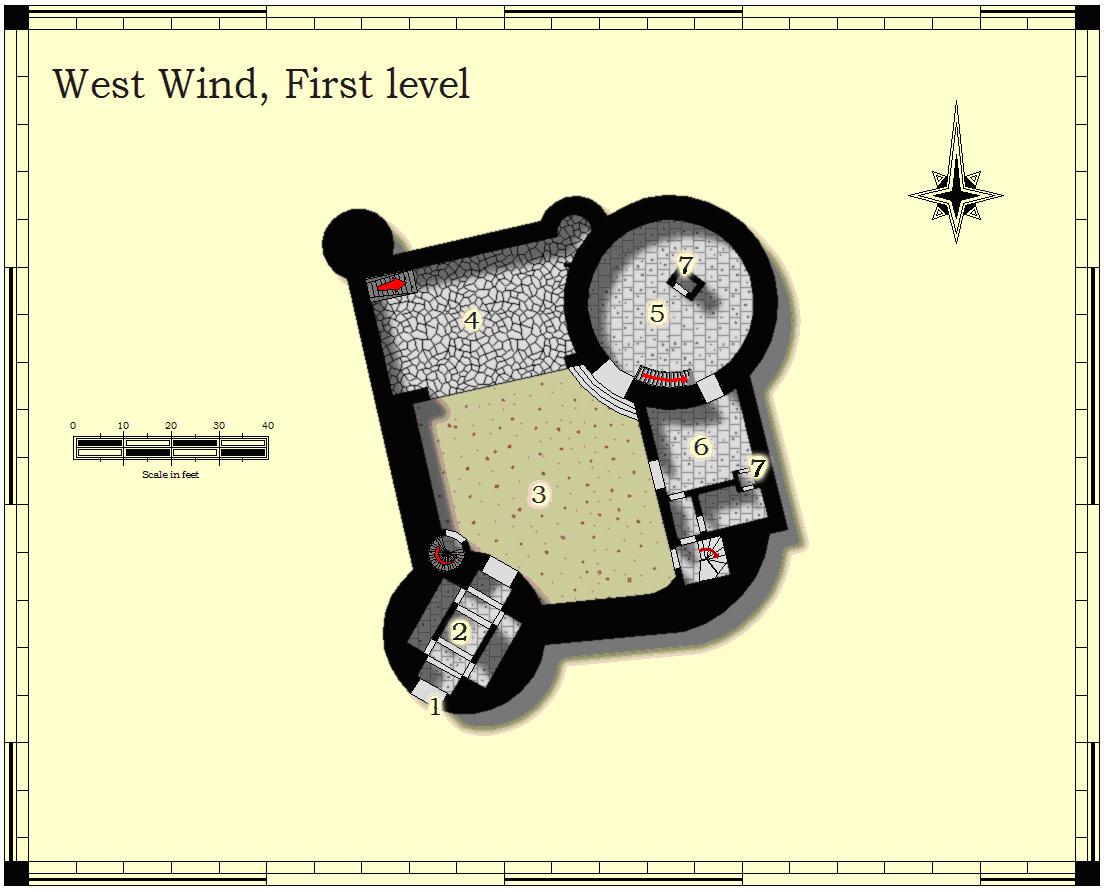
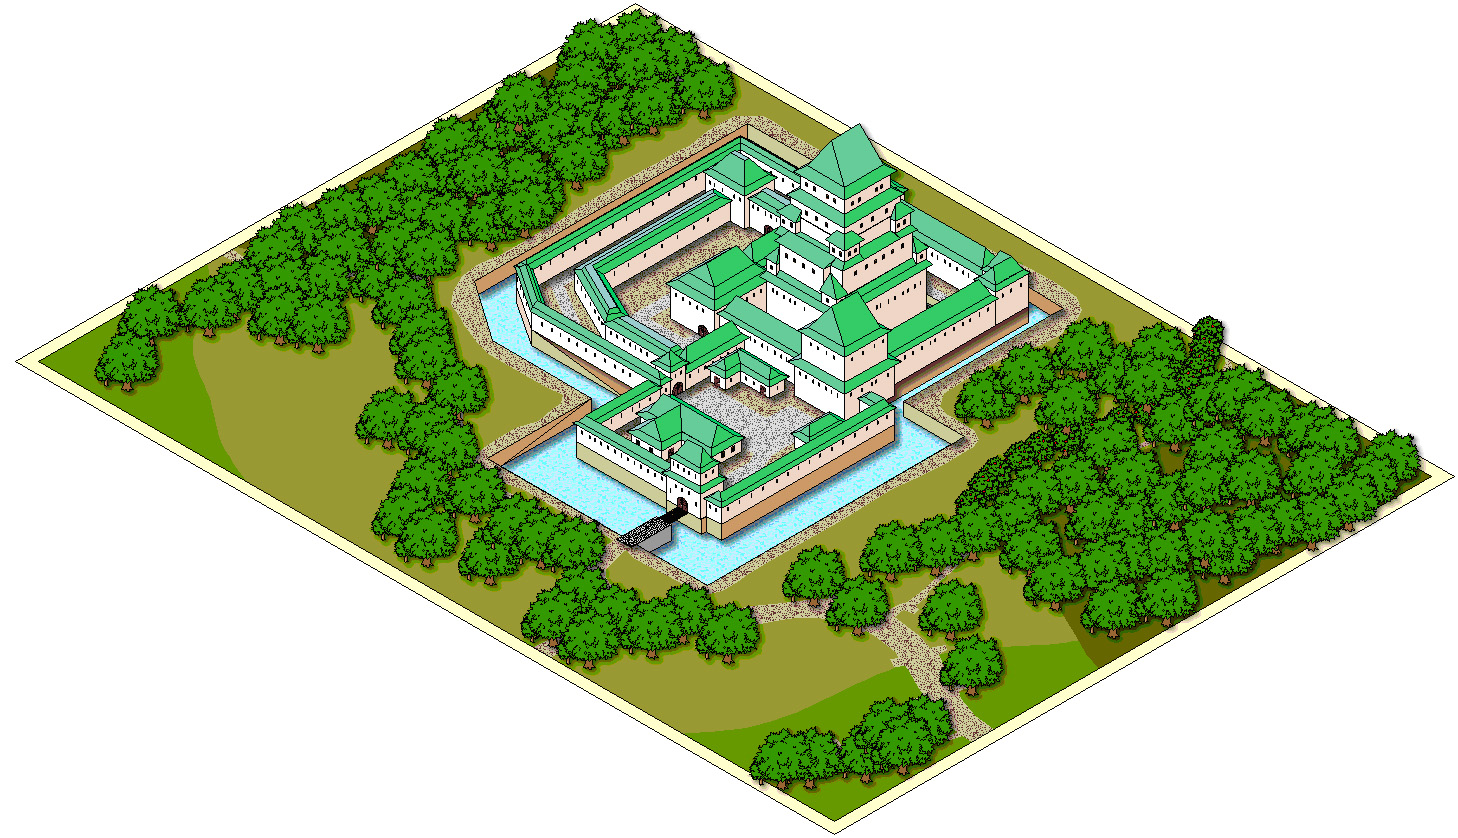
West Wind Castle, First Level
Room 1-1: Gate
Hundreds of huge rat-looking ogres and smaller ratmen are milling about outside of the stone gates to this keep. Periodically, they will rush down the hill and into the surrounding countryside.
Room 1-2: Gate Tower
This room is filled with mechanical ratmen. They have whirling blades and rapid fire arrows.
Room 1-3: Courtyard
A huge multi-tenacled grey tree-like creature sits in the center of the courtyard. While it sways gently in the wind, it does not appear to be moving independently.
This is actually the brains for the castle. Each tentacle has an eye, and the brain acts the same as before.
Room 1-4: Birthing Pits (open)
A series of large pools filled with a grey mud emit a foul stench. They bubble and mist swirls around the pools. Periodically, a lumbering creature steps from the pool – moving towards the front gate. Almost immediately, an apprentice moves to throw more warpstone dust into the pool along with a rat from the constant stream of clanrats coming from the passageway on the west side of the pits.
Room 1-5: Great Hall
This large room is filled with a banqueting table and a large throne.
Room 1-6: Kitchen
This room contains chopping tables, bubbling pots and other cooking utensils. Two ogres are here preparing a meal.
Room 1-7: Fireplace
This large fireplace is burning a strange grey wood – creating a soporific gas that permeates the castle.
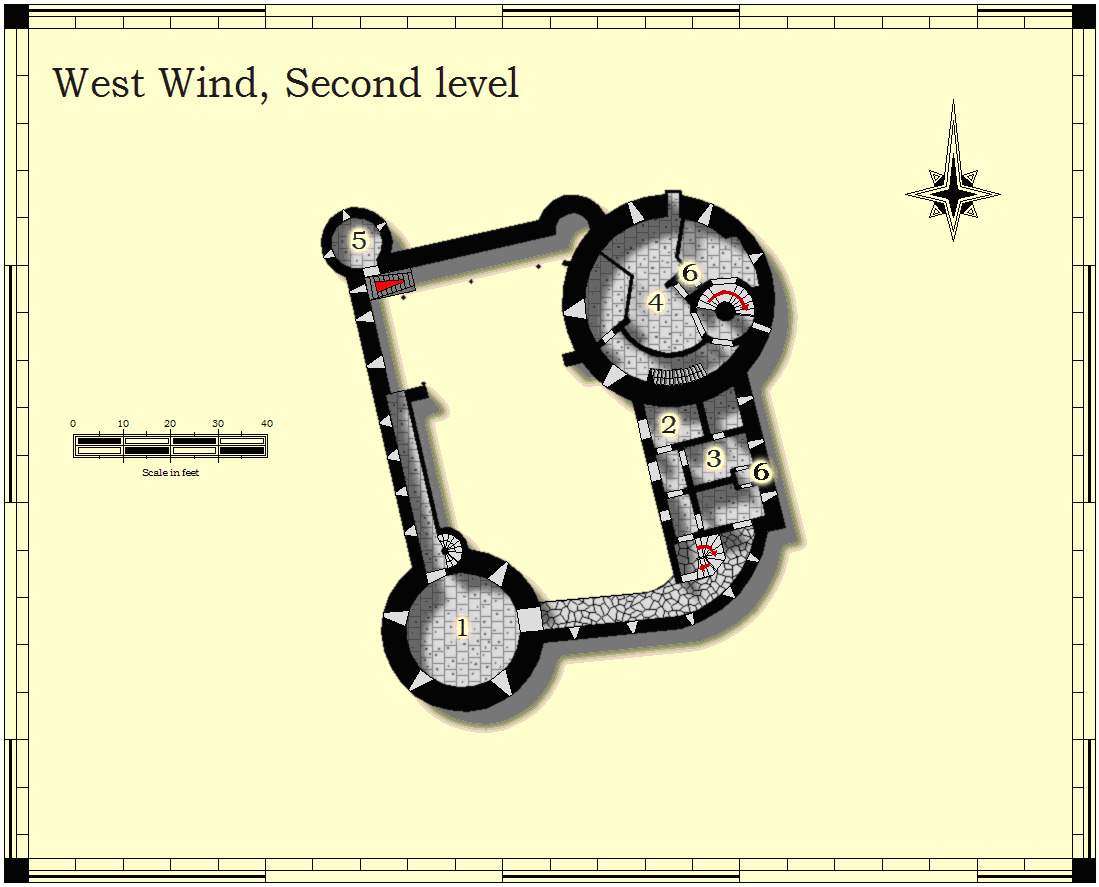
West Wind Castle, Second Level
Room 2-1: Brains of the Castle (trap)
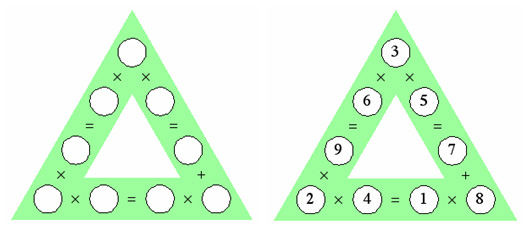
The door to this room is locked. A triangular rune flickers on its surface.
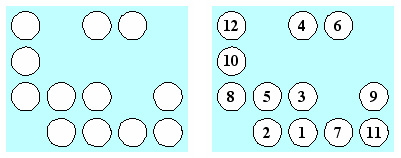
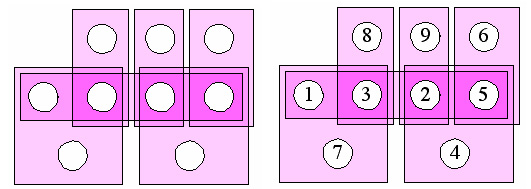
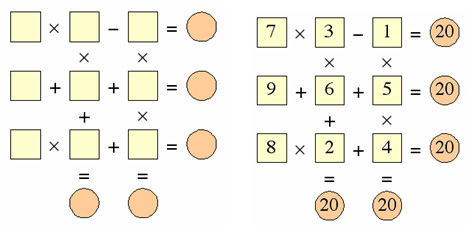
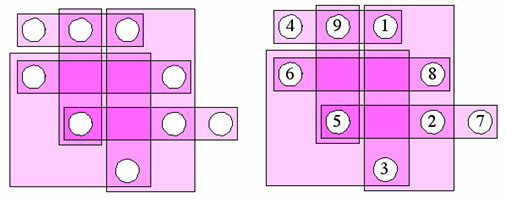
On the battlefield, many equations are needed – to keep men and support, enemies and terrain in balance. Balance your forces from one through nine so that this battlefield makes sense.
This room is filled with sticky strands of flexible material, like a giant spider’s web. The strands are vaguely flesh-colored, and the room is filled with the odor of rotting meat. Among the strands that hang from the ceiling, near the center of the room, is a large bulging sack. The sack moves. A careful examination shows an eye-like appendage at the end of many of the strands.
This is actually a trap with the brain promising anything to get the party into the room. From there, a false ceiling will drop, crushing the party.
Room 2-2: Master’s Room
This small room has a large square bed atop a number of pillars. A curtain is closed around the bed.
The bed contains a succubus who will transform in order to trap the party. She will pretend to be a slave.
Room 2-3: Marshal’s Room
This small room contains a strange wooden pallet – filled with nails. A chair with only three legs is pushed up in the corner of the room.
Room 2-4: Library
This oddly shaped room is filled with shelves of books on transformation. A number of tables have notes scattered upon them. Several show the dissection of elves and dwarves – grafted with giant pincer hands and multiple legs. One particularly revolting drawing shows a half-gnome/half-dwarf.
Room 2-5: Watch Tower
Four summoned Rune Warriors are here, awaiting orders.
Room 2-6: Fireplace
This large fireplace is burning a strange grey wood – creating a soporific gas that permeates the castle.
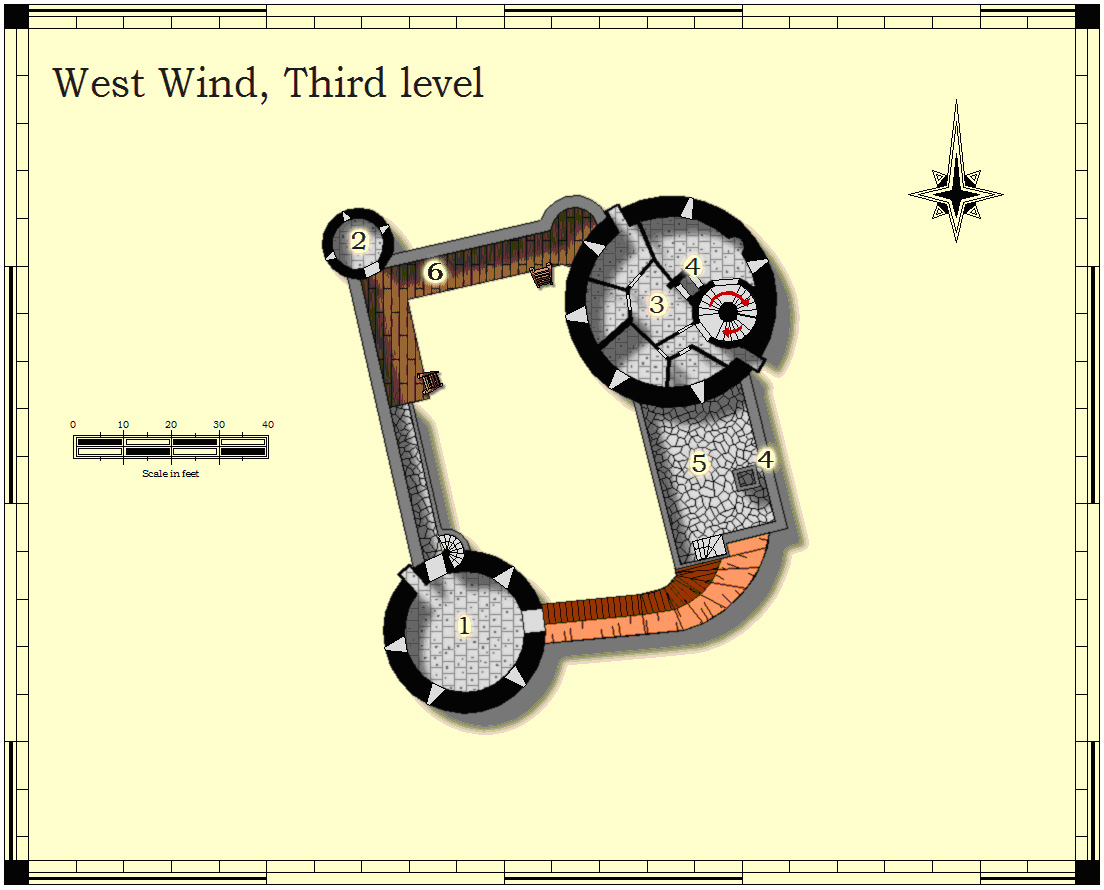
West Wind Castle, Third Level
Room 3-1: Teleport
This room is dominated by a large glyph in the center. Above the glyph, black smoke swirls in a continuous tempest filling the edges of the room with smoky tendrils. A constant stream of rats swarm from the room. Periodically, a gutter runner will emerge and be shuffled by an apprentice up the stairs to the east. Mainly, rats emerge and are sent along the passageway to the southwest.
The arrow slits are guarded by six mechanical statues of ratmen, facing outward.
There are always two apprentices and usually the Marshal here.
Room 3-2: Summoning Room
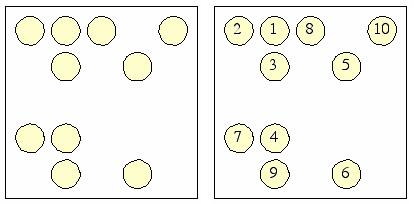
As the generations grow, so to does their separation. A wise man lets his children wander, but only as far as they need. For each of twelve generations (from one to twelve) place them so that they are farther away from their parents.
Inside the door, the room is filled with runes – carved on every surface as if some madman was trying to adorn everything. On the floor of the room, mists swirl in the vague shape of a human. On a nearby table, a large crate of grey dust sits open.
Periodically, an apprentice or the master will come in the room and throw in a bit more dust. This will cause the Runebound Warrior to become more substantial. Eventually, he will be summoned and another summoning will begin.
Room 3-3: Apprentice’s Rooms
Three beds line the walls here. They are simple without adornment. A number of grey cloaks hang on the walls. Linens and personal items can be found on small tables, and a number of chairs are scattered about the room.
An apprentice will generally be sleeping here.
Room 3-4: Fireplace
This large fireplace is burning a strange grey wood – creating a soporific gas that permeates the castle.
Room 3-5: Roof
This rooftop perch is used by the master to oversee the activities in the courtyard.
Room 3-6: Wooden Platform
A number of mechanical guards are stationed on this platform.
West Wind Castle, Towers Level
Room 4-1: Mutant’s Rooms
The door to this room glows with a magical rune.
As the generations grow, so to does their separation. A wise man lets his children wander, but only as far as they need. For each of ten generations (from one to ten) place them so that they are farther away from their parents.
Rows of specimen jars line the walls. Two tables have glassware and other laboratory equipment on them.
In a number of cells, mutations can be seen. These include: several ogre/elf golems, two partially mechanical giants with the tiny heads of dwarves, and a number of captured owlbears.
Room 5-2: Landing
Ten stone gargoyles circle this landing. Each is a grotesque, vaguely rat-shaped stone beast. They look out over the countryside below. They will alert the castle to anything that approaches. They can attack if the castle or courtyard is stormed.
Room 5-3: Communications Room
This oddly shaped room has a small square table in it. In the center of the table, a large bowl sits. Above the bowl, a swirling bit of air can be seen.
The bowl is used to communicate with the other Masters.
Room 6-4: Prison
A set of bars look into a small circular room. The room has a bed and table, although a set of impossibly thick looking chains hang from the wall. There are no keys, and the bars seem to be on some sort of portcullis system.
This room has magically completely dampened. It is usually used as a prison.
Room 7-5: Screaming Bell Tower
The Screaming Bell is a gigantic warp-forged bell mounted upon a huge platform. It is of alien shape and design, oddly asymmetrical and filled with odd protrusions.
It is usually pushed into battle by the hordes of ratmen. From this great altar-machine the tolls of the bell send waves of discord over the battlefield - driving the ratmen into an excited blood-thirsty frenzy whilst the enemies of the Tang are thrown into a state of despair.
Room 6: Fireplace
This large fireplace is burning a strange grey wood – creating a soporific gas that permeates the castle.
Room 6-7: Guardroom
Two mechanical guards are here, looking into the room behind the bars. They will not activate unless the prison is open and someone is placed inside.
|
Monsters
Fin Lu, Master of the West Wind – Room 4-1 |
Treasure
Robe of Petrification - Master |
Adventure Four: The Arrival of the Master of the North Wind
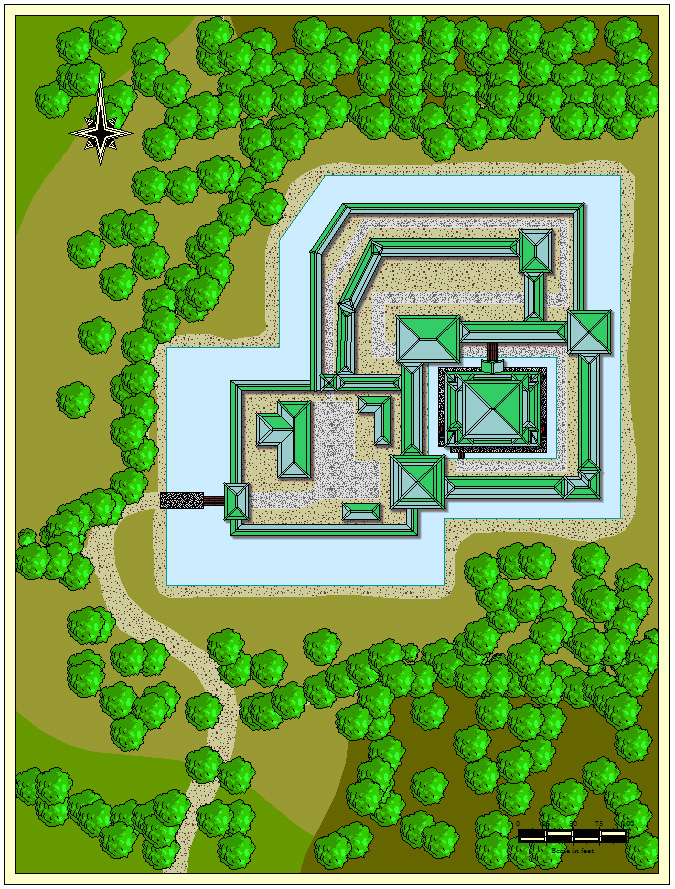
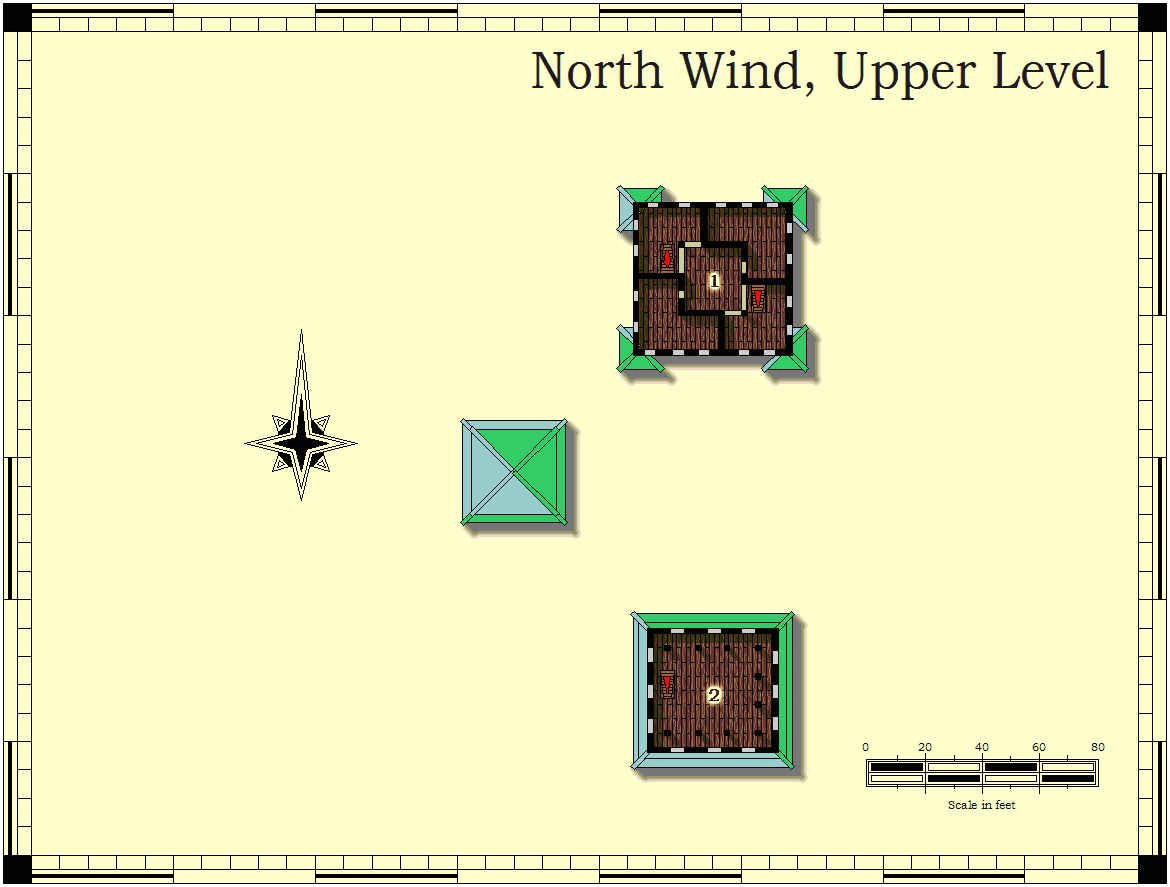
Inside the yards, hordes of ratmen carrying strange weapons can be seen. Several fire purple-lightning staves in a practice area. One courtyard contains a dozen huge wheels guarded by fifty large ratmen. The guard towers have warp cannons mounted in them for defense.
The Master of the North Wind is famed for his machineries that blend sorcery and an advanced science far beyond the understanding of mere humans. His creations are immune to the mind-influencing powers of his enemies, fighting without fear until the bitter end.
He will attempt to burn down the city of Teufeldorf – which is why he has landed so close by – just to the north. Falstaff will be used as a bargaining chip, if needed, to allow him to escape.
The Master of the North Wind will challenge the party to a set of duels. Each member against one Runebound Warrior (which, of course, will be stacked with Runes against the character).
The Marshal of the North Wind is the master computer for the mechanical monstrosities around the castle: mechanical spiders, golems and one-shot stirges. He has no apprentices.
- Clanrats – see above.
- Jezzails – these are ratmen armed with warp-lock firearms - heavy handguns of such length that it takes two ratmen to fire - one to operate the weapon and one to support the barrel and carry the heavy shield for them both to hide behind. These weapons shoot balls suffused with warpstone dust so that even the slightest wound quickly becomes corrupt and infected.
- The Doom Wheel – is an unlikely triumph of engineering - a vast mechanical wheel bristling with spikes, jezzails and warp-lightning generators. The Doom Wheel trundles across the battlefield scattering the enemy's ranks and raining destruction upon the opposing army.
NOTE: Most carry a small bag of warpstone dust.
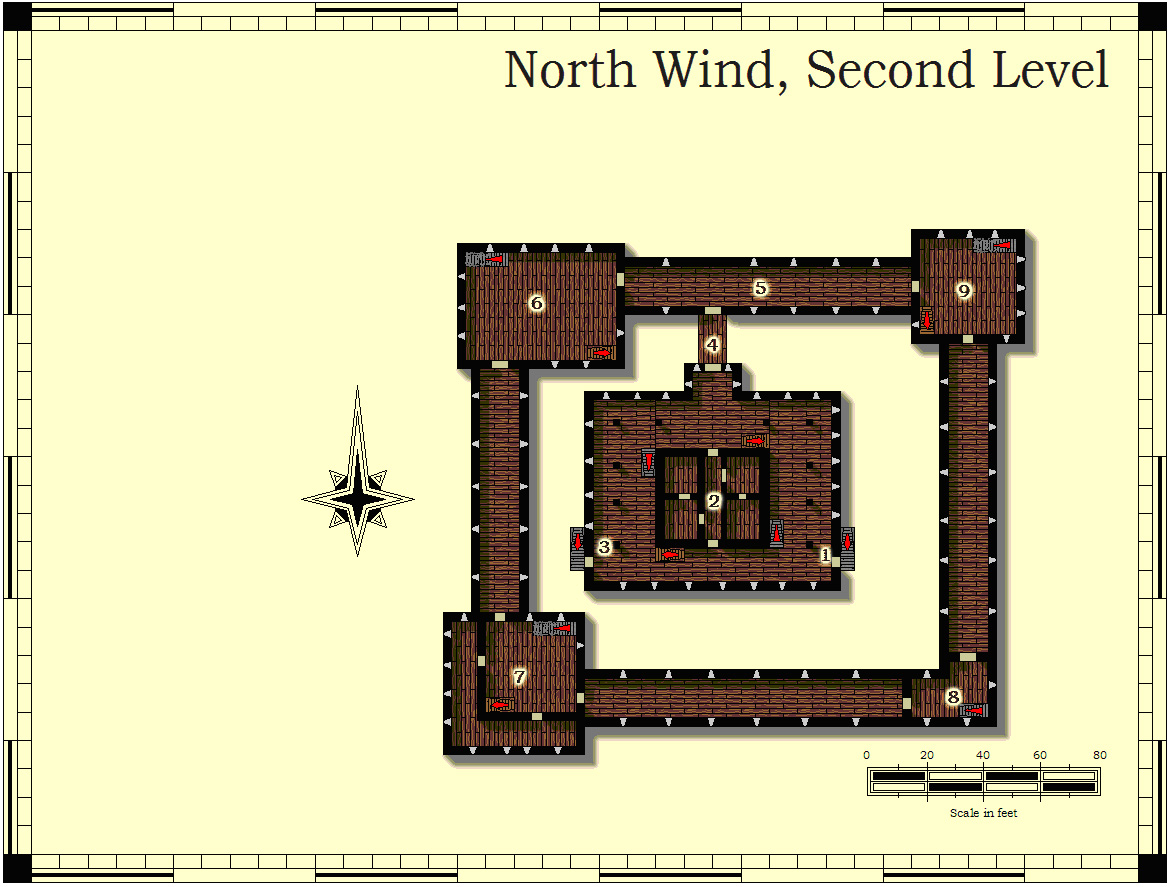
North Wind Castle, First Level
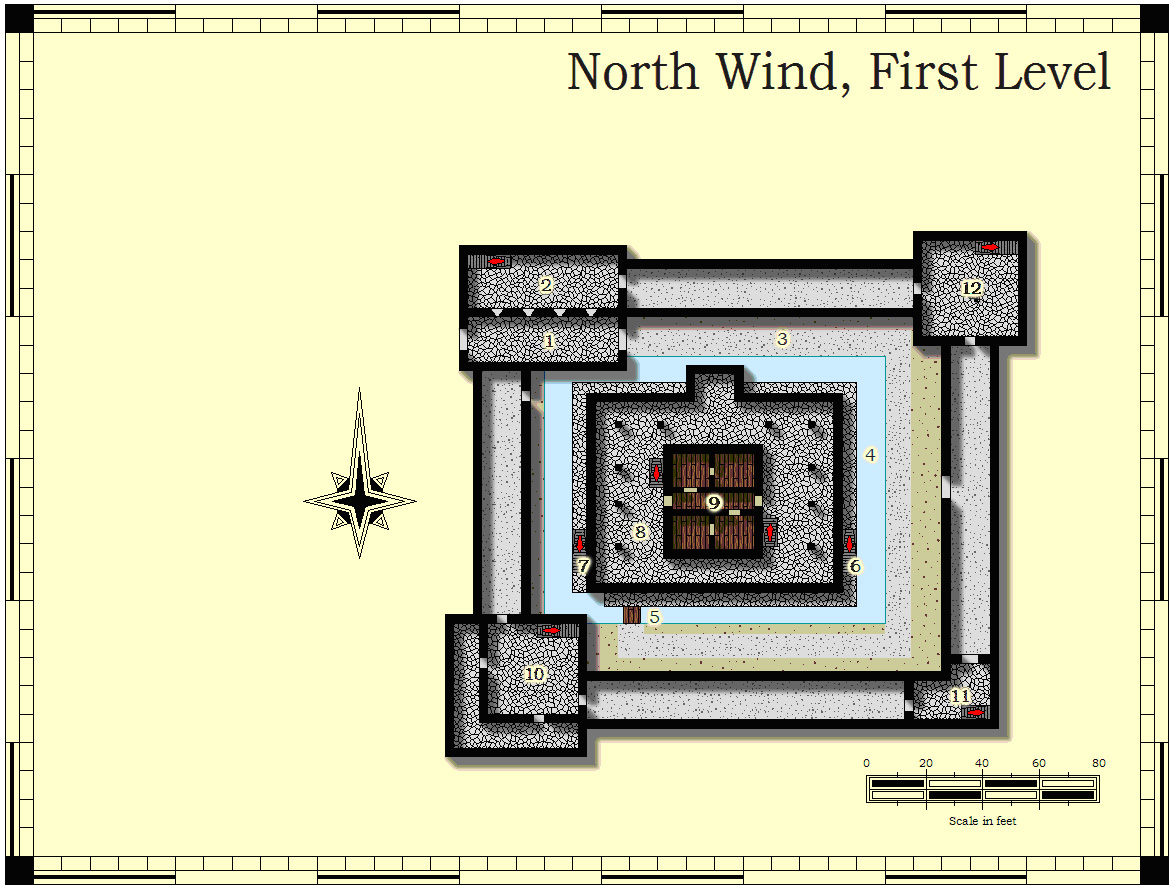
Room 1-1: Gateway
A single door leads into the main keep. It is stone without any visible means of being lowered or raised. A row of guards line the north and south walls. Behind the walls are mechanical traps that can only be avoided by walking along the ground. This causes a clicking – which is good. No clicks means fire or lightning.
Room 1-2: Guardroom
Mechanical spiders guard along the north and south walls. These will deploy as needed throughout the castle.
Room 1-3: Inner Yard
A narrow stone path leads around a square pool of murky grey water. High walls on either side make this area feel more like a prison yard than a courtyard. From here, a number of guards can be seen on the roof of the next level.
Room 1-4: Moat
The moat is filled with calm grey (albeit putrid) waters.
Tentacles slosh in the water, periodically making ripples in its otherwise placid surface.
The brains of this castle are the sea monster whose main body is under the keep. It can have tentacles here and in Room 1-8.
Room 1-5: Bridge
A small wooden bridge crosses the moat. The bridge looks old and in ill repair.
Room 1-6: Stairs to Meditation Room
A narrow set of stone stairs lead to an entrance on the second level of the inner keep.
Room 1-7: Stairs to Armory
A narrow set of stone stairs lead to an entrance on the second level of the inner keep.
Room 1-8: Cellar
Stairs lead down into the dank, dark room. A number of pillars support the structure above. The ground appears to be muddy dirt. Walking across the ground causes characters to sink in up their knees.
This is where tentacles of the brain and shambling mounds live.
Room 1-9: Cells
Balance is key while nature throws at us a great diversity. Place each of nature’s gifts, one through nine, in a circle so that the sum of each box balances its bretheren.
These are a set of cells containing the real Falstaff – who was imprisoned after coming across a wildfire. He could not see the castle and was overwhelmed by a Rune of Sleep cast by the master and carried by the smoke of the fire.
Falstaff is in a room that magically dampens magic. He will warn the others not to enter – as his magic is gone (but will come back with rest). No beans. Bummer.
Gnibley – a gnome tinkerer who has been held here since the First Age working in the workshop of 5-11.
Room 1-10: Garrison Cellar
This stone room is well organized and contains crates mostly filled with warpstone. It is always guarded by golems and stirges.
Room 1-11: Trap
On the battlefield, many equations are needed – to keep men and support, enemies and terrain in balance. Balance your forces from one through nine so that this battlefield makes sense.
This is where a workshop filled with tables of mechanical devices, scraps of metal, boxes of warpstone dust and partially completed warp-guns. There is usually a captive gnome tinkerer, Gnibley, here working. Gnibley has a “stun gun” that will open castle gates and doors.
Room 1-12: Summoning Room
Balance is key while nature throws at us a great diversity. Place each of nature’s gifts, one through nine, in a circle so that the sum of each box balances its brethren.
Inside the door, the room is filled with runes – carved on every surface as if some madman was trying to adorn everything. On the floor of the room, mists swirl in the vague shape of a human. On a nearby table, a large crate of grey dust sits open.
Periodically, an apprentice or the master will come in the room and throw in a bit more dust. This will cause the Runebound Warrior to become more substantial. Eventually, he will be summoned and another summoning will begin.
North Wind Castle, Second Level
Room 2-1: Meditation Room
This room contains meditation mats, incense pots and small privately screened altars. There is an unnatural calm about this room. A faint tinkling of bells can be heard here.
The bells and incense are causing the people in this room to be dopey nice, drugged on the lotus. If detected the sounds and gas are coming from Room 3-2 above.
A ratwoman dressed in silk red silk robes comes to greet the party. Her name is Mai Lin, and she will be hospitable even if attacked. She offers the party rest and relaxation. She tells them of four slave girls in the inner rooms that are available for their pleasure.
This is where the party will go to “relax” before the final battle.
Room 2-2: Private Rooms
These small rooms are furnished simply with a bed, table, candles and washbasin. The beds are soft. Four slavegirls are here. They appear to be whatever race the party members are.
These are actually slave dopplegangers, and they would like to escape.
Room 2-3: Armory
This room is filled with racks of armor – everything from basic leather to fancy full plate can be found here. Some is ornamental, but most is functional. Many of the suits of armor are from the First Age.
A young armorer, named Fi, will attempt to help the party even if attacked.
Room 2-4: Bridge
An old wooden path leads across the moat below.
Room 2-5: Fighting Corridor
This hallway is lined with mechanical statues – many of which appear to be very old. The walls of this room are decorated with scenes of battle and training.
Room 2-6: Doom Wheel Workshop (lower)
This room is filled with a three rows of large tables. On each table are mechanical parts, identical in size and shape. It appears that these are being assembled into the large wheel-shaped devices found in the courtyards. Rows of ratmen hurriedly assemble the pieces under the watchful eye of the Master.
Room 2-7: Command Center
This large room has several tables and a number of chairs. A map in the center of one of the tables shows the Reaches with small square blocks designating troop positions and the like.
On another table, a large bowl sits. Above the bowl, a swirling bit of air can be seen.
The bowl is used to communicate with the other Masters.
Room 2-8: Rune Master’s Workshop
This room is filled with tables and notes. There is a palpable energy in the room, and the air is filled with a grey smoke.
In the room is a small ratman, impossibly ancient. Thick glasses make his eyes huge.
He is the Rune Master, Wan Fu. I can carve your staves.
Room 2-9: Teleport
This room is dominated by a large glyph in the center. Every few seconds, a bright flash can be seen. And a new regiment of warriors comes through. The arrow slits are guarded by eight mechanical statues of ratmen, facing outward.
The ratmen move down the stairs and through the castle to the barracks houses in the courtyard.
There is a trap door in the ceiling which drops a set of stairs leading to the Master’s Room. These stairs are usually UP.
The Marshal will be here.
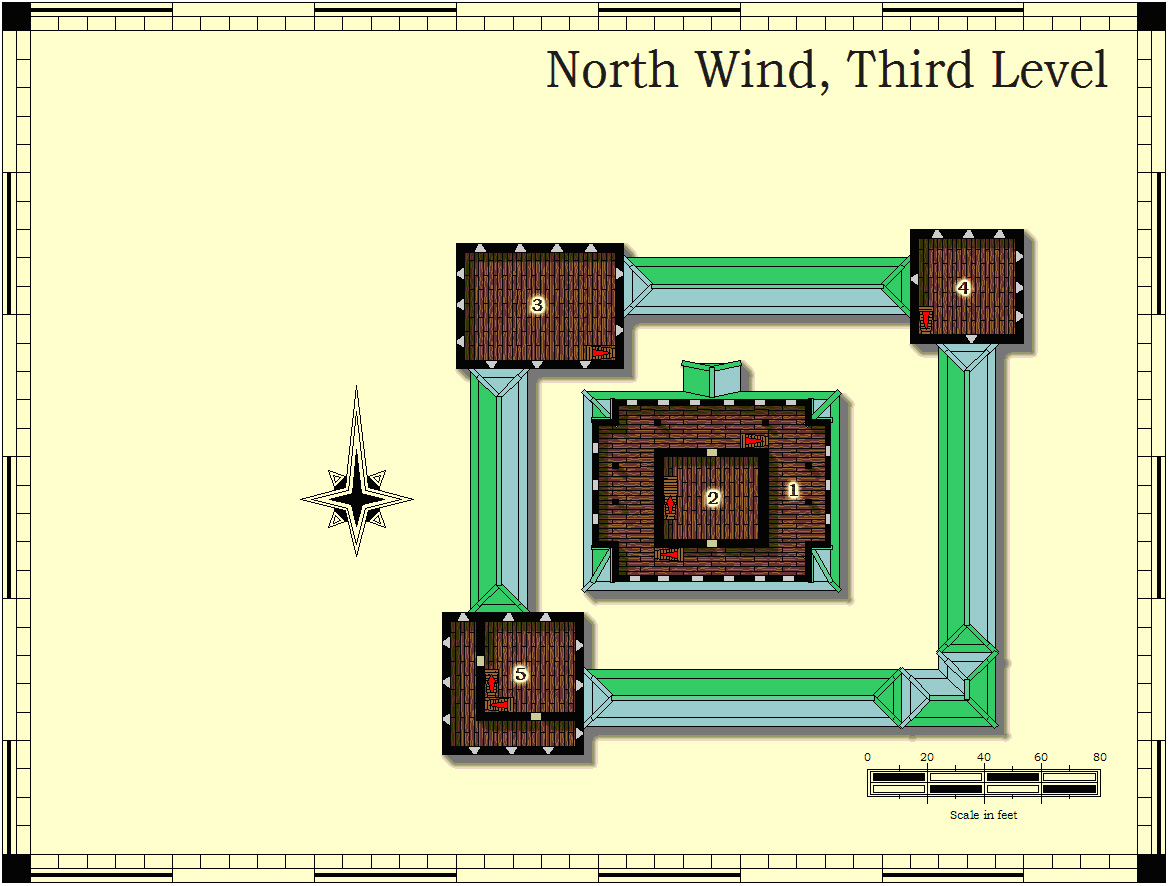
North Wind Castle, Third Level
Room 3-1: Fighting Gallery
This gallery is adorned with the trophies of battle. The floor is polished by centuries of combat. Rune Warrior can be seen practicing here (if the challenge is taken).
Room 3-2: Heart of the Tower
This room is filled with strange mechanical devices. Around the edge of the room are a series of bell and tubes. A whirring array of strikers buzz about these on impossibly complex tracks, making the tinkling sound heard on levels 2, 3 and 4 of this complex.
In the center of the room, several large stone basins are filled with flowers and plants (currently some variation of the lotus), slowly being burned to produce thick white smoke. A series of metal tubes and bellows are being used to suck the smoke from this room (supposedly to fill the other rooms on the level.
Several mechanical ratmen are tending to the apparatus. Usually, these are in “peaceful” mode, but they can be turned to “battle” mode by the castle if needed. The berries of the red fire pepper plant can be used to change the effects of the smoke.
Room 3-3: Doom Wheel Workshop (upper)
This room is filled with a three rows of large tables. On each table are mechanical parts, identical in size and shape. It appears that these are being assembled into the large wheel-shaped devices found in the courtyards. Rows of ratmen hurriedly assemble the pieces under the watchful eye of the Master.
Room 3-4: Master’s Tower
This large room is filled with finery, red tapestries and a red-canopied bed. Ornate furniture can be found here including a rare ivory inlaid table and chairs. The wardrobe is filled with fine silks and brocades.
Two slave girls (also dopplegangers) can usually be found sleeping here. There are mechanical guards at each arrow slit.
A soft sleep music is playing here. It stops when the Master is here.
The stairs in this room actually drop down when the Master desires. Otherwise there is no way to move between this room and the others.
Room 3-5: Guard Room
This room is filled with mechanical spiders – some inject poison, others spit, some jump.
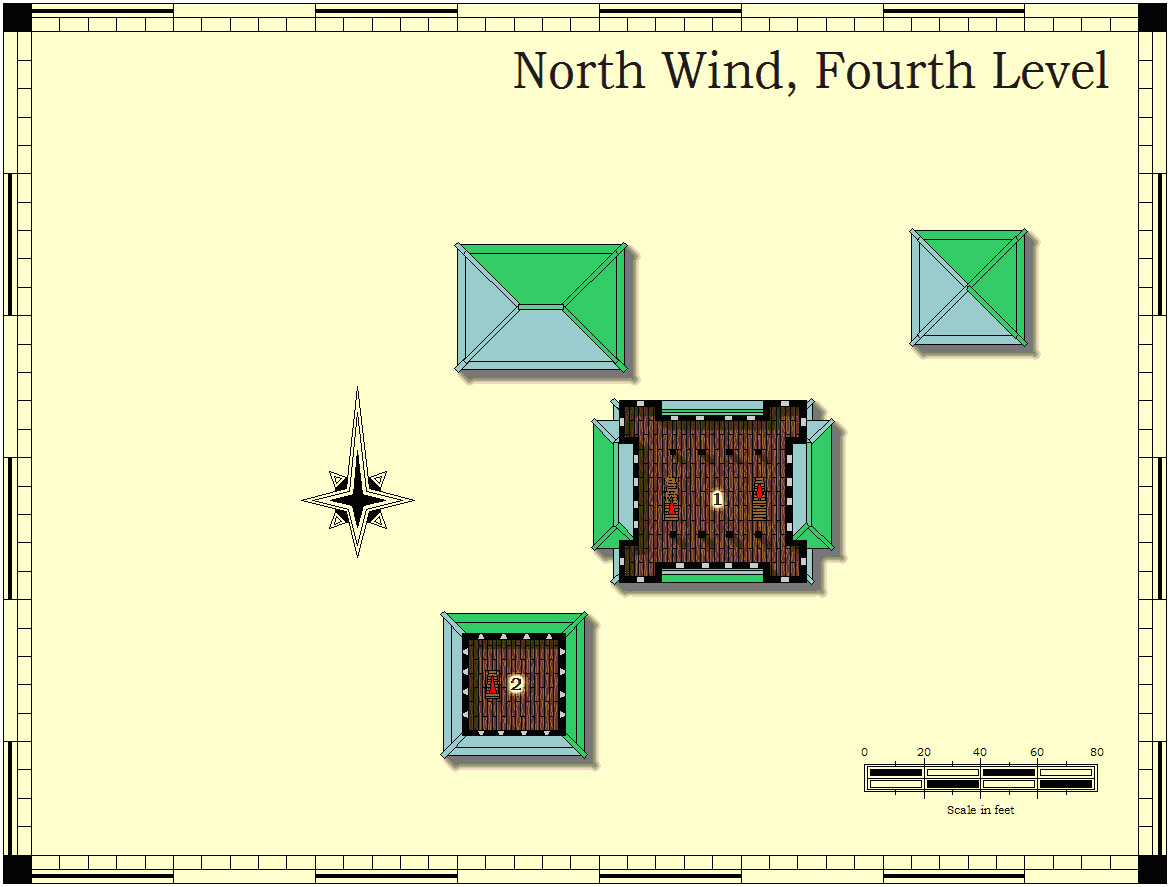
North Wind Castle, Fourth Level
Room 4-1: Fighting Level
This gallery is adorned with the trophies of battle. The floor is polished by centuries of combat. Braziers belch fire into the room, making it very hot and humid. The pillars in the room have the nicks of a thousand blades in their ancient surface.
Honor must be obeyed here. The room is under the influence of Room 3-2. This is where the final battle will take place, if the party opts to take the duel.
Room 4-2: Screaming Bell Tower
The Screaming Bell is a gigantic warp-forged bell mounted upon a huge platform. It is of alien shape and design, oddly asymmetrical and filled with odd protrusions.
It is usually pushed into battle by the hordes of ratmen. From this great altar-machine the tolls of the bell send waves of discord over the battlefield - driving the ratmen into an excited blood-thirsty frenzy whilst the enemies of the Tang are thrown into a state of despair.
North Wind Castle, Fifth Level
Rooms 5-1 and 5-2: Warp Cannon Battery
These rooms each contain a strange cannon-like device with whirling wheels and gears. A series of stone balls on a metal shafts get increasingly smaller towards the end of the barrel of the device. Several swirling plates are surrounded by a cloud of grey dust.
Warp Lightning Cannon – the warlock engineers have invented many strange and wonderful devices – including far-seeing machines that enable Tang masters to communicate over vast distances and many other wonder undreamed of by human science. These machines do have an annoying tendency to explode but such dangers are of no consequence to the tang masters who sensibly keep a good distance from these infernal contraptions. The Warp Lightning Cannon uses warpstone powered warp-lightning generators to create a bolt of powerful lightning - as potently destructive as it is unpredictable.
|
Monsters
Hal Dan, Master of the West Wind – Room 2-6 |
Treasure
Necklace of All Dragons |
Summoning of the Forbidden
During some point, the Masters will be flying their castles towards Teufeldorf. There they will land and disgorge all of their troops.
The masters themselves will bring come out to the plains of the city and begin a ceremony. They will use the blood of all the different colored dragons to draw a giant magical circle with two interlocking squares – forming 8 points. They must have enough Grey Seers and Marshals left to make the points of the circle (sacrifice) active. This will summon a great maelstrom of wind – a column that goes high in the sky, arching across the continents to the Forbidden Lands. There, it will “suck” dragons of all colors into the Reaches. Angry at being summoned against their will, they will attack in a rage.
After the ceremony ends, the castles will disappear, and the Masters will be finished for the adventure. Their troops will fight on, and the dragons summoned will cause havoc on the countryside for years to come!
