Wolfshaunt Unleashed| Type |
Dungeon |
|---|
| Status |
Explored March 904 TA |
|---|
| Location |
Wolfshaunt |
|---|
| Hex |
7916 |
|---|
| Campaign |
The Wolfshaunt Campaign |
|---|
| Adventure # |
117 |
|---|
Prologue
It is March 904 of the Third Age. A year has passed since the last adventure. It is the beginning of the campaign season.
Nevermind and the Oculus
- Chief Engineer Haldane – DEAD.
- Assistant Chief Engineer Cogwizzle - PROMOTED
- Oloster Gladdenstone, Wizard - ALIVE
- 4 engineer gnomes from control room – ALIVE
The Forbidden Library
- Master Librarian Crowquill
The Winter of 903-904 TA was the harshest in recent memory for the Eastern Reaches. Snowstorms raged along the entirety of the land with reports of snow as far south as the Sands of Time. When not in furious rage, the sky was a dead, ashen gray - the sun a weak spot of light in an otherwise monochromatic world. Reports of rare lightning snowstorms were widespread.
With temperatures plummeting, the villages and towns of the Eastern Reaches showed no life - their occupants huddled against the cold. Tales of wolf raids were commonplace - with gruesome scenes of homesteads completely sacked by ravenous canines. Families went missing, and yet nobody was able to venture forth to provide aid. Throughout the countryside, the village halls and chapels overflowed with countryfolk fleeing for the protection of their local lords.
It is now early March 904. Along the coast of the Inner Sea, the snows have finally turned to rain as torrential storms of inky blackness and blinding yellow lightning crash along the seaboard.
Rumors come to Dragonsford of a great maelstrom - some say coming from the Inner Sea while others claim the storm moves over the mountains from the Wolfshaunt. Already enveloping the towns of Portsmith and Ironwood, strange tales tell of the unending storm which is slowing moving west towards Dragonsford and the rich farmlands of the Eastern Reaches.
The most common tale is that great sea fishes have been reported falling from the sky. The strangest are monstrous with glowing lights dangling from stalks hanging in front of lantern jaws of immense size.
Another tale is one of an old man. He walks ahead of the storm selling lightning rods from a strange bag at his side. Protection from the storm - and by all reports those who don't buy his wares go missing - their homes destroyed by lighting.
Backstory for Awakening of the Wolfshaunt
The release of the Nephew – a vampire who was slew Booth and pretended to be him during the last adventure – was able to contact one outsider to let him know of his location before being recaptured and placed back into the vault. This outsider – Loomis – has been searching for the Forbidden Library his entire life – as his father and previous generations have done before. Calling themselves The Cult of the Shattered Moon – so named because their organization lies sundered by the Wolfshaunt Gate – Loomis stole the cyptex, used their remaining tokens to travel back to the Grandfather’s Castle, and are now trying to open the Wolfshaunt Gate permanently.
Unable to open the device directly, but suspecting where all the answers lay, the Grandfather created the Book of Secrets to “guide” extraordinary adventurers to find the clues, come to the castle, and open the cryptex. Then, he sent a pack of wolves through the gate and left the book on the chair in the Chapel of Udolf to be found.
The correct solution for the party is to find the cyptex and take it away without opening it.
Backstory for the Wolfshaunt Unleashed
Released from the Wolfshaunt, Grandfather Josiah seeks to leave the Wolfshaunt and establish residence in the Reaches. In order to do this on a grand scale, he must bring darkness to the land - which will weaken the people, starving them and making them more docile - and allow him free reign.
In order to do this, he is attempting to create a vast network of lightning rods (which are the real threat - not the storm) and activate them to create a powerful magical dimming of the sun. This requires thousands of lightning rods scattered around the area. He is getting the locals to help him by having the Hermit "selling" them rods and forcing them to protect them from removal.
The second task is to rescue his people from the Library - which will require an army which is currently coming out of the Wolfhaunt. In order to do this, he has enlisted the aid of the Tomb Kingdom - to bring back the Sandwurms to transport the army across the Sands of Time and into Sandal - where they will take the Library by force. The party must go to the Tomb Kingdom and stop the summoning of the great wurms.
The entire Wittenagemot campaign is centered around getting the Wolfshaunt army to Sandal in order to get to the Forbidden Library to release the other members of the Houses that are entrapped there. This would be a good change from the random kill cities campaign. This will be one of the short adventures – go to the Tomb Kingdom and keep the Sandwalkers from arising! Oh, Sandwalkers – actual Wittenagemot units which will transport units across the desert. Brilliant.
The final task is to return to the Wolfshaunt and subdue Father Joseph's line of kin and gain control of a Grandfather's Ring. THE NEPHEW + 12 OTHERS ALLOWED TO GO FREE!!! The Nephew will give them the intel report about what the Wolfshaunt is planning.
Storm
Encounter 1: The Village
A small stone farmhouse stands in a field covered in snow and sleet. From inside, you see the yellow glow of candles and a fire. The farm looks well kept, although barren for the winter. A ladder is propped against the side of the house near the chimney.
Atop the house is a lightning rod. In the flashes of the lightning you can see a small form huddled on the roof near the chimney. It seems to be watching the lightning rod.
The form is that of a child - Nathaniel Buckminster. He has been sent to guard the lightning rod and call his father if any approach.
They will tell of an old man who brought the rods to "give" to the family to protect them from the storm. They heard the Millers (Henrick and Selina), a nearby family, had refused to put one up - and their home - the old Mill was destroyed by a rain of acid which turned the stone to slag. None of the Millers have been seen since.
In exchange for his gift, the old man said that he was going to take the father's most loved possession - his oldest son Marcus - away for one year. This was to make sure the Buckminsters protected their lightning rod. After a year, Marcus would return and the lightning rod would be theirs to keep. He did leave a magical picture which shows Marcus sleeping soundly in a large feather bed, content and with a smile on his face. This is an illusion, of course, Marcus has been sent to the Tomb Kingdom, killed, and his soul awaits the Wurms.
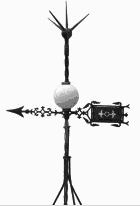
The lightning rod has a swirling globe of black and white attached to a black iron shaft. In addition, a weather vane points towards its nearest neighbor. A flag on the back of the weather vane is etched with a strange design.
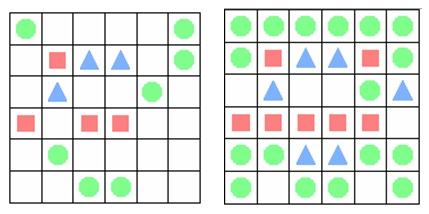
Add digits before or after some of the digits in the grid so that in the resulting grid, each row and column adds to 100.
The magic is summoned by the power of ten by ten.
This will turn the weather vane ON - creating a shroud of darkness. Right now, it is OFF. When ready, the picture frame will show the solution for the family to use.
In case they want another vane.
Encounter 2: The Hermit and The Wolves
With the wall of the storm looming behind, you see an old man - his long face is most noticeable for its rummy eyes - milk-white, watering, and rimmed with red skin. Dressed in a gray cloak with a long grey beard, the man leans heavily on a wolf-headed staff and he walks.
A pack of 8 wolves surround the old man, moving loosely around him in a watchful perimeter.
DM's NOTE: Greetings Outsiders. I am the Hermit. I have been waiting for you for many years. I have seen in my visions a time when our Valley will be opened again to the outside world. And now the Key Chapel has given up her treasure and the first handful of the Baneback pack has left for your world. The Mustering has begun. And you are the Seekers – outsiders trying to keep the Pack at bay. Your challenge is a grave one, and – I fear – you are already late.
My offer is simple. I will provide you answers to two questions. One I will answer here and now. Then, you will give me a token, and I will make my way to the underground river through the Long Tunnel. There I will wait until you come with another query and I earn another token and am free to go – unharmed and unhindered – through your world. I am an old man and I wish to live my final days in the sunshine.
His staff is called the Future. “I can touch the Future even if I can’t see the world.”
He is currently wearing one band of the Grandfather's Ring - which was put unwillingly on his hand to make him a servant - and thus his current task of distributing lightning rods.
He will tell the party of the Eye of the Storm if released from his bondage - a stone portal rotating slowly at the center of the maelstrom - a gateway to another world. He has seen the vision of it, surrounded by monstrous formless creatures.
The storm will surge ahead if he is approached.
There will be a pack of 8 wolves with the Hermit. They will howl if attacked. An answering howl will come from the Wolf's Lair nearby.
Encounter 3: Wolf's Lair
A small tangled grove of trees surround a fallen stone circle - long forgotten but of ancient lineage. Flickering around the edges of the stone circle are hundreds of fireflies - each unnaturally bright in the darkness of the woods. The fireflies form a dome around the area.
Inside, an extremely large and hairy man sits. In his hand, a glass globe flashes as if it has trapped lightning inside its confines. Around the man, a dozen wolves sit watching in all directions - their muzzles sniffing the air, the ears fully pricked.
The man is Marcus Darkmane - another werewolf. He is communicating with the Grandfather. The crystal ball is a communications device (see Room X in the castle). He is also wearing a silver ring - which if taken off while he is alive will cause him to warn the party of being controlled.
If the party takes the crystal ball, the Grandfather will watch them. If anyone puts on a ring, then they will be drawn to communicate with the Grandfather - showing the events that happen along the way.
Encounter 4: Shantaks
The darkness of the storm is absolute punctuated by blinding flashes of white-yellow lightning - snaking tendrils that move through the sky as if seeking a new victim to strike. The rain and hail alternate between blinding and painful as the downpour intensifies. Communication and movement are almost impossible within the storm.
Floating – unhindered by their surroundings are a number of large blackish purple protean shapes – large jellyfish trailing impossibly long tendrils of crimped pink tentacles. The bodies of the beasts are some sixty feet in diameter – and the tendrils are another several hundred feet in length. With a pulse of the jellyfish head, the beast moves quickly through the air.
Careful inspection will show weapons, armor, staves, etc. floating about inside the head.
Killing a jellyfish will yield 10 useable items – randomly determined. Make it fun!
These are the “flesh of death” - the Shantaks. These are alien creatures that devour the abilities of devoured victims. Each victim adds a new tentacle with their knowledge and power. When there are enough tentacles, the beast splits into several – which can also happen if they are done enough fire, electrical, etc. damage. Each tentacle can cast a spell or attempt to grab a victim. They cause both mental and physical paralysis before thrusting the victim into the head of the jellyfish.
They will sense new life within the storm and move quickly to absorb it. They can teleport if outflown – usually to point in front of their victim.
Encounter 5: The Eye of the Storm
As you approach the center of the storm, the darkness is absolute except for a spinning glow coming from a strange object hovering mid-air. Water appears to be rushing from the object.
Adjusting to the darkness, the object appears to be a stone archway - closed on the bottom to form a square of stone blocks - 4 feet thick and 20 feet on a side. Indeed it is spinning slowly, spewing water into the storm's clouds. Circling the archway are large purplish-black eels. Periodically, you see one move quickly to capture a large fish the comes through the archway.
These are acid lamprey. The spew acid from glands near their hind quarters - causing the acid rain. They will continue to make a more and more toxic environment until the party is killed.
When summoned by the Shantaks, the acid lampreys will come to their aid.
Encounter 6: The Sea Gate
An ancient stone archway is set into a large shelf of rock protruding from a steep drop in the ocean floor. Underneath the large shelf, a cave stretches into blackness. The archway is covered with barnacles and other underwater growth. However, it is clearly carved - a strange pictograph set into its keystone.
A tremendous flood of water is being pulled into the gate, creating a current that is sucking in water, nearby fish, and any loose flotsam that floats by.
The Sea Gate can be closed, but party takes damage from pressure mounting each round (or monsters attacking).
Sands
A letter arrives for King Ernie.
| True to my promise, my twelve brothers and sisters and I now live peacefully in the Reaches - eating only the occasional villager when the Hunger overcomes us. Although we have made no attempt to reunite with our brethren from across the mountains in the dark recesses of the Wolfshaunt, it has come to my attention that the Wolfshaunt now comes to us. An invasion threatens the peace and plenty that my small pack enjoys - for we will be hunted if the Reaches is overrun by legions of those who suffer the Hunger.
With that spirit in mind, I will tell you of a disturbing observance that my family made several weeks back. While hunting in the Southern Reaches in the small Barony of Overton - skirting the extreme eastern plains, we heard one night the familiar voices of wolves from the Wolfshaunt. Investigating we came across a small company led by Sir Edmund Blackwolf, a family name that has long been known in the Wolfshaunt.
Curious, we followed the knights to the edge of the Sands of Time where they met with a legion of skeletons under the command of an undead lich priest dressed in red and gold robes. From their conversation, in which we learned Edmund's name, it was gleaned that a ceremony was taking place to help establish a treaty between the Tomb Kingdom and the Wolfshaunt. While no particulars were gleaned, it seems that preparations are already underway.
What to do with this information, I cannot say. I merely provide it as an continuing show of our support for the Reaches and thanks for a release from the eternal darkness of the Library.
The Nephew.
|
With the letter comes a small pouch - containing an oddly-twisted silver ring. The pouch is labeled - keep this safe - but do not put it on for any reason. Its value will become obvious with time.
NOTE: Research on the ring will give them the legend for the Wolfshaunt Unleashed adventure.
Encounter 1: Approaching the Pyramid
Dull grey clouds hang low over the dunes. Lacking sunshine, the sand appears bleached, almost white. Cresting a dune, you look down into the valley of the Tomb Kingdom from the west. A large four-sided pyramid sits at the southern end of the valley.
In front of the pyramid, just to the north, is a large circular stone dais - several hundred feet across raised some 20 feet above the sand. On the platform a number of peasants stand knotted in small groups. They look furtively towards the edge of the platform which is ringed with skeletal guards.
To the east, several practice areas have been established where impossibly massive bone giants are throwing large needle-like spears across a sandy expanse at some hastily constructed targets.
And finally, the northern end of the valley is filled by six large circular depressions dug from the sand. In the center of each, a stone altar block has been carefully placed and aligned with the great pyramid. This area appears to be empty.
Encounter 2: Sacrifice
As you watch, a rumbling tremor passes through the ground and a grinding sound can be heard. Slowly a stone projection begins to emerge from the pyramid, creating a balcony 100 feet above the sands. The balcony is directly in front of the dais of villagers. At the same time, the area above the balcony opens up revealing a tunnel leading inside the pyramid. A priest - dressed in red and gold robes walks onto the platform. A large gold staff is in his hand. He is surrounded by several dozen skeletal archers.
Without ceremony, the priest raises the staff above his head - holding it with both hands. Suddenly, the villagers all drop on the platform. You see a flash from the area below the dais - a blue-black light that lasts for only a moment.
The priest turns and retreats into the pyramid. The grinding signals the pyramid closing - as the skeletal archers follow their master.
Below, skeletal guards begin to haul the bodies off the platform and into several openings at the base of the pyramid.
Puzzle Keypads to Raise/Lower the Pyramid
Outside each level (and inside the high priest's level), there are puzzle keypads for opening and closing the passages in the pyramid.
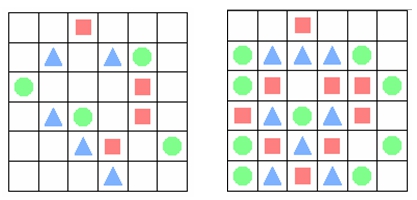
Put shapes in some of the empty squares. Ignoring the blank spaces, the shapes in each row and column should be palindromes.
Across the vastness of the desert,
Back and forth the sands of time
Ebb and flow - looking the same in all directions.
Encounter 3: Pyramid Base - Factory and Crypts
The sound of hammers pounding iron can be heard from outside the pyramid.
The base of the pyramid is a large open room roughly 200 feet on a side with exits in each wall. The ceiling is 20 feet high and made of the same stone blocks arched around stubby pillars that support the structure. The floor is cut stone as well. The entire area is unadorned.
NOTE: The base can be sealed with a lever that lowers the stone tunnels leading into the room.
ALSO NOTE: A shield of unlife can be activated by the high priest to affect all those in the pyramid. Round 1 = lose 1 life, Round 2 = lose 2 life, Round 3 = lose 4 life... you are getting sleepy.
In the southern end of the room, large bellows stoke a series of massive forge ovens. The smell of burning sulfur is strong here. Along a series of anvils, skeletal blacksmiths are laboring to pound iron swords, pole arms, and spears into shape. In the corners of the room, large piles of scrap metal can be found, along with ore and sulfur.
In the northern end of the room, workman are laying out the newly deceased bodies. Several skeleton move among the bodies, removing their hearts with a long, curved iron daggers. The hearts are then carried over to a large golden bowl sitting against one wall. Six lich priests circulate among the bodies casting spells - causing the dead to animate. Shambling forward, the dead receive their swords and are led out of the southern exit.
To the south, a vast field of animated dead can be seen practicing swordsmanship - clearly clumsy and not adjusted to their newly-dead status.
Guards are strewn about the room.
The golden bowl of hearts is periodically taken to the carrion birds as an offering. Yum!
Encounter 4: Middle Level - Lich High Priest
A single tunnel leads into the pyramid - along its walls are carved strange scenes of ritual sacrifice. The construction of the pyramid looks impossibly ancient and yet crafted to the highest standards and remarkably unaffected by time. From the far end of the tunnel, voices can be heard. In the distance, a faint light can be seen.
The scenes are of priests sacrificing men and women - their souls dropping into the earth. Below the souls are images of massive worm-like creatures coming from the depths to devour the souls.
The center chamber of pyramid has a low, irregularly-shaped ceiling - 10 feet high in most places - supported by a number of pillars, each with four niches carved into them. There are no furnishings in the room. In a central area, light is provided by a number of lamps. A number of wooden crates have been pulled around a central stone slab. A red and gold draped cloth covers the slab - which is strewn with maps and other written materials.
Sitting around the slab on the wooden crates are six knights - each dressed in the livery showing a black wolf silhouette on a gray background. Standing in the circle is the lich priest, the large gold staff cradled in his arms. A discussion seems to be underway about the disposition of the dead after the armies of the Wolfshaunt invade the Southern Reaches. Several mentions of a summoning ceremony can be overheard.
This is the map the sandwurms will take.
The leader of the mercenaries is Sir Edmund Blackwolf, an emissary from the Grandfather. He is acting on his own accord. Will change to wolves if needed.
NOTE: The ceiling of this room can be lowered to collapse on the party. The lich will jump into the stone sarcophagus that makes up the "meeting table". It is recessed for this purpose.
Encounter 5: Top Level - Carrion Birds
Eight short tunnels lead into the top of the pyramid. These are difficult to see from the outside because of the clever way the stone blocks near the top are stacked.
The center of this area is a maze of large blocks creating a warren of sorts. Periodically, a hallowed out nest can be seen, strewn with bones. In the center of the area is a larger hollow - a golden bowl sits in the center surrounded by a number of large carrion birds - their tattered wings seemingly unable to sustain flight.
Carrion birds will go for the heart. They can paralyze with a call. Very fast. Very sharp claws.
Encounter 6: Bone Giant Wurm Riders
At the east end of the complex, a number of massive bone giants are at weapons practice with several very long and sharped hooked polearms. They are throwing them at targets. Each polarm has a length of chain attached to it - the other end of which the giants have secured around their wrists.
Training area where they are learning to ride.
Encounter 7a: The Chutes Above
The northern end of the valley is filled by six large circular depressions dug from the sand. In the center of each, a stone altar block has been carefully placed and aligned with the great pyramid. This area appears to be empty.
Underneath, this where the wurms will be summoned by the party.
Encounter 7b: The Chutes Below
You feel the perpetual twilight of the Land of Shades draining the strength from your body. The topology of Oblivion is the same as that of the mundane world. Here, however, here, each of the six large depressions is filled with a number of peasants - dour and frightened in their new existence.
Around the edges of the depressions, a number of large, black hell hound-like jackals patrol the perimeter - their red eyes glowing in the darkness, their low gutteral growls keeping their prisoners in line. Periodically, the ground rumbles with an ominous vibration - deep and large.
There are 66 souls in each circle.
In the Land of Shades
- There is no natural healing.
- There is no need for sleep.
- Spells are not recovered.
- Some spells (especially divine spells that require a deity to respond) are weakened.
- Time moves at a different rate.
- Etherealness and magic attracts creatures here.
Nigglers. These small creatures attempt to suck the magic from one item. They are non-corporeal, flying and tend to come up through the ground or through dungeon walls. Items not given freely are allowed a saving throw. They will scream to stun. Then kiss an item to drain it. Random (pick a card).
Encounter 8: Oblivion and the Summoning
The lich priest floats from his landing towards the sands. From the landing, six armored knights watch the proceedings. On cue, six more priests come from beneath the pyramid, falling into line behind their master.
The ground begins to rumble.
The priests quickly move to the north end of the complex - each of the priests climbing to stand on an altar. An incantation begins.
The ground continues to rumble.
The bone giants begin to move about the edges of the pits. Each has a long, hooked polearm at the ready.
Suddenly, the ground erupts and a massive sand-colored wurm breaks the surface. Centered around the altar, the creature consumes the lich on top instantly. In unison, the bone giants around the wurm throw their polearms - a few catch into the hides of the creatures, and the giants are pulled to their backs.
A moment later, all six wurms have emerged. They head northeast away from the complex. Each mounted by several bone giants.
The high priest walks back towards the pyramid. Ascending his air staircase, he shakes hands with each knight in turn. Upon his touch, the knights vanish. As the skeletal priest moves down his tunnel, each of the levels begins to grind slowly shut.
With surprising quickness, the Tomb Kingdom pyramid begins to sink into the sand.
Wolfshaunt Unleashed
Prologue
Read the legend of The Hunger.
At this point, the party should have two parts to the Grandfathers ring. One gained from the Hermit - who was enslaved. Another gained from the Nephew in his original letter.
A coded message arrives in the same crabbed hand as the note about the Sands of Time. Clearly, it is from The Nephew.
The enemy does not play fair.
They come at us two at a time.
Sometimes five by five.
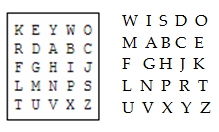
The key is always wisdom.
cu jn gv wj en kb yj we bo gi ws sj wa vl no nl kb nd vn sd ed bl tm zk it ru pk at eb pg co oa og ti il ez pk mt de en sw ti kl kb tc ab av av jn av hi cu cp ez kb pj ci it mb ri nw za os pl om at ti tl ks kl kb tw vn lz pv ta uf gv dj at lz nd bo gn sz
mygrandfathercomesavoidhimuntiltheringiscompleteonlythencanhedieiknownotthelocationoftheremainingringsmybrother
hadoneandlivedintweennorthofthelongtunnelmanycenturiesago
My Grandfather comes. Avoid him until the Ring is complete - only then can he die. I know not the location of the remaining Rings. My Brother had one and lived in Tween - north of the Long Tunnel - many centuries ago.
Entrance to the Wolfshaunt
Encounter 1: Moon Hollow
The gloom deepens as you approach the village of Moon Hollow. The ground is muddy from the rain that periodically whips through the trees of the Hornwood. You see the marks of hundreds of wolves, men and horses coming out from the Wolfshaunt. There is an oppressive feel to the air.
A single trail winds into the darkest, most remote reaches of the Hornwood. Descending into a natural bowl in the forest floor, the village of Moon Hollow has been transformed. The small Chapel of Udolf still sits perched on the large rock outcropping in the center of the complex. But now, there are stone and wood barracks built surrounding the chapel. While no fires burn, you can see figures flitting between the buildings and hear the occasional growl of a wolf nearby.
An odd building with a long metal spire ending in a lightning rod has been constructed near the center of the complex. As you watch, lightning strikes the rod - illuminating the courtyard. An immense blue-black dragon sits watching the darkness. You notice that a saddle has been placed on its back - large enough to hold several human-sized creatures in comfort.
This area is guarded by a company of werewolves in service to the Grandfather. The commander - Lucian - is meeting with a man dressed in blue-black scales. He represents an unknown faction that might come into play in future Matcons.
Encounter 2: The Chapel of Udolf
This small hexagonal chapel is made of a green serpentine stone – now blackened by the ravages of time. Five walls of exquisite craftsmanship held stained glass windows which now lay shattered - replaced by hastily-built stone arrow slits. A stone dome rises above the walls, and above the oak doorway - now also sporting newly carved arrow slits, the figure of a hulking man has been cleverly carved into the roof. A green flame traces around the edges of the Chapel.
The flames are simply a warning trap. Green serpents will appear from the chapel walls to strike at the party.
The interior of the chapel is small – only 30 feet across. The stone altars and dais have been destroyed, leaving a hole in the ground with a set of spiral stairs leading down. All adornment has been removed.
At the north end of the room, a large hairy man dressed in leather is speaking with an armored knight in blue-black scaled armor. The man has a bushy red hair and a flowing beard. He carries two double-bladed swords and a shield in the form of a dragon. The men are looking at a map of the Realm.
Lucien is the werewolf. He wears a ring. His companion is from an unknown location. They are discussing how the Realm will be divided under the new rule. The Eastern Reaches on the map has been marked with the word "Midnight". There are hundreds of dots across the Eastern Reaches - each denoting the location of a lightning rod.
Encounter 3: The Long Tunnel Entrance
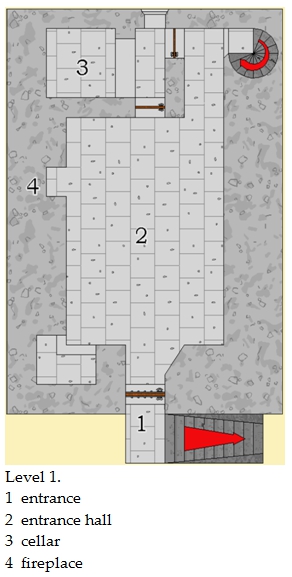
The stairs wind around a central column. About 60' down, there is new stonework in place on the walls. Clearly, something has been sealed recently.
Continuing down, you eventually emerge in the center of a large shadowy room. This room appears to be carved from solid stone. The floor is smooth, and the room is roughly hexagonal with six large open chambers around the perimeter. The ceiling is only 20 feet high. In each wall is an archway leading out into a roughly hewn maze of dozens of rooms and sprawling hallways randomly connected and at different elevations. Several hundred feet below the chapel, these are clearly burial crypts – with low vaulted arches. There is an ancient mustiness to the air here, although the floors are clean.
On the walls and floors of the hallways and vaults, hundreds of plaster seals have been placed – each roughly three feet square. Some are simple and others ornate filled with symbols and epitaphs, but they are all tombstones – bearing the name and date of the occupant of the grave beyond.
A clear trail of muddy footprints, mostly leading out, end at a tombstone reading: Here lies the Family Byborough. Gentle be the Passage Beyond.
Below it, are symbols have been drawn in silver on the headstone. Interspersed are cube-shaped depressions. The symbols are on a circular stone disk that has been inset into the headstone and can be rotated. Ten stone blocks lie on the floor.
"Look up and down before you enter here."
Fill in the blank spaces in each puzzle with the digits shown below so that the equation is true, and remains true even when viewed upside down. (Note that the 2 and 3 look like one another upside down, as do the 4 and 7, and 6 and 9.) No puzzle contains any digit more than once. Standard order of operations are used: multiplication and division before addition and subtraction, and otherwise left to right.
Random guards = rust monsters, gelatinous cubes, guards.
Once the puzzle is solved, the entire circular stone will push in and rotate. This will cause the entire wall to move, revealing stone steps leading down. The steps are of a new and hastily-built construction.
When the party leaves, the door will slam shut and the stone blocks will be ejected onto the floor. Otherwise there is no way to get them out.
Encounter 4: Tunnel Patrol
The passage leading down to the Long Tunnel is clearly recently built. At one point it breaks through some old rooms and you recognize the remnants of the old marble slide. The construction is new and no-nonsense.
As you descend you hear footsteps and panting if from very large wolves coming up from below.
An armored troop of 10 wolves and 10 humans come by. The leader is dressed in plate mail with the symbol of a black wolf on his shield. No ring.
After an hour, they will start to encounter areas covered with blood – large stains on the floor, ceilings and walls.
As you come down a particularly long set of stairs, you hear the sounds of running water ahead. The hallway is the same dull brown polished stone as the previous 30 miles – your estimated progress as you have been walking for about six hours.
Soon, you feel the fresh smell of rushing water and feel a cool breeze on your face. The hallway breaks into a large room – still hewn of the same rock – but sixty feet across and about the same height. Across the center of the room is a curtain of water created by a large crevice in the ceiling from which thousands of gallons of water fall in a cascade. A similar crevice in the floor about 5 feet wide allows the water to fall unbroken to the inky depths below.
Glancing around, you see a smashed stone font beside you and a scratched out elemental symbol on the wall. Across the room is a passageway leading out - also flanked by a smashed font and defaced symbol.
Encounter 5: Long Tunnel Exit
After another six hours of walking, this time with the stairs slowly moving up in elevation, the tunnel – mercifully – ends in a stone doorway.
Pushing on the door, it opens into a large natural cavern except for the cut stone doorway on the back wall – from which you entered.
In the center of the door, a circular stone on which symbols have been drawn in silver. Interspersed are cube-shaped depressions. The symbols are on a circular stone disk that has been inset into the headstone and can be rotated. Ten stone blocks lie on the floor.
"Look up and down before you enter here."
The cave is large – almost 100 feet in length. Faint light comes from an opening beyond. There is a smell of occupation here, smoke from fires, excrement, and a general mustiness. A number small natural passages line both side of the cavern. You can see the glow of red eyes coming from several of the passages.
Wolf guards. Lots of howling!
Maybe the party will forget to solve the puzzle in advance. If the blocks are taken, they will appear back by the door.
The Village of Tween
The path through the forest begins to climb – heading into highlands directly against the Wolfshaunt Mountains. The trees here are still thick – a forest of twisted trunks and unwholesome vines trailing from the high branches.
Encounter 1: The Bats of Tween
NOTE: This will appear to be a random encounter, but it is really designed to let the villagers gain a bit of trust in the party.
Climbing along the steep path, you approach the mountain – its face dotted with myriads of small caves – some perched high in the mists that truncate the tops of the granite peaks.
What at first appears to be a cloud of black smoke, resolves itself into a gigantic swarm of birds – no bats. Each bat is the size of a small dog. They move with relative ease quickly dodging about. About half a mile out, the cloud breaks into two – with one approaching from up the path while the other circles about to cut off your escape.
The bats will create a sonic shriek which will stun any who fail a saving throw (constitution modifiers apply). The bats will swarm the party attempting to cover every inch with small biting fangs.
Running down the hill towards you are twelve young men – all dressed in dark green hunter’s cloaks and leather armor – each carrying a composite long bow. Behind them, a middle aged man – also dressed in green – follows. He is carrying a staff.
Nearing the party, they shoot strangely-tipped arrows into the air. These cause a loud shrieking – which also requires a save. However, the effect is that the bats will follow the sound – even leaving the party.
The man will use the staff to cause sonic booms which cause the bats to drop – stunned. The man is Liam Swarmslayer. He wears a necklace with two silver tokens on it. “We saw the bats. Hurry, to the safety of our village.”
Encounter 2: The Village
The creek running from the mountains splits at a large outcropping of rock which forms a mostly-vertical spire of stone about 100 feet high. Running parallel to each other for several hundred yards, the two forks of the creek join back together again. The water is swift and deep – cutting a difficult path to ford its current.
On the island created by the two forks of a river lies a small village. The tops of its roofs can be seen just over a high stone wall that has been built at the water’s edge. At the far end of the island, the spire rises above the village. A stone watchtower has been erected – steep stone steps carved into the stone to provide access from below. Beyond the village, the sheer stone walls of the Wolfshaunt rises into the mist – creating the illusion of a solid barrier of granite.
Liam tells the party:
- The village has been here for centuries.
- We are the werewolf hunters. LIE: They are actually werewolves. The wolves in the area are just wolves.
- We live peacefully with the other villages of the area – Sundown and Bingham Falls being the closest. They provide us with food, cloth and weapons. We provide them with protection.
- If fact, our hunters have just captured a werewolf which we are going to burn tonight. It doesn’t kill them – nothing will – but it does take them a full cycle of the moon to reappear. TRUE: Burning takes a month to come back. LIE: The werewolf is one of their own – sacrificed to gain a silver token!
- They control the bats – which are their hunting eyes and ears, btw. They will summon them back if the party attacks.
He will NOT tell the party:
- They keep the villagers they capture behind the Wolf Door complex.
Encounter 3: The Spire
The stone steps end in a large stone platform. From the top of the spire, there is a good view of the village and the river below. The path snakes south from the village and is quickly lost in the trees.
Besides a number of hidden blinds for archers, the most notable feature is a long wooden bridge that hangs down on the creek/cliff side of the spire. Two winches can be used to “raise the drawbridge”. On the far side of creek, a ledge on the stone leads into a large natural cave entrance leading back into the cliff. A fire can be seen burning in the cave.
Encounter 4: The Human Holding Pen
This party will be told that the bridge leads over to villagers who have been bitten and are therefore in quarantine from spreading lycanthropy to the others. LIE: These are ordinary villagers (i.e., food).
Huddled around the fire in the cave are six villagers – three men, two boys and a young woman. They are dressed in tattered clothes and are scraped and bruised. They hunch over the embers for warmth – with the stoic resolve of people who have lost all hope for life. Beds of tattered wool cloth are piled about. A single set of stairs leads up from the back of the cave.
If the party lets on that they are going across the bridge, the wolves will have the bats come and kill all the villagers.
Otherwise, it might be possible to sneak in undetected (not using the bridge, of course).
These are villagers from Sundown. They will claim:
- We have been taken by the werewolves of Tween.
- We just want to go home.
- The werewolves eat several villagers each week.
- There is a strange door at the back of the cave.
Encounter 5: The Wolf Door
A steep set of stairs carved into the rock leads to the Wolf Door.
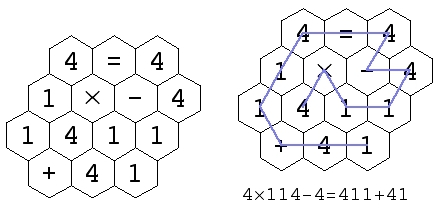
An ancient door - circular stone covered with lichen - blocks the passageway into the cliff. Across the front of the door, a wooden sign with a red wolf symbol has been wedged into the stonework - an ominous warning of what lies beyond. The path leading to the door shows that it has not been used in centuries. The musty odor of death hangs heavy here. On the door, you see a number of hexagonal shapes have been carved. A verse on the lintel is written in a Second Age dialect of Common.
My power holds while my secrets stay.
A single path through the hexes lay.
Statements true: divine the math,
Trace your finger to find the path.
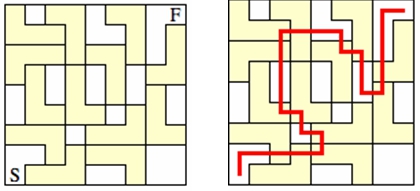
Find a path that passes through each hexagon exactly once, and traces out a true equation. The usual order of operations is used: multiplication and division before addition and subtraction.
This room appears to be carved from solid stone. The floor is smooth, and the ceiling is 20 feet high. The room is roughly hexagonal with six large open chambers around the perimeter. The stone walls have been dressed smooth and covered in plaster. There is an aura of peace and tranquility here.
In the room are: a chair with a wolf’s paw pattern. A small chest with a dagger (glows when vampires are near – multiple gems more glowing, more powerful?), a horn, and 2 silver tokens.
When the light of truth comes to canine lies,
And the wolf’s path door is opened,
The horn will sound, the beasts come,
And the pack be lost forever.
Blowing the horn will cause the werewolves to come involuntarily. Now, they will fight, but they will not flee. This should allow the party to trap them and let the “real” villagers go.
Encounter 6: The Nephew's Brother
Behind one of the plaster alcoves, a seam can be found. Digging the seam reveals a lead door with a strange symbol on it.
The door opens into another alcove completely filled with an ancient lead coffin - exceedingly heavy and ornate.
Opening the coffin reveals a red-velvet lined burial space. In it, a perfectly preserved man lies in ancient robes. On his hand is a silver ring. A ruby necklace glows around his neck. His skin is a perfect alabaster, his hair dark, and his countenance that of a sleeping man.
This is the Nephew's Brother. His name is Mikhail. He will attack the party unless the ring is removed. However, he may have a few rounds to talk before the Grandfather learns that he has returned.
He will point the party towards the Shades of Dumbolton - who live deep in a hallow to the east of Tween. It marked by a large rock in the uncanny shape of an owl. They will exact a high price for their knowledge.
Encounter 7: The Shades of Dumbolton
Moving along the path, you are startled by the presence of a large owl sitting on a rock near the road. The creature is almost 12 feet tall.
Closer examination shows that the owl is a moss-covered stone outcropping - amazingly life-like, although clearly natural.
You sense the owl is watching you.
Across from the owl, a small culvert drops steeply into the dense forest. From the road, it looks like a natural runoff. Taking a few steps off the road, the path is a set of ancient steps - some carved from stone, others placed by ancient hands.
As you descend, you have the tingling sense of ancient, malevolent power growing stronger.
At the base of the path, you come into a small clearing - bowl shaped with a marshy grass surrounding a slime covered pool. You notice immediately, there are bubbles coming from beneath the slime.
Slowly rising, five forms take shape from the pool. Each is covered in moss and appears to be more like a giant shambling mound.
The shades will demand a life - taken from each character sheet in exchange for the location of the other rings. Ironically, all five will be in the same place - in one night's hence - the Grandfather is calling a conclave of the wearers of the ring to which you hold three parts.
The Grandfather's Castle
As you descend from the pass, the darkness of the night seems absolute. You can see no hint of the moon. The air is cold and fetid. The trees that line the path sway eerily as a faint breeze move through their branches.
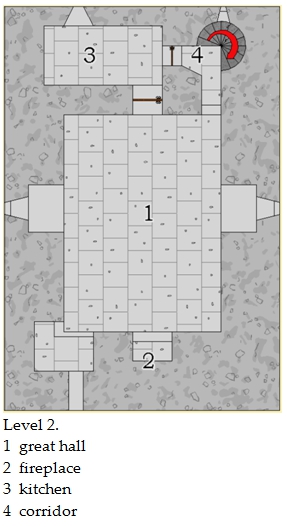
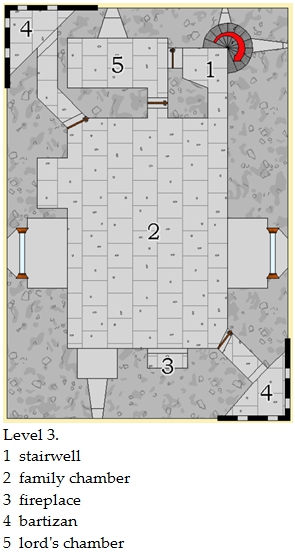
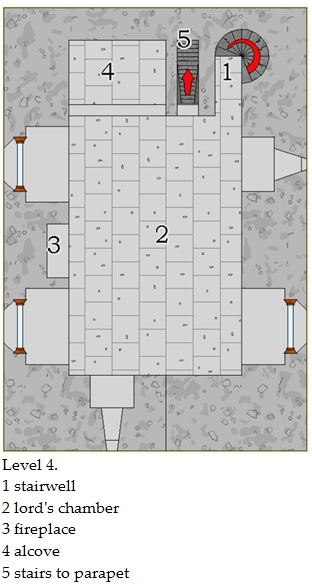
At the intersection of the roads - a place you visited just a year ago, stands a large imposing four story castle - square in shape - without adornment. A long needle-like pole extends from the top of the keep. It is impossible to imagine how this castle came into being in such a short time. Even from this distance it appears weathered an ancient, as if some magical spell just dropped it into the center of the road.
Snaking out from the castle are large reddish-purple tendrils - like the snaking roots of an ancient tree. The tendrils roughly follow the four roads for about 200 yards before being buried in the earth. Their sickly glow casts a pallor into the absolute darkness of the night.
This is the castle of Grandfather Josiah. He is one of the Council of Five. He has formed an uneasy alliance with Lycurgus, leader of the Baneback. After failing to open the cyptex, he created the Book of Secrets and the taunt of King Ernie in order to get them to do the deed for him.
He gave Lycurgus a substantial part of his cache of tokens in order to free the first of the pack. In exchange, they will help each other when the gate is opened. Lycurgus is also to keep the party moving on the plan by intercepting them if they stray too far afield.
Lycurgus rules Liam’s pack in the village of Tween – but generally considers them lower in the pack order. It is doubtful that Liam will mention Lycurgus unless he is completely threatened.
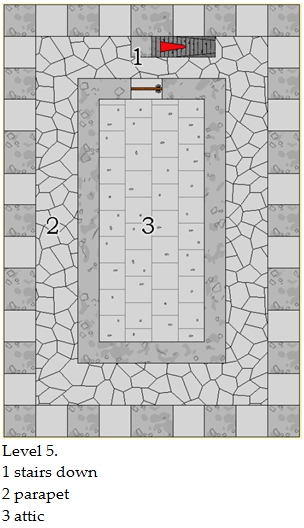
Encounter 1: The Attic
The interior of the attic is a single large room. The ceiling, walls and floor are dressed stone. The ceiling follows the contour of the outside ceiling – with the apex of the interior room roughly 20 feet high.
In the center of the room a large silver needle juts from the ceiling. While almost eight feet in diameter at the point it exits the ceiling, the needle tapers to fine point just above a table where it sits in a glass jar filled with swirling black smoke. On the table are a variety of alchemical apparatus – beakers, flasks and jars of liquids of a number of different colors.
At the front of the room, several stone benches are pushed up around a long wooden table. The table is cluttered with dishes of dried bread, wilted vegetables and dried meat. Several small plates and goblets are nearby.
This is the Vvrrak. He speaks with a strange voice that appears to be one of thousands of vocal cords working together – giving the impression of many voices speaking together.
Wears a silver band.
Encounter 2: The Conclave
This massive stone room is cold and uninviting. A fire has been made in a large stone fireplace, but it gives the room little warmth or cheer. A large table is set in the center of the room. Some sort of diarama sits on the table. Around the table stand four very unusual men and an otherworldly creature.
One is a large man, clearly a werewolf from his shaggy appearance. On his back is a wicked serrated sword which glows with a dull reddish light. He is dressed in leather armor.
A second man is dress in robes, a large cowl pulled up over the back of his head. A braid of long, black hair snakes down his chest. His hands are thin, alabaster, and adorned with a large silver knotted ring and a single silver band.
The third is a frail looking man dressed in red robes. His grey hair has mostly fallen out. He leans heavily of a black staff made of a shiny wood. His hands are festooned with rings - 10 to be exact.
The fourth man is clearly a fighter - dressed in shining plate mail with a helm adorned with large wings. His tabard is green with a great black wolf on it. He is very large and extremely powerful looking. Despite his ornamental trapping, his weapons look well tended and sharp. His hawk nose and beady eyes make him look like a predator. He wears a single silver band.
The fifth figure is more insubstantial that not - more of a black mist. Vaguely female in form, it is unsettling to watch her for more than a few moments. No details can be made of her appearance.
1 = Lycurgus from the Banebacks.
2 = Uncle Jonah, a sorcerer of great renown, currently Bound to Josiah.
3 = Grandfather Bela
4 = Benedict Blackwolf, a captive representative from the Blackwolf pack; bound to Josiah.
5 = Myrrah, a spirit form of a young woman bound to Josiah. Capable of extreme intelligence gathering. Preternaturally observant in all planes.
Encounter 3: Communications Room
This stone chamber is dark except for a glowing orb in the center - which casts a mysterious swirling shadow on the walls. Hunched over the orb is a gnarled gnome in black robes - his eyes milk white - his head cocked in concentration. Drool runs from the side of his mouth.
Communications Room in Castle - where the Grandfather keeps track of his brood.
The gnome is Coggle Wiseseer wears one of the rings. He can communicate with Josiah telepathically. He can also communicate with others in the same way. He begs for death - anything to remove the ring.
Encounter 4: Myrrah
The door to this room is marked with a strange star-shaped sigil.
Wake not the dreamer as she moves through all the possibilities.
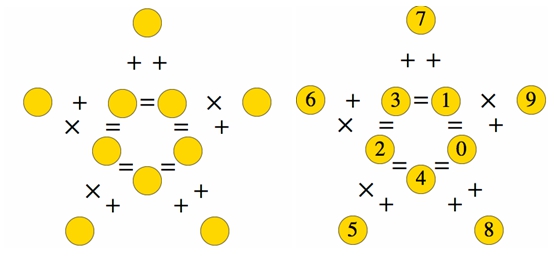
Insert the digits 0-9 into the circles to make the 5 equations true when read from left to right. Each digit is used exactly once.
Unlike the rest of the castle, this room has a warmth to it. Although it is pitch black, the soft sounds of a sleeping woman can be heard coming from within.
The woman lying on the bed is beautiful - dark raven hair cascading down her slim shoulders. She is pale, but not unnaturally so. She appears young, although it is difficult to ascertain her true age. She is dressed in a light white cotton shift - simple and yet elegant. Her hands rest by her sides, although the bed she sleeps in shows signs of struggles or nightmares - twisted sheets, discarded pillows, and the like. On her hand is a single silver band. The bed and furnishings in this room are very old, but well tended, neat and luxurious.
Encounter 5: Uncle Jonah's Laboratory
The room is cluttered with a number of glass jars, beakers and flasks. The workshop seems to be alchemical in nature, as there are all manners of potions strewn about.
In the center of the room, are six glowing large jars filled with swirling vapors. Each is about six feet in height and open on the top. In each is a small jellyfish with long pink tendrils and a pulsing clear head.
At one corner of the room, a young man with a short beard and sits sleeping. He is chained to a hook in the wall, although he looks well fed.
In a cabinet near the door, a single thin, leatherbound book has been placed near a quill and some ink. The faint tracings of a red light can be seen - undoubtedly a ward placed to keep the volume safe.
These jellyfish are "absorbing" the talents of others and being studied for use the Eastern Reaches campaign.
While the book is written in a foreign tongue, it can be translated with enough work - especially by a local - who might not be that well educated.
The young man is Gustav, a scholar from Portsmith. He is noted for his expertise on understanding weather and the ether. Gustav is quite insane - having his mind sucked already.
He will wake up and babble - in two voices.
I am Gustav. I lie on Monday, Tuesday, and Wednesday.
I am Harold. I lie on Thursday, Friday, and Saturday.
We both tell the truth on Sunday.
A: I lie on Friday.
B: I lie on Monday.
A: Who am I? Harold
B: Who am I? Gustav
Both: What day is it? Sunday
If A is lying, he is Gustav, and it is Monday, Tuesday, or Wednesday. On those days Harold tells the truth, but B says he lies on Monday, a contradiction. So, A is telling the truth, and he is Harold. Therefore B is Gustav, and he is telling the truth when he says he lies on Mondays. Since both of them are telling the truth, it is Sunday.
Encounter 6: Werewolf Party
This large room is filled with laughing, chatter, clanking of tabards, and the periodic rending scream. From the sound emanating from the room, a party is in full swing.
The room is filled with several dozen burly men and women. They are mostly dressed in leather armor, and they share an outwardly hairy appearance. Each has a huge copper tankard, and several kegs have been tapped at one end of the room. Serving them are a dozen frightened villagers - both young and old, man, woman and child. In addition to the ale, raw meat is being served by several strong-looking boys - who nervously watch the ground as their hosts select morsels of what could only be manflesh.
At the very center of the room, a beautiful villager stands atop a large cask. She dances while playing a beguiling melody on a silver flute. The tune is hypnotic, but her captors seem not to care about the show - busy with their merrymaking. Unlike the peasants serving the werewolves, the flautist has a confident, almost defiant look on her face.
Of course, she will be dinner - but probably the last on the menu. Her flute is one of charming, but it has no effect on the werewolves. It might work on the party to persuade them to come to her rescue. The woman's name is Melody.
