Blisworth Chapel
| Type | Dungeon |
|---|---|
| Status | Explored November 907 TA |
| Location | Dreadfield |
| Hex | 7615 |
| Campaign | The Siren's Song |
| Adventure # | 129 |
Legend: The Blisworth Lich
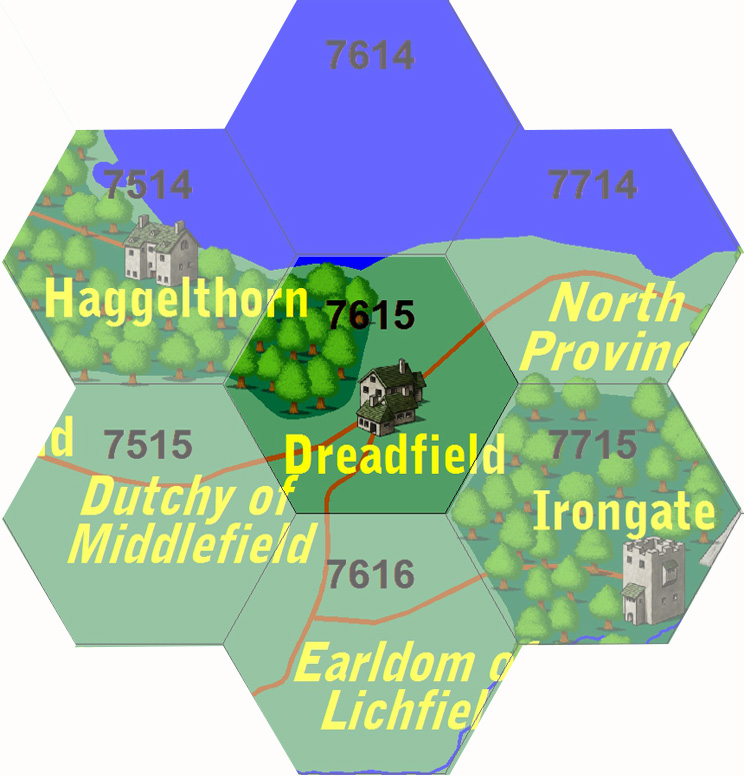
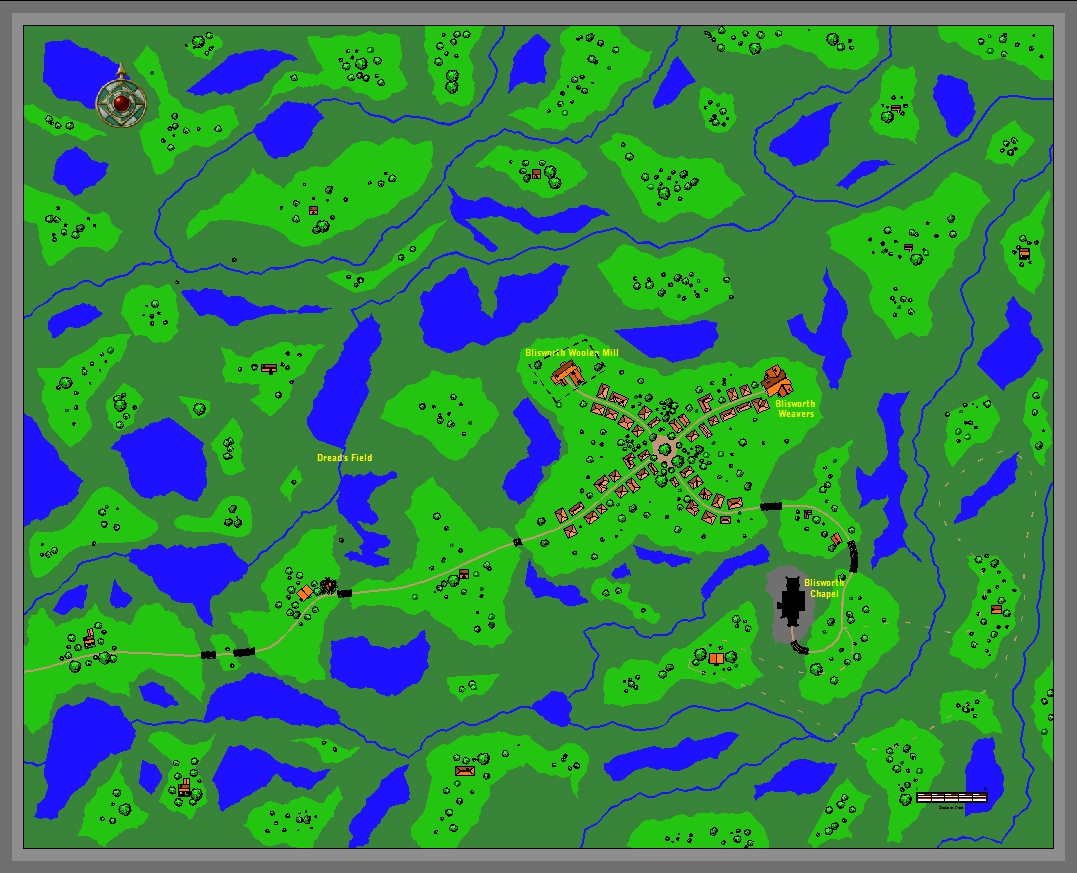
The quiet village of Bliswoth lay some thirty miles northwest of Dreadfield in a marshy mire known as Dread's Field. Isolated from all but the most far-reaching adventurers, Blisworth boasts only one tavern, a small mercantile, a woolen mill, and several shops relating to sheep, the sole economy of this sleepy town.
According to legend, the town of Blisworth was founded in the late seventh century of the Third Age, shortly after the arrival of the Haggelthorns. Official records mention that the woolen exports from the area were insignificant for collecting taxes. As such, it is doubtful that any notables from Haggelthorn or the Eastern Reaches have ever visited Blisworth in their official capacities.
In the eighth century TA, the town hired a young priest from the Church of the Hearth to oversee their spiritual needs. Upon his arrival, the priest was faced with a significant task as there was no church, the land was a swampy peat bog, and the basics of civilization had barely made their mark on the townspeople of Blisworth.
In time, a rocky outcropping overlooking the town was chosen as the building site for Blisworth Chapel. Although it was located on the site of the ruins of Curl Abbey which had been built on an even more ancient pagan site, the priest found it to be the only suitable venue for his church. With the help of the townspeople, a simple chapel was built from peat blocks. The chapel stood for years. Slowly the site was improved, with a proper stone chapel and living quarters for the priest (who had originally stayed in the only guest room above the tavern), a small graveyard to service the needs of the community, and a prayer path leading through the moors.
In time the young priest, grew old. Leaving Blisworth, the priest promised to send a replacement from Haggelthorn. Not more than a month passed, and a new young priest appeared to take over the needs of the townsfolk. And so time passed, every twenty or thirty years the old priest left and a new priest arrived. During this time, the town prospered in its trade with Haggelthorn and Dreadfield. The Blisworth woolen mill garnered a reputation as making some of the finest cloth and yarn in the Eastern Reaches.
The oddest local tradition in Blisworth is leaving a small cake - called a Tabitha cake - on one's doorstep on the day of the Third Harvest in October each year. This is done in remembrance of a local shepherd girl, Tabitha, who disappeared on that day under mysterious circumstances in 828 TA. Her ghost - still young and beautiful - has been seen on a number of occasions since then, and the cakes are meant to appease her spirit. Those lucky enough to have the cake disappear before the next morning are thought to be blessed in the coming year.
What Really Happened....
The first priest, Father Robert Mason, stumbled upon a secret chamber (see Room 15) when building the church. There, he discovered Tabitha's Mirror (see Wanton Wench). The mirror had two sets of three magical stones (one ruby, emerald and sapphire in each set):
- SET 1 - Resurrects the dead
- SET 2 - Provides eternal youth (reset to 20 years old)
After accidentally sitting in front of it and creating a duplicate - one that he barely destroyed, Robert began to experiment with the mirror. He discovered the properties and used them to "reset" to a younger version of himself every 20 years or so.
In time, Robert fell in love with Tabitha, a local shepherd girl. Fearing reprisals from the townsfolk, Tabitha "disappeared" creating a series of false trails to provide mystery and subterfuge - secretly moving into the church to be with Robert. When needed, she would hide in the secret crypt-room where she too discovered the mirror.
When it was time for Robert to "reset" and assume the guise a new priest, Tabitha followed suit - retaining her youthful appearance. Careful to remain hidden, Tabitha was been seen only a few times in the environs around Blisworth over the last 80 years.
In time, both Robert and Tabitha became thoroughly corrupt from the mirror's influence. And paranoid. Of each other.
In March 907 TA, Robert decided the time had arrived to move from Blisworth Chapel. The townsfolk were out to get him. Tabitha was out to get him. He must get the mirror far away. During his sojourn to Haggelthorn to facilitate another "reset", he posted for a ship and crew leaving the area to take him and the mirror far away.
The crew of the Wanton Wench agreed going with Robert to Blisworth to get his belongings.
Robert went into Blisworth, killing the townsfolk and making a few into guardians to keep trespassers out of the chapel forever.
Then, Robert told the men to wait outside while he went in and dealt with Tabitha. A fight in the crypt ended with Tabitha being trapped and Robert dying.
The men went down but decided to take the mirror without reviving Robert (he had told them to put his body in front of the mirror). They didn't notice that Tabitha had torn a stone (a sapphire) loose in the struggle. They left Blisworth quickly with the mirror before the zombies appeared and returned to the Wanton Wench.
Blisworth Environs
CLOSER EXAMINATION: The Woolen Mill is surrounded by a large iron fence that has been hastily constructed around its perimeter.
There are a number of fresh human footprints here - intermingled with large wolf prints. They are fresh given the poor weather conditions.
On a hillock near the village, a wrecked horse cart is near the bridge, its wheels up in the air. It appears to be a merchant's cart. A number of smashed crocks are sticky with honey.
Mollie Stone
DC 20: You hear the breathing of a young girl.
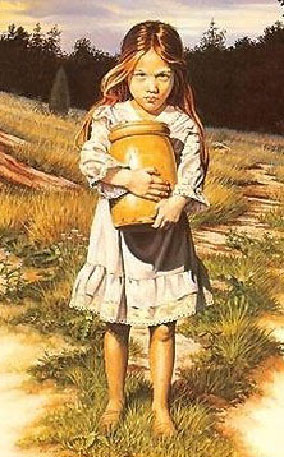
A young girl with dirty brown hair and bare feet is dressed in a tattered white frock. She holds a large crock. Her name is Mollie Stone and her parents - Ma and Da were taken by some shaggy men into the village. She was sleeping in the back of the cart when her father whipped the horses into a frenzy and crashed into the bridge.
Running away from wolves.
She is afraid of the "moaners" that are in the swamps.
Fetid Spore Mound
Blisworth Chapel
The Secret of Blisworth Chapel
The Chapel of the Hearth celebrates the seasons and is dedicated to shepherds - which is appropriate for people who worshipped here.
Like most chapels, it has a cleansing ritual. In this case, the chapel was "cleansed" once a year after the sun fell through the four windows representing the seasons. This ritual will create a safe space that zombies and werewolves cannot enter.
When shepherd's glow falls on lifeless eyes,
And shadowed sword splits form immortal,
When summer's water shines on fallen men,
And burnished beasts eclipse ancient graves,
Then will the dead rest, evil flee,
And the shepherd's church be clean again.
If the party casts a light through each of the windows, the interior of the chapel will start to glow with a dim yellow light. The feeling of warmth fills the space. Undead here will collapse (including Bruces), and any werewolves will be burnt unless they leave immediately.
The ritual is written on cards that used to be given out to the congregation - although their meaning is lost.
Exterior
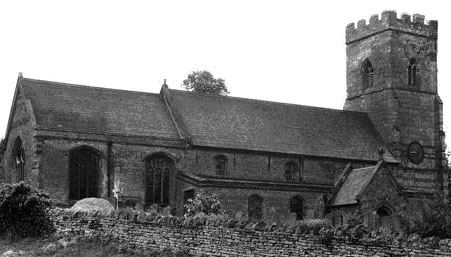
The exterior of this chapel is sturdily constructed of stone. It is brown and weathered with leaded windows of stained glass. The chapel has a peaked roof and a bell tower in the front. The front doors are made of weathered oak bound in silver. A large apple tree sits outside the chapel. The peak of the roof is lined with large, black crows.
Front Doors
Sprawled on the ground as if fleeing the chapel through the front doors is a young man dressed in traveling clothes which have been shredded and burnt in a number of places. He holds a mace in one hand. He is wearing a falconer's glove on the other.
Examination will show that he has a backpack with a small notebook, quill and ink.
This is a later adventurer looking for the key room was killed outside the chapel by the guardian zombies.
| June 7, 907 TA - Haggelthorn
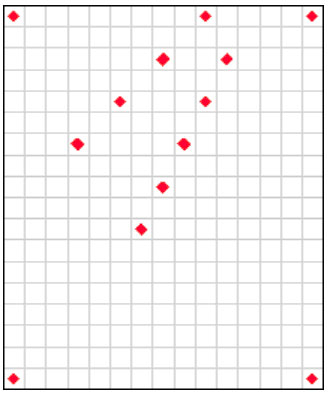
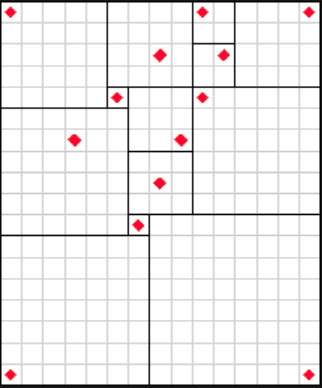
My journey nears its end. I start a new journal - having sent my notes to date back to Father Bartholomew. My research at Haggelthorn Hall's library turned up a few clues. For the past eighty years, Blisworth parish has been served by a series of young priests who replace their aging counterpart after twenty or so years of service. My research has proven that the "new" priests have never made it past Haggelthorn when called. Each met with an unfortunate, disfiguring death. In fact, I believe that Father Robert Mason has been the only priest in Blisworth during this time. How does he keep his youthful appearance and why this guise? If he is immortal, why stay in this backwater parish? Is his tale intermixed with that of Tabitha? So many questions. Perhaps he has discovered what lies beneath the old chapel. I hope not. June 8, 907 TA - Dread's Field I intend to investigate Blisworth Chapel tomorrow. For now, I have camped in the moors - the town is dark, but it seems ominous and haunted. This place is terrifying. The chapel in the distance must be the one from the old texts, although it is clearly not of Second Age construction. Perhaps, a new chapel has been constructed upon the older structure, although I pray that the builders did not dig too deeply. I have brought with me the key to the Room of Pain and Truth. I have not yet figured out how to solve this riddle, but I hope the chapel will contain more clues. I know that I must divide the grid into squares along the lines so that each square contains one red diamond. And the lines must be drawn in blood. My charge is simple. The evil here must remain sealed forever. I hope this will not be my last entry. |
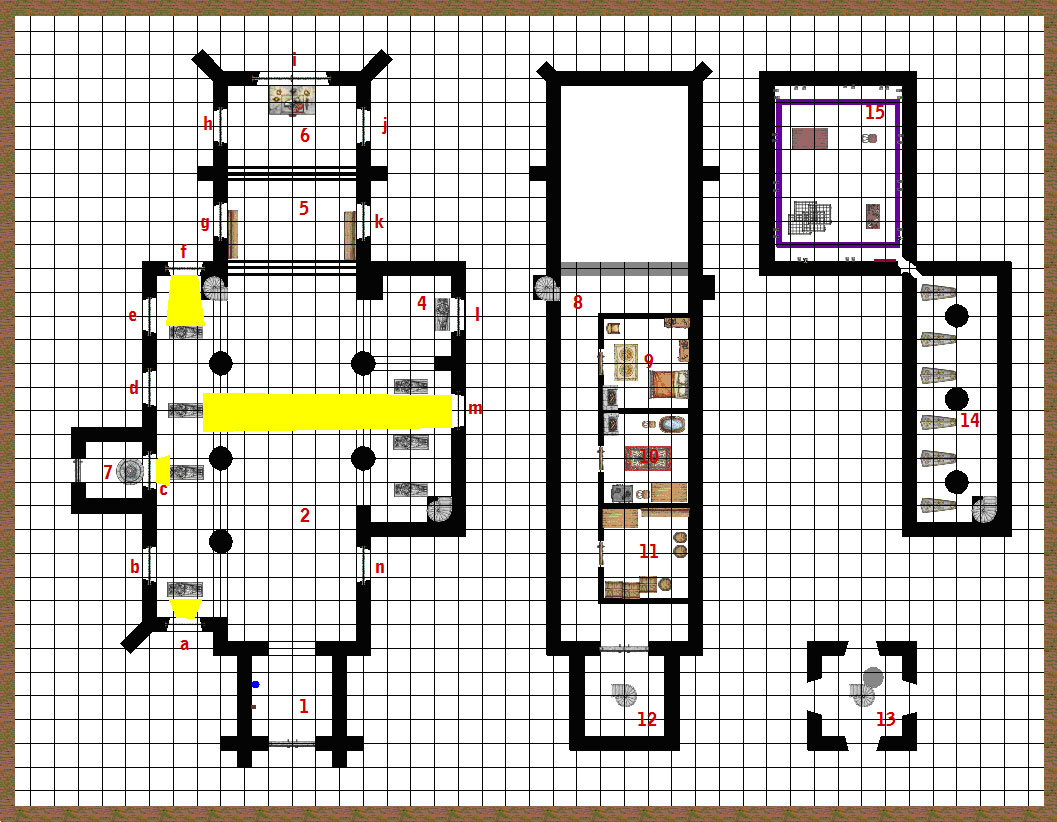
Room 1: Narthex
Inside the front doors is a small narthex. Against the wall is a silver font and a iron offering box with a lock. An archway leads into the main nave beyond from which the sounds of groaning can be heard.
The offering box contains 200 gp, 30 sp, 1 cp.
Room 2: Nave
The interior walls of the nave are covered in plaster and whitewashed giving a rough but clean appearance. Five pillars support a flat ceiling fifteen feet in height. At the far end of the nave, a set of stairs lead to a chancel and altar beyond. A side isle on the west and two small side chapels on the east complete the room.
In the center of the room, 8 figures stand swaying slightly back-and-forth. They are moaning in a disturbed unison - all facing towards the altar at the far end.
South Wall (winter) - 1
- a: A shepherd girl is inside of a room kneeling at the front of a fireplace that is burning. There is a small sheep sleeping near her. There is a window to the left with circular drops of either snow or water falling.
West Wall (spring) - 6
- b: An elk rummages through a leafy forest. A snow-banked stream runs behind the bear and the sun is shining brightly.
- c: A shepherd girl is standing aside a large sword stuck point end down into a large stone surrounded by overgrown weeds. A sheep nibbles on the grass and a plowed field of dark, brown dirt can be seen behind.
- d: A black bear is reaching for what looks to be a honeybee hive, hanging from a tree branch that is full of leaves. On the ground is a plethora of wonderfully, and imaginatively shaped flowers.
- e: A black window - cracked by first appearance - but actually contains a yellow lightning bolt that is runs it length.
- g: This window has been broken - a few fragments of green and red glass remain. It has been carefully boarded up from the outside to protect the lead frame.
- h: A field of white and yellow flowers carpet rolling hills that are crisscrossed with small blue streams. A flock of black birds sit in the branches of tall willows. In the foreground are three small, fresh graves.
North Wall (summer) - 2
- f: A shepherd girl is swimming in what appears to be a pond, surrounded by cattails. Her sheep graze nearby. Under the water can be seen with several brightly-colored fish and underwater plants.
- i: Sheep grazing on a green hillock with dark storm clouds in the distance. Sunshine is streaming through breaks in the clouds.
East Wall (autumn) - 5
- j: A pile of gourds, apples, pumpkins and other vegetables and fruit are piled high on a table. A large black crow stands on the table eyeing the fare.
- k: A fox and a rabbit dance under the moonlight that filters through the barren branches of several large trees.
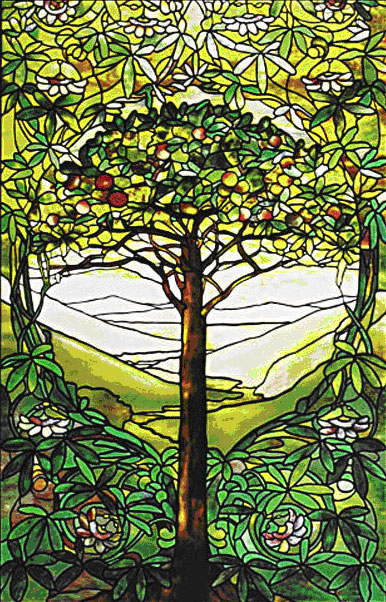
- l: An apple tree dominates the frame with bright red fruit and yellow leaves. Underneath the window is a plaque: Here lies Ull - Our Bountiful Healer.
- m: A shepherd girl is walking with her flock in what appears to be a forest with nearly identically looking trees in the fore and background. All the tree limbs are bare. Two bears sleeping in a den are in the background.
- n: An owl peers from inside a hole of an old tree with barren branches. His eyes are wide. A full moon shines through limbs casting a reflection of the tree on the dark earth below.
Spellgorged Zombies
Room 3: Southern Side Chapel
Three stone effigies are set in the ground here. They show three knights - who could be brothers by their close resemblance. The stones are unremarkable except that each brother carries a square shield with an identical set of red gemstones set in its surface. Carved into the stone at their feet is the phrase: And yet the truth with me you’ll always find.
EXAMINATION: The effigies appear older than the chapel itself - perhaps from an earlier church built on this spot (Curl Abbey). Each has a phrase carved at its feet:
It is I, who cannot hear any sound,
It is I, with no mind to astound.
It is I, who is completely blind
CLOSER EXAMINATION: The jewels in the center effigy 's shield are made of real stones. The others are painted red to appear real.
What is it that is deaf, dumb and blind and always tells the truth? A mirror.
Saying the word mirror causes an audible click. The gems on the center effigy will glow - slightly pulsing. Touching a particular gem will cause the square around it to appear for a few minutes.
The puzzle will reset after 24 hours.
Room 4: Northern Side Chapel
This area smells strongly of apple. The tomb of a woman rests under a stained glass window showing an apple tree in full bloom. The effigy on the stone is that of a beautiful young woman. One hand is carrying a staff. The others is open with a slight recess in the stone.
"Here lies Ull. Our healer, protector and saint."
Ull is apple in gaelic.
If the tomb is opened, a shrouded figure will be found inside, but the magic of the tomb will be broken.
If an apple from the tree outside is placed in the recess, it will form into a healing apple - both for wounds 5d6, negative levels, fear, etc. The apples so blessed will last only a few minutes.
Room 5: Chancel
This small area has a thick layer of undisturbed dust on the floor. Two benches have been pushed up against the east and west walls - presumably for a small choir or altar attendants.
Room 6: Altar
Like the chancel, this area is dusty. On the altar are two silver candlesticks, a silver chalice inlayed with semi-precious stones, and a large book. The items are in slight disarray, as if tossed aside casually.
The book is a priest's prayer-book for the Chapel of the Hearth. It is old and dusty.
If opened, the first few pages have been torn out. These are typically where a priest makes private notes.
A copy of the poem will be found here.
Room 7: Shepherd's Shrine
The stone door to this room is split - the bottom half is open, the top half is closed.
Several sheep will escape if the door is opened.
This small 15 foot square room smells strongly of manure - an odor which is understandable as the floor is earthen and piled with it. A number of life-like sheep statues sit around the room each facing a small fountain. Low like a livestock tank, the fountain has a wooden staff stuck in the center. The staff has three leaves coming from the top - a small holly leaf, a medium mistletoe leaf, and a large oak leaf. There is a feeling of warmth here and safety here.
The water is pure and refreshing.
The staff is the Shepherd's Staff which grants the wielder three druid spells - one 3rd, one 5th and one 7th. By eating (or making tea) with the leaf, or blowing it or flicking it towards a target, you cast the spell. Leaves take 24 hours to regrow. Spells are random.
Room 8: Landing
The landing overlooks the chancel and altar below. A spiral staircase in the north, three wooden doors along the hallway, and a set of double doors leading to the bell tower are all shut. There is a heavy layer of undisturbed dust here.
Room 9: Priest's Room
The northernmost door opens up to a small square room, obviously used in the distant past as a bedroom. Simple oak furniture is covered with a thick layer of dust. The dresser holds a variety of makeup, wigs, and other costume components. Titanium and Aluminum.
Upon entering the room, the ghostly apparition of a young boy dressed in cutoff clerical robes comes rapidly towards the party. Waving his arms frantically for you to leave the room, you notice the animated corpse of the same young boy slowly rising from the bed. The zombie boy is dressed in the same clerical robes with a very small silver key around his neck.
This is the ghost of Tabitha's youngest great-great nephew - Joel - who went out searching for his long-lost great-great aunt and found her here at the chapel. The two played together in secret. Fearing Robert's treachery, Tabitha gave him her phylactery. When Father Robert created the zombies, Joel was caught in the trap.
Joel's ghost is friendly, and he will show the party a small chest hidden under a hollowed out brick in the floor of the room. The chest contains a dagger of zombie slaying.
Dagger of Zombie Slaying
He will attempt to keep the party from taking the necklace, instead trying to get them to bury it with his body - or at least leave it behind.
Room 10: Kitchen and Bath
Like the other rooms on this floor, this room is covered with a thick layer of dust. A fireplace, oven, table and bathtub show it to be a common room to be used for meal preparation and daily chores.
There is nothing of interest here.
Room 11: Storeroom
Listening to this room, you hear the sounds of crates being opened. And maybe an occasional kaw-kaw.
This room is a storeroom of sorts. A hole in the wall near the ceiling lets in fresh air. The contents of the room - mostly barrels and crates have been knocked over and broken. In the corner of the room are several murder crows.
Murder Crow
Undead Raven Swarm
Room 13: Bell Tower
Stairs lead to an open-air room with only pillars supporting the ceiling in the north, east, and west. From here, a good vista of the surrounding countryside. A large bell, obviously has fallen from its bracket in the ceiling and rolled precariously close to the stairs. Looking up you see a long-decayed rope hanging from the ceiling.
It is possible that the crows will be here if disturbed in Room 11.
Room 14: Burial Crypt
A stone spiral staircase leads down some 20 feet below ground ending in a burial crypt. The ceiling here is modest, about 6 feet high, and the stone roof is supported by three thick columns. The walls have plaques for bodies buried into them. Six free-standing stone sarcophagi stand along the west wall.
Unlike the effigies above, the sarcophagi have carved lids with traditional weapons and shields. They also appear to be older than the chapel itself.
The lids of these can be removed to reveal simple bodies wrapped in cloth - of varying age but most have been here for decades. Not magical.
In the NW corner of the room, a small crawl-way leads down into a much older Second Age chamber. An aura of evil radiates from the room beyond.
Room 15: Keyroom
This room feels ancient, the stone walls here are blackened with age. The ceiling is six feet high and filled with thousands of keys hanging suspended from the ceiling. The keys are made of all manner of substance: stone, metal, and wood, and they are shaped from the smallest diary key to the largest dungeon skeleton key. As you enter, the keys begin to sway, producing a eerie rattling.
NOTE: The purple square is the extent of the keys.
In addition to the keys, the room is filled with strange items:
- Near the door, a large square pattern with small glowing red gems is set into a stone frame. The edge of the frame has a pattern of interlocked circles.
- A large pile of black iron window frames are piled near the southwest corner.
- A blackened table with manacles hanging from it is in the northwest corner.
- A single wooden chair is in the northeast corner facing the wall.
- A table of surgical instruments is in the southeast corner.
- Along the walls, 12 sets of manacles sway towards you as you enter, seemingly animated and wanting to pull you in. NOTE: Each has a key in it.
- A 13th set of manacles (on the east wall in front of the chair) holds a beautiful young woman in her early twenties. She is dressed in rich purple robes. Her clothes are ripped and she is dirty, as if she has been in a fight. Both her fists are clenched and her eyes are closed. NOTE: This key is missing.
- Near the table is the slumped form of a man, also in his twenties with dark hair. He is clearly dead, his neck snapped against the table at an odd angle. He has a key in his pocket. NOTE: This is Tabitha's key.
Father Robert has been dead since May 907 TA. His body was looted by the Wanton Wench sailors. Tabitha is held in stasis by her bonds.
The twist is not to use the keys.
The riddle board is used to reset the trap. The manacles will all stop functioning, releasing their captives. All the keys will disappear - teleporting back to the ceiling. Once the blood is dried or washed away, 13 keys will drop to the floor. Inserting the keys into the manacles will reanimate them - ready for reuse.
Once a person is put into the manacles and the key is taken out, the key can be used to open it back up again.
Tabitha's Mirror
- The mirror causes the last occupant of the chair to be "reborn" in about 4 days
- Bones, organs (muscle, eyes), skin, and hair and clothing.
- If the person is dead, they are resurrected. Slightly more evil. Otherwise, they will act perfectly normal. And, the mirror will be precious to them.
- If the person is living, the reanimated version will attempt to kill them.
- The mirror wants to always be near as many people as possible. This is why it allowed itself to be taken to the Wanton Wench, but not thrown overboard.
- If the mirror is thrown overboard (cannot be destroyed), it will appear back in the room, dripping of seaweed.
- The mirror is what is causing the stench - which only smells while the mirror is in operation.
- Strong necromancy; CL 15th; Craft Wondrous Item, clone; Price 100,000 gp; Weight 45 lbs.
Tabitha (Lich)
