Temple of the War God| Type |
Dungeon |
|---|
| Status |
Explored March 883 TA |
|---|
| Location |
Shadowkeep (now Dwarrowdelf) |
|---|
| Hex |
2313 |
|---|
| Campaign |
Shadowkeep Campaign #3 |
|---|
| Adventure # |
67 |
|---|
Introduction
Beyond the third portal, lies the third level of the Shadowkeep, affectionately known as the Temple of the War God. Entry to the temple is via the altar in Room 10 of the Hall of Relics.
Canto Three: War God
Long ago the mighty prayed,
Brave strong souls in graves now laid,
Their god lives on in temples strong,
His tests will challenge mind and arm.
His boon he'll offer to the brave,
And though it's strange, you must say,
"To the balrog's pit of doom,
Must I go to reach the room."
Wherein lies the simple moan,
That sends me to the fourth of stone,
Temple of the War God: Portal 3, Level 1
Temple of the War God: Portal 3, Level 1
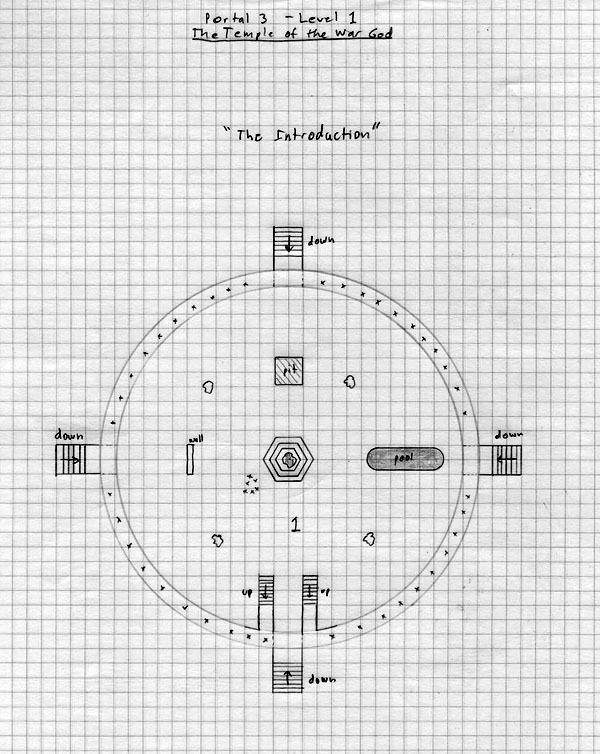
Room 1: Entrance
This vast room is carved from what looks like pure red marble. The roof is domed 100 feet above your heads. A walkway rims the entire room 30 feet from the floor. Two wide stairways in the south lead up to the walkway. Around the room are a number of interesting objects. In the west, a 6 foot high wall, 20 feet long sits in the middle of a large open area, seemingly without purpose. To the north a 6 foot deep pit, 20 feet across again sits in the middle of a floor. A large 10 foot deep pool of water, almost 40 feet long dominates the eastern part of this vast circular room. Four very large iron golems are positioned in the northwest, southwest, northeast, and southeast, all facing the center of the room. There on top of a hexagonal pedestal some twenty feet in height, stands a beast of enormous proportions, arms the size of tree trunks and a chest larger than most men's bodies. He is dressed in armor which glows with devil's light. A two-bladed sword makes you realize that you are in the presence of the War God. The War God is looking at you.
As soon as the party tries to speak, the War God will cry:
SILENCE. Do you mortals feel that you are powerful enough to speak in my presence?
Yes?
Then PROVE it.
With a wave of his hand the room is filled with sound. Four passages to the south, east, west, and north appear. From these creatures stream out. On the ledge above 40 archers appear ready to rain down arrows upon the party. The iron golems begin to move, as they slowly come to life. The war god smiles and watches.
If the party does well, the War God will smile.
A battle well fought. Womanly magic spells are not generally permitted in this MAN's temple. Since you are new, I will let the infraction pass with retribution. However, make sure that it doesn't happen again. I deem ? the most worthy fighter amongst you. Here is a token that you will need in your quest. ("O" stone). You are worthy to speak. What do you want from me?
EAST: Hill Giants (16)
WEST: Giant Scorpions (16)
NORTH: Phase Spiders (16)
SOUTH: Peryton (16)
BALCONY: Archers - 9th level fighters (40)
BALCONY: Archers - 9th level fighters (40)
CENTER: Iron Golems (4)
Temple of the War God: Portal 3, Level 2
Temple of the War God: Portal 3, Level 2
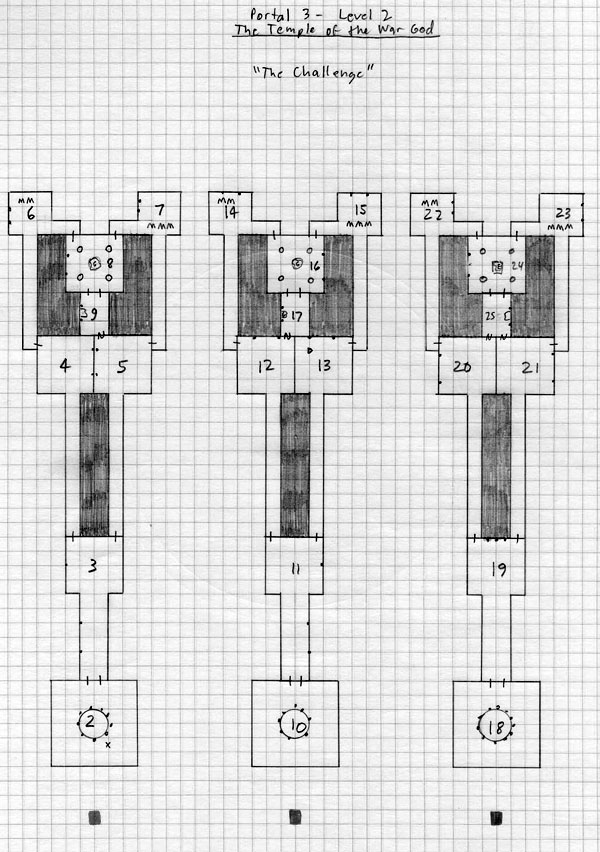
Room 2: Briefing Room (Red)
This large room is plain and unadorned. The walls, floor, and ceiling are of simple cut stone. A set of double doors in the north, and a large round table with 12 chairs are the only adornments here. Standing at the table, looking over a map, is a middle aged man. He is trim with close cropped black hair with traces of grey at the temples. He greets you.
Welcome, my lords, I was beginning to think that you were not going to make it. There is little time left to complete our mission, so let me give you a briefing. He shows you the map, indicating a room at the center of a small complex. Gentlemen, this complex is held by the forces of the enemy. There are a few things that we know about this scenario and few things that we don't. First, this strange device is a key - although I don't know how it works. The key is a four-sided pyramid segmented so that one tip rotates. The tip has an arrow on it that points down. It will snap into three positions with the arrow pointing at one of three colors: red, green, or blue. The man snaps the top several times, it doesn't come apart and it doesn't seem to do anything. But, it's yours. What we do know is this. This room (Room 8) contains a magical tree which is rumored to be good in nature. This room (Room 9) is where the War God's daughter is. In one of these two rooms (Rooms 4 or 5) is the Grim One. An immortal who kills with a touch. He cannot pass through the room with the magical tree. These other rooms are guarded by minotaurs who work for the Grim One. The party must stay together, if you get separated, the group without the pyramid will be teleported back to this room unconscious. You mission is to rescue the War God's daughter and return her safely to me. Good luck.
Room 3: Southern Hallway (Red)
This simple hallway is plain and unadorned. Along the western wall, three torches burn brightly in their brackets. There are two doors in the northern wall, and a double door in southern wall.
Room 4: Western Hallway (Red)
A single narrow passageway leads into a forty foot square room. Two torches on the eastern wall burn in their brackets. The room is simple and unadorned. A single door is in the northwest corner of this room.
Room 5: Eastern Hallway (Red)
A single narrow passageway leads into a forty foot square room. Two torches on the western wall burn in their brackets. The room is simple and unadorned. A single door is in the northeast corner of this room.
Room 6: Western Foyer (Red)
This oddly shaped room has two hallways exiting from the southern and southeastern walls. Two torches on the western wall are burning in this otherwise simple and unadorned room. There are two minotaurs here.
Room 7: Eastern Foyer (Red)
This oddly shaped room has two hallways exiting from the southern and southwestern walls. Two torches on the western wall are burning in this otherwise simple and unadorned room. There are three minotaurs here.
Room 8: Tree Room (Red)
Four pillars of plain stone surround a beautiful birch tree in the center of this strange 40 foot square room. The tree is a circular pot filled with brown soil. There are two torches on the western wall. Four doors lead out of this room.
Room 9: Treasure Room (Red)
This small unadorned room has a heavy oaken chair pushed up against the western wall. Two torches are on the western wall on either side of the chair.
Room 10: Briefing Room (Blue)
This large room is plain and unadorned. The walls, floor, and ceiling are of simple cut stone. A set of double doors in the north, and a large round table with 12 chairs are the only adornments here. The room is empty.
Room 11: Southern Hallway (Blue)
This simple hallway is plain and unadorned. Along the eastern wall, three torches burn brightly in their brackets. There are two doors in the northern wall, and a double door in southern wall.
Room 12: Western Hallway (Blue)
A single narrow passageway leads into a forty foot square room. Two torches on the northern wall burn in their brackets. The room is simple and unadorned. A single door is in the northwest corner of this room.
Room 13: Eastern Hallway (Blue)
A single narrow passageway leads into a forty foot square room. Two torches on the northern wall burn in their brackets. The room is simple and unadorned. A single door is in the northeast corner of this room. A skeletal figure in tattered black robes moves quickly towards your party, his bony hand outstretched.
Room 14: Western Foyer (Blue)
This oddly shaped room has two hallways exiting from the southern and southeastern walls. Two torches on the northern wall are burning in this otherwise simple and unadorned room. There are two minotaurs here.
Room 15: Eastern Foyer (Blue)
This oddly shaped room has two hallways exiting from the southern and southwestern walls. Two torches on the northern wall are burning in this otherwise simple and unadorned room. There are three minotaurs here.
Room 16: Tree Room (Blue)
Four pillars of plain stone surround a beautiful birch tree in the center of this strange 40 foot square room. The tree is a circular pot filled with brown soil. There are two torches on the eastern wall. Four doors lead out of this room.
Room 17: Treasure Room (Blue)
This small unadorned room has a heavy oaken chair pushed up against the western wall. Slumped in the chair is a little girl, perhaps four or five, dressed in a blue velvet gown. The little girl appears to be sleeping. Two torches are on the western wall on either side of the chair.
A small chest is pushed up under the chair. It is unlocked and contains the following: 50 gold pieces, 3 small garnets, red glass disk, "R" rune stone, Dagger +4, Potion of Grave Healing.
Room 18: Briefing Room (Green)
This large room is plain and unadorned. The walls, floor, and ceiling are of simple cut stone. A set of double doors in the north, and a large round table with 12 chairs are the only adornments here. The room is empty.
Room 19: Southern Hallway (Green)
This simple hallway is plain and unadorned. Along the northern wall, three torches burn brightly in their brackets. There are two doors in the northern wall, and a double door in southern wall.
Room 20: Western Hallway (Green)
A single narrow passageway leads into a forty foot square room. Two torches on the western wall burn in their brackets. The room is simple and unadorned. A single door is in the northwest corner of this room.
Room 21: Eastern Hallway (Green)
A single narrow passageway leads into a forty foot square room. Two torches on the eastern wall burn in their brackets. The room is simple and unadorned. A single door is in the northeast corner of this room.
Room 22: Western Foyer (Green)
This oddly shaped room has two hallways exiting from the southern and southeastern walls. Two torches on the eastern wall are burning in this otherwise simple and unadorned room. There are two minotaurs here.
Room 23: Eastern Foyer (Green)
This oddly shaped room has two hallways exiting from the southern and southwestern walls. Two torches on the eastern wall are burning in this otherwise simple and unadorned room.
Room 24: Tree Room (Green)
Four pillars of plain stone surround a beautiful birch tree in the center of this strange 40 foot square room. The tree is a square pot filled with brown soil. There are two torches on the western wall. Four doors lead out of this room.
This room actually contains a roper polymorphed to be a birch. It will attack when the room is entered.
Room 25: Treasure Room (Green)
This small unadorned room has a heavy oaken chair pushed up against the eastern wall. Two torches are on the eastern wall on either side of the chair.
Temple of the War God: Portal 3, Level 3
Temple of the War God: Portal 3, Level 3
Room 26: The Pit of Doom
This totally dark room has an omnious presence. Torches only sputter here, and even infravision seems somehow dimmed. There is a stench to the air that reeks of death and dispair. The cavern is obviously large, the ceiling lost in the darkness. There are a number of exits to this room, although it is difficult to spot them. You can sense movement nearby.
The party will be attacked by wraiths here. Because of the darkness, any normal sighted adventurers fight at -6/-6. Any infravisioned adventurers fight at -3/-3. Ultravisioned adventurers are not punished. If any attempt to cast a light spell is made, the balrog will be summoned.
The balrog fights as a 24 hit dice ghost with triple damage. He can cast spells as a 9th level cleric. If challenged, he will flee to the Room of Tones.
Room 27: Room of Tones
This small rough-hewn chamber is dark like the pit itself, but on a much smaller scale. In the room, three strange looking "Y" shaped metal objects are centered on the south, east, and west walls. The objects are carved with a number of faint runes. Behind each "Y" stands a zombie, blankly staring ahead. The northern wall of this room is perfectly flat and polished to a black lustre. It is framed by an archway of singing angels.
Closer examination will show that each zombie carries a mallet. Upon command, the zombies will strike the tuning fork in front of them.
A terrible screech, like a thousand wailing voices, fill the air. Growing in intensity, the harmonic discord becoming greater and greater.
The three tuning forks have the following effects (at 24th level secular):
SOUTH: make saving throw - STUNNED 1d6 rounds (no spells, fight at -3/-3); miss saving throw - DEAF 1d6 turns (no spells, fight at -3/-3)
EAST: make saving throw - no effect; miss saving throw - all metal objects disintegrate (separate save for magic)
WEST: make saving throw - no effect; miss saving throw - all glass objects disintegrate (separate save for magic)
A small chest is hidden behind the western tuning fork. It is unlocked. It contains: 300 gold pieces, Small Tuning Fork (when struck the northern wall will shimmer and can be passed through), 2 small diamonds, Yellow Ioun Stone, Potion of Heavy Healing, War Hammer +3, "Y" rune stone, Poem to Begnt.
|
Monsters
Hill Giants (16)
Giant Scorpions (16)
Phase Spiders (16)
Peryton (16)
Archers - 9th level fighters (40)
Iron Golems (4)
Wraiths (8)
Balrog
Zombies (3)
Minotaurs (15)
Roper
Grim One
|
Treasure
300 gold pieces (Room 27)
Small Tuning Fork (when struck the northern wall will shimmer and can be passed through)
2 small diamonds
Yellow Ioun Stone
Potion of Heavy Healing
War Hammer +3
"Y" Rune Stone
Poem to Begnt
50 gold pieces (Room 17)
3 small garnets
red glass disk
"R" rune stone
Dagger +4
Potion of Grave Healing
|


