The Rescue of Worldswing
| Type | Dungeon |
|---|---|
| Status | Explored March 832 TA |
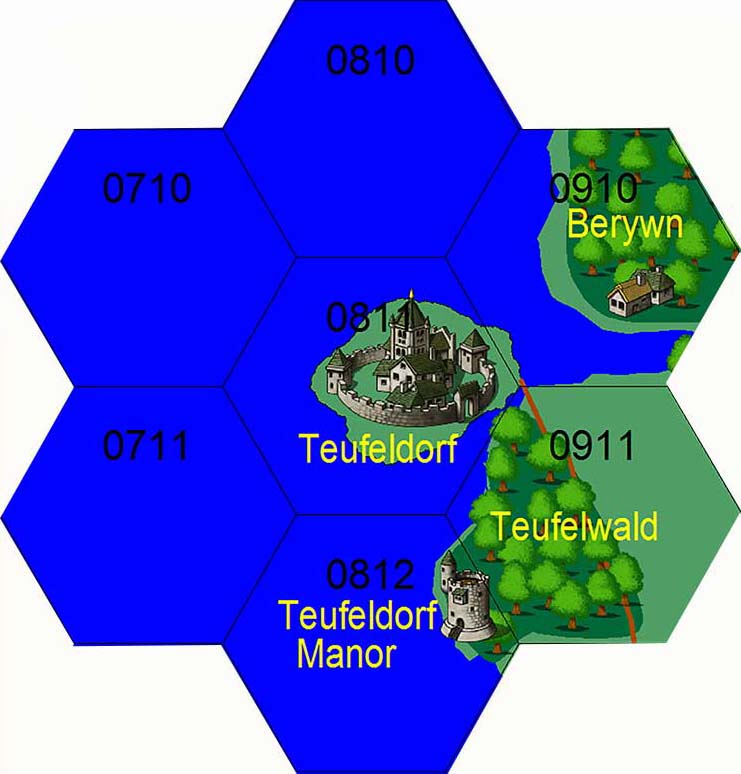
| Location | Teufeldorf |
| Hex | 0811 |
| Campaign | The Third Age of Man (middle) |
| Adventure # | 38 |
The Last Few Days
Today is March 13, 832 TA. You are in Teufeldorf at a pub called the Dragon's Egg.
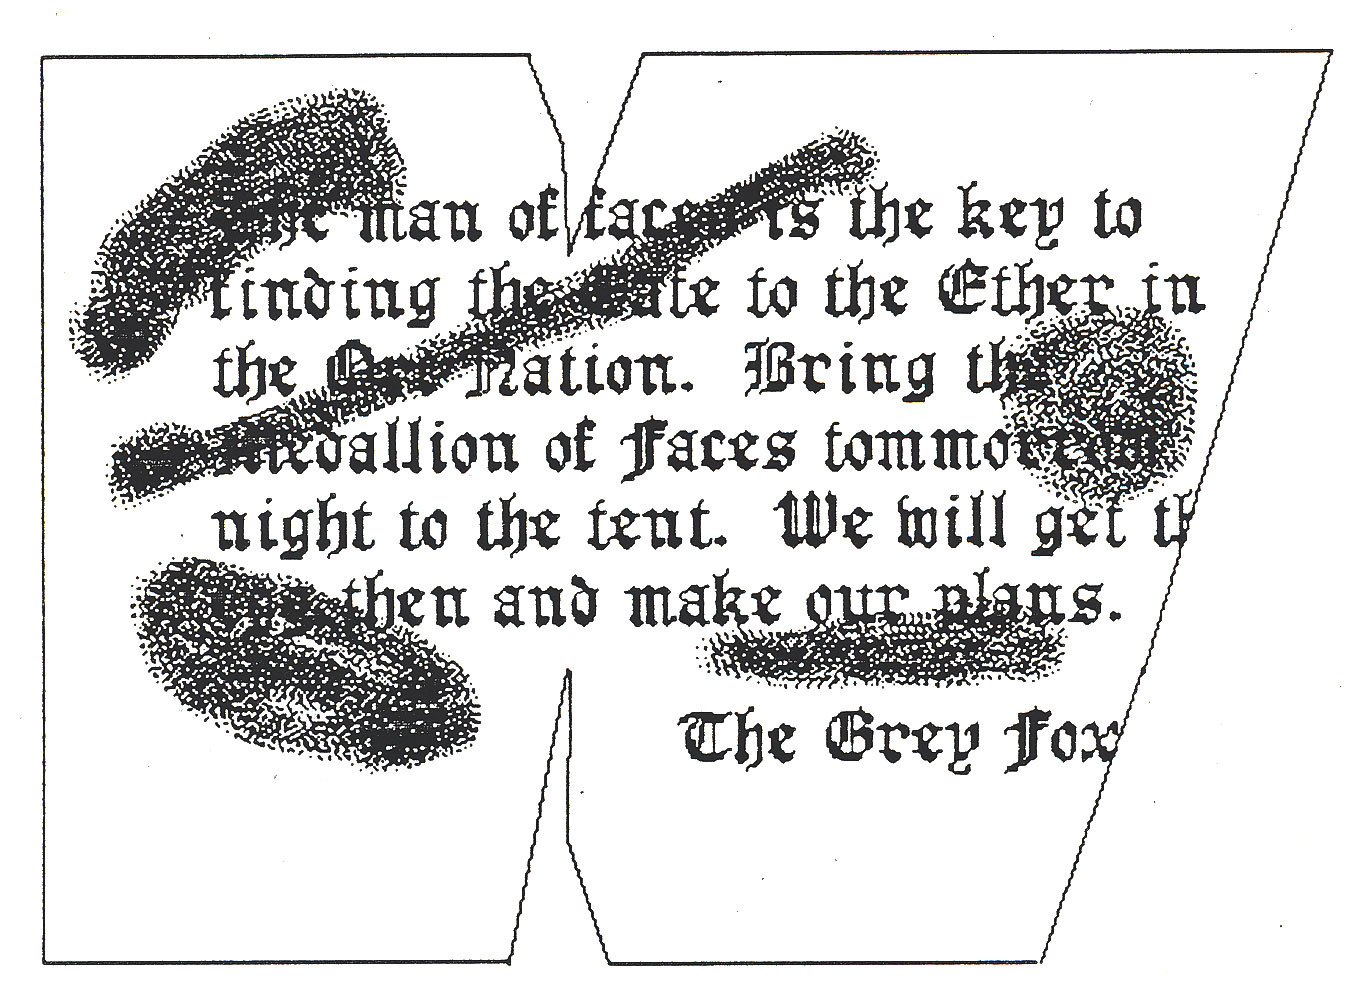
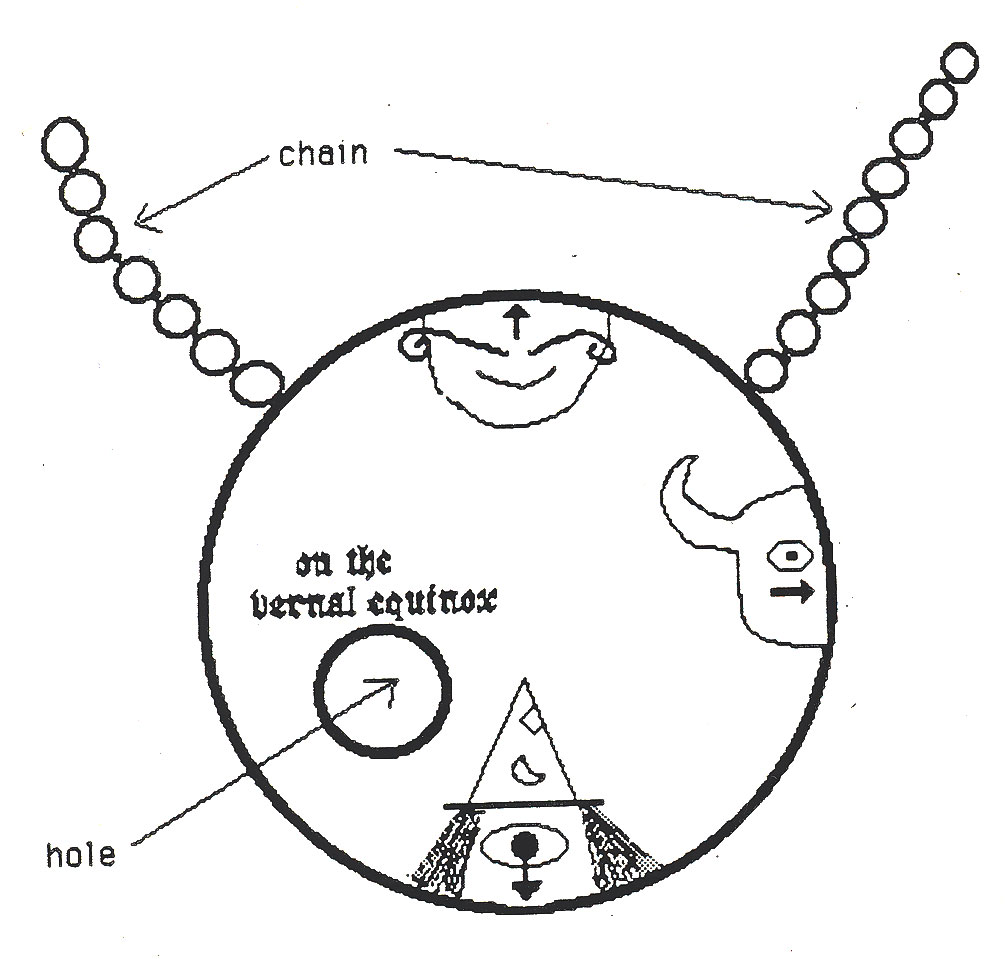
In the morning, you were awakened early by a pounding on your door. When you opened the door, you noticed that a message had been tacked to it. Quickly searching around for the culprit, you could find nobody nearby.* The message reads as follows:
|
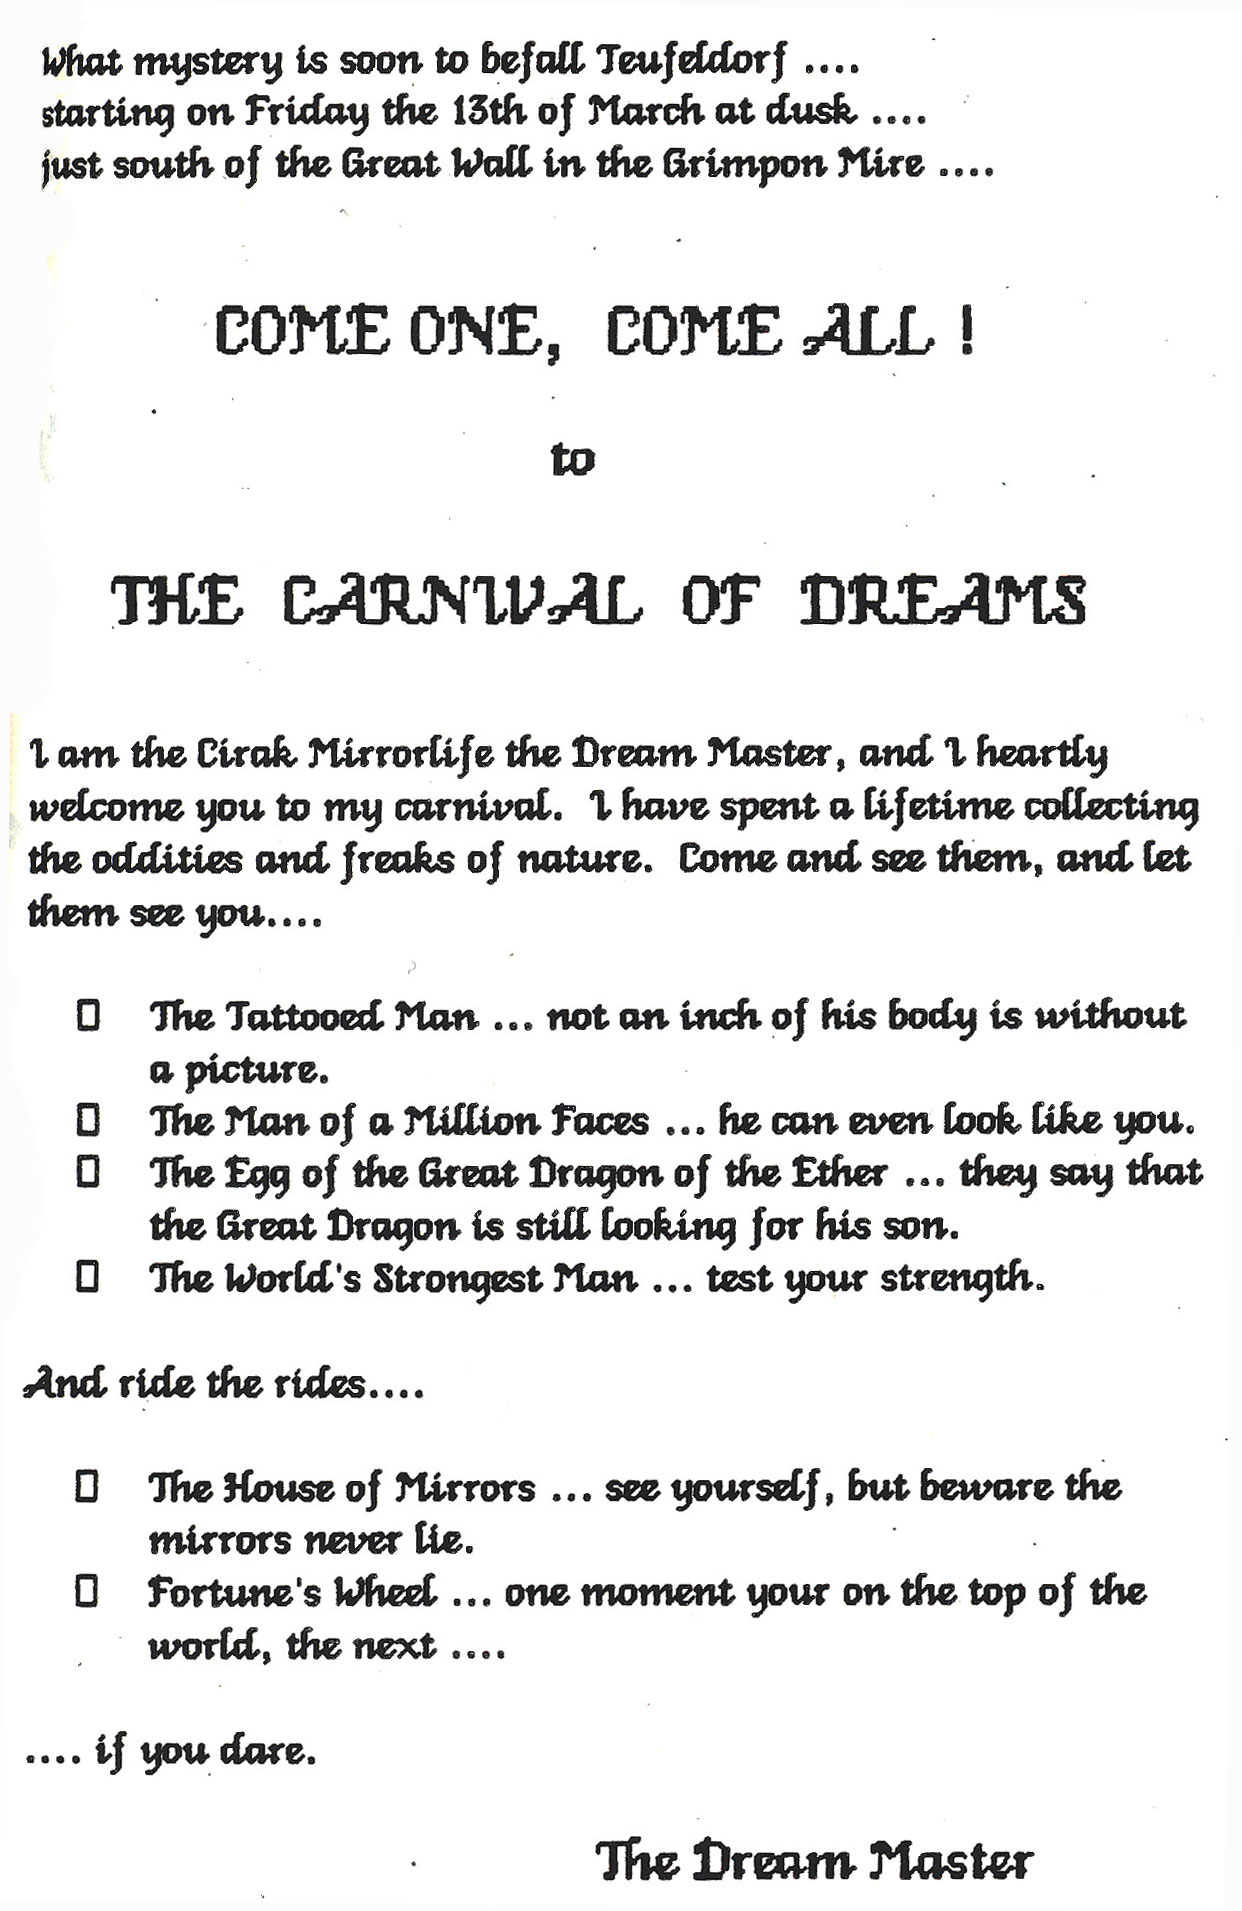
In the afternoon, the streets of Teufeldorf came alive with many young children parading around in bright outlandish clothes. At first, one may have thought the children of Teufeldorf had gone mad, but a closer inspection showed that these small clowns weren't actually children at all. True, they were about the size of young children, but their faces and hands were those of very old people. Gayly laughing, one of them came up to you and handed you a leaflet and winked at you. Before you could question him, the child/man spun off and went jogging down the street.*
In the evening, a strange fog settles on the city, and it is hard to see more than a few feet in front of you. The area of town where the Dragon's Egg is located is known for its unsavory characters and rampant crimes. On a night like this, no sane person would journey in that neighborhood. Undaunted, you set out for the pub. As you near the Dim Fountain, a man staggers towards you and falls. He beckons you over and whispers into your ear: the man of faces... the egg, beware." And he dies. You notice a large knife protruding from his back. Suddenly, you hear the cry of voices, "Murderer, get him!" You can hear the sounds of feet coming towards you. In this part of town, murderers are often punished outside the law. you run onwards to the Dragon's Egg.*
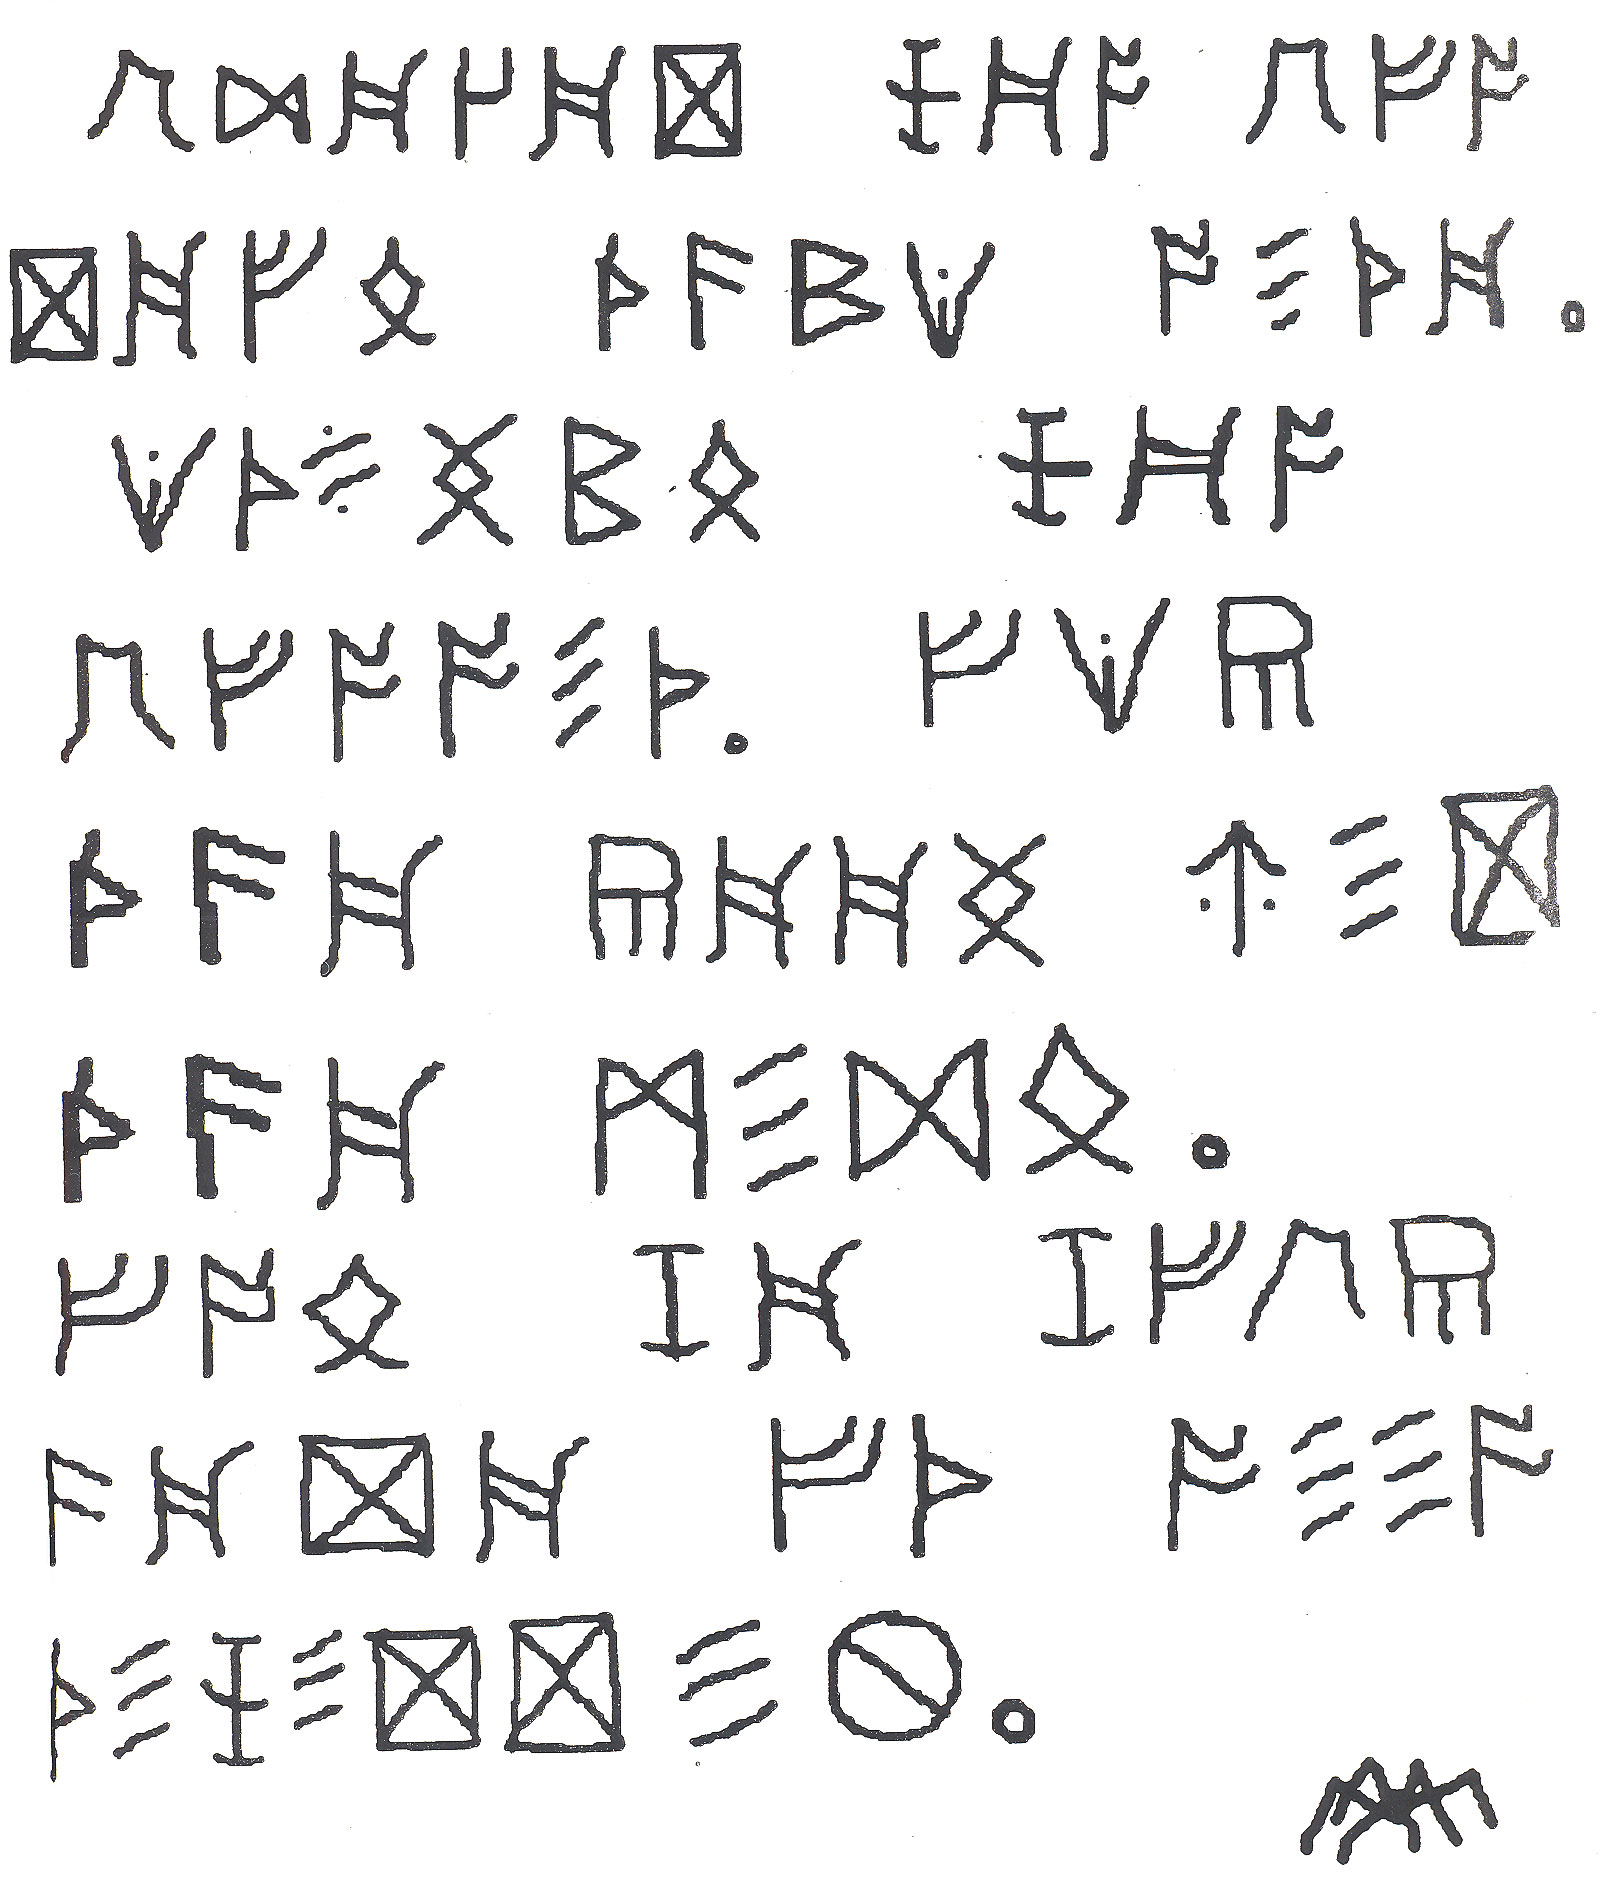
As you arrive at the Dragon's Egg, you notice that the patrons are all crowded around the dart board near the front of the bar. As you move closer, you see that a message has been posted on the board. It is written in a strange tongue. It is about 10 minutes after 10pm.
As you sit in a booth overlooking the crowd, an old man enters the pub and studies the message. He exclaims loudly that what is written is not a foreign language, but it is rather a code. The patrons laugh at the old man, and quiet him with a large drink.
You overhear a conversation in the booth behind you. Four men are planning a trip. One is a large bald man with a scar across his forehead wearing leather armor. The other three are wrapped in black cloaks and hoods, and you cannot see their faces. You can only catch small pieces of their conversations.
- Something about stealing the dragon's egg... the legend
- A mention of the gate within the Orc Nation
- Tomorrow night... the fortune teller
- Treasure beyond all measure
- Murder and the duplicate
What do you do?
Legend: Worldswing the Great Dragon of the Ether
It is said that the Realm of Man is separated from the Realm of Gods and Devils by a substance known as the Ether. The only way one may travel between the different Realms is through this Ether. Since the creation of the world, this Ether has been ruled by the Great Dragon. Being of a neutral alignment, the Great Dragon known as Worldswing has kept the Realms separated, allowed very little travel between them. His control over the Ether supposedly rests on the Artifacts of Ethereal Rulership. Over the centuries, historians have surmised that these items (if they exist) include a crown, a net and a staff. He who possesses these items controls all movement through the Ether. The only other fragment of the legend that you can remember has to do with Worldswing's greatest treasure, his son. However, the Great Dragon's son is yet an egg. Worldswing is said to guard the egg in order to assure that chaos will not reign after his death.
A Guide to The Great Castle of the Ether
To get an idea of how the castle looks, compare your picture and your map. The Great Keep is the large domed tower on the left hand side of your picture, the short tower with a cone-like base in the middle of the picture is the Low Tower, the tall multi-spired tower is the High Spire atop the Square Tower,and the two small turrets on the far right side of the picture are the Gate Towers. If you have not explored the interior of the castle, your map will have a large square labeled the Great Keep. Otherwise, other details will be shown. The black square at the top of your map is the only gate into the Castle (not shown on picture). The entire castle is made of a black shiny substance. The Great Outer Wall is 4 stories (80 feet) in height.
THE OUTER TOWERS: These large round towers are divided into three segments of three levels each. Thus, each tower is nine levels high. Only the top two segments (levels 4-9) have windows. These are much too small for a human to enter. There seems to be some sort of landing on the top of these towers. There are three outer towers.
THE GATE TOWERS: These are more like turrets than towers. They are stuck on the top of the Great Outer Wall on either side of the Gate. They have medium-sized windows which are about of human proportions. The Gate Towers seem to have but one story (level 5) and would most likely lead onto a rampart on top of the Great Outer Wall.
THE GREAT KEEP: The central building of the complex, the Great Keep is entirely within the walls of the castle. It has ten stories. You know only that the top level has small windows. Little can be discerned about the Great Keep.
THE SQUARE TOWER AND HIGH SPIRE: The Square Tower makes up the base for the high spire. All the windows in this complex are small. The Square Tower itself is ten stories (levels 1-10) in height (with windows on levels 4-10). On the tenth story there are four observation turrets of one level each (level 11) and a landing. The High Spire continues on for three more stories (levels 11-13). The highest of these levels has a landing.
THE GREAT TOWER: This tower is segmented similar to the Outer Towers. By looking at the windows, one would conclude that total number of levels in this tower would seem to be five. The three lower levels have no windows. The upper two levels, however, are twice as wide as other towers in the Castle. This tower is also covered by a great dome about two stories in height. The windows in the upper two levels are very large and would easily fit a human. Thus, the lowest three levels are of normal proportions (levels 1-3), the next two are twice as big (levels 4-5 and 6-7), and the dome represents two more potential levels (8-9). Attached to the GREAT TOWER is a smaller tower of three levels. The upper level has the same large windows and a dome. It seems as if this smaller tower is connected only to the Great Tower proper.
THE LOW TOWER: This tower has a total of three levels. The lower two of these are conical in shape and have several small windows. The third level has no windows and a large dome. This tower appears to connect only to the Twin Towers.
THE TWIN TOWERS: These towers are similar in all respects to the Outer Towers except that they are only six stories in height and have windows only on level 5. Also, these towers are domed.
Adventures in the Great Castle of the Ether
Response to having the note tacked to the door: None.
Response to having the leaflet handed to you by the clown: None.
Response to the dead man: Check knife for poison. Take knife. Place into robe.
None found. Taken. Placed in robe. The knife in his back is an ornate throwing knife of foreign make.
Response to the dead man: Search man.
He is wearing a set of chain mail carefully hidden under his cloak. A quick search of his belongings reveals a note written in orcish. It is badly stained with blood.
The only other thing that the man has on his person is a medallion. Searching the body has stained your clothes with blood.
Next Response: Face crowd. Attempt to find killer with Ring of Truth.
A group of persons of a most unsavory nature come upon you. They see the blood on your cloak and immediately start screaming murderer. One man yells, "Call the King's Guards!. Another one yells, "They won't do anything. He is not even a man. Justice is in our hands. Get him." And yet a third person yells, "He must be the Waterfront Murderer! And a foreigner at that!"
As the group charges with clubs raised to kill you, you have time for one spell. Hylax polymorphs into a bird and flies away. Angry cries of kill the wizard" and "Did you see his face?" are heard. The crowd is very frightened by the magic and disperses into their own homes. Several men carry the body to the local gravedigger to be buried. You cannot follow and get to the pub.
Response to the pub scene: Check daggers for similarities.
They are of similar make.
Next Response: Ask the bartender for the gold.
He hands you a bag with 36 gold squares in them. Some squares have letters on one side, some both, and some none. The barkeep turns and walks away without saying anything.
Next Response: Try to overhear the conversation of the hooded party.
The most you can gather from the conversation between the men is that the large man with the scar wants to steal the dragon's egg from the carnival and replace it with a forgery. Their plan to meet at the fortune Teller's tent tomorrow night, steal the egg, and head for the ore nation.
Next Response: Leave pub. Go to carnival as a bird.
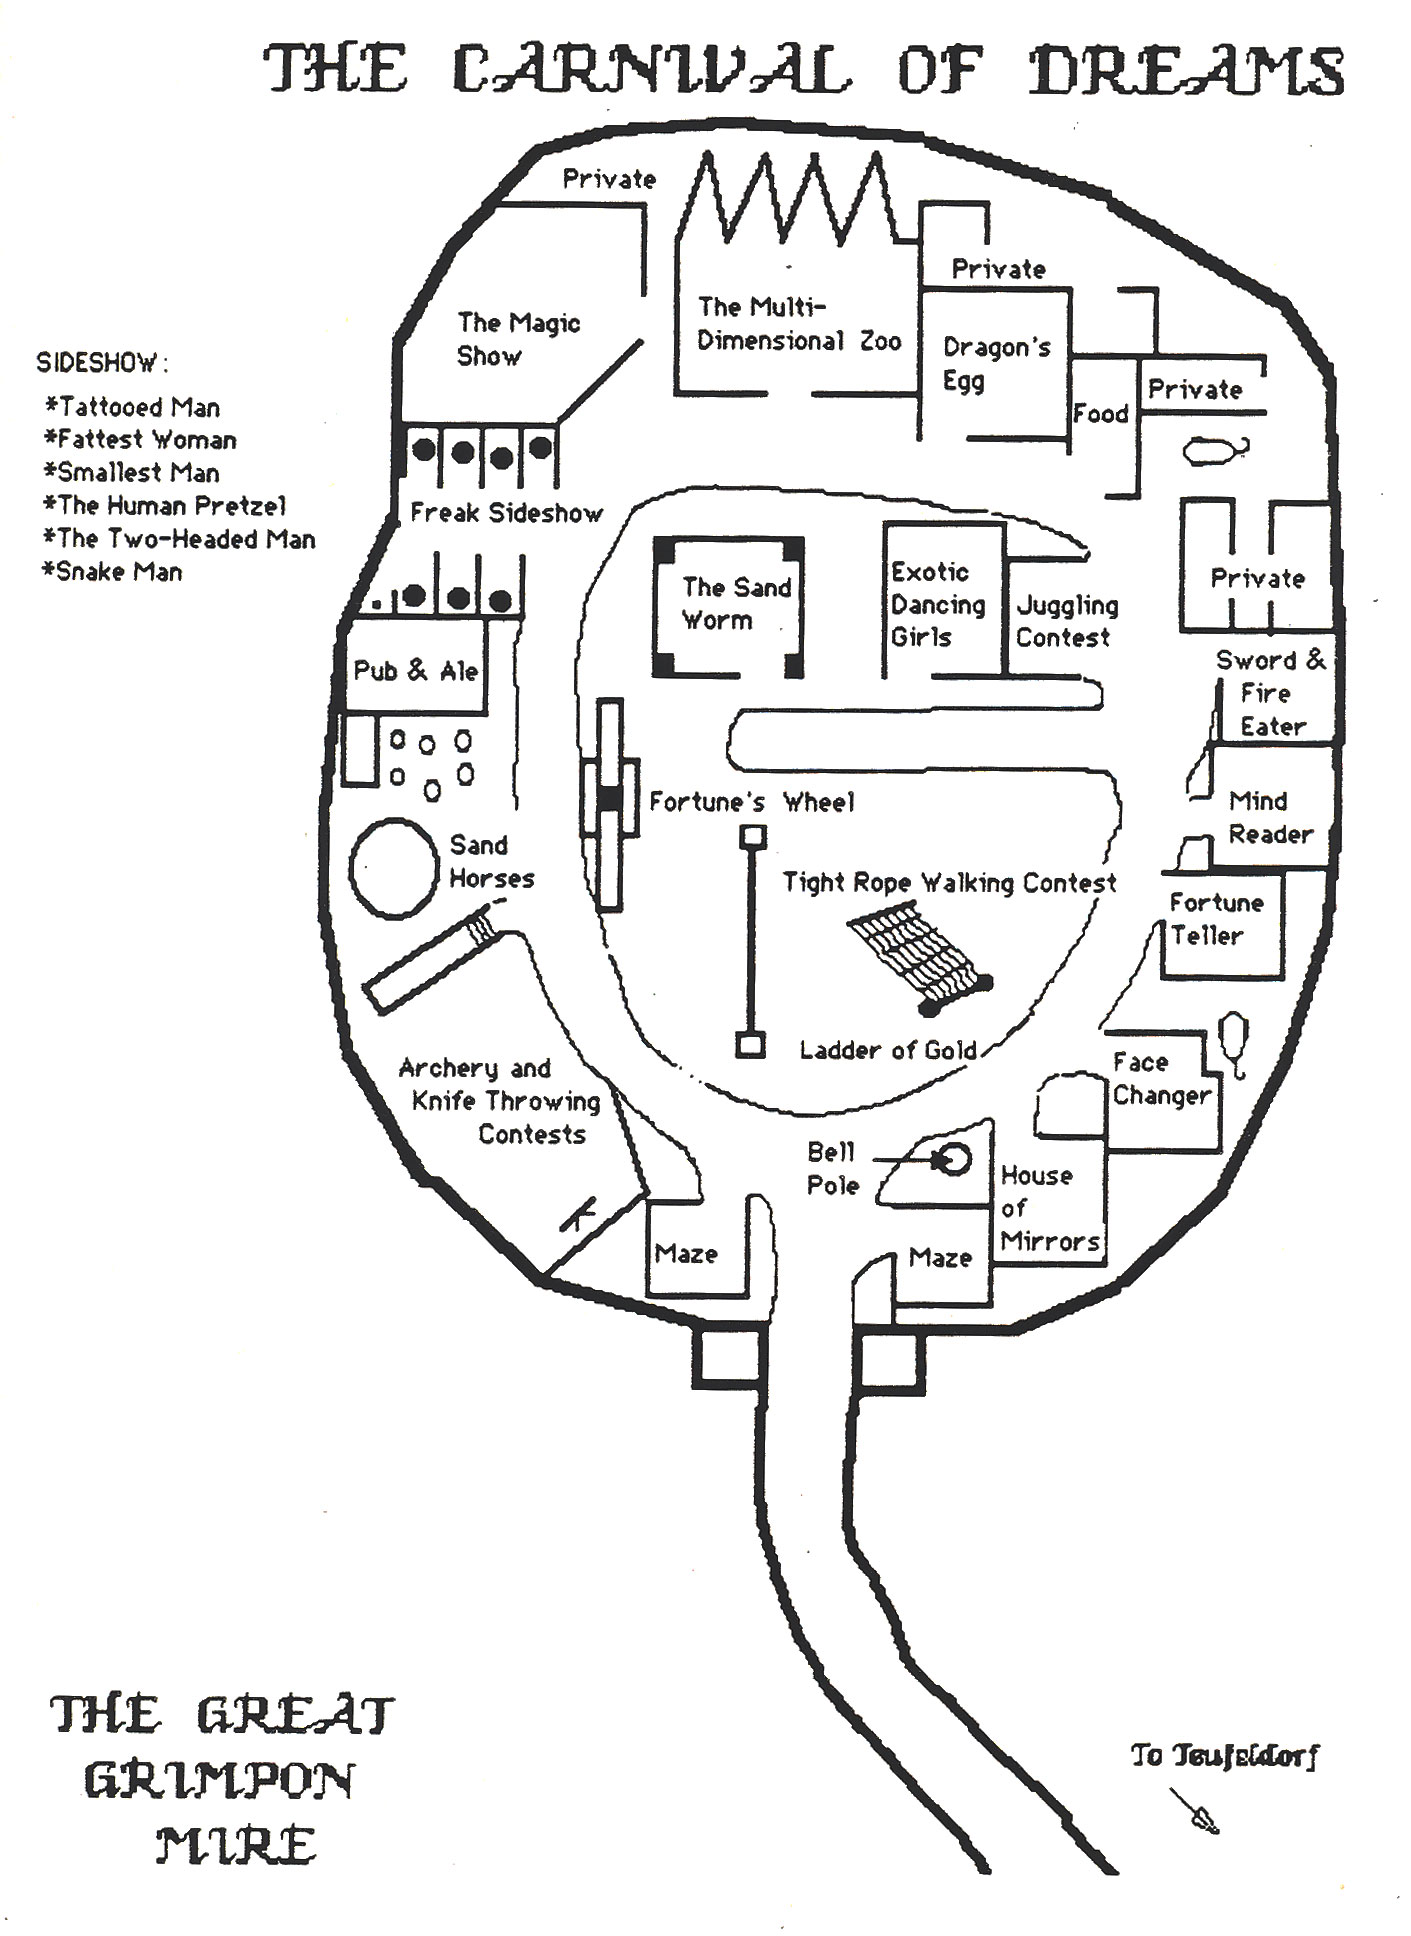
The carnival is closed by the time that you get there and everyone seems to have retired to sleep. You may make a general map of the area.
Next Response: Go to King Gregory to ask about the dagger.
King Gregory knows nothing about the dagger. He suggests that you go to the Trader's Market and see Kevin Knifesblade at the Knives and Wives shop. Kevin is one of the leading experts on knives in the city. King Gregory knows nothing about the mob scene.
Next Response: Go to the Dragon's Egg at noon.
The next day is bright and sunny. There is no hint of the heavy fog that hung over the city the night before. You go to the pub at noon. Upon reaching the pub, you notice that the door is closed and a note is tacked onto the outside. A small group of children (normal ones) are playing around the Dim Fountain. There does not appear to be anyone else around the pub. The note reads:
|
As you approach, the barkeep comes to the door and hands you aprinted on a small scrap of paper. This note reads:
|
The handwriting on each of the notes is the same. The barkeep shuts the door without saying a word to you.
Response to the children around the Dim Fountain: Question them.
Upon a more careful investigation, you realize that the children playing around the Dim Fountain are actually watching something that is going on inside the fountain itself. Floating in the fountain is a miniature replica of a merchant ship. The model is about one foot long. The fountain is about 20 feet in diameter. On the back of the boat is written the name The Lost Horizon. The mainsail of the small ship is adorned with the symbol for infinity written in black. The children seem to be trying to snatch the ship from the water. However just as the ship seems headed directly for one of the groping urchins, it abruptly changes direction and heads towards another part of the fountain.
You ask them about the note and get no response. The children seem intent on catching the elusive ship.
You jingle 10 silver pieces in front of them and get their undivided attention. The largest boy in the group says that the bartender tacked the note onto the wall. He holds out his hand for the money.
You pay him.
Next Response: Go to Knives and Wives.
Kevin Knifeblade is more than happy to help you in strictest confidence for 300 gold pieces. He looks at the knife very carefully. He tells you that it is of southern make. A knife like this is very common in Sandal and the Southern Reaches of the Sands of Time. The knife, he continues, is very well balanced. He says that he knows of no one in Teufeldorf who makes such weapons.
Next Response: Check out the carnival.
The carnival is in full swing when you get there. You pay the 3 silver piece admission, and you are almost immediately swamped in the crowd. People shove you and push you. You continue without incident to the knife throwing contest. You notice that the knives that the carnival champion uses match the one that you have.
Next Response: Investigate the Lost Horizon.
You find out from King Gregory (who is becoming annoyed at your constant pestering) that the Lost Horizon is indeed a ship. It arrived in port several days ago carrying the carnival people and supplies. A special request was made of the king by the DreamMaster to unload the dangerous animals. King Gregory does not know where the ship has sailed from.
Response to the ship in the Dim Fountain: Throw detect magic.
Casting a spell sends the children into screaming panic, and they an run way from the area. Several of the bigger children watch you from a goodly distance. You detect a magical aura. Do you wish to cast Fetch?
Response: Return to carnival. Look for the infinity symbol around the grounds. Check out the tattooed man. Check out the Dragon's Egg.
You rush back to the carnival and pay the 3 sp to enter. A quick but careful search reveals no sign of the infinity symbol anywhere.
To see the tattooed man, you must pay 3 cp. The tattooed man is in a medium-sized tent. He is a very large man with no hair. He is standing on the top of a pedestal, and people are slowly circling about him. His body is covered with thousands of small faces. By rippling his muscles, he is able to make the faces do different things such as wink and smile. The face are similar to those on the medallion.
Next you visit the Dragon's Egg. It is in a very small tent. There are many guards around the tent. People are paying 10 cp to see the egg. Only 4 people at a time are allowed to enter the tent. Upon entering, you see that the egg is very large. It is almost round. It is goldish in color, and it seems to shimmer. as if it is about to disappear. There are 4 guards inside the tent who keep you from touching or getting too close to the egg. Inside the tent, it is very dark.
Next Response: Go to harbor. Find The Lost Horizon.
The harbor is dark and gloomy by the time that you arrive. You find a willing peon and pay him 1 sp to show you the location of the ship. It is easy to find. The ship is a large galley. There are many guards around the gangway. There are no flags or sails flying at this time.
Next Response: Polymorph into bird. Return to Fortune Teller's tent.
By the time that you fly back to the carnival, it is closed. There are many of the carnival people helping clean up. You fly into the Fortune Teller's tent to find that it is empty. However, in the corner you see a large round bundle (of familiar proportions). Using your beak, you manege to tear away a small piece of the cloth. Inside is a shimmering gold surface similar to the one you saw earlier.
Response to the ship in the Dim Fountain: none.
Next Response: Go to harbor. Find The Lost Horizon. Talk to guards.
The harbor is dark and gloomy by the time that you arrive. You find the ship. There are many guards around the gangway. There are no flags or sails flying at this time. You approach the guards and say, "Hey dudes, this is where the gold told me to go!" One responds, "Get lost, kid." He is telling the truth. Their disposition improves when you give the lot of them 5 gold pieces. "The meeting, sir, is not tonight, but if you return on the morrow, your questions may be answered." He is still telling the truth. "And who is the Master of this ship?" you ask. "Cirak Mirrorlife, of course." The truth again. You leave.
Response to the Fortune Teller's Tent: Unpolymorph. Check for guards. Cast detect magic. Grab egg. Polymorph. Fly to house.
Done. None. Some. Done. Done. Home.
First Response: Eat breakfast.
Yum. It was good. You are very full. Scrambled Dragon's Egg is very filling. The stolen egg is hidden carefully in your room. It seems real.
Next Response: Buy scroll.
As all good magic-users know, and Instant Summons spell works only on non-living objects up to 8 pounds. I assume that you do not need this spell. However, the magic shop in town is more than happy to sell you a Forget spell for three times its value. You pay 900 gold pieces for the piece of parchment.
Next Response: Polymorph into Falstaff T. Druid and go to Thieve's Guild to hire a thief.
A guild mistress, Johnna Darkblade, agrees to send a thief to the Bloody Ram Pub and Grill at noon. She takes your 100 gold pieces and tells you that a thief known as Sly will meet you there. She describes Sly as a thin man with a long cut over his left eye. She also sells you a sleeping potion for 100 gold pieces. The vial contains one charge.
Next Response: Get wax copy of Amulet made. Meet with Sly.
The copy of the Amulet will take 3 dags to complete and require that you leave it overnight at the jeweler. You decide not to make a copy. Thieves have their own code of honor. Sly agrees to your plan except no spells will be cast on him. The job is child's play, but he will have nothing to do with wizardry. He agrees to meet you at the Harbor Haven Inn.
Next Response: Unpolymorph . Go to pub. Meet with Sly again. Get amulet and directions.
You go to the Harbor Haven Inn to meet S1y. He arrives and not noticing you waits at a nearby table. He does not seem to be followed. You go over to him and introduce yourself. He does not believe who you are and will not give up the information. Finally, you are forced to go outside, polymorph back into a famous Druid and return. The thief seems skeptical, but he gives you back the amulet and a piece of paper. On it is written the following message:
|
The thief tells you that the circle enclosed part of a poem written on the man's chest. Your basic knowledge of topography places the Fetid Swamp in the middle of the Ore Nation. The thief takes the 200 gold pieces and vows silence. Forget ???????
Next Response: Go to Lost Horizon for meeting.
The evening proves to be as foggy and damp as the night before. You are not able to see very far into the night. As you near the ship, you see a man dressed in a brown cloak talking to the guards near the gangway. You can tell by their conversation that the cloaked man is their leader. As you cautiously approach, the cloaked man turns and sees you. You see a leather bound book in his right hand. He calls out, "HYLAX T. BARKER. I should have known that you 'would figure it out." As he approaches you, you see a shadow move in the gloom nearby. Before you can react, a blaze of blue light flashes out and the man's cloak and book drop to the ground. Nothing can seen of the man who once occupied it. The guards near the gangway (thinking that you might have done this) come charging towards you. But before they get near you, a ball of red fire blazes from the gloom-hidden robed figure and kills the men. The man quickly turns towards you.
The robed man is about 30 feet away. The remains of the captain are about 20 feet away. The crew and the gangway are about 30 feet away. There are many crates and boxes behind which you or the robed man may hide.
First Action: Melee.
Hylax casts an anti-magic shell. The cloaked figure casts a fireball - which fails - and flees - limping. Hylax chases him for a few rounds, but his disappears.
Second Action: Look at book. Return book and robe to first mate. Ask about meeting.
The book is a leather-bound tome entitled "Travel Log". It lists the ports of entry, the dates, and the cargoes picked up and delivered for a ship. It seems to date back roughly one year. You are rather hurried, and you do not get a good chance to look at it. The first mate takes the book and robe. The first mate tells you, "Due to the untimely death of the captain, I'm afraid that our plans have fallen through. We are sorry that we wasted your time. But your services are no longer needed. Good bye Mr. Barker.
First Action: Introduce yourself to the men. Question the first mate discretely.
You talk to the first mate for a short time. He does not lie to you about anything. You learn the following information from him. The first mate's name is Drego of the Watchful Eye. He has worked on the Lost Horizon for five years. He does not know who the killer is. The captain was a man known in many ports around the world. He was known as the Sea Dog. His private life was very mysterious. He proved himself to be a clever sailor and an excellent leader. Your name was known when the note was tacked onto your door. With most of the crew killed and the captain lost, the quest seems hopeless. Only the captain knew the plan to get the egg. Without the egg, there is no need to continue. To continue the quest a crew would have to be hired, the ship restocked, and a few minor repairs made. Someone will have to come up with the money. The crew ts very poor. Nobody else solved the puzzle (as far as they know).
Second Action: Read the travel log.
The first mate is reluctant to let you see the book. He said that if you would like to swear to the quest (and to the cost), then you will get to study the book as closely as possible.
Third Action: Return Home. Sleep. Eat Breakfast. Go to mapmaker. Get map to the Fetid Swamp.
You return home without incident. You sleep well. Your breakfast is good. You go to several mapmakers before finding a nice 10 gold piece map to the Fetid Swamp.
Fourth Action: Ask the Collegium Magicium about a limping magic-user.
Nobody knows anything a limping magician. The person must be a free-lancer (or perhaps he is not a magic-user).
First Action: Send Drego to hire crew, provision ship, and repair ship.
Drego is able to do all of the things that you want him to do with exactly as much money as you gave him. Drego does not know anything about what happened to the captain's body. He is telling the truth. He says that he thinks that Baliol may have taken him to the haunted depths. You rather doubt this. Drego still knows very little about the captain's past. Sorry. The Lost Horizon is equipped and ready to sail the next day.
Second Action: Get the travel log from Drego. Study it.
Drego gives you the travel log. It tells you that the Lost Horizon has come up the coast from Sandal. Its last Master was Cirak Mirrorlife the Dream Master. He used the ship to take supplies up the coast from Sandal. The ship made a stop at Thunder and lightning Point to pick up a large package from the pirates. The package was said to contain the dragon's egg. The pick-up was made in secret by the pirates, Cirak, and the captain. After unloading the supplies for the carnival, the crew was told that Cirak would be taking the carnival by land. The crew was still officially under Cirak's hire. Cirak was not trusted or respected as a sea leader.
Third Action: Test egg with True Seeing.
The egg is a genuine dragon's egg. However, the displacement effects have been added. Also, the true color of the egg is green. You conclude that this egg is fake.
Fourth Action: Make insulated crate for egg. Store on ship.
Done. Done.
Fifth Action: Meet followers. In the process of hiring the crew, you meet four rather strange figures volunteering help. They know nothing about sailing (the dwarf doesn't even know how to swim), but they are willing to work for free. You find that they are very loyal type people.
Final Action: Question crew.
The crew very grudgingly allows you to question them. Several of the men want to quit already. They say that they don't want to work for somebody who doesn't trust them, but they agree that answering a few questions is infinitely easier than the Nuclear Option. One man says that he ain't goin' to work for no runty kid that dresses funny (he means your hat). All things said and done, the crew doesn't think too highly of you (low morale in the face of danger). As you are ready to get underway, Drego points out that you questioned only 49 of the men. One man is missing. He might have either missed the boat (too drunk from the night before) or he might be a stowaway. It would be very difficult to find a man who know the ship hidden somewhere in it.
Finally, Drego brings something to your attention. There has been a giant sea dragon of sorts terrorizing boats outside of the Teufeldorf Harbor. The thing is said to breathe fire and acid. Also, he forgot to buy medicine in Teufeldorf.
Final Action: Send Drego and Humphery to get some medicine for the journey.
Drego and Humphery go into Teufeldorf and buy bandages, gauze, sea sickness pills, etc. They manage to spend 29 gold pieces. Drego also manages to find a sailor to replace the missing one. This costs you an additional 40 gold pieces. You question him, and he seems okay. It takes Drego several hours to do all of this.
Second Action: Give crew speech. Offer week's wages for any man who can tell you about the sea monster. Send men to their rooms.
The crew seems pretty uninspired by your speech. You hear a familiar voice say, I ain't goin' to lissen to any skinny runt kid ten me about sailin'." One sail or leaves. After you offer a weeks wages to the crew, you get 45 different accounts of the sea monster. You now owe the 45 crewmen seven gold pieces each. You pay them (315 gold pieces). You do learn some valuable information from them. The only two common denominators in all of their stories is that the monster only attacks at night and always in the fog. (Fog is very common along the coast.) The crew gladly goes to the common room (bunkhouse and mess hall) to count their recent pay. The crew thinks that you may have several screws loose, but they seem to like you a bit more.
Third Action: Conjure bloodhounds. Cast Detect Hagic. Search for stowaway.
Melanie conjures several nice bloodhounds to find the stowaway. You search the ship's holds and stores. You notice several large crates towards the front of the hold which bear foreign markings on them. Drego says that they are used for ballast during a storm. The fake egg is safe in its box.
Hylax casts Detect Magic. There are several small sources of magic on board. Several of the men seem to have magical daggers. One of the weaponeers has a magical long sword. Other than that you detect the magical sailing charms, and a magical wine flask. There are no sources of major magic aboard. The hounds meanwhile do not turn up any stowaways living in the holds, with the other men, in the staterooms, or on deck. The ship seems to be free of aliens.
Final Action: Unfurl sail. Sail away.
When you unfurl the blue and silver pennant of Hylax, you hear someone say, "1 ain't goin' to sail under the flag of no gopher. I don't care what the little kid says. As is typical of Teufeldorfian evenings, it is foggy and damp when the sun finally sets. You decide not to drop the sails and set anchor. The men have expressed an interest in getting way from the monster-ridden port as soon as possible. You are about 3 miles south of the port. It is about midnight. And suddenly, from out of nowhere, two large icebergs appear in front of you. There appears to be sufficient room for your ship to maneuver between them. However, you have never heard of icebergs this far south at this time of year. To circumnavigate both would require a quick turn. You notice that a red lamp is glowing from the crow's nest. To the best of your limited knowledge, this is a very unusual practice. What are your orders admiral?
First Action: Turn ship hard to port.
You immediately order the ship to be turned away from the icebergs. As the ship veers off away from the encounter, you can see that the icebergs are really part of an elaborate ship. The icebergs themselves are actually giant floating wooden structures. Their fronts are disguised as to look like icebergs to oncoming ships. However, just below the waterline the icebergs are connected by a metal bar. Any ship trying to pass between the icebergs would crash into the bar and sink. The rear section of the iceberg ship has decks on which you can see men standing. The decks are positioned so that if a ship were to crash into the bar, the men would be able to swing and/or climb down onto the sinking ship. Below the decks are large pools full of (you guessed it) dry ice. The dry ice is causing the incredible fog bank that hides the ship. The ship has no means of propulsion itself being rather squarish and bulky. Ho¥ever, you see a small transport barge floating nearby. You can guess that the barge pulls the icebergs from place to place. From your position, it looks as if you can easily outdistance both the icebergs and the barge.
Second Action: Cast Darkness on the crow's nest.
Casting the spell causes the red lamp to disappear from sight.
Third Action: Send Ichabod Nimblefingers to the crow's nest.
Ichabod climbs into the Darkness spell and disappears from sight. This is a fairly risky procedure given that Ichabod is not very familiar with the crow's nest. However, he is fairly careful and manages to bring down the red lantern from the nest. When he is down, Ichabod reports that there was nobody (that he could see or feel) in the crow's nest. The guard that was supposed to be there was missing. You notice that the red signal was simply a regular ship's lantern with a red warning cover (a red glass cup) placed over the top. Any of the crew would have access to these covers (they are stored with the general supplies).
Final Action: Continue sailing.
You continue sailing that night and the rest of the next day. There is a good stiff breeze, and you make it out of the Port of Teufeldorf. By dusk you have covered a good 50 miles. You are heading south.
At dusk, the seaman in the crow's nest reports that a small warship is approaching from the south. It is flying the flag of Sandal. It moves much faster than your ship. When it reaches a distance just outside of cannon fire, the other ship drops anchor. A small dinghy is launched from the other vessel and approaches your ship flying a flag of truce. The ship pulls up within shouting distance.
"Admiral Hylax," a young woman on the dinghy shouts. "We have somebody aboard that wishes to speak to you. He wishes that his identity remain secret. Your safety is insured. Will you come with us?"
The dinghy contains four crewman. There is space for only five on board. The crew from Sandal insist that you should come alone. They are willing to leave one of their own behind as insurance that nothing bad will happen.
First Action: Question four men.
The four men will not come aboard your vessel, but they agree to talk to you from afar. You ask them if their master has honorable intentions. "Of course, sir, the most honorable," they reply. They believe that you wi11 be safe, although their master did not tell them anything about why he wanted to see you. You ask them how they knew who you are. They tell you that their master told them. They tell you that they do not know how the master knew who you were. They have never heard of you before. All-in-all, you have not gained much information. The men seem to know nothing more than what they told you at first.
A brief aside about "cannons." Your ship is armed with 2 cannons. These are more like modern conceptions of a catapult. They contain no gun powder (very very few people in my world know about that) and no explosives. They differ from a catapult in that they cannot throw anything except specially made "cannon balls." Their design requires an exact weight and geometry for projectiles. So sorry, dude, no guns in my world. Anyway, guns kill people and are much too dangerous for you.
Final Action: Go with men to other ship. Meet captain.
You are escorted over to the other ship. As soon as you land, you are wisked away to the captain's quarters. Before you go in, however, you notice that the ship is full of nasty fighter-types. Furthermore, the ship has at least 10 cannons which look vastly more advanced than yours.
You are shown into the captain's study. It is an ornate-paneled room lined with bookshelves. The shelves contain many maps, antique weaponsand other artifacts collected over the years. There, you meet two men. One is a middle-aged fighter. By his dress, you can tell that he is the captain of the vessel. He motions for you to sit down. You notice that he carries a long sword of very fine make in the scabbard by his side. The other man in the room is dressed in a wizard's robe similar to yours. He is a very tall very lanky man in his middle years. As the captain speaks to you, he carefully studies you. He particularly scrutinizes your staff.
The captain offers you all a drink. As you are undoubtedly doubtful, he assures you that nothing is wrong with his brandy (he is lying). The robed man speaks for the first time. He has a low and melodic voice. "Captain, your playful tricks will not work on Wizard Hylax. He wears the Ring of Truth. I suggest that you treat him with more respect."
"Very well, Admiral Hylax, you have something I want and I have something that you want. The Dark Lord knows that you have stolen the Dragon's Egg from the carnival in Teufeldorf. As a result, I have risked my ship and its men to come and get it from you. I have little that I can offer you except the lives of your crew and friends. My friend here says that you are much too powerful to attack directly. He also says that you are an intelligent man who will listen to reason. When the dinghy docked next to your ship, a small device was planted on the hull. On my command, the device will detonate, and your ship and friends will go up in fire and smoke. (He is telling the truth.)
"The point is, Wizard Hylax," the magician says, "the egg was not yours to take. It is lucky for you that Cirak did not catch you. We are reasonable men. We do not want to kill you. Here is our plan. You will remain on board while a crewman (polymorphed in your guise) returns to your ship and gets the egg. Once we have the egg in our hands, will give you a rowboat in order to assure a safe return to your ship. To make sure that you do not throw any unwise spells , I will cast a Sphere of Force around your dinghy. This will give us ample time to outdistance your ship. Do you agree to this plan?"
First Action: Talk. Talk. Talk.
You laugh. You ask the wizard to explain to the captain that you are unable to lie while wearing the Ring of Truth. The wizard is unsure about this. However, he does convince the captain that because you are a wizard (of some renown) that your words should not be taken too lightly. Both the captain and the 'wizard are surprised when you tell them that the egg is a fake. The wizard believes you and the captain does not. They begin another argument between themselves. The captain says that you should be killed, and that your boat should be raided. The wizard laughs and says that the captain wouldn't even get his sword drawn before he was turned into a frog. The wizard explains to you that the Dark Lord is (he looks around at this point and lowers his voice) at many times like the captain. He does not care about doing things in the wisest manner. The magician explains that if the egg is a fake, then you would not be adverse to handing it over . Your ship would then be free to go on its way. On this, he gives you his wizard's honor. You agree on this.
You and the wizard (whose name is Dronsmean) go off in the rowboat. When you are completely alone and far from the two ships the other magician confides in you. "The Dark Lord is a fool. He fights a war with the King of Teufeldorf while ignoring the real problem at hand. There is a new menace in the Realm. Something greater than Teufeldorf and Sandal. My knowledge of it is scant, but I think that Drebb the Wise may call a Wizard's Council soon. I feel we will be talking again at that meeting." When you reach your ship, you go off to bring the egg to Dronsmean. Meanwhile, he removes the "bomb" from under your ship. Taking the egg, he bids your farewell and good luck.
Final Action: Meet with the green dragon.
You sail on for several more days without incident. The men seem happy and content. There is a good breeze. However, on the night before you are to reach Thunder and Lightning Point something strange happens. You are down below telling your followers about your mighty adventures, "The mighty gnome once journeyed ....", when you hear many screams from up on deck. There is a loud shuffling, some more screams (followed by several splashes into the ocean), and then silence. Rushing onto deck, you see that a large green dragon has attacked your ship. While you are not sure of what has happened, you guess that the dragon took an initial pass that scared off the lower level crew (the splashes). Then on his second run (?), he breathed a cloud of poisonous vapors. This might explain why several crew members are lying on the deck. But don't worry about them, the dragon is coming in for a new attack. You and your followers (if you want them there) are on deck. The dragon is two rounds from clipping off your main sail. You hear a crewman from behind you yell, "What's the runt going to do now?"
{DM's NOTE: As far as you know, Drebb is just a legend. He was supposedly the wizard in charge of the First Wizard's Council several hundred years ago. He is rumored to be the most powerful wizard that has ever lived. The first (and only) Wizard's Council was held in an attempt to bring unity to research and magical power. It was unsuccessful for the most part. It took place long before your small gnomish feet knee what was going on.}
First Action: Cast several Moon Runes on Green Dragon.
Hy1ax casts a Moon Rune on the incoming dragon. The dragon misses his save and turns into a large chunk of blue cheese. The cheese barely misses the ship and skips along the water several times before being devoured by hungry blue gills (mice don't like water). The runt, however, passes out. He is carried below by a sailor who keeps saying, "Boy this little guy is heavy for a runt." The remainder of the crew is picked up. You are now 9 more men short. The captain is worried about being able to maneuver the ship in combat. The ship continues on to Thunder and Lightning Point.
Final Action: Disembark and search area.
You arrive at Thunder and Lightning Point in the early morning. The five adventurers disembark in a small craft to go to shore. From your lesson in geography, you know that there are hundreds of caves nearby. It would take about 5 months to search the area carefully. What exactly are you looking for?
First Action: Teleport back to Teufeldorf. Buy Arrow of Direction.
You cast a Teleport spell and blink back into what is left of the Fretful Porpentine. The place has taken substantial damage due to a fire in the Inn next door. The porpentine itself is loose in the city causing nearby residents to fret . The bartender is there trying to pick things up. He agrees to loan you the money to help buy the Arrow. You wonder at how a bartender has that much money. You go to a nearby magic shop. They have one Arrow of Direction that they are willing to part with for 17,500 gold pieces. You think that this is a fair trade. You buy it and teleport back to the beach. You make it.
Second Action: Throw Arrow of Direction. Go to gate.
You throw the Arrow of Direction into the air and ask it to point towards the nearest entrance into the ether. It points towards the north end of the beach. You walk down to the beach for about 10 minutes and toss the arrow again. This time the direction is towards the NW. Then N. Then NE. Then NE. Then N. By being a clever adventurer and triangulating, you have found that the entrance that you are looking for is not on the beach at all. The entrance lies on top of the cliff above. The cliff is much too steep to climb. Cast Levitate and get to the top of cliff.
Final Action: Check out gate.
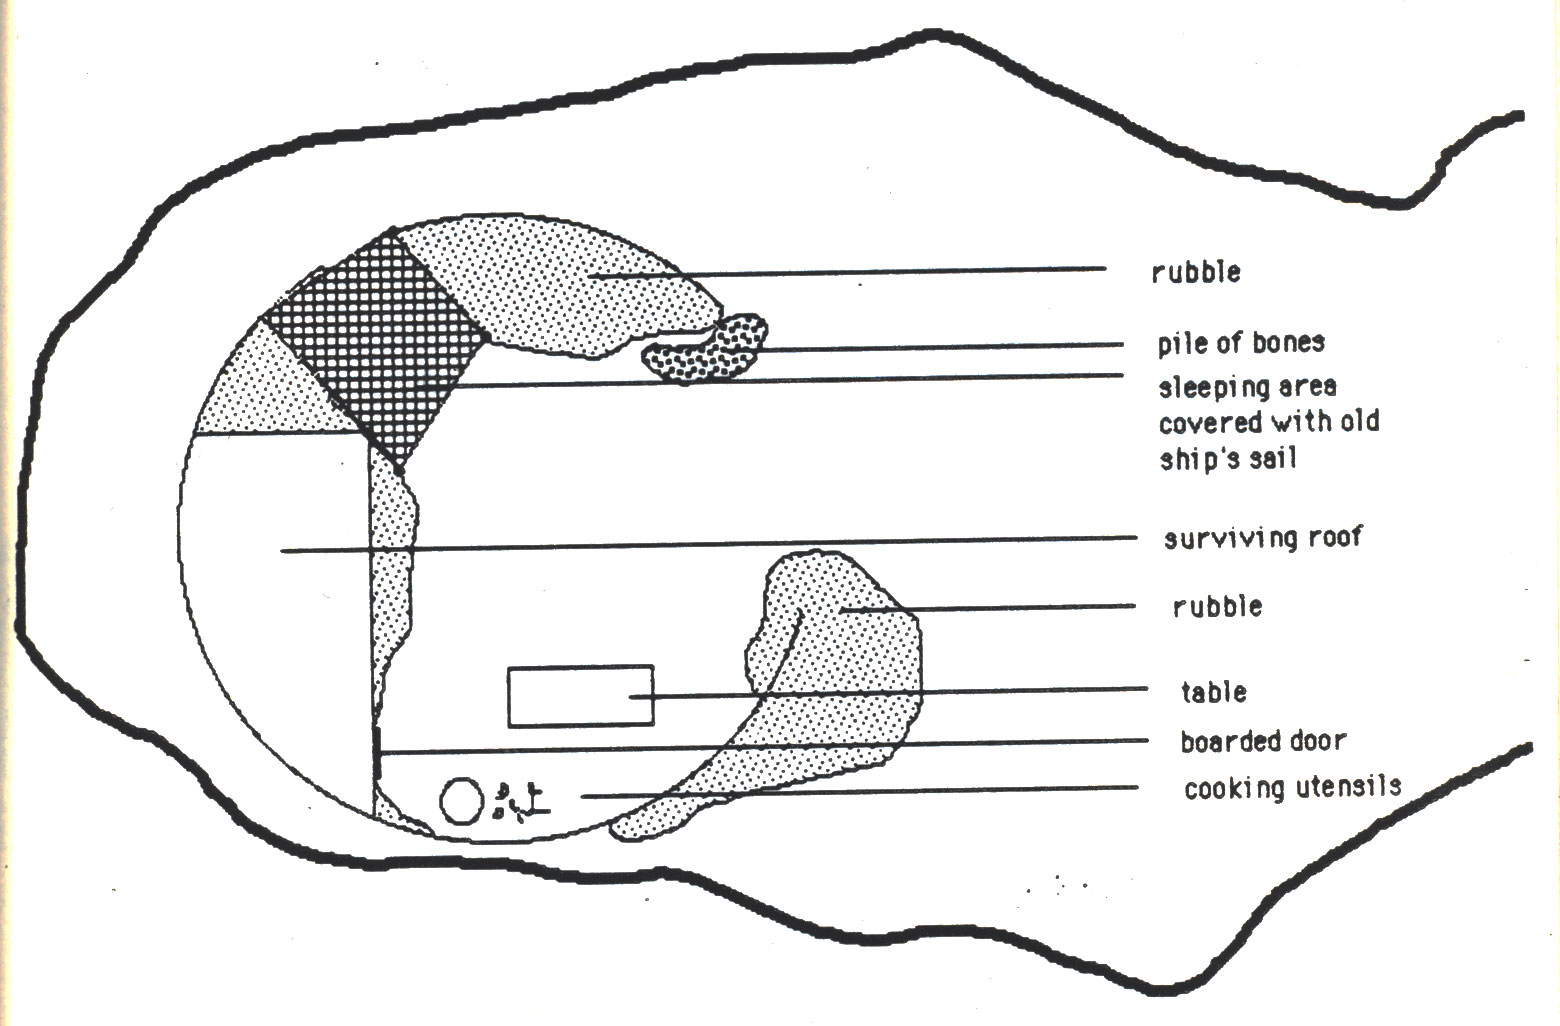
You get to the top of the cliff and see the remains of an old deserted lighthouse. Tossing the arrow for a seventh time, you are assured that the lighthouse is the way to go. The lighthouse is out on the rocky point of the cliff approachable from only one direction. It has a completely caved-in roof and the windows are boarded up. The place looks like it has been deserted for several years. However, you see that there are a pile of bones (recently gnawed on) stacked near the door of the lighthouse.
First Action: Send Humphery the Hack to scout out situation.
Humphery the Hack happily goes to investigate the lighthouse. He easily climbs the outer wall. Inside he sees the situation below. The two trolls seem to have made a make-shift home inside using stone tools and implements. Some are of early Bronze Age manufacture.... It is obvious that the door lies in the uncollapsed section of the lighthouse. It seems that the trolls go for a food run each night just before nightfall. It is then that your party plans to go into the lighthouse.
Second Action: Wait until dark. Go to lighthouse.
While your party is waiting for the trolls to go on their food run, you use the time to investigate the woods nearby. It is about 30 minutes before sunset when a smell green figure {of roughly boy-sized shape) darts into your party. He moves quickly out of and back into the forest before any action can be taken. As he leaves, you notice a faint din of Irish music and hear, "And a good day to you, Mr. O'Runt." You quickly search your belongings.
About this time, you notice that the trolls are leaving the lighthouse. You hurriedly go into the lighthouse and pry open the boarded door. Behind it is a small room. In the small room, you see another door.
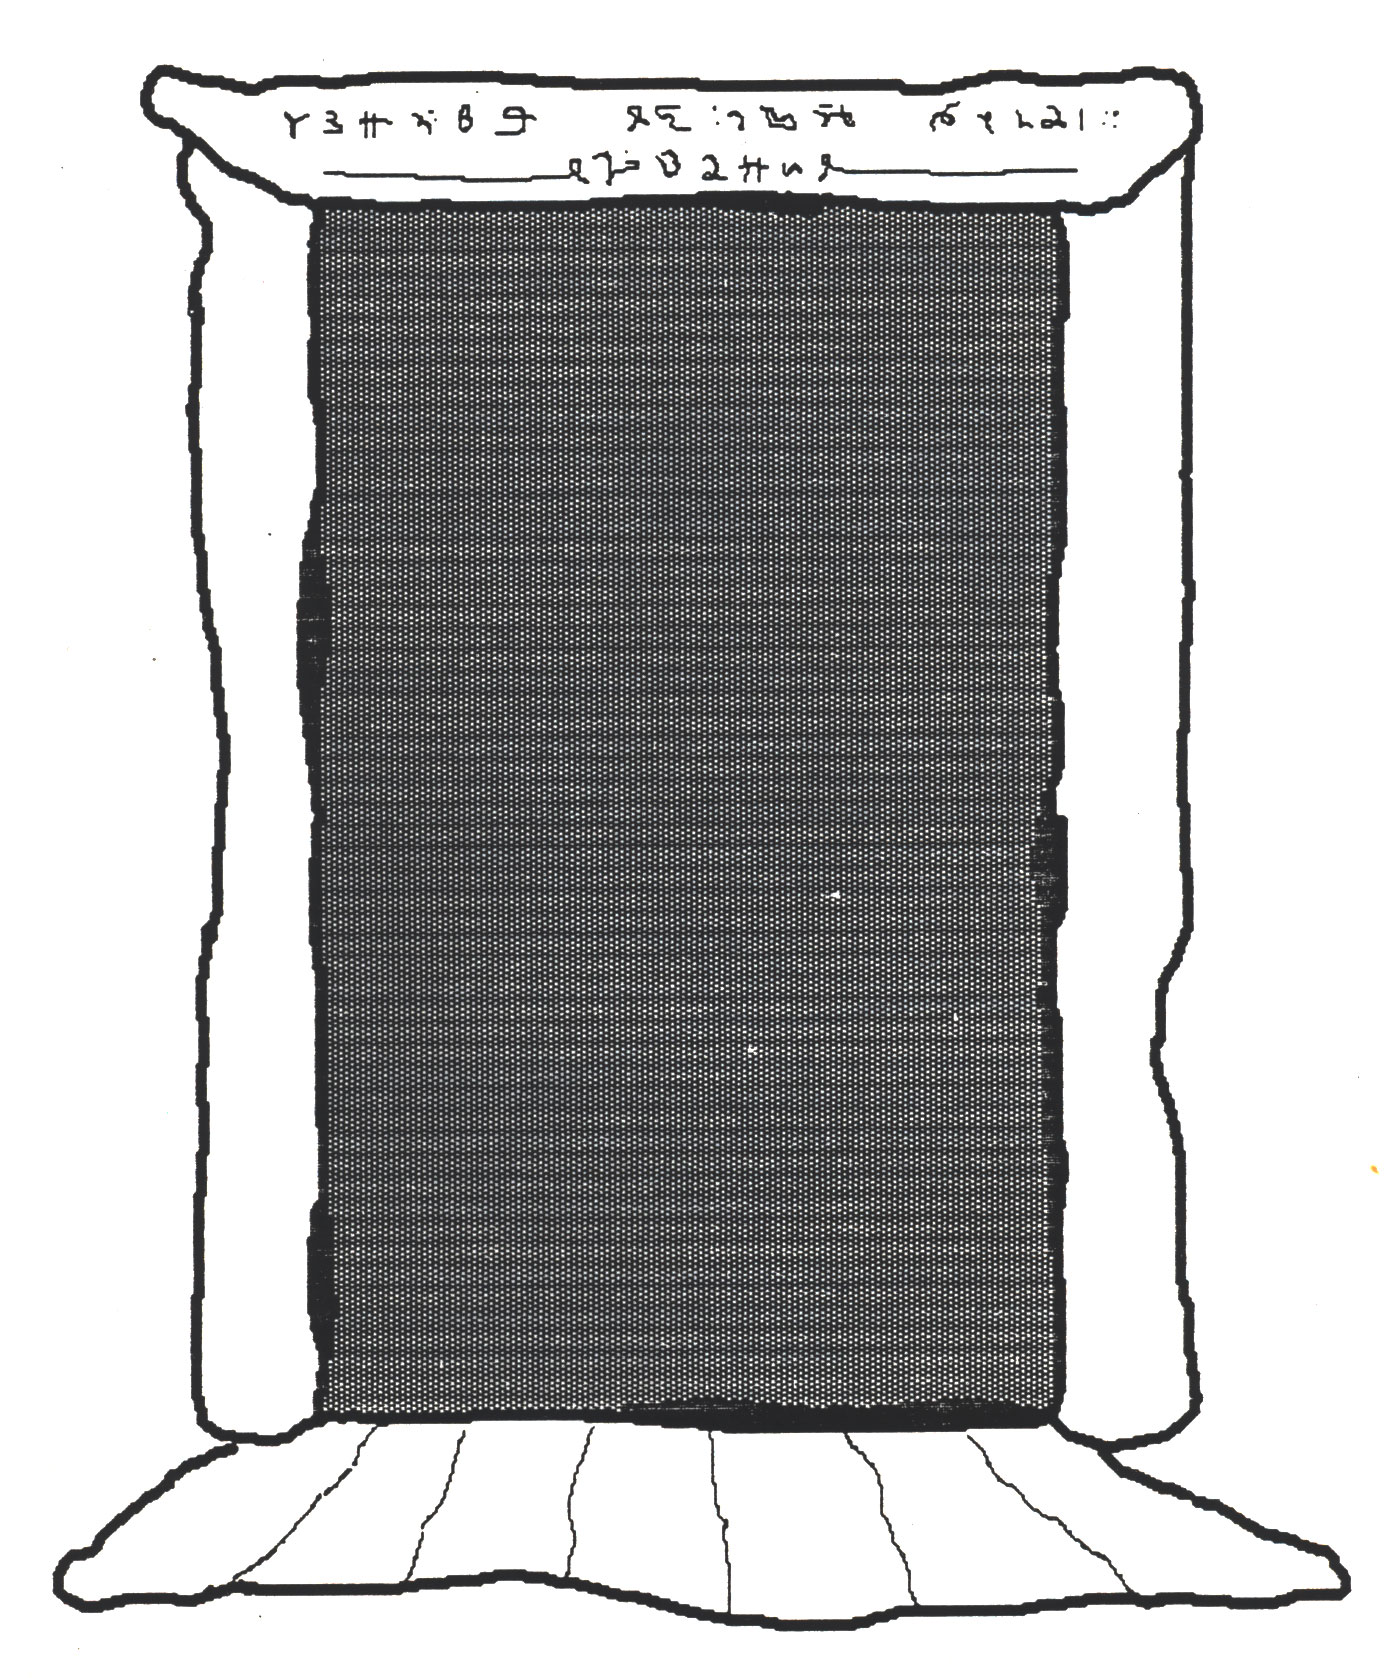
As you step through the door, things became very dark for a few seconds and then you find yourself standing on a great icy plain. It extends as far as you can see in all directions. The plain is very dimly lit and has many shadows around it. Furthermore, there are several large black objects moving slowly across the plain. In the center of the plain stands a very imposing-looking castle. The castle is made of a black shiny substance. There are several turrets and citadels within the palace. There does not seem to be a front gate in the castle or any roads on the plain that lead to the castle. You notice movement in the shadows nearby.
First Action: Cast Read Magic on ethereal door.
Casting a Read Magic on the door provides the following quotation: "MCTS: Hex 1889".
Second Action: Cast Detect Evil and Monster Summoning 6.
You are easily able to avoid the large moving shadows. They seem to be pretty much randomly moving around. The castle is too far away for you to be able to tell whether your thief will be able to climb the walls.
Shrewdly casting a Detect Evil in the direction of the castle provides a strong - "YES, THERE IS MUCH EVIL THERE" reaction. You think that this is strange because the Ethereal Dragon is indeed neutral. Melanie casts a Monster Summoning 6, but she is unable to get a Ki-Ri (nice try). However, she does manage to get a lammasu. The lammasu is of genius intelligence, so it is able to speak to Hylax on his own level. "Well, uh duh, that is the, uh, Castle of the Ethereal Dragoon. Yup, yup. But, I won't go near it now. Lots of mean nasties there. Lots of evil. Yup. They might control the Ether before long. They be deformed men around the grounds and large birds in the sky. Always circling, yup, round and round and round, if you're good, they'll get you. Eat you up they ¥111. Never been near myself. Fraid of those nasties. But Worldswing, he was a nice dragon and fair too. Too bad he's gone. Kept prisoner in the tallest tower they say. Yup, yup. Well, so long guys. The lammasu flies off.
The leprechaun does not seem to have taken anything of great value. You were very lucky, little one.
The Ether has shadows not made of darkness. Your vision does not help very much to see through them (unless they contain a heat source).
First Action: Cast Darkness 15' Radius and Extension 2. Summon some creature. Continue on to the Castle.
You cast 11 Darkness 15' Radius spells {Extension 2 costs too many beans to be worth it). Melanie summons up a small bird to help lead your party. Very clever. You continue moving towards the castle on foot. The bird is scouting slightly ahead of the party. There does not seem to be any difference between night and day here (not because of your Darkness spell). You are within about a ten hour walk of the castle when suddenly several shapes materialize out of the shadows nearby. Before you can react, several more materialize. The small creatures are vaguely human-like in form. However, they are jet black in color and slightly deformed. The creatures now surround your party. They do not seem to be affected by your spells. One of the large creatures near you speaks. "We are the Shadowwalkers - who rule the Ether. You approach the castle of our leader, Merdebax. None are allowed near that bear weapons or ill tidings. What is your business?"
First Action: Speak with the Shadowwalkers.
Melanie unbuttons the top three buttons on her adventuring blouse and speaks to the Shadowwalkers. She tells them that she is Melcon, leader of a group of hearty adventurers from Teufeldorf. She goes on to explain that she wishes an audience with Merdebax. After assuring the poor misshapen creatures of your peaceful intentions (Hylax's tongue begins to burn at this point), the Shadowwalkers seem convinced. However, like good soldiers, they demand that the children give over their weapons no matter how whimpy they look. Humphery and Ichabod give their swords to a guard. The guard promises to keep in sight of the party at an times. The party and their escorts set off for the castle. Just before you get to the castle, the shadowwalkers lead you into a thick bank of black fog. The fog seems to be pretty thick and would be very difficult to maneuver through.
Second Action: Travel through castle to the Throne Room.
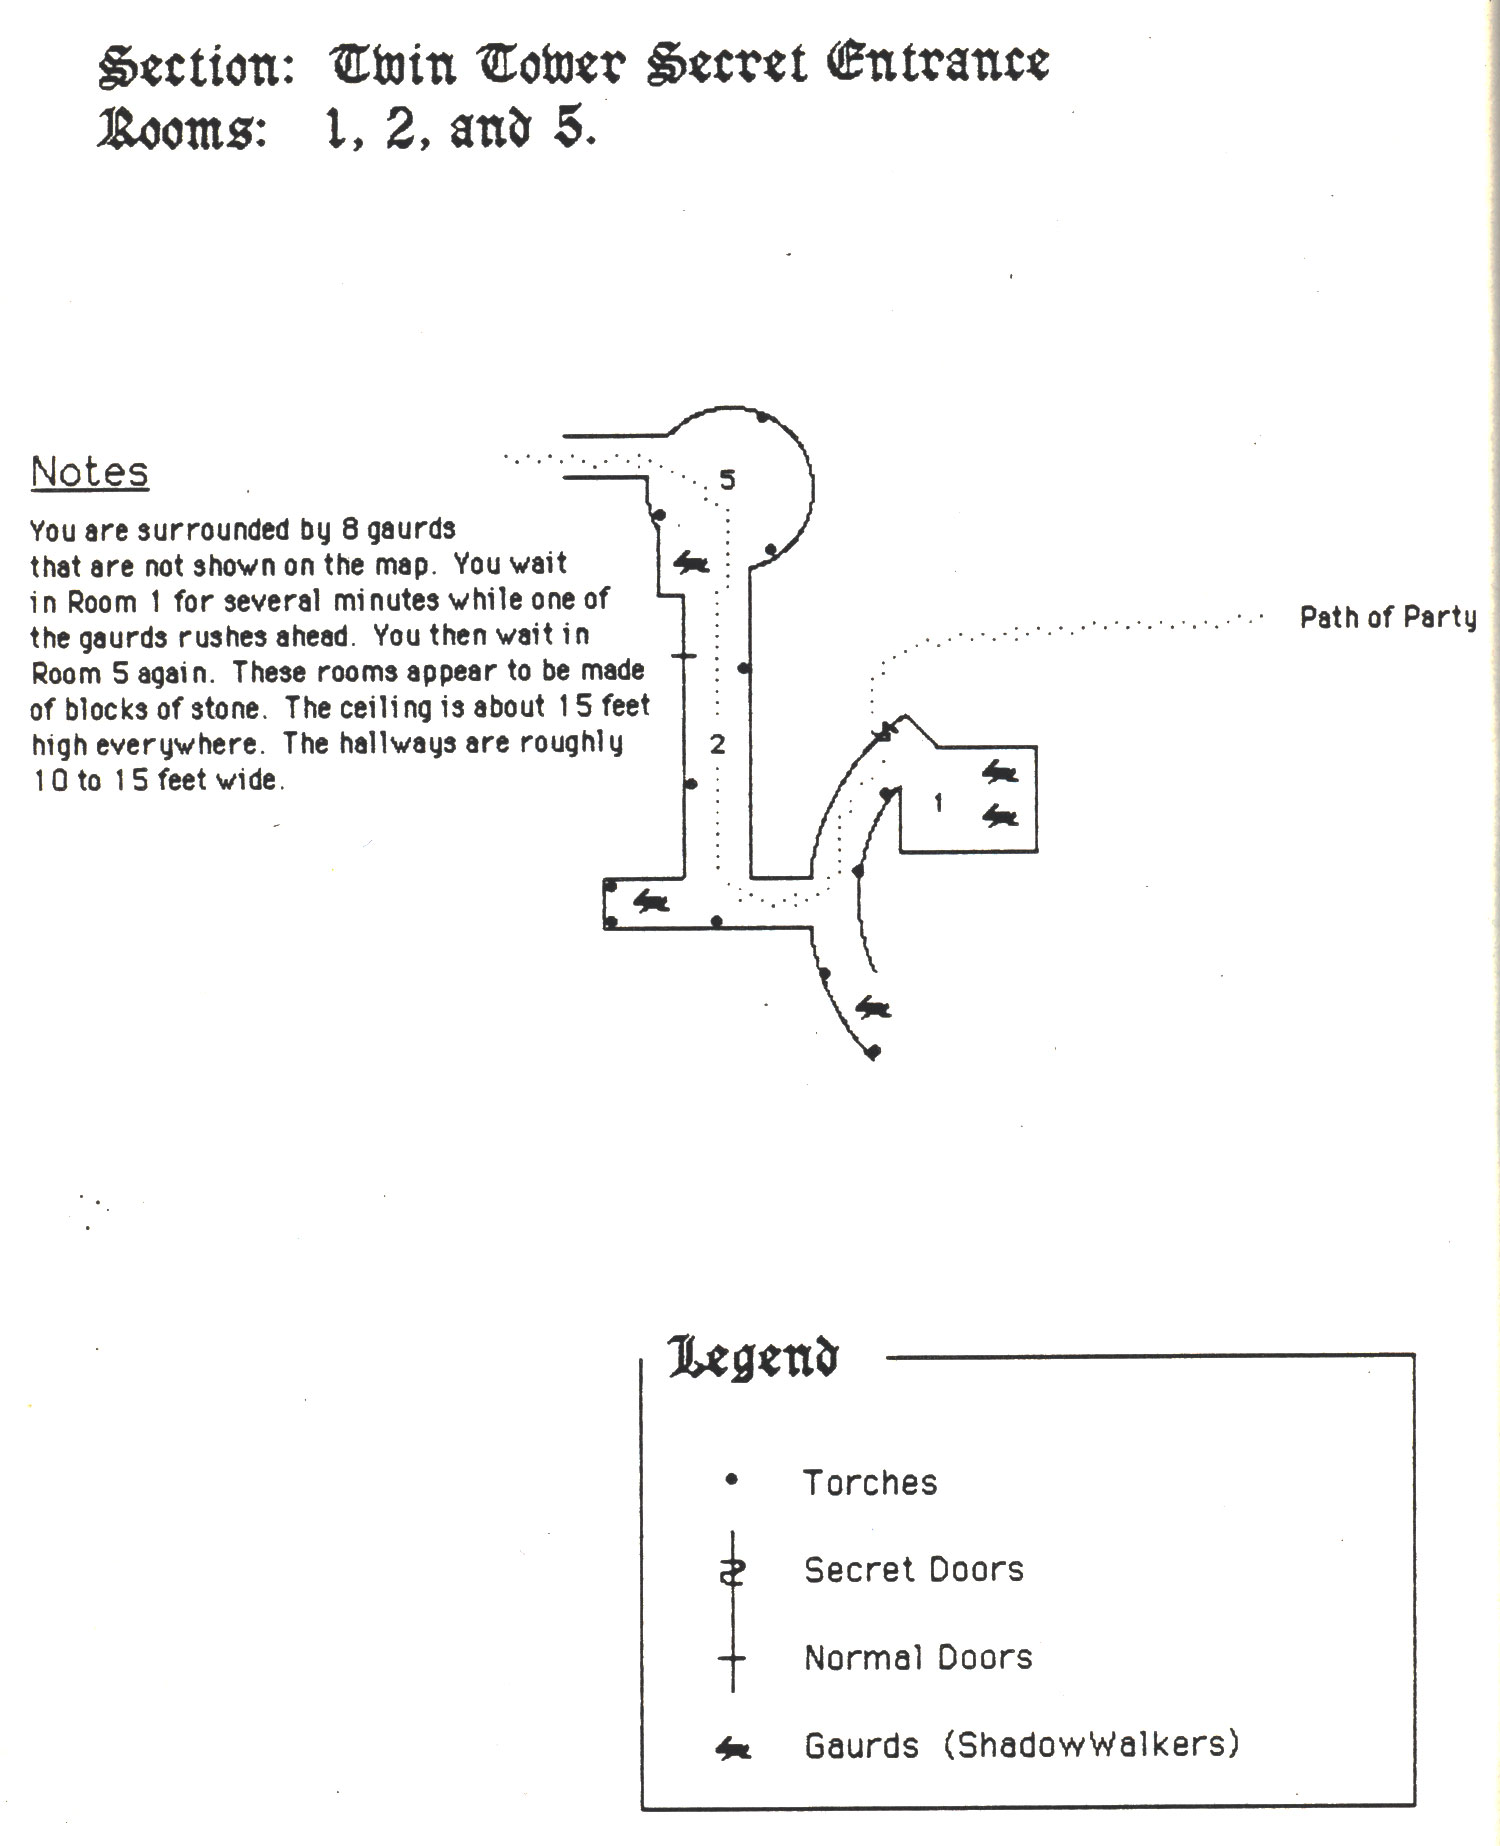
You keep very close mental notes on the towers, lights in windows, guards, construction, sloping passages, and concealed/secret doors. This is a very good idea for the seemingly endless maze of rooms would be very easy to get lost in. The Shadowwalkers lead you through the heavy fog and suddenly the castle looms up in front of you. The guards lead to the northernmost of the Twin Towers. While your party stops around the corner, a guard goes and opens a concealed door. You are quickly ushered into a round room and asked to wait.
You are then led through the following procession of rooms. You move fairly quickly and periodically are stopped in order to allow a guard to open a secret or magically-barred door.
Final Action: Speak to Merdebax. Get thrown into the clink.
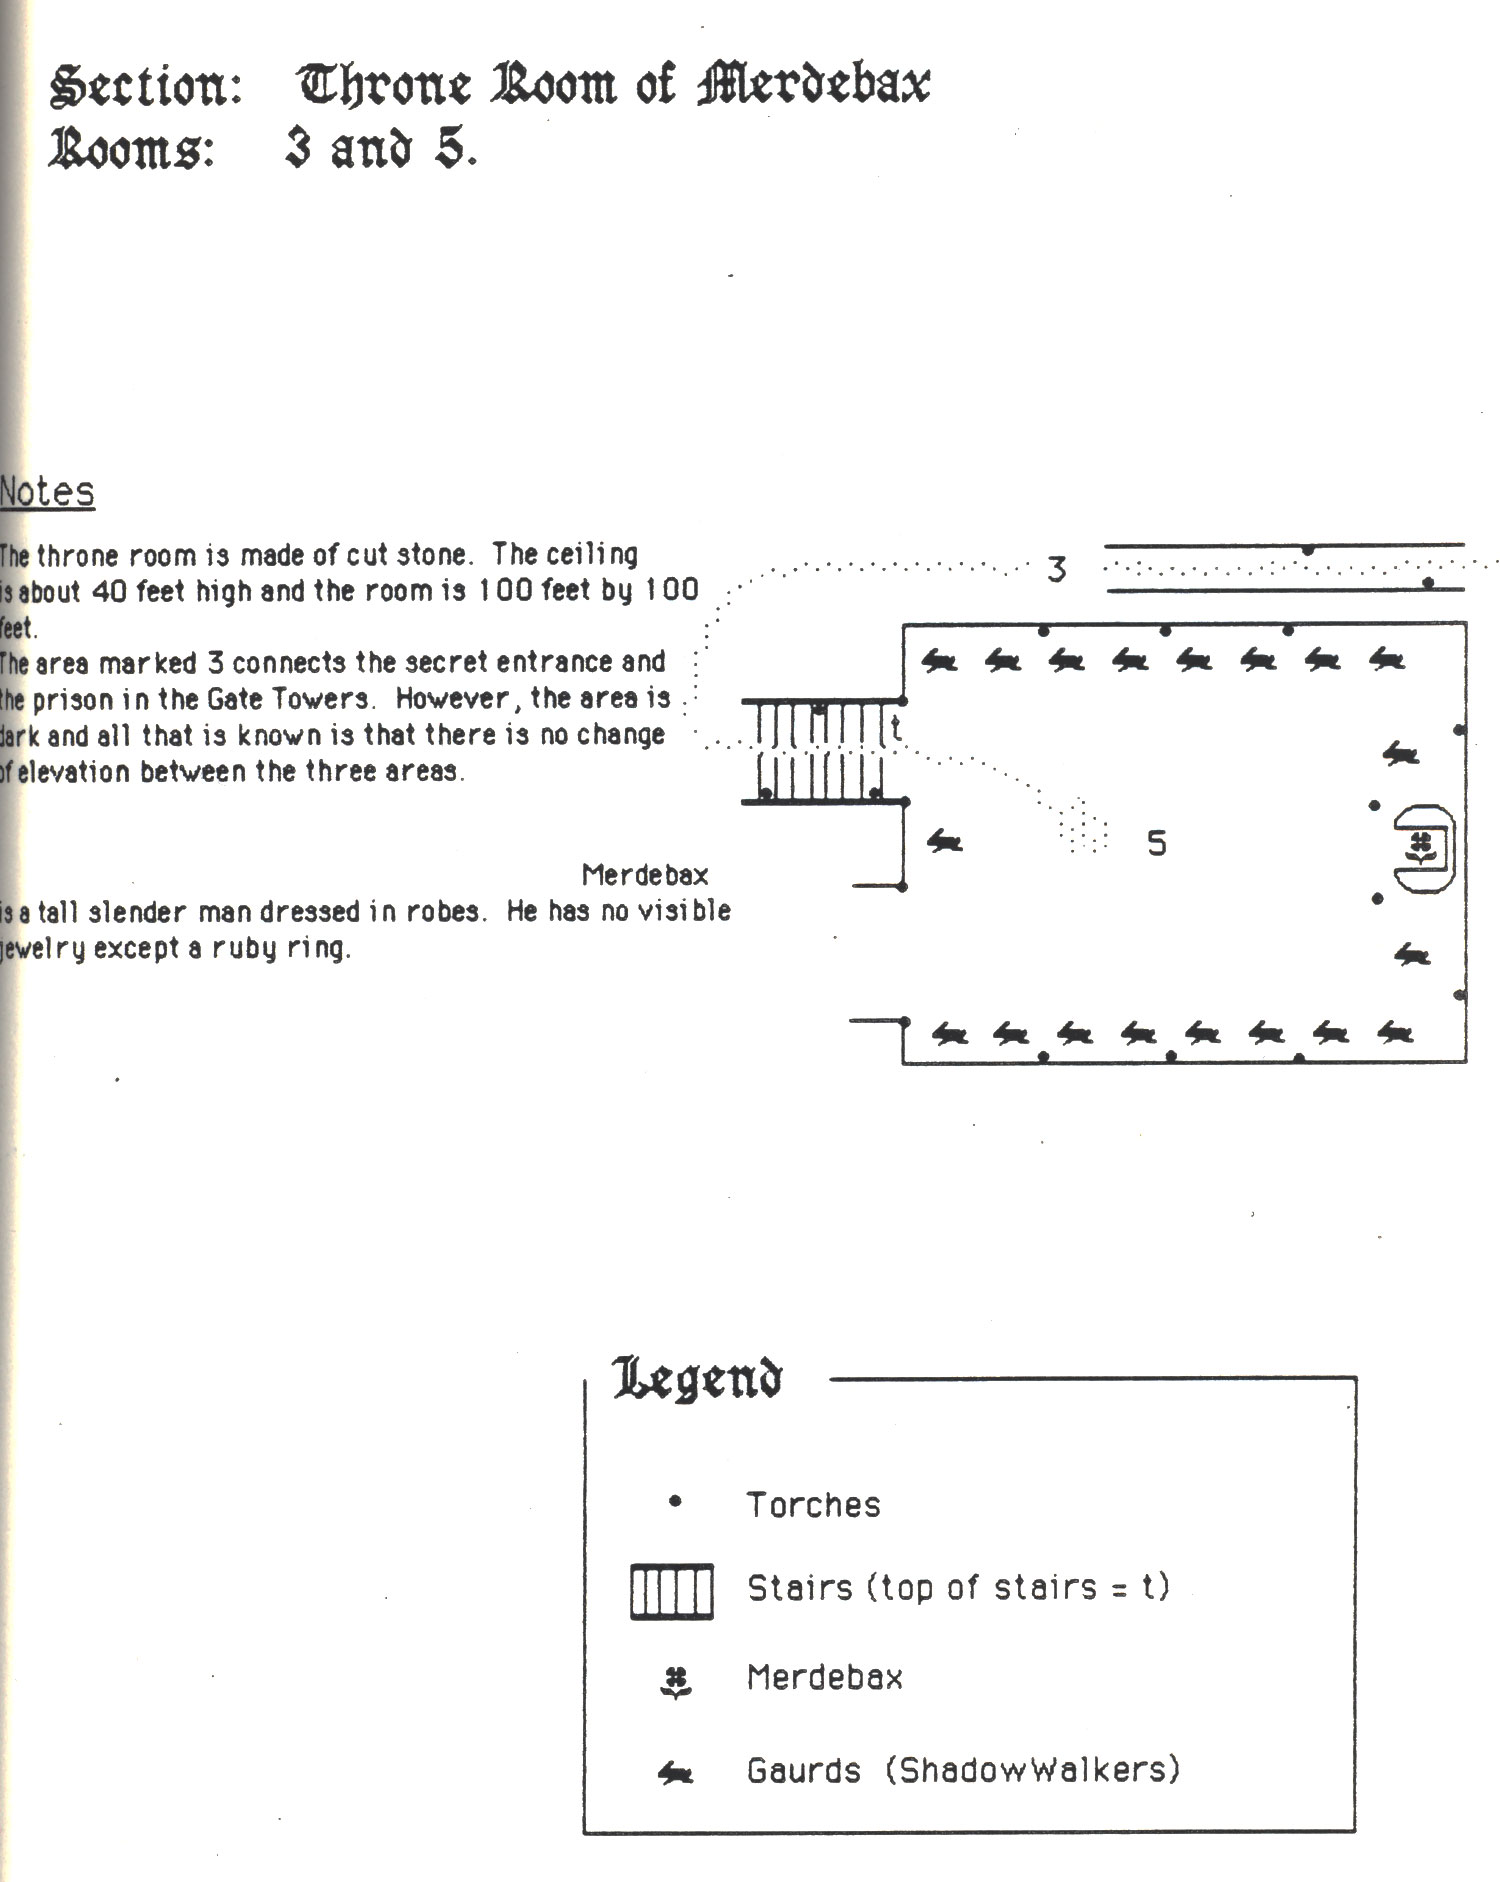
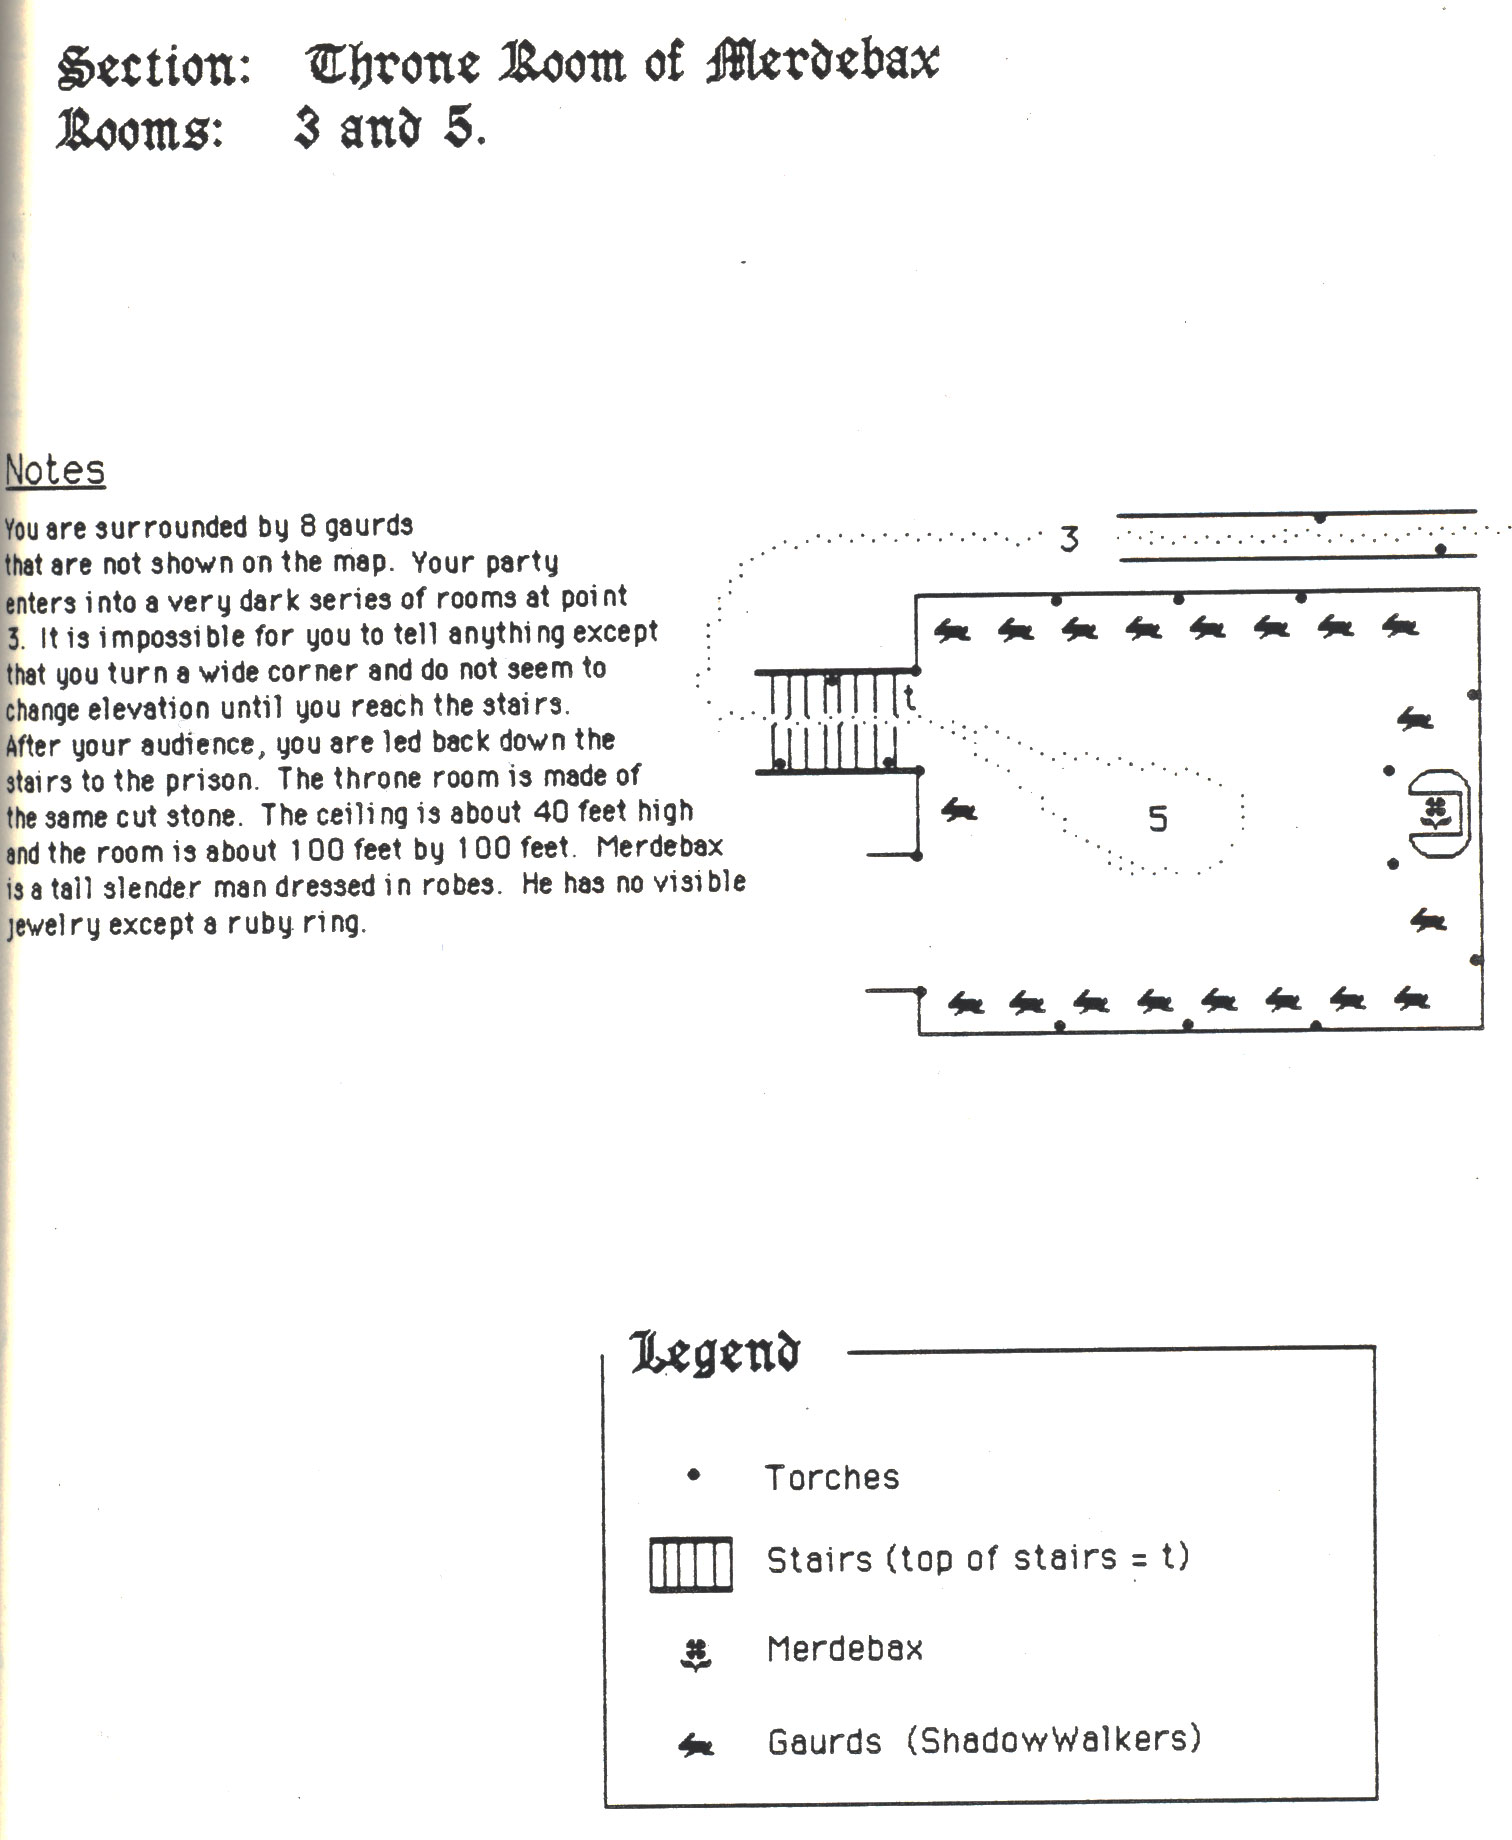
When you reach the throne room, Melcon speaks to Merdebax. He insists on having you call him the Lord of the Castle. Melcon recounts the story told before. Merdebax refuses to have any of the guards leave the room. He does seem very interested when Melcon tells of how your party escaped the tyranny of King Gregory the History Twister. He seems even more interested when you mention overthrowing the throne and taking Teufeldorf for himself. He even believes that you are doing this for wealth. However, when you mention Worldswing, the Lord of the Castle's attitude takes a 180 degree turn. After listening to your story about how only Worldswing would have the power to transport large armies through the Ether and how you should be taken to him, Merebax makes a quick excuse to depart (something about a headache) which Hylax knows is a lie. He tells the guards to take you to Worldswing. As you are being escorted out he instructs the guards to, "Make sure that these great and noble travelers are safe." You notice that the guards cast sideways looks at you as they lead your group into a trap. SEE ATTACHED MAPS.
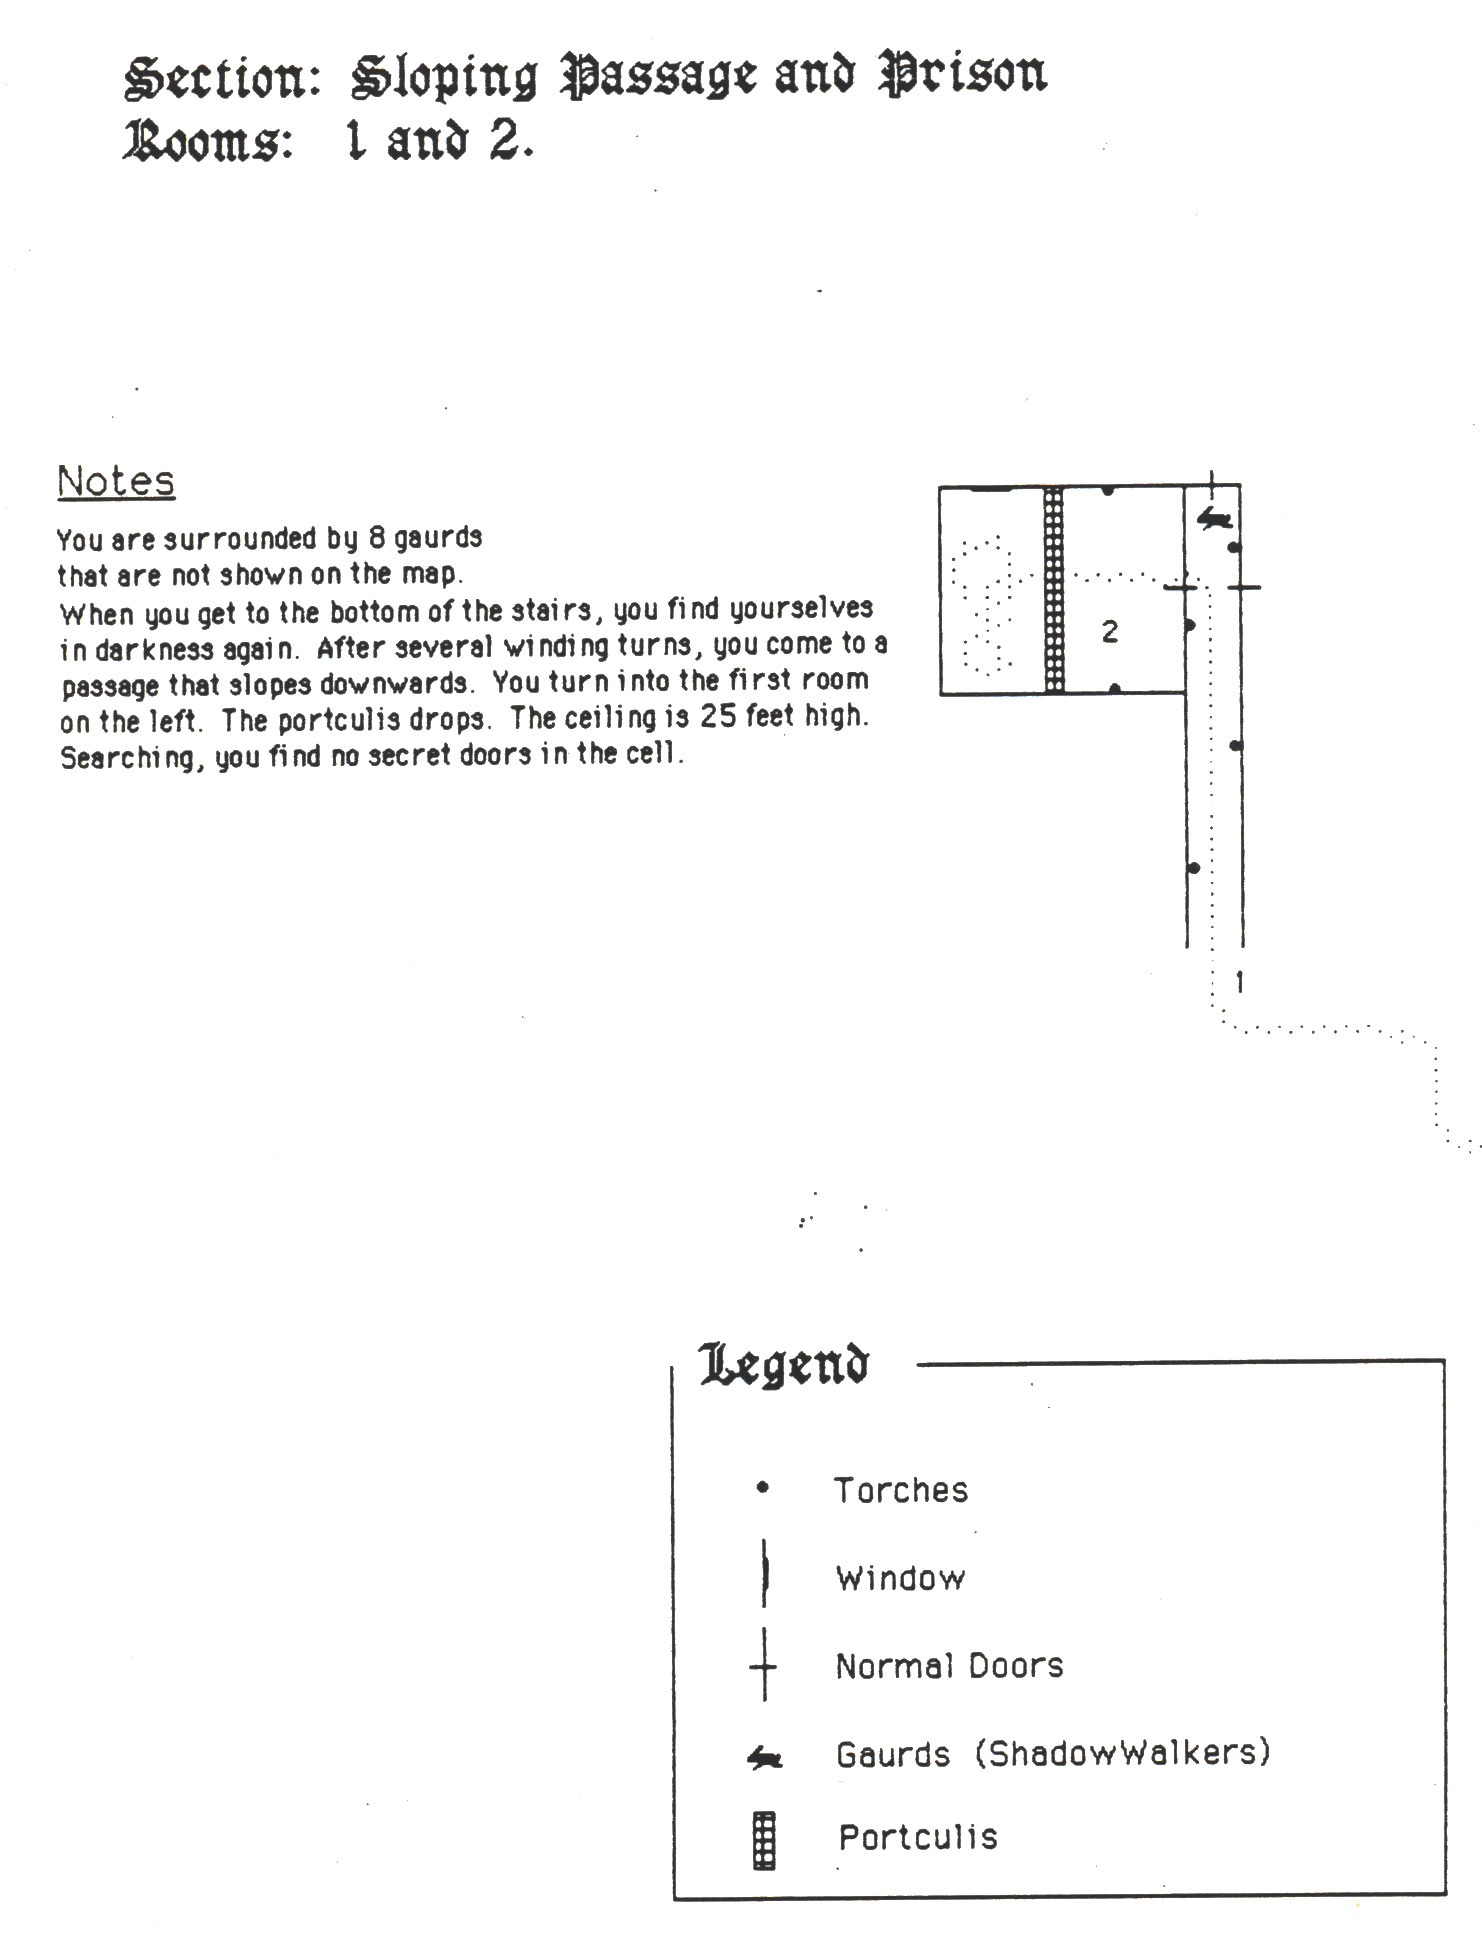
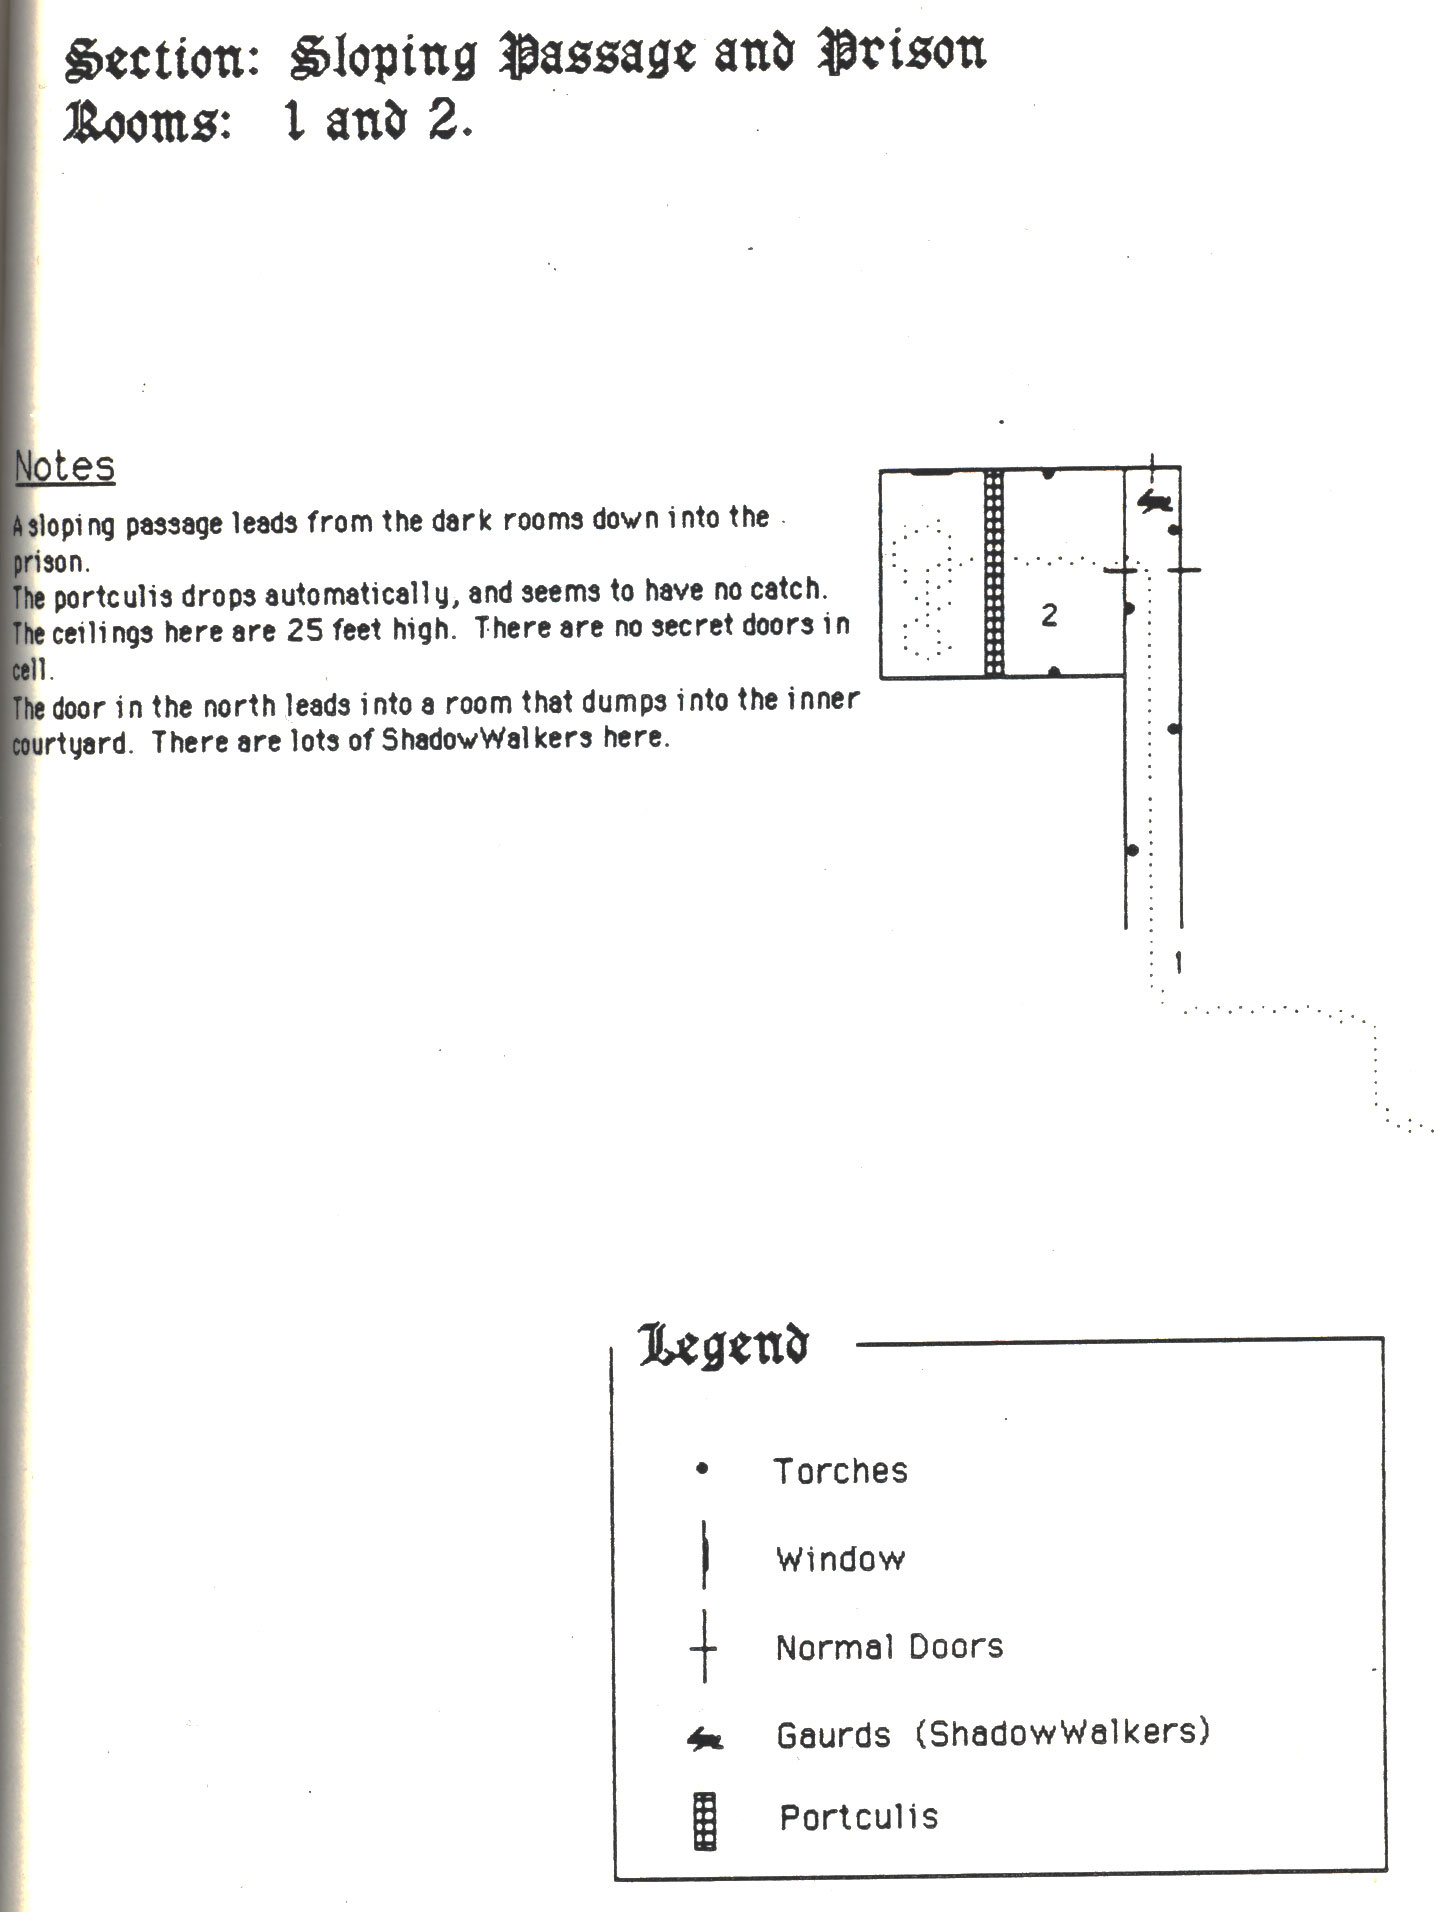
You are walking down the Sloping Passageway when suddenly the guards escort you into a small room. When you get to the far side of the room, a portcullis of bars drops down and forms a cell. The guards quickly leave and you find yourself alone in a small cell. There are solid walls on three sides and a very small window (no light coming through) with bars on it about 20 feet from the floor. The ceiling is 25 feet in height. The bars in front of you are very thick and sturdy. There are no guards in the room. What do you do, Timcon?*
A brief aide about Pinocchio... I am afraid that in the light of the overwhelming evidence concerning King Gregor I have a confession. Indeed, King Gregor is King Gregorg. However, the analogy does not end there. Your first question might be, "Who is Pinocchio?" Well, Pinocchio was a short little guy with a somewhat wooden personality. He was known to be a puppet of some sort and was afraid of fire. So when comparing the story to my world, we must look for a short person with little or no personality. Also, this character must be a puppet for a larger and more powerful figure. Let's call this more powerful figure "The Dwarf". And not to forget the little guy's fear of fire, let's introduce a character which we will call "Fiery Flame Fire". Little known to most people, Pinocchio also wore a ring. This was the famous ring that made his nose grew when he told a lie. So finally, we must look for a character that wears a ring that does strange things when a lie is told. Who is this fearful misfit terrorized by The Dwarf and Fiery Flame Fire? Perhaps I should leave that conclusion to your more powerful deductive mind. By the way, Hylax has recently noticed that it is getting more difficult for him to see his feet. Also, one of the guards called you "Karl" and asked if you had any American Express Adventurers Checks.
First Action: Leave a trail of sulfur.
As you are walking along the passageways that are completely dark, Hycon and Humcon do not notice any unusual heat sources. Once and a while, your party passes a guard (heat source), but you are unable to tell anything more about your surroundings. Leaving the sulfur trail is an excellent idea. It uses up all of your spell components (but since we aren't using them yet I guess it doesn't matter). You think that your trail is unnoticed.
Second Action: Implement Plan A.
There are eight guards in the room when the portcullis drops down. After they leave, there is one guard outside of the door. Apparently, Merdebax doesn't think that anyone stupid enough to walk into a prison is much of a danger. As soon as the guards are leaving the room, Hylax coughs off a Fetch spell. The children's weapons appear in his hands. The guard carrying the weapons stops (causing the ones behind to run into each other). The guards look at each other. They don't seem to quite know "What is going on. After inspecting the party and deciding that they couldn't have done anything, they leave. You hear one of the guards say that the incident should be reported to the Lord of the Castle. You are not able to find the mechanism for raising the portcullis nor do you find any peep holes for someone to watch you. lccon checks the windows out. The room points outward (towards the Plains of the Ether). There is the same black bank of fog in front of everything. You can tell nothing of your position within the castle. You wait 15 minutes. Melcon conjures 5 dopplegangers (it would be hard for summoned creatures to get to you). Hycon casts a Teleport spell (it works) and your party appears on the other side of the bars. The spell Polymorph Other works on only one creature. So, Hycon casts the spell and the others chug their potions. Suddenly, your adorable three children and two bewitching mothers turn into five ugly shadowwalkers. Just a bit different so that you can distinguish your party members. Casting a Glassee spell off of Reinwood enables you to see the one guard. The dopplegangers begin screaming, the guard comes in, Hylax throws Hold Monster on him. It works. Humcon takes his place, you tie up the guard and question him. He seems rather confused. Wouldn't you be. He tells you that the Great Dragon of the Ether is in the Great Tower. He tells you a path that avoids all of the secret doors and passages. You need special passwords to get through. Here is the path that you follow:
You pass through the door at the north end of the sloping passage. You then travel through the open arch in the west. You are now in the great courtyard. The prison seems to be in the Eastern Gate Tower. Thus, the sloping passage is within the Great Wall. You travel around the Great Keep. This seems to be a large house with many doors and windows. It seems for the most part to be unguarded. Your party enters the Great Keep through the western door. You enter into the Large Entrance Way. Through the arch in the west is the Great Dragon of the Ether.
The archway is about ten feet thick. At the far end of the archway is a shimmering red wall. The wall seems to be somewhat transparent. Behind it you can see the outline of what seems to be a dragon. On the wall of the archway are two concentric circles. The rings are made of small holes about the size of a dime. The outer ring has 30 holes in it. The inner ring has 12 holes in it. The top hole of each circle has a number "1" over it. In the center is the following poem:
When seasons change from snow to heat,
On Middle Earth the great spheres meet.
The God of Fire falls from the sky.
While overhead a full moon flies.
What do the Teufelcondors do?
First Action: Check out the puzzle.
Ichabod checks the two circles of holes very carefully. The search reveals no traps. However, upon closer inspection Ichabod notices that the holes are not truly circular. They are indeed faceted. Each hole seems to be made of about twenty small hexagonal surfaces. Also, the interior of the holes seem to be smoother (like glass) than the surrounding wall. Ichabod Nimblestubs sticks one finger in the third hole of the inner ring and one in the twenty-first hole of the outer ring. Nothing seems to appear to happen. He tries turning, twisting, pressing, and rubbing the holes without any success.
Second Action: Check out the circular hallway.
Checking the hallway reveals no traps, secret, or hidden doors. The hallway has two more exits (into different towers), but it has no more entrances into the main room. You see no guards or other signs of life.
Third Action: Make observation room.
Hylax casts a Disintegration spell and hollows out a small "room" across from the puzzle. Then using two Stone Shape spells, he manages to make two secret doors from which the puzzle could be watched. The clever little gnome and his fearless friends wait and wait and wait. Soon, the potions and spells wear off and Hylax and company become their beautiful selves again. After many hours, it is obvious that this is not the way to go. Leaving the room, Icabod notices that the only tracks in the area seem to be your own. You can conclude from this that travel into this room is rare.
Final Action: Disentegrate things at random.
Disintegrating the wall nearby shows that the red haze extends in a sphere around room. It does not look like the DM will let you in this easily.
Only Action: Cast a whole bunch of new spells.
Hylax begins to glow brightly and casts a Detect Magic on the red barrier, the circle of holes, and everything else. He finds that the red barrier and the circle of holes are both magical. However, a further search of the surroundings shows no magical devices. Hylax then takes out some clay and sticks it into the third hole of the inner circle. Pulling the clay out, Hylax now has a "key." Blowing off another spell, Hylax casts a Stone Shape spell on a nearby pebble turning it into a "key" ring. He then puts his Pebble of Continual Light near the holes but finds nothing unusual. Putting in his stone "key" does nothing. However, you notice a short flash of light when the key is removed. Frustrated, Hylax casts a Dispel Magic on the red wall. Nothing seems to happen. Hylax then sticks his fingers into the hole. Again nothing happens. Your party begins to yell, "Hail 0 Great and Mighty Worldswing..." The shape behind the red wall does not seem to move. However, you are making a considerable amount of noise. Thinking back, Hylax dumps out the dead guard. Ichabod begs to search the body. Finding nothing of interest, Ichabod begins to play with the dead creature. Hy1ax pulls the little thief away and puts the body back into the Bag of Holding. You toss a spike through the red wall. It goes through and lands on the floor on the other side of the red wall. The spike does not seem to have been effected. About this time, you can hear the din of marching feet and fighting in the distance. It seems as if the sounds are coming from above you, but it could be the acoustics. What do you do?
Only Action: Be disgusting.
Ichabod becomes very excited as Hylax once again pulls out the dead body. Casting a Glassee spell off of Reinwood, Hylax turns the stone ring into a glass one. This allows light to pass through the ring. Sticking it into the "proper" holes, Hylax is blinded by a bright flash of light that comes from the ring. However, after the little guy's eyesight returns, he looks and sees that nothing has happened. Frustrated, Hylax gives the ring to Ichabod who thrusts it into the dead body. Licking his fingers, he hands the now-bloody ring to Hylax. Sticking the ring into the holes produces another bright flash of light and the sickening smell of burning blood. However, it does not seem to do anything. Perhaps, the little gnome should go back to school and learn a bit more about optics. What do the Teufelkinder want to do for entertainment now?
First Action: Sleep to get spells back and then begin blowing them off.
After sleeping for several hours, Hylax and Melanie wake up refreshed and fun of spells. Humphery (who looks disappointed at not being allowed to play with the dead body) tells you that the marching and fighting sounds stopped shortly after you went to sleep. At one time, however, the sounds seemed to be very near. Nothing, however, was seen. Hylax then begins to cast more random spells. "1 think that I will make another useless but very pretty ring." Casting a Glassee and a Stone Shape spell allows the little guy to do just that. Putting the rings into the holes produces two simultaneous flashes of light. The light waves interfere with each other so as to produce a very poorly defined beam. The beam hits a random wall and nothing happens. A study of optics might help this plan.
Second Action: Summon up a hyrax.
Melanie (whose adventuring blouse is still quite revealing) casts a Monster Conjuring I spell. In front of your party appears a small ungulate mammal characterized by a thickset body with short legs and ears and a rudimentary tail, feet with soft pads and broad nails, and teeth of which the molars resemble those of the rhinoceros and the incisors those of rodents. This creature called a hyrax runs through the red wall, into the room, and back out again. He laughs at Hylax and disappears.
Third Action: Cast an Anti-Magic Shell. Walk through the wall.
Casting the spell causes an INVISIBLE globe to SEEM to appear around Hylax. Trying to walk through the red haze, Hylax finds that an INVISIBLE force is holding him back. What do you do?
First Action: Question the dead Shadowwalker
You get the dead Shadowwalker out of your Bag of Holding. Ichabod's eyes light up at the sight of the dead body. Fuzzwort casts a Speak With Dead spell. You ask about the route, passwords, ruby rings, a search, zombies, and throne room defenses. He tells you that the only way out of Great Tower is the way you came in. He tells you of the same secret passage that you took before into the castle. There are no passwords that he knows of. He knows that several of the high priests have ruby rings. The Shadowwalker says that there are several hundred of his types in the castle alone. The only new information about the search, zombies, and the throne room that he offers concerns the existence of guard dogs that vaguely resemble hell hounds. They would probably be used to sniff out an escaped prisoner.
Fina1 Action: Go to throneroom. Get trapped.
Humphery casts a Polymorph Other spell off of the Sword of Shaping. Hylax blows off lotsa spells to polymorph Rachel, Melanie, Ichabod, and Reinwood into Shadowwalkers. Banner uses the Flying carpet as a stretcher. Fuzzwort and company gives their weapons to the newly-polymorphed shadowwalkers. The party leaves the Great Tower. As your party leaves the door to the Great Tower, you notice nothing unusual. However, you are not more than 10 feet out the door when you stumble into a very well hidden net (it's amazing what you can do given an entire day for preparations). In less than a segment, the entire party finds itself in the net. Before you can do anything effective, a Silence 15'R spell is cast on the net. Testing the net with the weapons reveals that the net is of a magical nature and cannot be cut.
Looking around, you see 12 men-like creatures dressed in robes. You figure that they are probably the priests that the Shadowwalker mentioned earlier. They quickly form a double line (like a ceremony) and proceed into the Great Tower. You cannot see their hands. At the end of the procession is Merdebax himself (gloating over his recent capture.). After the leaders have entered the Great Tower, the remaining Shadowwalkers (you can see about 45 of them) circle around you and lower the net. You are to be escorted into the Tower. Each of you is physically restrained by 2 Shadowwalkers. You are still in a Silence spell. It would be almost impossible to merely run way.
Only Action: Walk into the Great Tower hallway.
Your party is lowered from the net. Fuzzwort's party quickly gets their weapons back. Hylax's party is still under the influence of the polymorph spells. You are led two abreast into the hallway that you spent so much time in before. The order of the party is: Ichabod and Melanie; Fuzzwort and Rachel; Hylax and Humphery; Banner and Venkman; Elrica and Regimbold.
There are two guards behind each character. You are still under the influence of the Silence spell. You see that the red wall is still up. Behind it you see Merdebax and the twelve priests. The secret room is spiked shut. The priests seem to be chanting something. Your party has two places in which they can act. First, there is the large circular hallway that runs around the central room. Second, there is the hallway itself.
NOTE: You do not know the source of the Silence spell, but it seems to be following you.
Only Action: Escape the clutches of death.
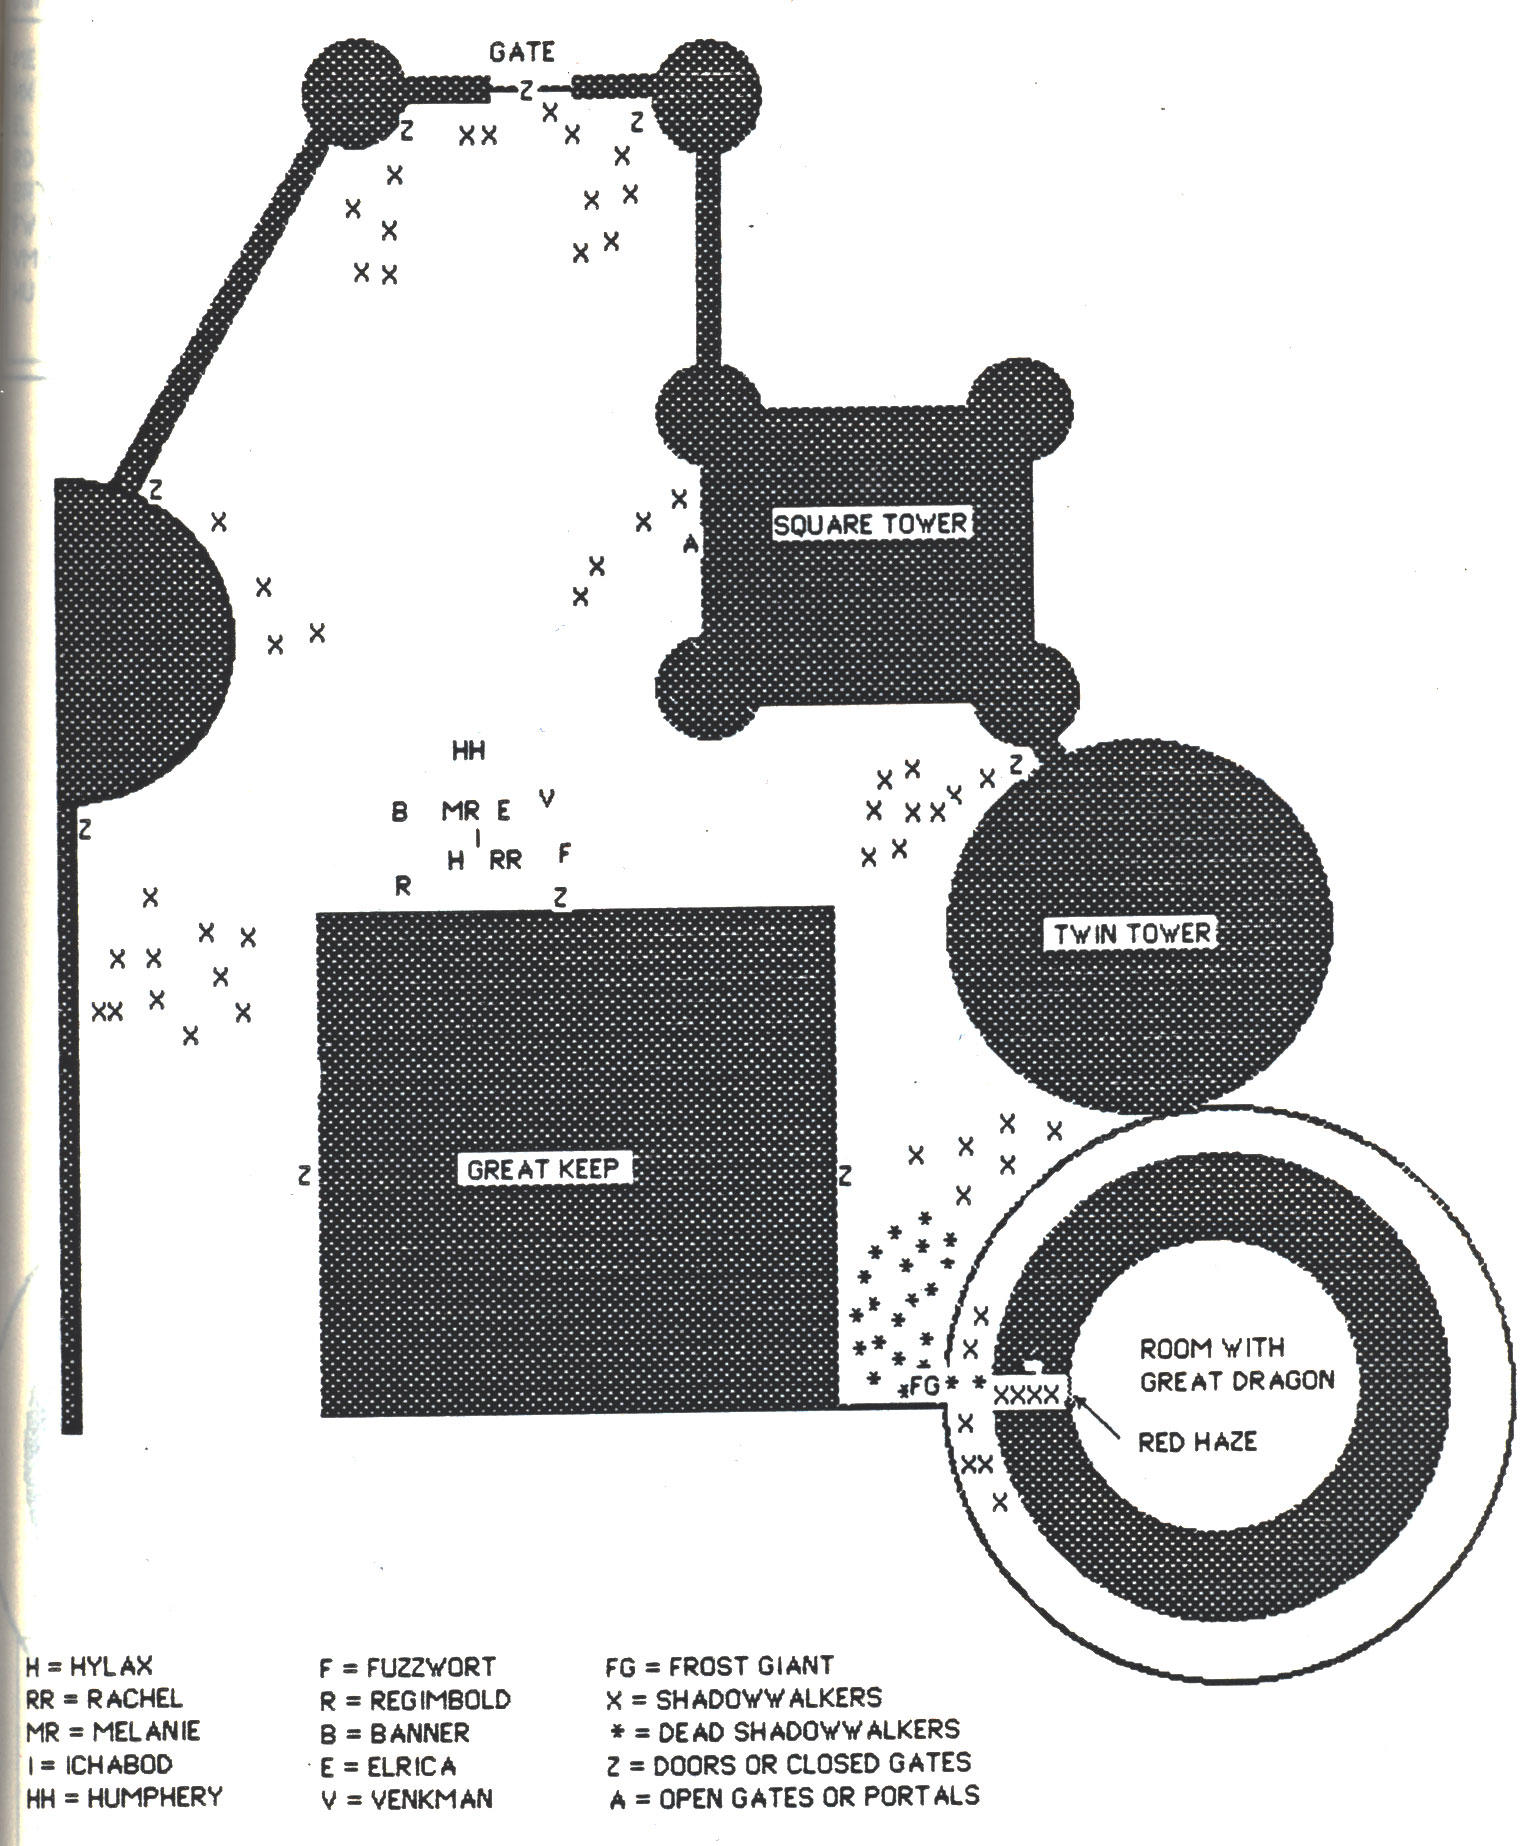
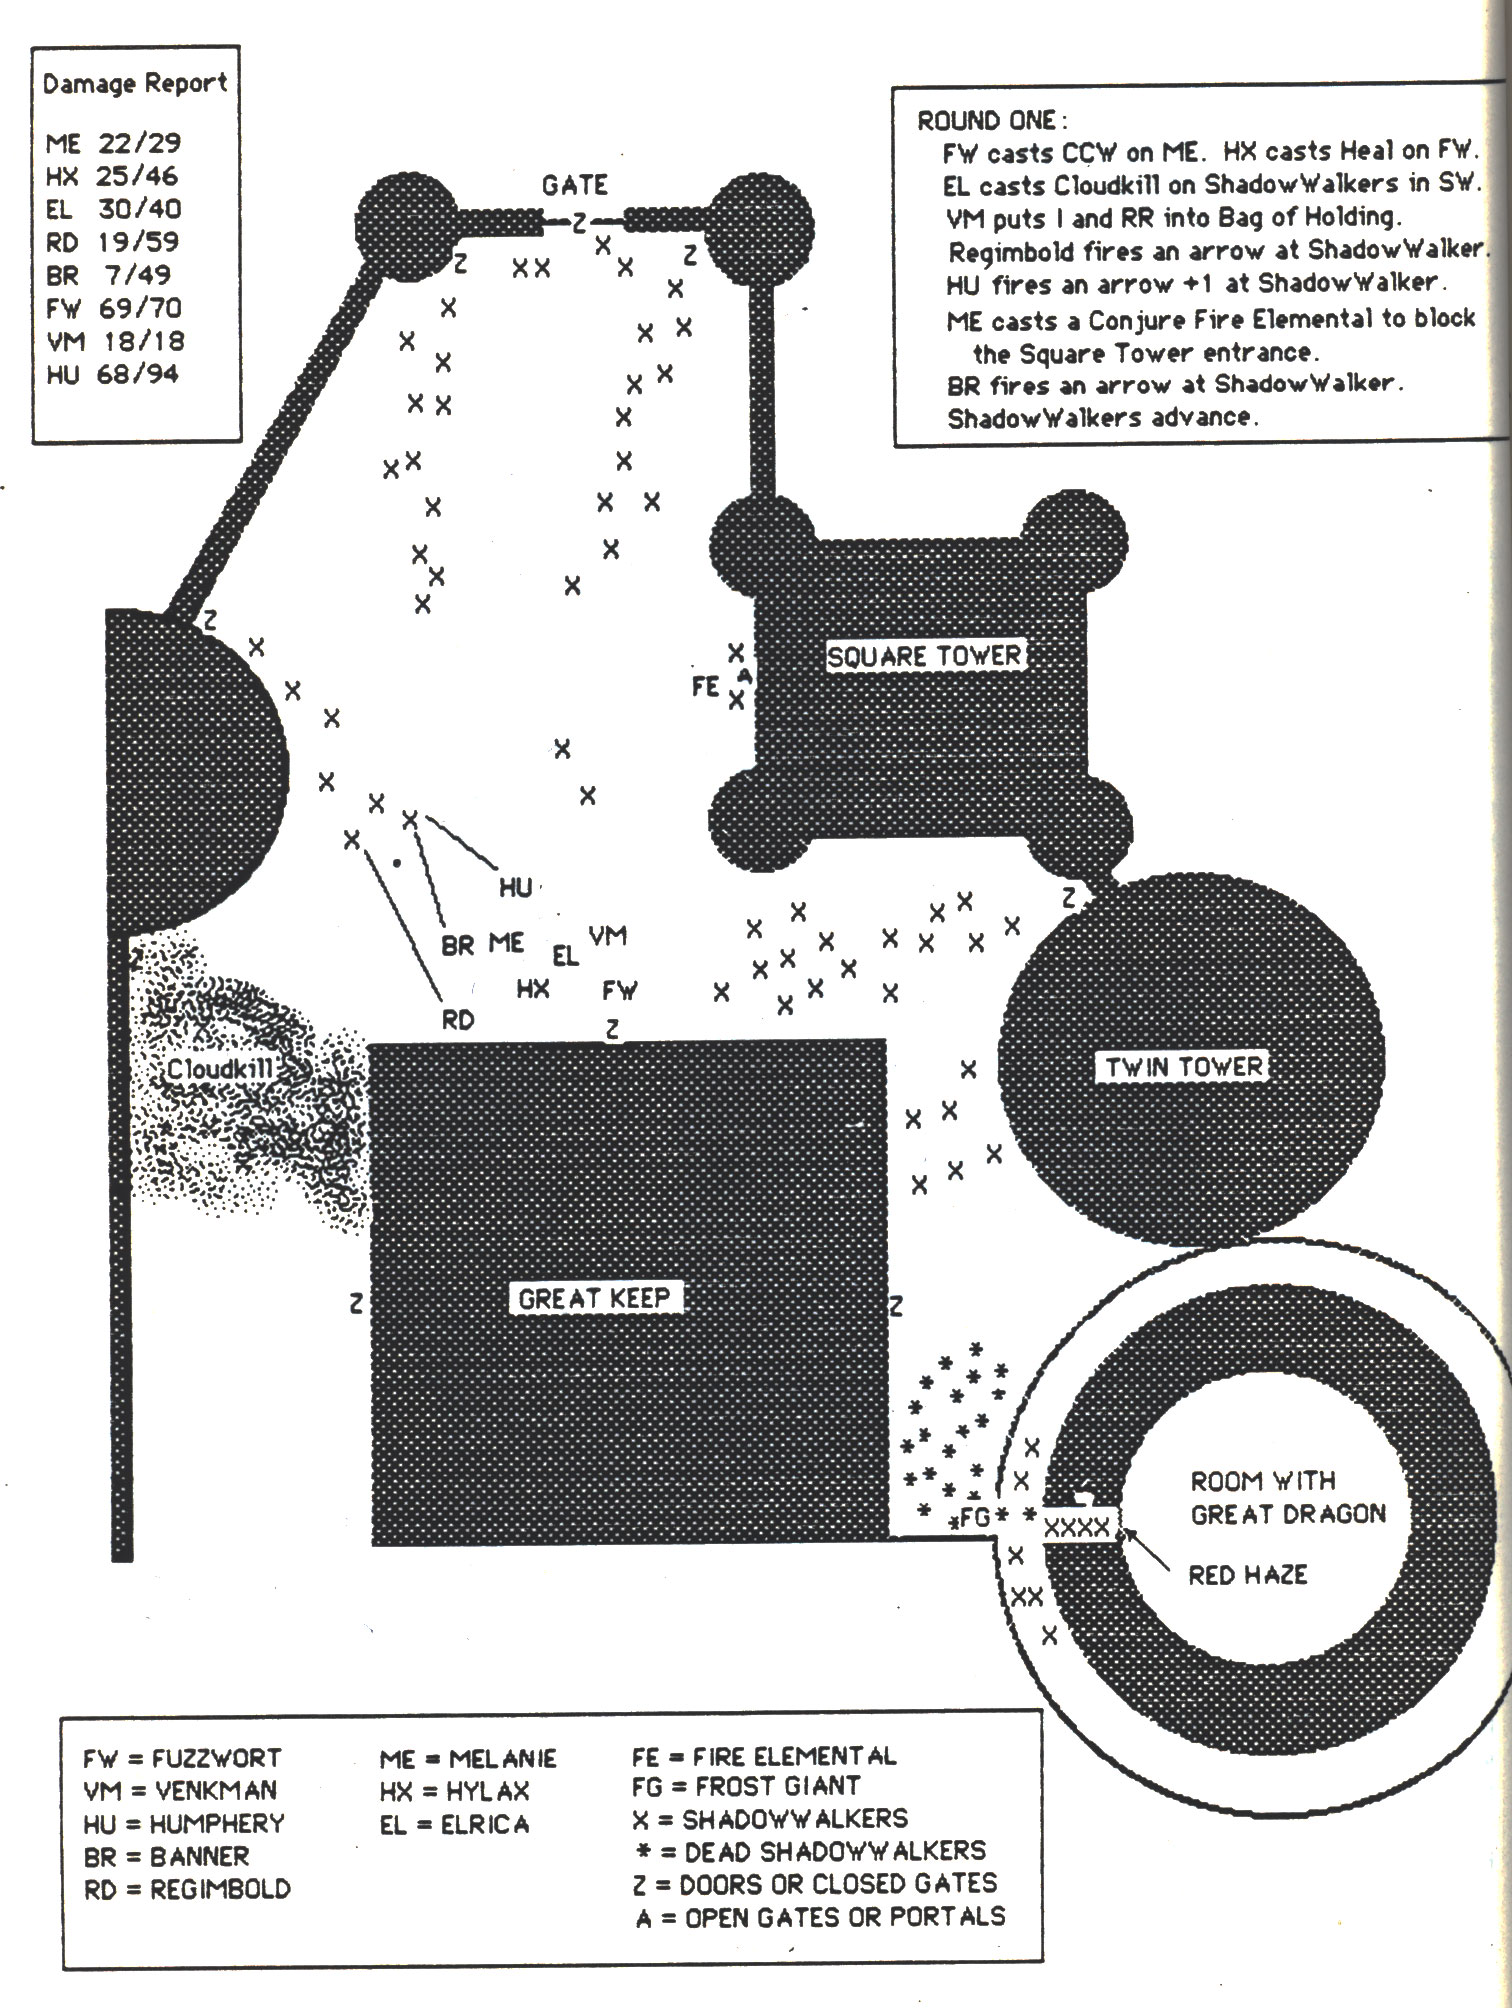
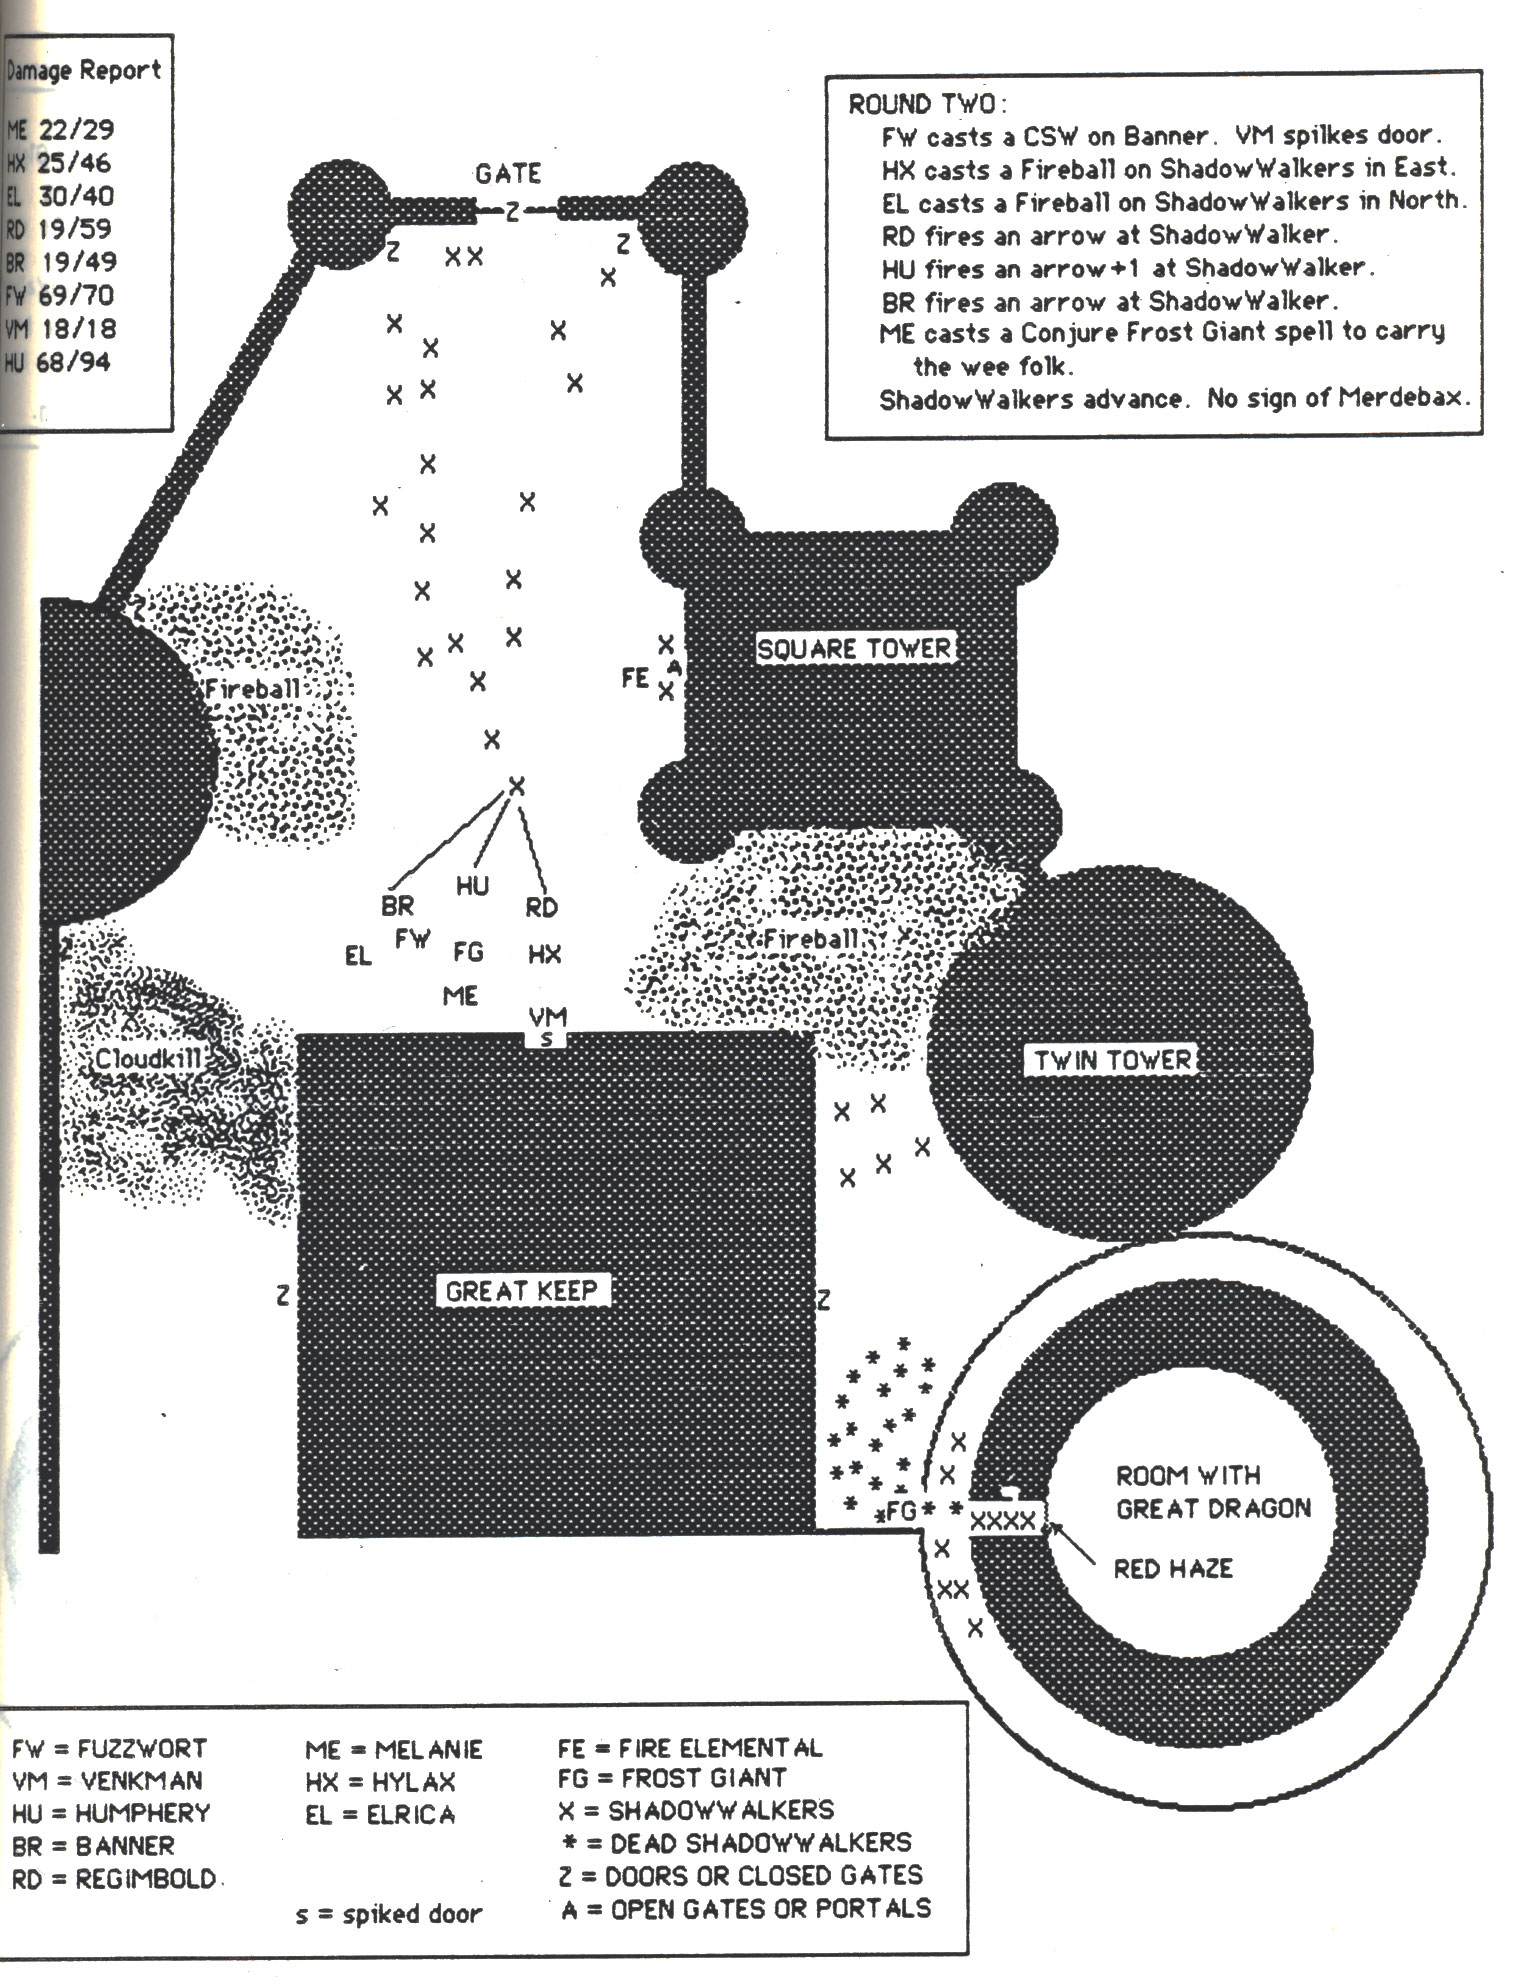
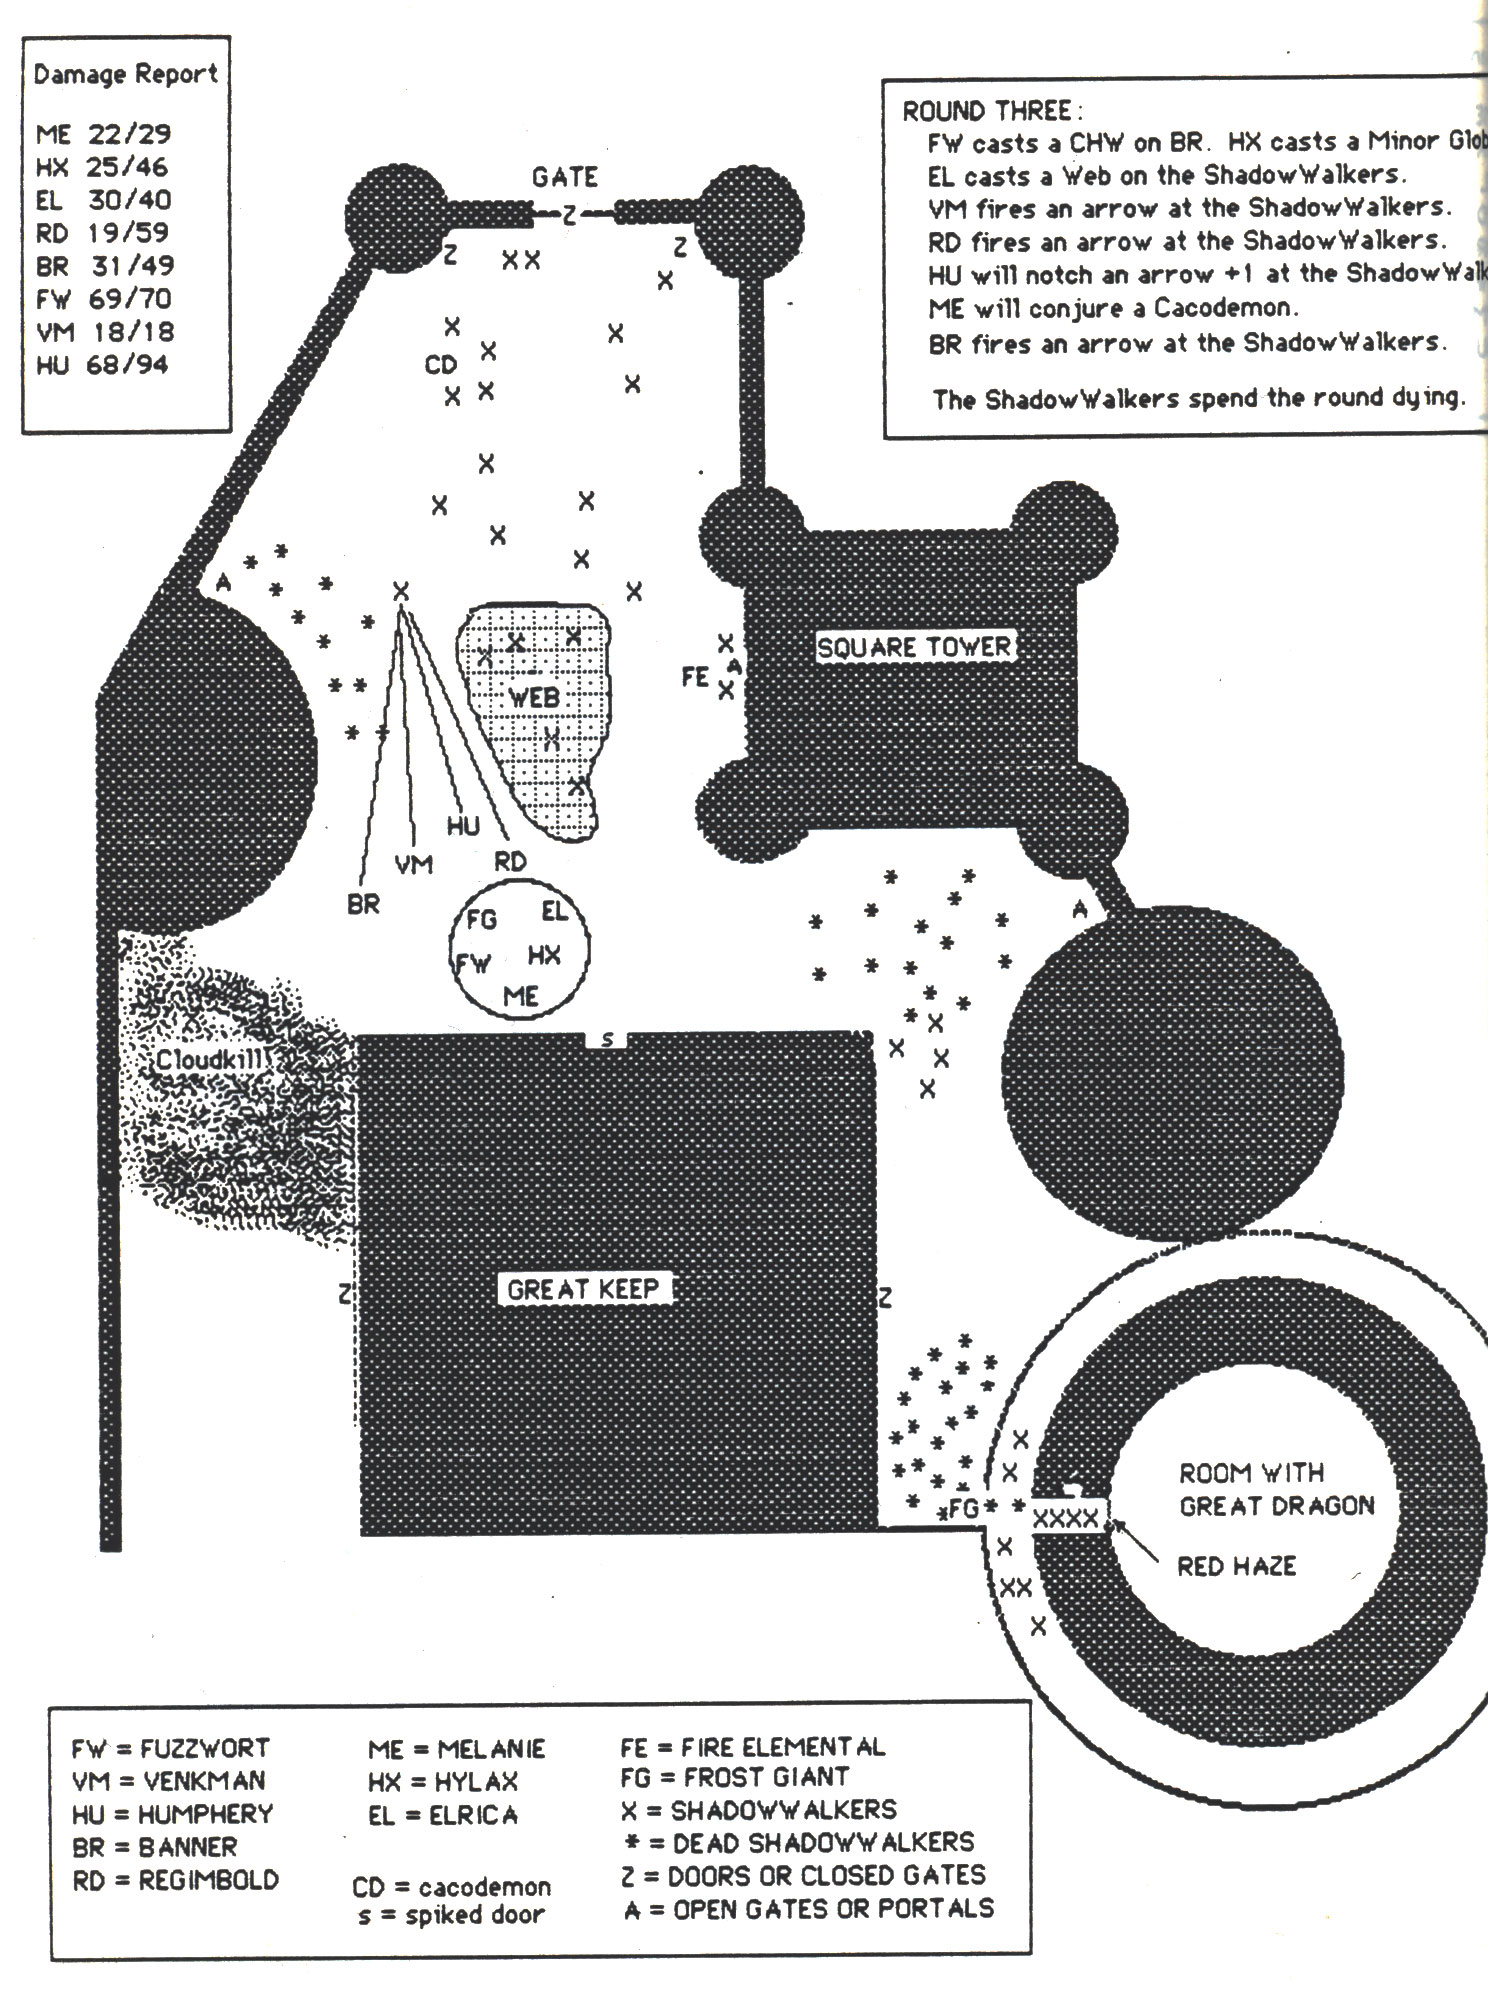
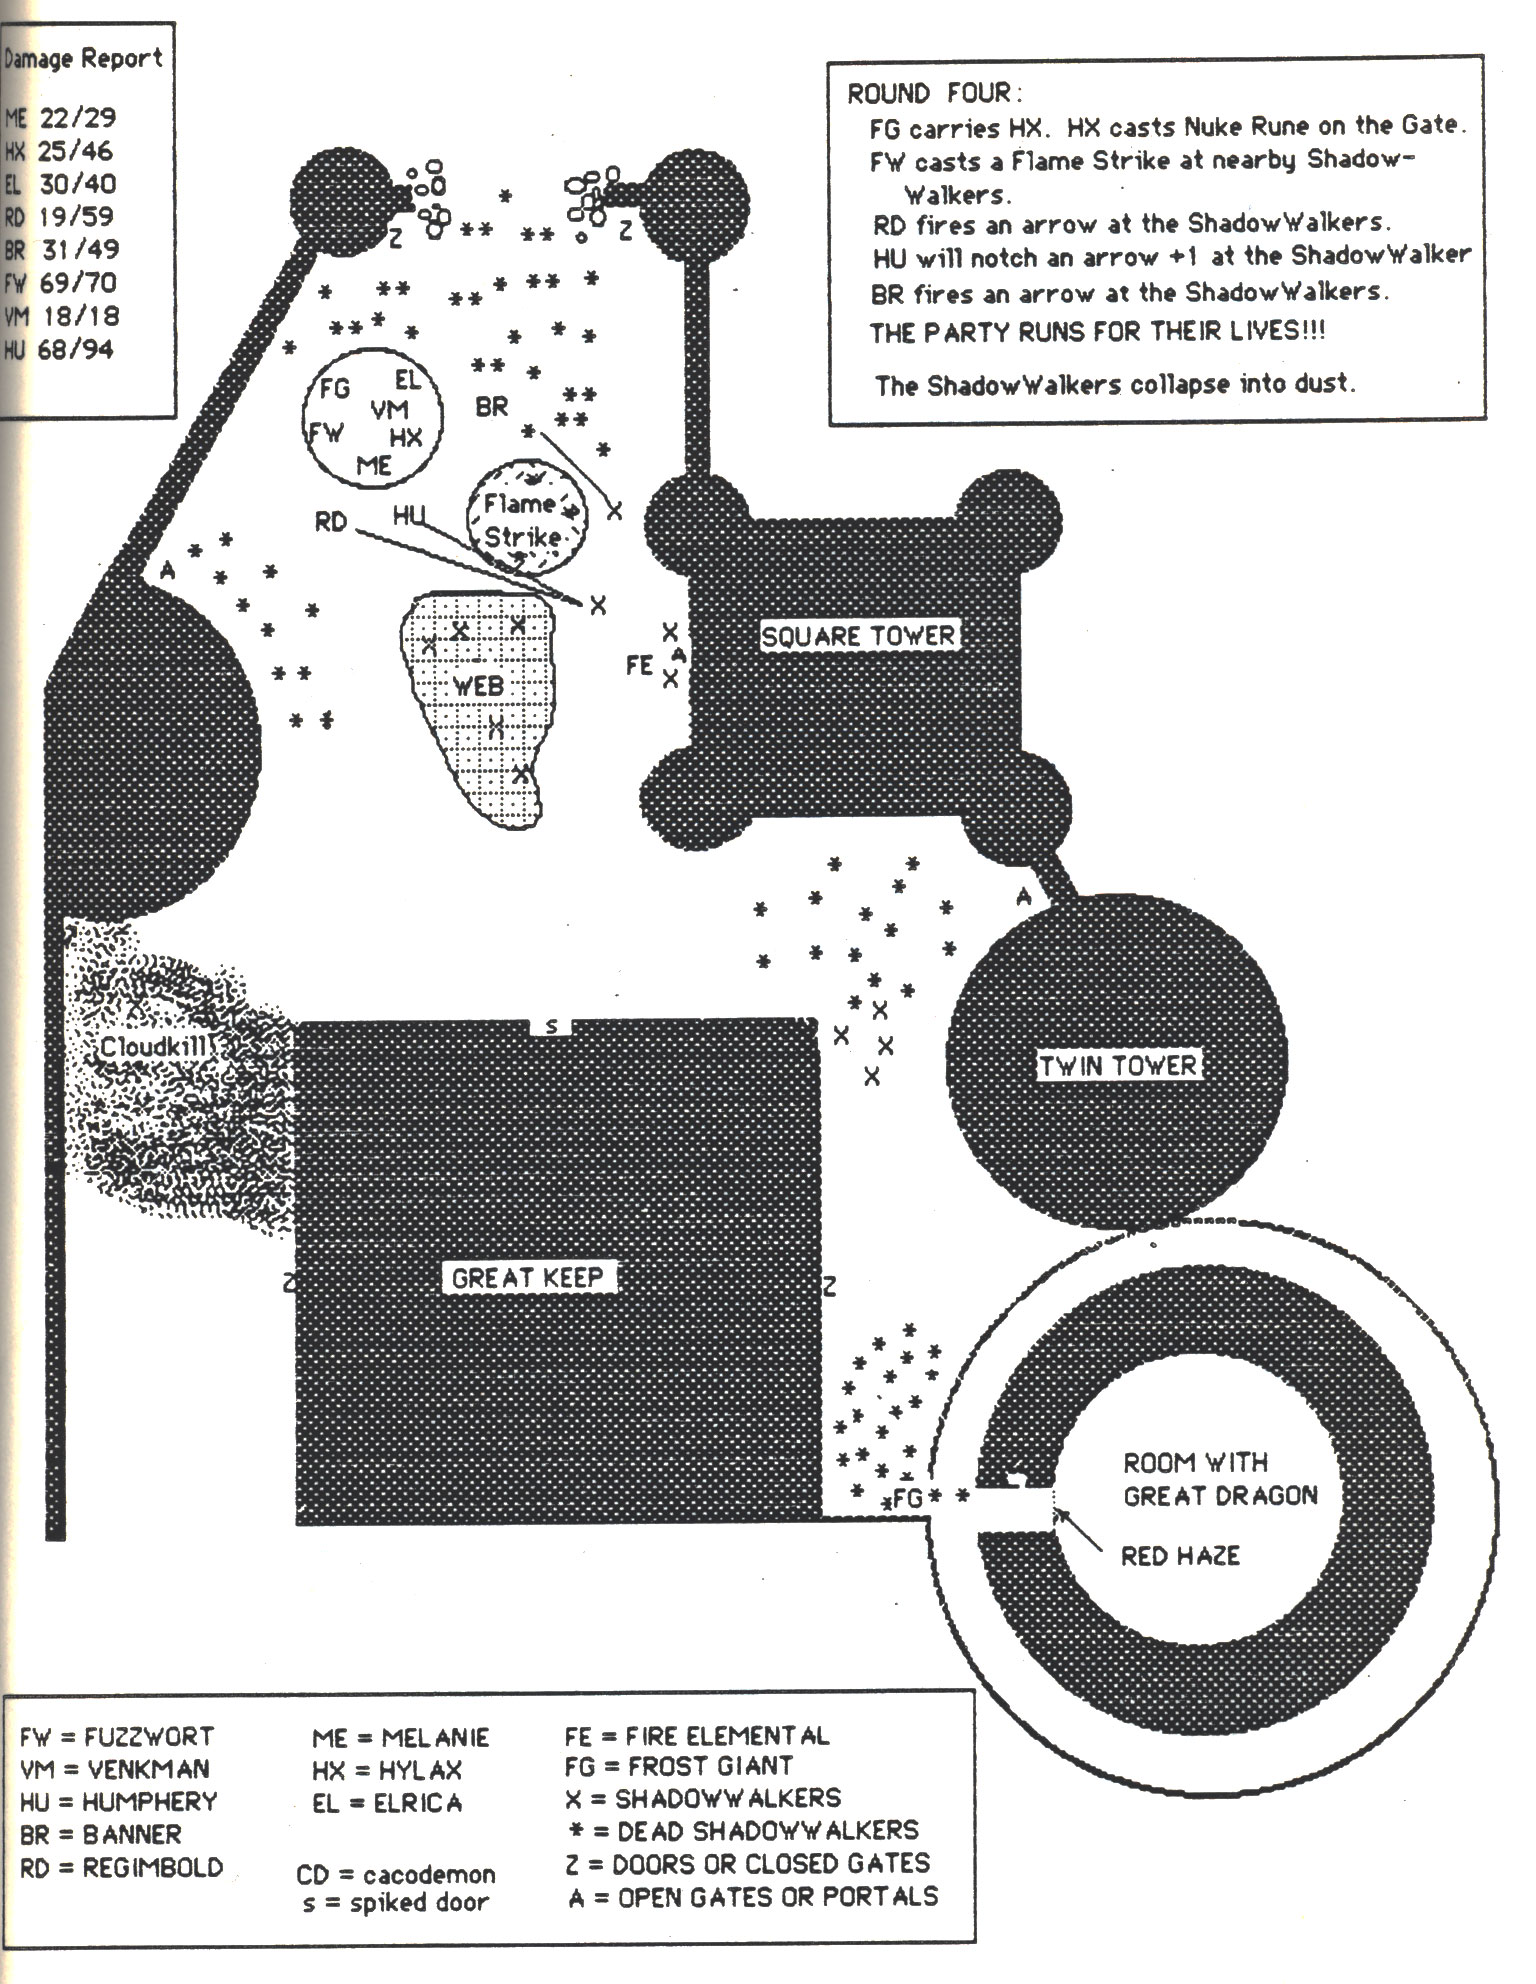
Your party is entering into the Great Keep when you make your break for it. The walking order determines the number of swings that the Shadowwalkers get. The entire melee (before the Nuke Rune spell) takes only 11 rounds. After a poorly fought battle and a hasty retreat, your party regroups on the green circle with the x in the middle. The remaining Shadowwalker guards and some from the circular hallway come towards you. Quickly, everyone unpolymorphs into their original form. There are about 20 guards in a nice closed-in area near the entrance. Three are injured from the previous fight. Hylax casts a Nuke Rune. He does not pass out. A blinding flash of light rips through the air. The party is blinded by the light, and as the glow slowly fades you see twenty small piles of ash. Melanie summons up one nasty frost Giant just in time to intercept another group of Shadowwalkers.
Your party heads to the north and rounds the Great Keep. An alarm has sounded, and guards are pouring in from an nearby doors. Well guys, it looks like your not out of it yet. 40 down and 40 to go. What do you do?
Only Action: Escape the clutches of death.
As your party begins to do some serious wailing on the poor Castle of the Great Dragon of the Ether, you find that there are lots more Shadowwalkers than at first you imagined. However, by cleverly sealing the entrances into the courtyard and then blowing a hole in the north wall , you are able to escape the castle. You can see a Shadowalker here and there inside the castle, but they don't seem too anxious to engage your party. No sign of Merdebax can be found. The last you saw of him was with the priests in the room with the Great Dragon.
As you run through the northern hole, you are greeted by a frightening sight. The smooth black plane of the Ether is dotted by hundred of black shadows (shadowwalkers undoubtedly). Most of them are very far away, and the nearest group is still hidden in the mist. You move far enough away from the castle so that you cannot seen by guards. It seems that you have a few moments (hidden in the mist) to do whatever. ¥hat's your next move?
OM's note: The fire elemental is still doing damage, but the cacodemon was destroyed by the Nuke Rune spell. I think that you can see this by studying your last set of melee maps.
First Action: Resurrect Ichabod.
Humphery pulls the lifeless Ichabod from the Bag of Holding. Fuzzwort uses the Rod of Resurrection to restore the little guy. He makes his constitution check. Ichabod is no w at full strength.
Second Action: Move to and collapse the Great Tower.
The party quickly makes for the Great Tower in a counter-clockwise direction. The frost giant carries Hylax. Ichabod, Melanie, and Fuzzwort fly on the Magic Carpet. The fighter types will run on foot, they're tough. You are about three quarters of the way around the castle when suddenly three Shadowalkers appear on the wall. They are looking at you. One of them is pointing to where your party is (hidden in the mist). Thinking quickly, Elrica casts a three-prong lightning bolt and the walkers fall off of the wall. You think that they are dead, but you're not sure. The flash of lightning may have drawn some attention. Continuing, the party stops at the baseof the Great Tower. The carpet lands and the giant puts the runt on the ground.
Fuzzwort and Hylax get on the carpet and race to the top of the dome. It takes four Glassee spells to see through the dome. It seems to be made of stone and metal . You do not see Merdebax and the priests. They seem to have left. The dragon is still there. Fuzwort casts True Seeing, but the spell reveals nothing out of the ordinary. You cannot tell whether the spell works through the red haze. Hylax takes the Heavy Hammer from around his neck. Uttering "Holbern," he strikes the dome in three places. Boom. Boom. Boom. Needless to say, the effects of three Earthquakes on the dome is sufficient to bring it down. You hear some creaking as if metal is bending, followed by the rumbling of masonry falling, finally the whole dome collapses very quickly. The roof falls onto the red haze (which holds it up for a few moments). Then the red haze disappears and the entire roof of the Great Tower (now known as the Great Circular Wall) falls down.
Needless to say, the entire contents of the room below take much damage. The furnishings and such are destroyed utterly, but the great dragon takes only minor damage. It is chipped and in some places broken, but the statue is still intact. Hylax and Fuzzwort fly down into the room. Humphery fashions a door with a Stone Shape spell off of his sword, and the rest of the party enters the room from below. The one giant that you have already is able to clear enough rubble away for the two groups to meet.
Here is the status of your quest: The entire party (an nine of you, ten with the giant) are now inside the inner room. There is a large hole in the roof, and there is no red haze. You see no guards, and the Great Dragon of the Ether {still stone) is chipped but whole in front of you.
Only Action: Restore the Great Dragon.
You post two guards on the carpet at the top of the dome. The giant and the dwarf guard the ground door. Fuzzwort and Hy1ax start casting Dispel Magic spells on the statue. Hy1ax goes first. He fails. Fuzzwort fails. On the third try, Hylax casts the spell, and slowly the stone dragon starts to come to life. As the dragon begins to move, you notice that he begins growing in size until he literally fills the room. Finally. his eyes open and he speaks: "I am Wor1dswing - also known as he who protects the balance of power in the multiverse. And who are you that have returned me from my fate?" Then, looking around, he states, "It is not safe here. I feel the presence of that wwrm Merdebax and his priests coming. Quickly, everyone touch me, and I will teleport us to a safe haven."
You touch the dragon, and suddenly you are plunged into darkness. Hylax thinks that he heard the familiar voice of Sirfexx lvancevio just before the party teleported. It could have been an illusion, but it sounded as if Sirfexx was hailing the little gnome. An instant later, you find yourself in a very odd-looking cave. Assembling yourselves in front of the Great Dragon, the usual formalities are exchanged. "Hail O Great And Mighty..." Worldswing thanks you for his rescue and promises you a reward if you continue to aid him. He says that there are only two things which must be done before his power is completely restored. First, his son (the egg) must be rescued. Second, the Artifacts of Ethereal Travel must be recovered from Merdebax. He knows the exact location of both the egg and the artifacts. The egg is held in a secret chest by Cirak Mirrorlife the Dream Master. No doubt still safely tucked away in the carnival. Cirak was pompous enough to think that he could raise the young dragon by himself {and for his own means). The artifacts are held in a secret room by Merdebax. Surely, the Ether Usurper was tipped off to the present situation and will be waiting. But time is of the essence, and Worldswing suggests that the nine of you take one mission, and he will take the other. Which journey do you wish to take?
Only Action: Go for the goodies.
Your party discusses the different offers made by Worldswing. You decide to go into the castle and go for the artifacts. The Artifacts of Ethereal Rulership include a staff, crown, and net. Contrary to popular belief, the artifacts are made of plain oak, iron, and rope. They do not radiate any aura of magic, but any attempt to use the items will reveal their true nature. Worldswing says that it took him over 200 years to master the items, and Merdebax has already scattered the molecules of three of his priests trying to experiment with the net. That is why he has supposedly returned them to their original hiding place for safekeeping. Worldswing did not give Merdebax any clues (that is why he was kept alive as a statue) as to the artifacts' true workings. The dragon suggests that you merely grab the items and break the teleport bead that he has given you. Worldswing gives you the following items:
- A Teleport Bead which will bring your party and an items that you are touching back to the cave.
- A Map of the Third and Fourth Floors of the Square Tower with the location of the Artifacts, secret doors, and other things marked. The large central room on the map shows a dais-like structure. On the dais is a stone pedestal where the items are supposedly kept.
- A Key To The Artifacts Room Door which may come in handy.
Worldswing teleports you to the large conference room on the fourth floor. You hear the voices of shadowwalkers coming from the hallway outside. By carefully peeking through cracked doors, you ascertain the positions of the shadowwalkers. You overhear enough of their conversation to hear that Merdebax is looking for a book on the workings of the Artifacts. Thus, most of the shadowwalkers are in the library. They do not speak of the dragon's escape (or your arrival). This might mean that news has not traveled throughout the entire castle yet.
You post guards at the door, and Hylax casts two Glassee spells from Reinwood while Fuzzwort casts a True Seeing spell. The room below has a circle of six steps leading upwards to a four foot high stone pedestal. On top of the pedestal is a black globe. It looks as if a Darkness spell has been cast on it. The True Seeing spell shows that a glyph has been cast on the door and a secret drawer located on the lower part of the pedestal is also protected. No information about the black globe is gained.
Hylax casts a Disintegration spell on the floor, and a breach in opened in the ceiling of the treasure room. You do not hear any voices, but the walls are pretty thick. Hylax tries casting a Dispel Magic on the globe, but the spell is not successful. The room is empty, and you can easily lower each of the party members (except the giant) into the room. Just as you are discussing this, Humphery reports that several of the shadowwalkers are coming towards the door. He suggests immediate action.
First Action: Grab Ethereal Artifacts.
Thinking quickly, Hy1ax casts a Wizard Lock on both doors in the Conference Room. Almost immediately, you hear a shadowwalker trying the door. He yells something about it being locked, and you hear a number of footsteps approaching the door. Fuzzwort casts a Cure Heavy Wounds on Humphery, Melanie conjures a Fire Elemental, and Venkman lowers a rope into the hole in the floor.
The party positions itself in the following manner: the giant is by the noisy door, Humphery is by the quiet door. Venkman is at the top of the rope. The fire elemental, Ichabod, Elrica, Fuzzwort, Banner, Hylax, Melanie, and Regimbold lower themselves into the vault room. When everybody is down the rope, the fire elemental positions himself by the trap door and the rest of the party remains near the pedestal. Hylax casts a Glassee spell on the pedestal. It reveals that inside the pedestal are three items: an iron crown, an oaken staff, and a rope net. Sound familiar? In a moment of unparalleled splendor, our faithful adventurers avoid the nasty Sphere of Annihilation, and concentrate on the pedestal. Carefully casting a Stone Shape spell, Hylax fashions a stone door leading into the pedestal vault. With all other obstacles out of the way, Ichabod quickly grabs the artifacts and Hylax breaks the bead of teleportation.
Second Action: Return the artifacts to Worldswing and get reward.
Mists swirl, and you find yourselves back in the cave. You look around, but there is no sign of Worldswing at all. Suddenly, everything becomes dim again, and the entire party is teleported into the courtyard of the Ethereal Castle. Standing in front of you is a man. He is a human of middle age with silver hair and grey eyes. He is dressed in a simple blue tunic . You recognize the man as Worldswing. He holds his hands out ceremoniously, and you see Ichabod go forward and place the staff, crown and net into his hands. He smiles at each of you and places the crown on his head. It glows slightly. The net he hangs from his belt, and the staff remains in his hands.
hen this ceremony has ended, you feel as if some charm is broken and you look around for the first time. The castle courtyard is in ruins, and the Great Tower is crushed in. You notice that there is a distinct lack of shadowalkers nearby. Behind Worldswing you see Merdebex and twenty priests. They are stripped of their fine clothes and are dressed in black tunics. In place of their usual staves they carry shovels, picks, and work implements. Worldswing laughs and says that he has found a willing work force to rebuild the castle brick-by-brick. It should only take about 50 years.
Worldswing then asks for the key and the map back that he loaned your party, and he congratulates you on a job very well done. It seems that Cirak Mirrorlife the Dream Master saw the folly of his ways and returned the egg unharmed. Funny what an enraged dragon can do.
Again eech party member's attention is drawn back to Worldswing. He again thanks you for your help. To each character he decides to bestow a gift. First, Worldswing passes his staff over the party. Each in turn is healed of his wounds, and the fallen witch is resurrected. Also, the fatigue of battle seems lessened. To Hylax, Worldswing offers the following gift (which I assume you accept):
A small vial of the primal source (known as Magicium). The gold piece value of such an item is staggering (about 100,000 gold pieces). The vial contains about 100 grams of white powder. This is enough to create about 10 levels worth of magic items. The vial radiates a strong aura of magic. It will be critical to have this substance when learning to create magical items. The services of Worldswing or one of his minions whenever you feel that your life is threatened (once). This is somewhat limited in that the gift can be used only to save Hylax, but it can not be used to destroy a foe. This comes about because Worldswing has sworn to uphold the balance of good and evil in the world, and any such actions against one side could jeopardize the his neutral position.
Final Action: Return the party the Realm.
Worldswing then takes his net from his belt. He wings in around in a circle above his head three times, and casts it several feet away. The net disappears, and, in a blinding flash, Sirfexx and party appear where the net had been on the ground (and the net reappears hanging on Worldswing's belt). Worldswing tells the fifteen adventurers that there is much work to do before order is restored in the Ether, and so he must bid you farewell. He wishes you the luck of the gods, and again takes out his net and wings it over his head. Mists whirl, and our hearty adventurers return to the Realm. Sirfexx, Hylax, and Fuzzwort appear at the gates of Rivershaw Castle on the River White. Overhead on the ramparts, you see the smiling face of Ernest Goodfellow. He hails you and calls for the gates to be opened. It seems as if the adventure has just begun.
Wrap-Up
Today's date is January 12, 833. It has been a number of months since the strange carnival of Cirak Mirrorlife the Dream Master came into Teufeldorf, and a number of Realm-shaking events have taken place since then.
The last time we saw our adventurers, cryptic clues had been left on each of their doorsteps by the captain of the Lost Horizon. He was in need of intelligent and cunning companionship. U-Gene, Vince, and Ernie, however, were caught up in enjoying the life that Teufeldorf had to offer and decided to ignore the plea. There they stayed until the storm hit, and they were forced to flee from the city. Ohm, Fuzzwort, Hylax, Sirfexx, and Falstaff were intrigued by the situation and began to investigate. Ohm ran into many dead-ends and subsequently returned to the quiet city life. Falstaff, in the guise of a humble bookseller, rode the flaming chariot of Sustare to Sandal. Before he arrived, a king's messenger arrived, took charge of his books, told him of the desperate situation, and pleaded for his noble help at Rivershaw Castle. Hylax, Sirfexx, and Fuzzwort masterfully travelled to the Ether avoiding many traps and pitfalls along the way. After saving the Realm from the evil usurper Merdebax (which is another story altogether), they were transported back to Rivershaw castle by Worldswing, the Great Dragon of the Ether. And so the party is gathered together again.... This time to forge a kingdom for themselves.
