Hookhill
| Type | Dungeon |
|---|---|
| Status | Explored October 890 TA |
| Location | Hookhill |
| Hex | 1610 |
| Campaign | Hookhill Campaign |
| Adventure # | 110 |
Overview
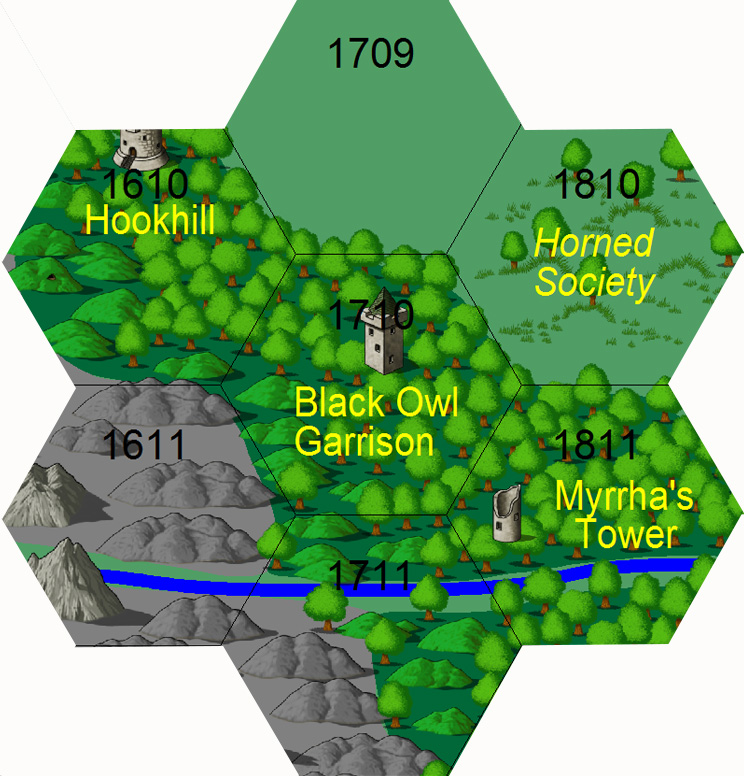
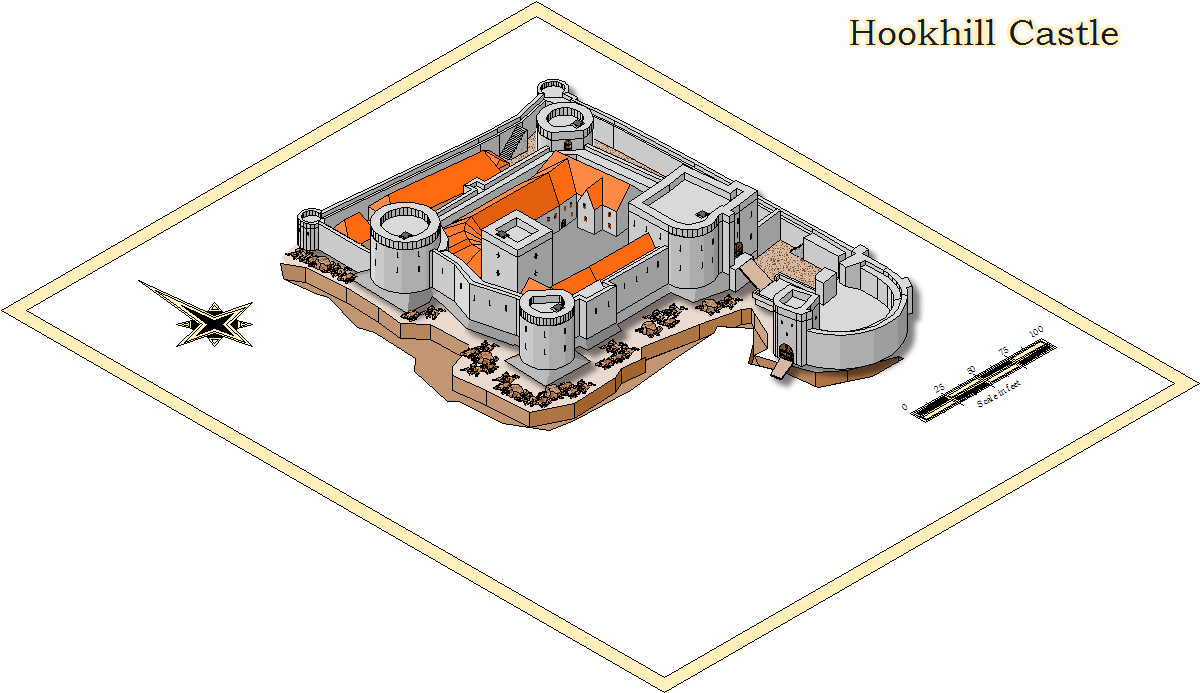
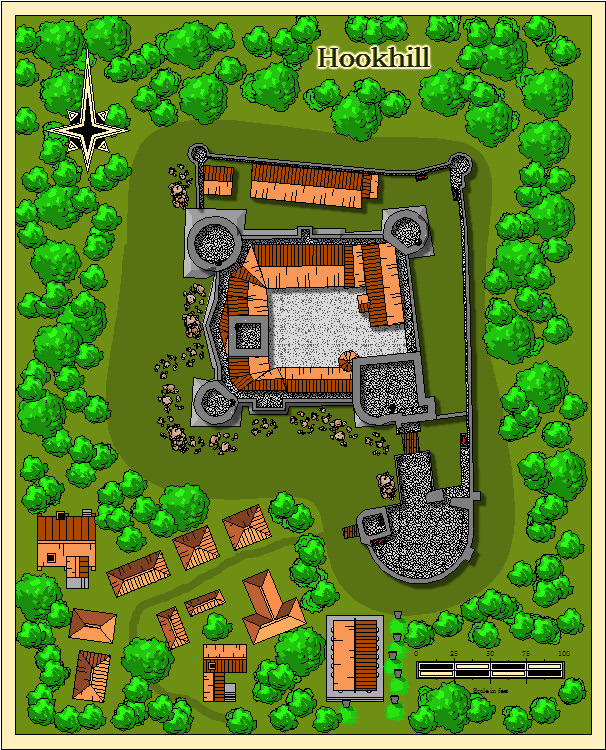
This lone hill at the northern end of the Misty Woods east of the Cairn Hills is the home of the Horned Society. The hill itself has sheer sides making it easy to defend. Tunnels are said to lead from the stronghold at the hill’s summit into the forest below.
Originally a stronghold of the more organized of the orc tribes, the area came under the rule of a group of evil humans some decades ago. It is speculated that these wicked people were disaffected bandits or were at least aided by one of the bandit barons. In any case, the land between the Cairn Hills and the Forest of Bloodlent is now firmly in the grasp of the Society. It is known that many troops of bandits from the Bandit Kingdoms frequent the walled town of Hookhill.
There are no children in the village.
Hookhill Graveyard - The graveyard at the base of Hookhill runs in all directions, its tendrils probing deep into the murky trees and right up against the cliff face. While incredibly ancient, there are recent signs of grave robbing – although closer inspection shows the graves to be exploded from the inside. There are no mausoleums here, although ornate headstones appear to be popular. The graveyard runs on both sides of the stream here, a testimony to the harsh life of the area.
The Cast
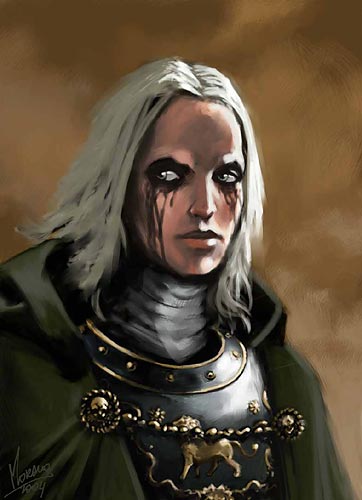
Walford Woebringer, Guildmaster of Horned Society, is typically dressed in ornate green and gold armor with a long green cape. Believed to be a young man, Woebringer has grey-white hair and strange red streaks below his eyes – thought to be the result of a demonic experiment gone wrong. The Guildmaster of the Horned Society is known for ruthlessness, although he is even-tempered and thoughtful in his decisions to murder and torture those that oppose him. It is rumored that Woebringer is immune to pain, although this theory has never been confirmed. A shrewd businessman, the fortunes of the Horned Society have never been greater.
Milliwitt, a mid-level sorcerer of the Horned Society. Deaf and mute, Milliwitt is the perfect companion to Walford – although many do not realize that he is actually a sorcerer. Milliwitt primarily assists Walford with information gathering – scrying, detecting, etc. It is rumored that they have a silent communication between their minds. Milliwitt uses a Wand of Shouting as his primary offensive weapon, although he has learned silent casting to allow him a normal range of spells.
Bentbrood - A mysterious figure, Bentbrood is rumored to have been a druid of the Bloodlent. Now, he resides at Hookhill - although his whereabouts are shrouded in confusion. He is also rumored to be the instigator of strange storms over the Misty Woods. He is currently wanted by the Lord March.
The man was hunched, wearing a faded brown cloak. From his neck hung a glowing purple amulet suspended by a thick silver chain. The man’s staff was made of a black wood, nobbed on top and streaked with silver down its shaft. The silver in the staff glowed brightly in the morning’s sun.
As the man approached, he looked at the boy – purple eyes showing vigor that his old body did not mirror. The man had black lank hair and brownish teeth. Approaching the gate, the man knocked once with his staff and was admitted entrance without challenge or question. As he stepped through, a strange, acrid smell remained.
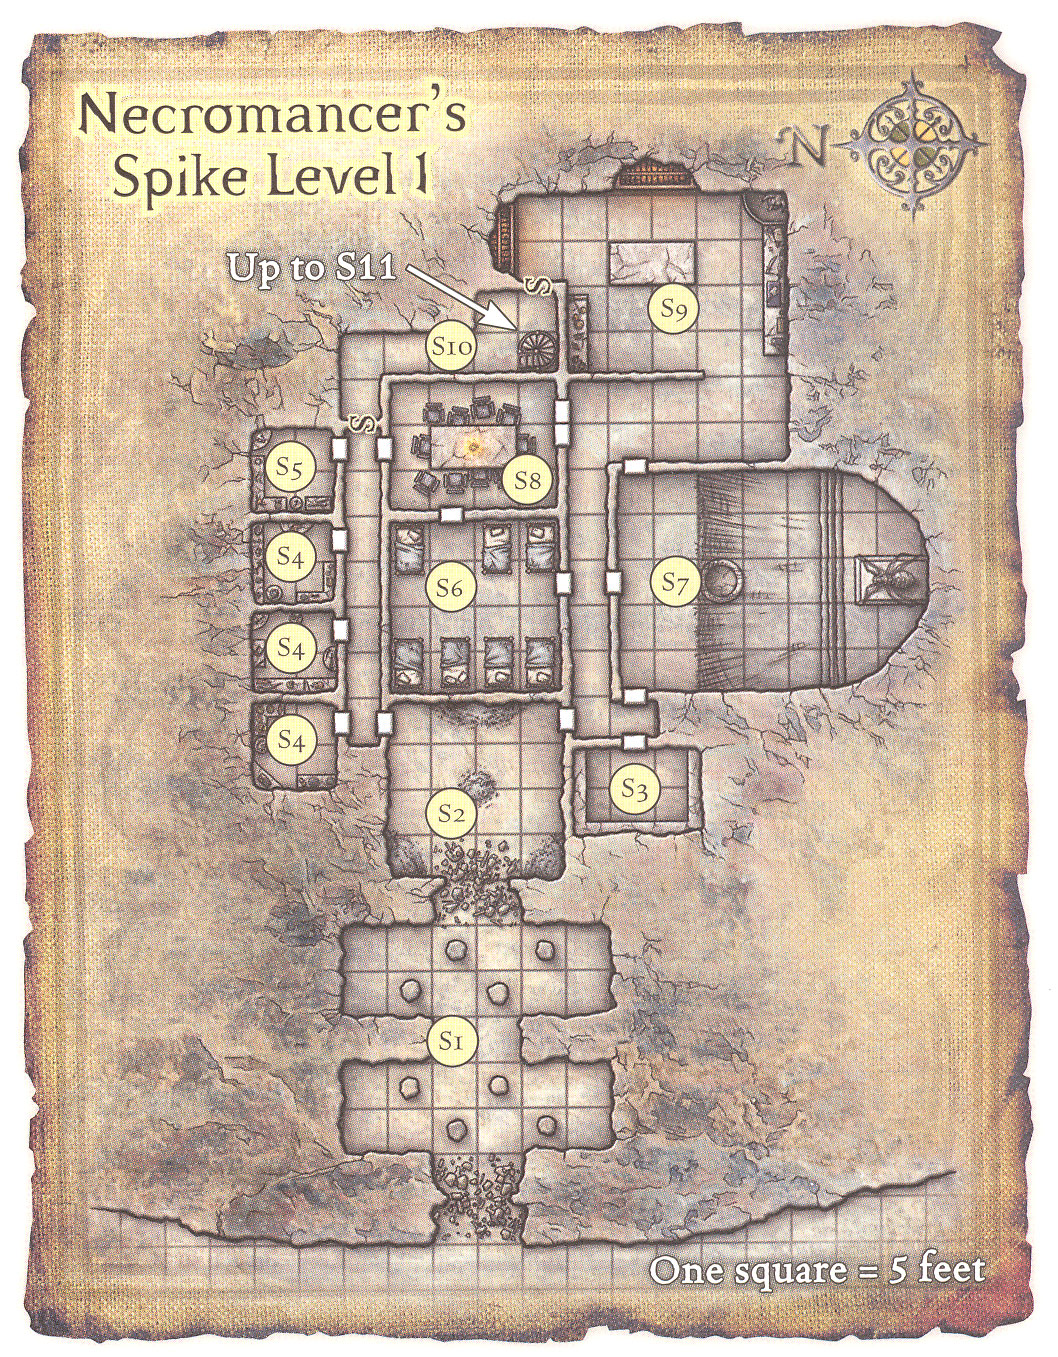
Secret Entrance: Level 1
The inside of the Eye (of the Needle), the rooms are dark. Most ceilings are 10 feet high. The doors are stone; 4 inches thick; AC 4; hardness 8, 60 hp; break DC 28. Door are unlocked. Secret doors are DC 25 Search check to locate and close 1 minute after they are opened.
The entire Eye radiates a faint aura of evil and enchantment.
Spectral remnants are not undead and cannot take actions – nor can they be harmed. A DC20 Knowledge (religion) check identifies them. Distant cries, Fleeing phantom, Whispers in the dark, Corner of the eye.
Room S1: Entrance
The two statues are gargoyles. Speak “I HONOR THE HORNED MASTER” to pass freely.
Room S2: Guardian Chamber
There are scorch marks here as if a number of graves have exploded from the inside. There are no footprints here.
Room S3: Chamber of the Grandmasters
These are the bodies of the old Grandmasters – preserved so that they can be spoken with – a way to keep a ledger without having to write it down. The area radiates a faint aura of evocation. The party can find out the story of the Crypt of the Three Kings here.
Room S4 and S5: Storerooms
One contains religious items, another foodstuffs, and the final two building supplies and rusted weapons.
Room S6: Quarters
Casual inspection reveals that the doors are designed so they can be locked from either side. The room otherwise contains musty sheets and blankets.
Room S7: Shrine of the Horned One
The doors here are adorned with large etchings of a horned demon.
The bowl contains small scraps of paper each with a word written on it. Saying the phrase, “THE HORNED MASTER KNOWS ALL” allows a character to pick up a scrap with the password on it.
The two statues are gargoyles. Speak “I HONOR THE HORNED MASTER” to pass freely.
Room S8: Dining Room
The candles have continual flame cast on them, so the radiate a faint evocation Spellcraft DC 17 to determine.
Room S9: Kitchen
Several exploded bodies can be seen here.
Room S10: Spiral Stairs
A set of wrought iron stairs wind up into the darkness.
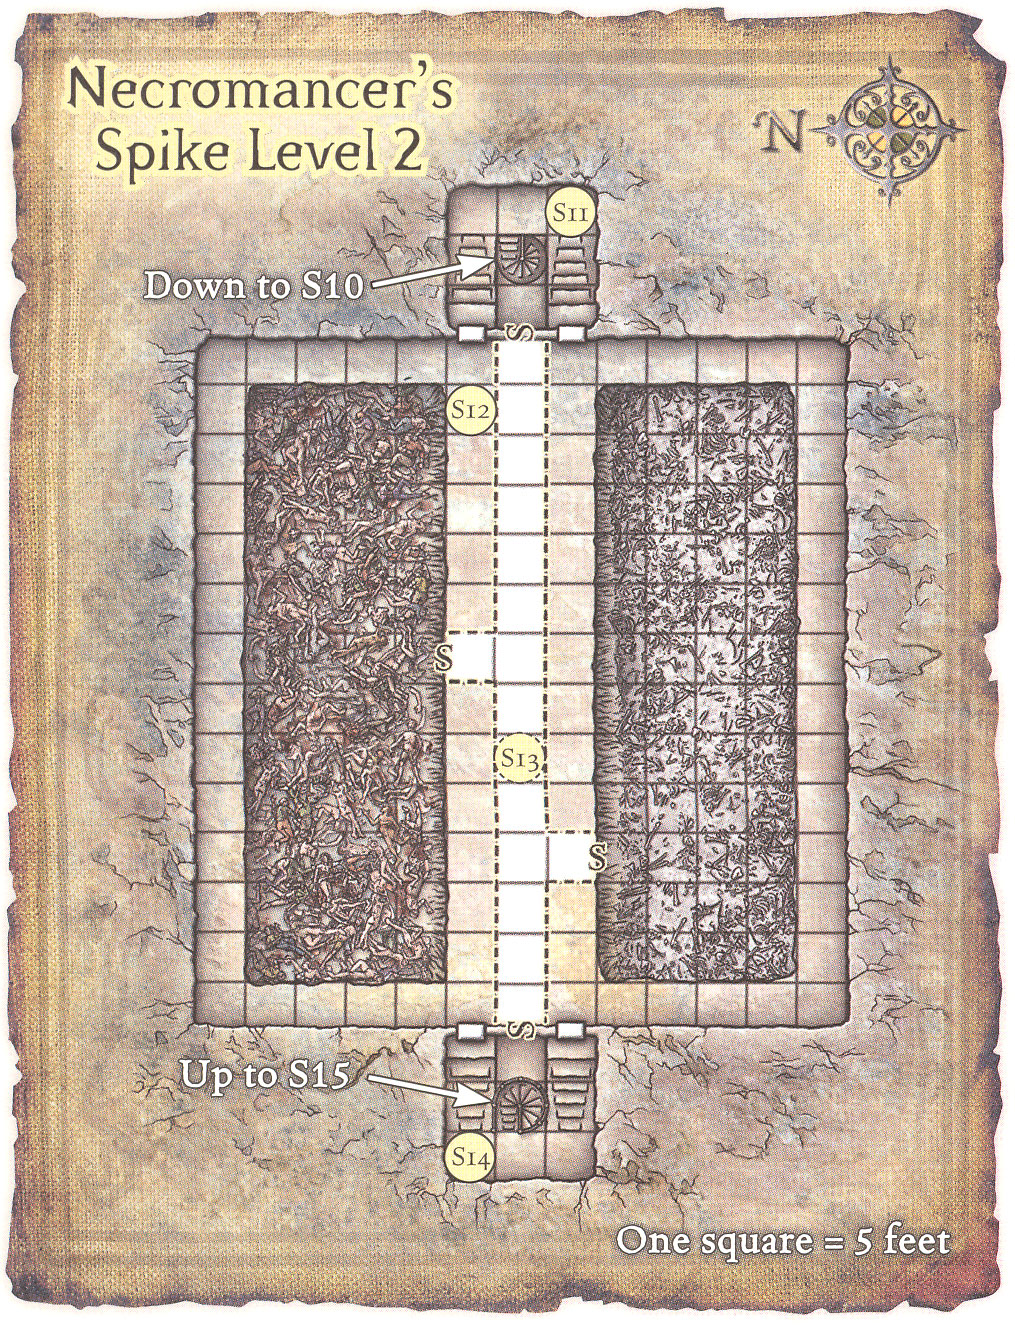
Secret Entrance: Level 2
Room S11: Foyer The small stone chamber is almost a perfect cube. Other than the spiral stairs down, two staircases ascend on the south side of the room. At the top of each stairway is a stone door with a heavy iron bar across it. The space between the two flights forms a ledge between the two doors.
Take the path less traveled to avoid the path that all men take.
The other two will fire a Glyph of Warding (Blast): spell; spell trigger; automatic reset; spell effect (5th level cleric); 2d8 sonic, Reflex DC 14 half; multiple targets (all within 5 ft.) Search DC 28; Disable Device DC28.
Room S12: Charnel Pit
The flesh golem can only be passed by the code word – found on the scrap of paper in Room S7.
Room S13: Golem
Room S14: Landing
The bars are easily removed from one side. A secret door leads to S13. The spiral stairs ascend 40 feet to S15.
The other two will fire a Glyph of Warding (Blast): spell; spell trigger; automatic reset; spell effect (5th level cleric); 2d8 sonic, Reflex DC 14 half; multiple targets (all within 5 ft.) Search DC 28; Disable Device DC28.
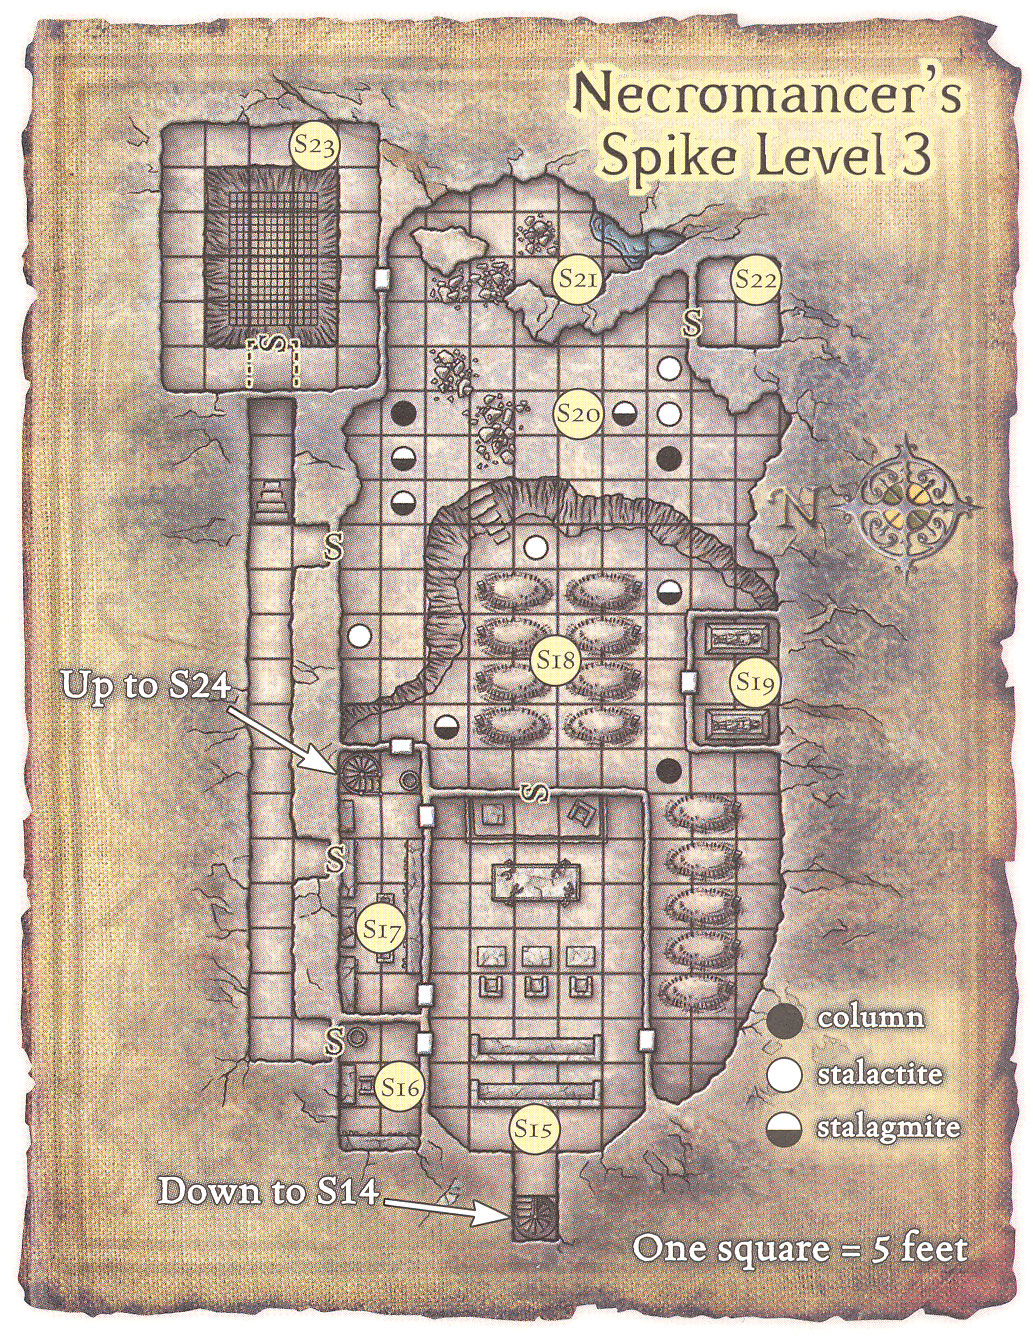
Secret Entrance: Level 3
Room S15: Hall of Audience
Room S16: Study
The font is dry. Ample parchment, ink, charcoal, and three blank books sit unused on the desk. The bookshelf is packed with old journals, esoteric texts, stray papers.
One journal contains details on the creation of the magic mirrors in S24. It describes the creation process and the guardians, as well as how to attune the mirrors to other locations, but it doesn’t tell how to avoid the guardians. Another few journals contain ravings about vengeance on King Vince, as well as formulations for creating a new magical disease. DC30 Search check and 1 hour to quickly find this. 8 hours otherwise.
Scrolls – Create Undead
Scroll – Vampiric Touch
Boots of Speed
Room S17: Library
This library contains mundane educational texts, and the font here is dry. A secret door opens a bookcase and leads to a corridor that connects this room with S16, S20 and S23. The stairs ascend 50 feet to S24.
Room S18: Graveyard
Room S19: Mausoleum
Two great stone sarcophagi swivel open easily, remaining connected to the stone coffins they seal. The sarcophagus with the female figure contains a perfectly preserved body of a breathtakingly beautiful woman covered in a shining burial cloth and dressed in regal finery. The other sarcophagus is empty.
Shroud of Perpetual Beauty.
Room S20 – S22: Cavern
Room S23: Well
DC20 climb check to scale the well. The top is a magically treated iron grate – hardness 16, hit points 90, break DC40 per 10x10 section. The grate radiates a moderate aura if viewed using detect magic (Spellcraft DC20, Conjuration).
Secret Entrance: Level 4
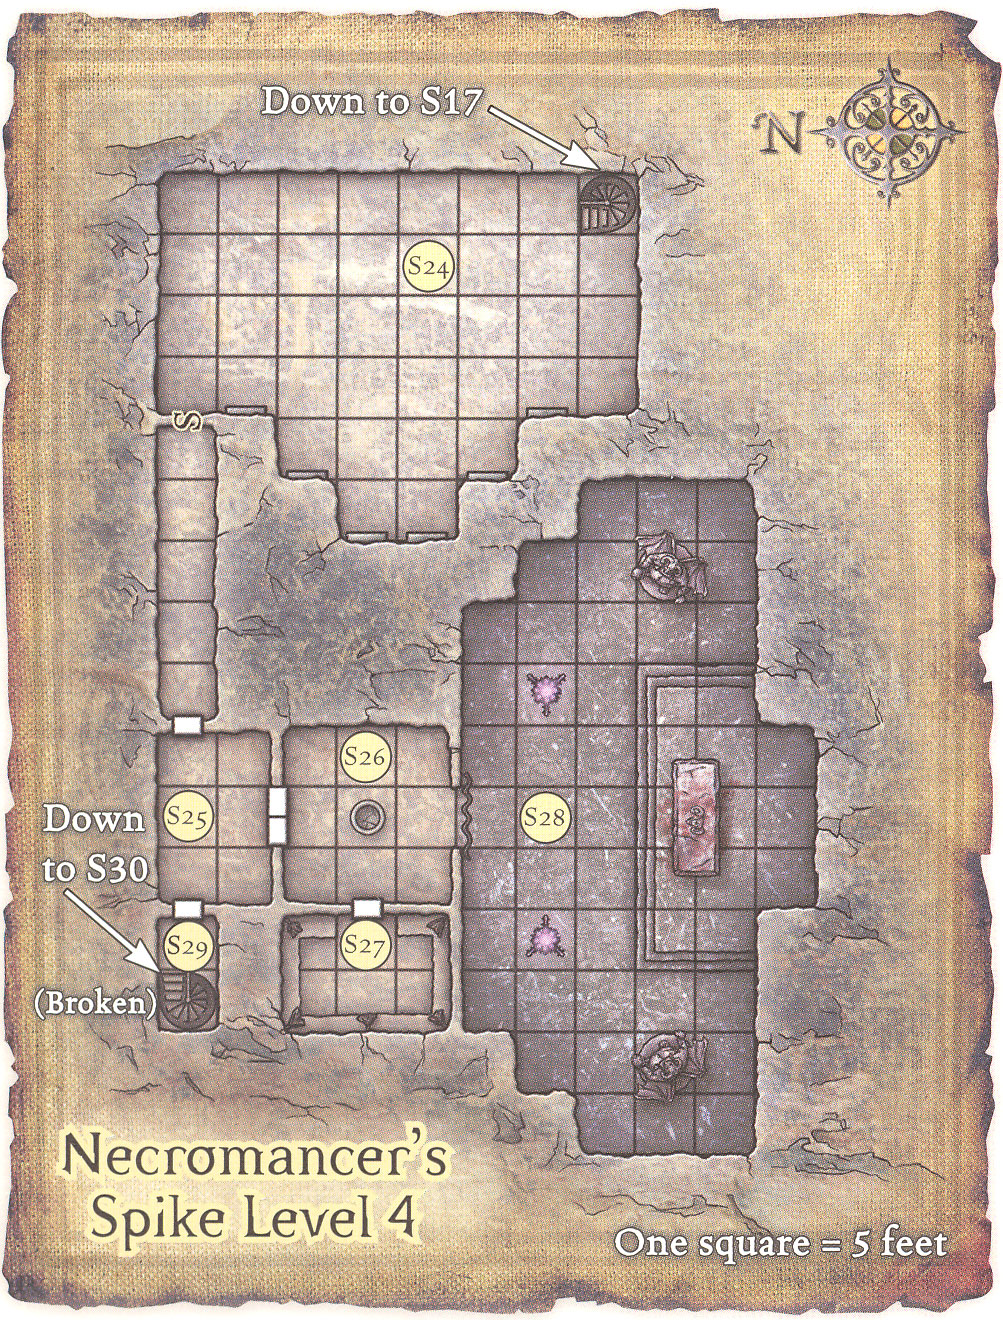
Room S24: Hall of Mirrors
The mirror grinds as glass extrudes from it. A hulking figure formed of glass emerges quickly. As it emerges, a faint blue luminescence can be seen in its translucent interior.
The mirrors are attuned to different areas (Spellcraft DC20 for divination). Can be attuned using the journal is S16 and Orb in S35. The mirrors are 1 foot thick, AC 4, hardness 2, HP 21, Break DC 38 per 5x5 section. Currently one is attuned to the courtyard.
Mirror 1: You see a courtyard before you and recognize it immediately as the central bailey of Hookhill castle. It is late afternoon and cloudy. Two guards are standing near a central well talking.
Mirror 2: From the dark shadows that fall upon this scene, it appears to daytime – although the dappled light shows the scene to be heavily forested. Your view is that of a stream or lake’s edge up from which a solitary path winds to simple cave. On either side of the cave, two large tree ents with glowing purple eyes stand their massive limbs swaying slightly in the breeze. There is no sign of life about the cave entrance.
Mirror 3: A swampy morass extends in all directions. The slightly undulating ground is dotted periodically with large mounds or small hills – each of which is covered in bright green grass and tangled thickets. A few mounds have collapsed, showing simple one and two room burial crypts. These ruins appear to be ancient with no sign of recent activity. In the center of the clearing, directly in front of you, stands a stone obelisk – the only man-made structure in the area. It is made of a porous black stone, almost worn smooth by ages of rain and exposure. This obelisk has a single door leading into its interior. An opening at the top was clearly for a bell, which now sits in a heap at the bottom of the monument.
Mirror 4: You see the smoldering ruins of the Black Owl Garrison as seen from above the moat house.
Mirror 5: Is currently dark. A close examination shows that it is simply night. The mirror appears to be focused on a stone slab in a small outdoor clearing. A thick jungle of trees surrounds the slab. (Watching long enough, you see a strange monkey-like creature with glowing eyes come into the frame before becoming frightened and scuttling off.)
Mirror 6: A large banquet hall is seen from one end of a long table. Several arrow-slit like windows are along one wall while the other walls each have a single door. A number of chairs have been pulled up around the far end of the table. Bentbrood is sitting in the chair looking directly at you.
S25: Entry Hall
The silvery metal is steel. This is a preparation chamber.
S26: Vestibule
S27: Vestry
The five robes are made of black velvet (5gp each).
S28: Shrine of the Horned Society
The ominous flames in the braziers have dark eyes – creatures! Malefic violet figures of flame crackle as they leap from the braziers, toppling those containers and spreading hot coals on the floor.
An amorphous cloud of darkness broken only by two points of blazing violet rises from the bloody altar. A breeze moves towards you as if it is drawing in the air. It hisses as it flies towards you.
Secret Entrance: Level 4
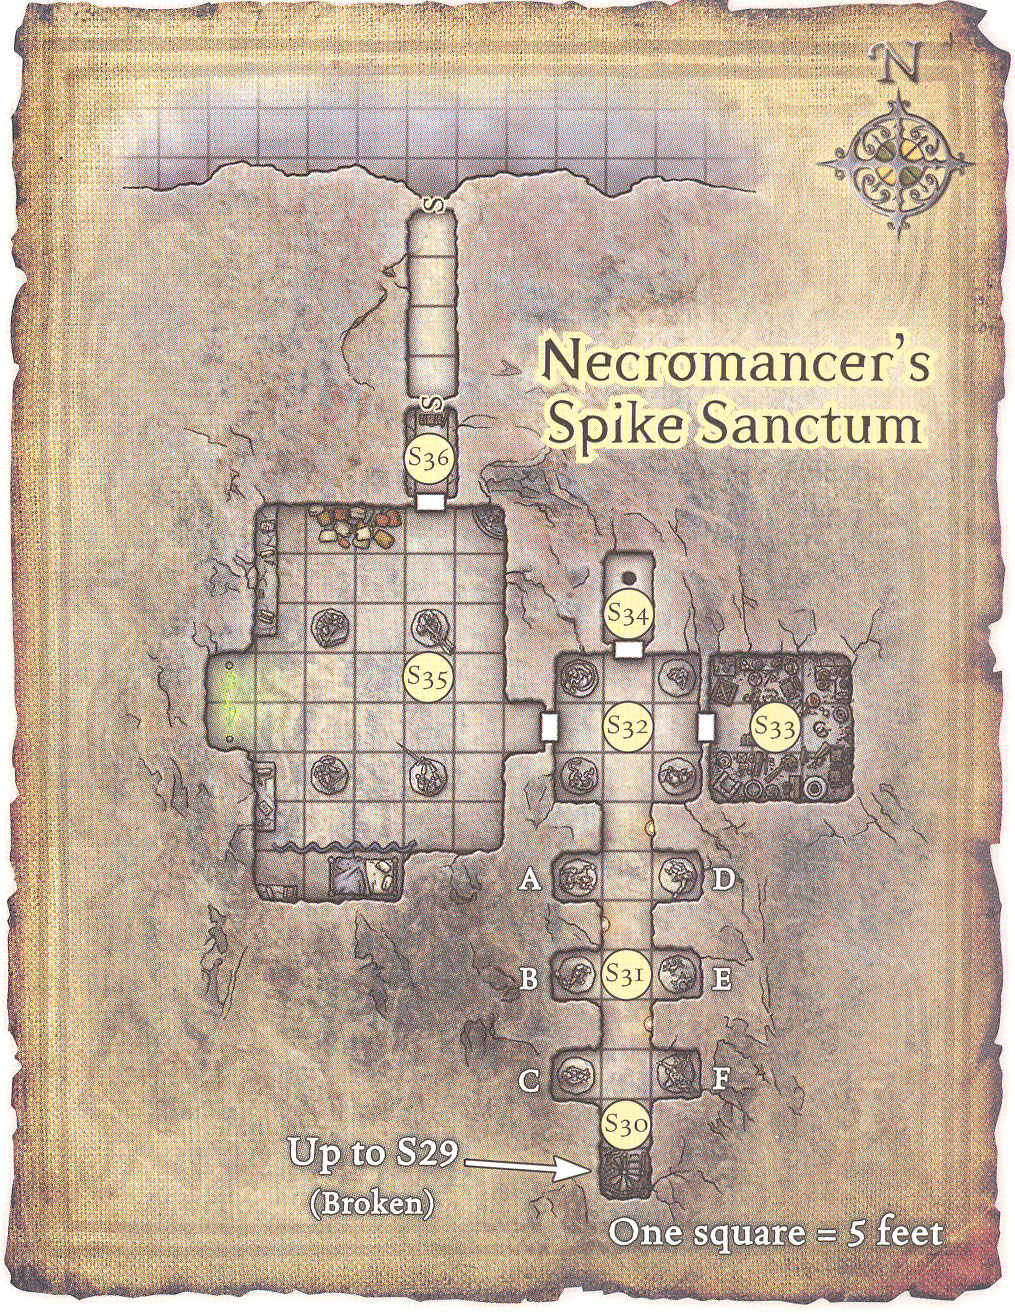
S29-S30: Cursed Stairs
This black iron spiral stair shudders and groans as climb onto it. It feels unstable.
If more than 300 pounds is placed on the staircase, it collapses. DC20 Reflex to jump off if at a floor. Otherwise, plummet 30 feet taking 5d6 points of damage. Players can climb the shaft (Climb DC30).
S31: Gallery Hall
Statues are those of six beautiful dancing girls, arrayed in only the skimpiest of attire. They are all posed as if in mid-twirl.
S32: Museum
Periodically, the western door will be illuminated with brilliant blue light, each time accompanies by a sound like the discharge of electricity.
S33: Storage
Crystal goblet (20 gp), gold comb (150gp), platinum circlet (450gp) – 1 hour of searching
S34: Lavatory
Poop.
S35: The Master’s Lair
Periodically, the electricity will jump to either door – giving it a brief charge. Anyone who steps between the two iron rods takes 5d6 points of electricity damage each round. The key can be used to shut the gate off for 1 minute either from the outside or the inside.
In the bed is Osa the succubus. She will beguile or attack with the Wand of Petrification. She is the Master’s consort.
In the north is a Field Provision Box.
In a secret niche near the bed, there is a magic chest.
Orb of Mirror Control
Wand of Petrification
Ring of the Gate
Book containing a list of the order of the Horned Society – including spies in Teufeldorf.
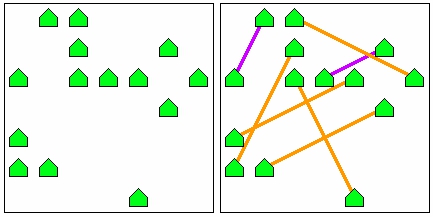
“A leader finds battlefield matches which suit the strength of his men. And his timing must be solid. Match each of these warriors in pairs so that only two different distances occur.”
S36: Stairway to Hookhill
An iron stairway circles up from this small room. It appears to be well used. The stairway comes up at the edge of the courtyard in a recessed alcove.
