Hookhill Environs
| Type | Dungeon |
|---|---|
| Status | Explored October 890 TA |
| Location | Hookhill |
| Hex | 1610 |
| Campaign | Hookhill Campaign |
| Adventure # | 109 |
Adventure Two. Black Owl Garrison, October 2, 890 TA
Black Owl Garrison
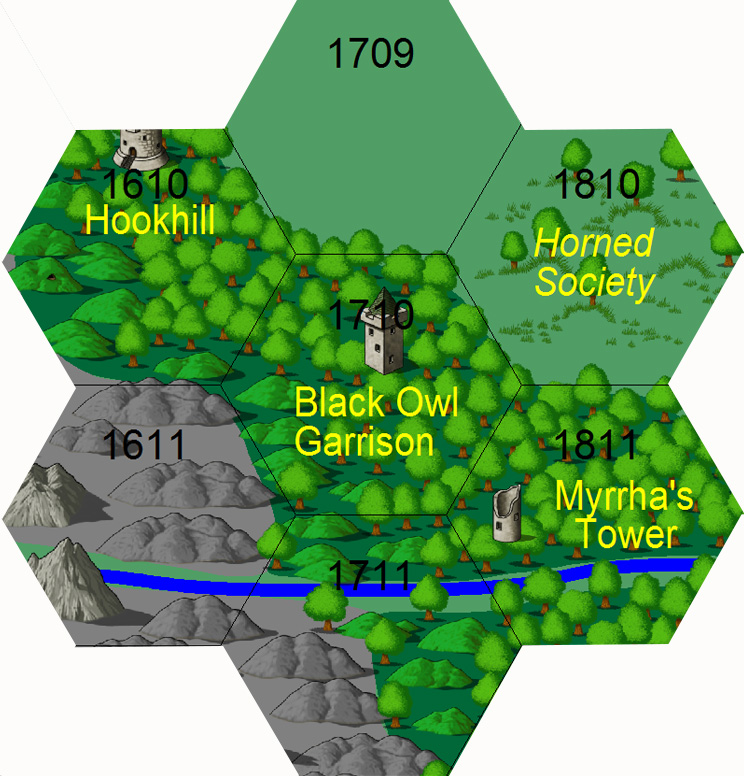
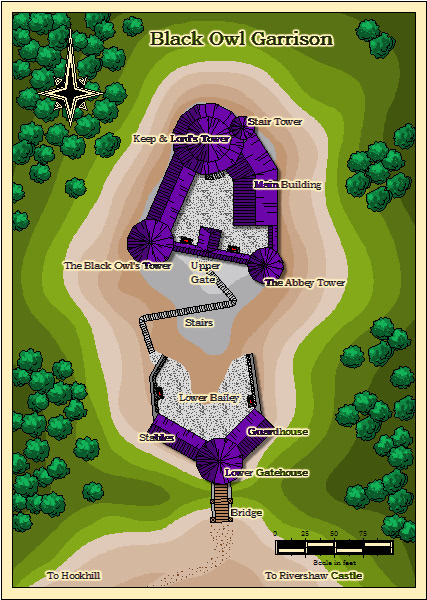
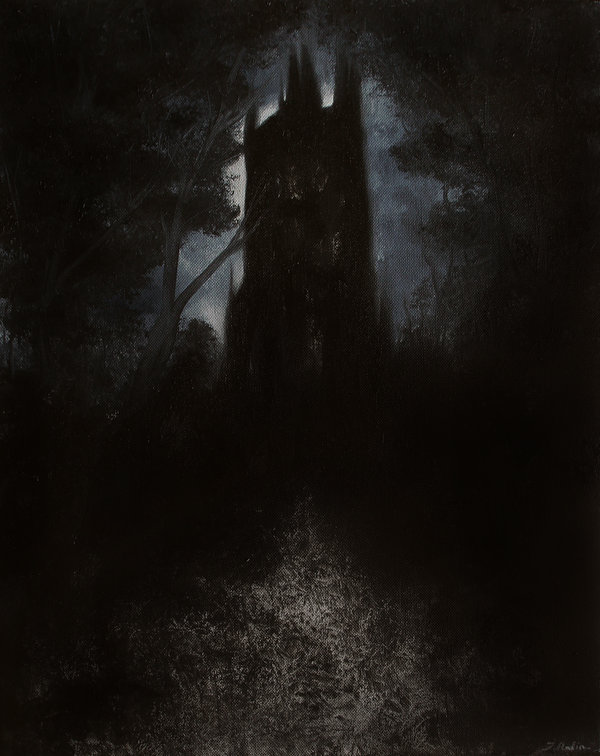
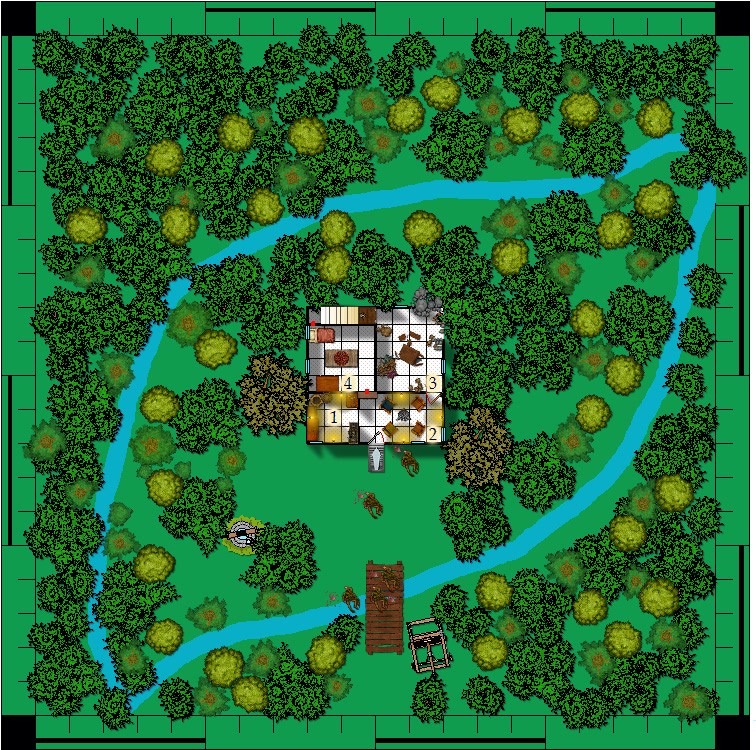
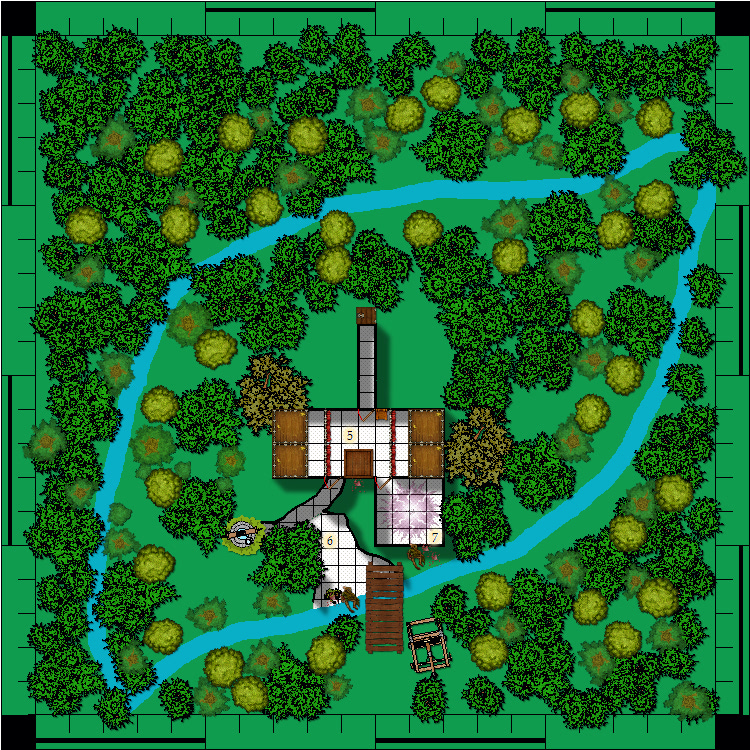
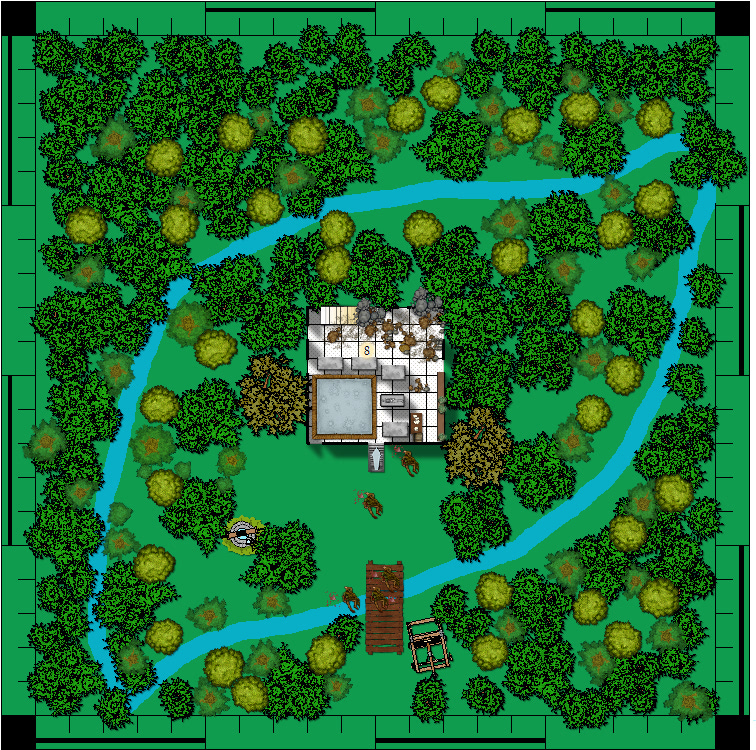
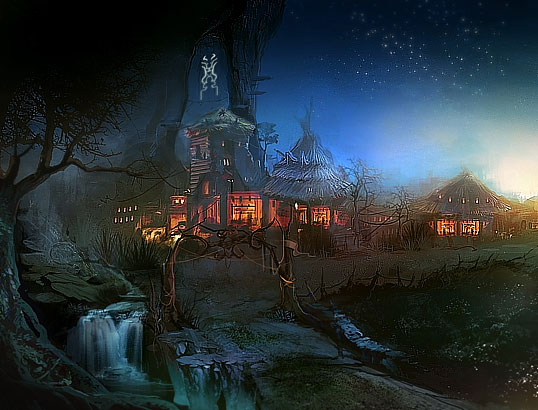
The Black Owl Garrison sits upon a steep hillock which provides a commanding view of the forest to the north, east and west. The castle is accessed most easily from a single bridge on the south side of the complex. This bridge leads to the only access road in the area running east to Rivershaw Castle and west towards Hookhill. The fort consists of a Lower Gatehouse which includes a stable and lower bailey and an Upper Keep which includes several towers and a gatehouse.
The current structure was built in 887-889 TA by the Lord March of Wirksworth whose engineers came across the location during a scouting mission in 886 TA. A long-abandoned abbey sat on the site and significant underground works were already in place, albeit crumbling into decay. It is unclear as to the religious order of the previous occupants, as no written remains were found during the initial scouting mission or subsequent construction efforts.
In 887 TA, the Lord March ordered the clearing of trees near the site, and the present castle is built from the stones of the abbey itself. The Abbey Tower is named to commemorate the previous structure, although several reports of hauntings have been made. The source of the ghostly appearances has never been established.
During construction, the Lord’s workers reported a large black owl that had previously roosted in the abbey ruins now watched the construction. The owl would often be seen at night flying between the structures, while during the day it could be seen watching the activity from the nearby forest. The Black Owl’s Tower is named for this creature, although its appearances have been less frequent of late.
The major events:
- The rain started coming down. This caused chaos among the men, as they started to fight amongst themselves.
- Then, the orcs attacked the Lower Gatehouse. While most of them were berserk (oftentimes fighting each other), the commanders seem unaffected by the situation.
- The Lord March and a small contingency went out of the Upper Keep to quell the fighting. Before he left, he gave orders for the rest to stay inside no matter what. Those who left went mad as well. The Lord March slew his own men before being captured in a net by the orc commanders.
- The rain ended. The commanders left – taking all the horses and burning the wagons. The orc warriors remained behind. After the rain stopped, they regrouped into a siege.
- The orcs are located in the Lower Gatehouse. The humans in the Upper Keep.
In general, these rooms are fashioned of stone. Iron sconces are placed around the walls to hold torches. The ceilings are 10’ high, unless noted otherwise.
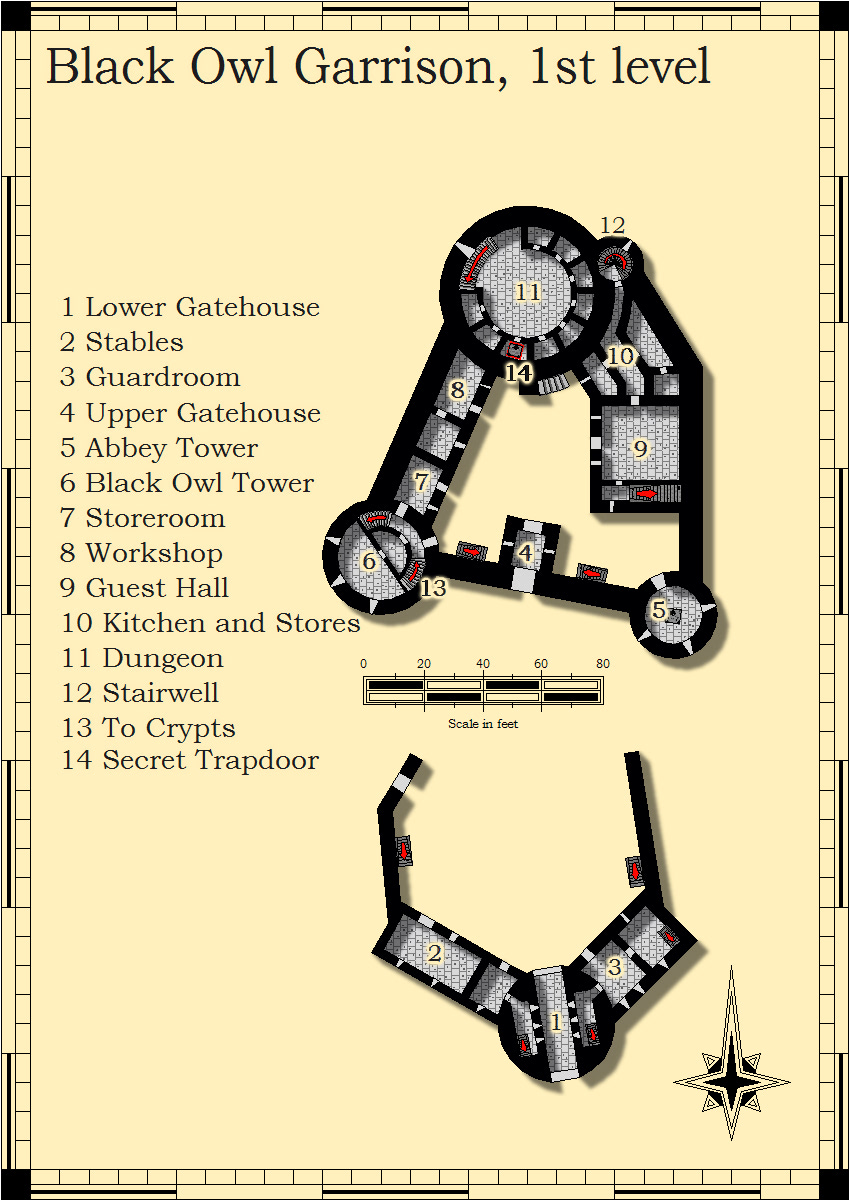
Room 1-1: Lower Gatehouse
This passageway leads to the bailey. Three arrow slits on both sides of the passage provide protection for those who get through the wooden doors at both ends. The floor here slows signs of fighting. Both doors have been broken off their hinges.
Room 1-2: Stables
Stalls for eight horses are all empty. Unused tack hangs from the walls. The room smells of freshly cut hay. This room has 20’ ceilings.
A small room off the stable is empty with a set of stairs leading up.
Room 1-3: Guardroom
Several broken chairs have been piled into a back room with a bed – now smelling of the orc commander. A set of stairs leads up from the back room.
The outer room has a table with a crudely drawn map of the castle. Several flagons of ale and some stale bread are also on the table.
The back room contains a chest with 60 gold in it – the wages of the orcs who are fighting.
Room 1-4: Upper Gatehouse
This small room is guarded by fighters at each arrow slit. A second inner door is closed.
Room 1-5: Abbey Tower
This door to the tower is locked.
This small round room has a simple shrine at its center with a prayer kneeler. An old stone sarcophagus acts as a makeshift altar, draped with a white linen cloth with two silver candlesticks on top.
There are three guards on the third level of the Abbey Tower (see room 3-2).
Inside the sarcophagus is the body of a priest - wisps of white hair surrounding bone. His staff of office shows that he is the abbot as does his ceremonial robes, now decaying.
Careful observation will show that one finger is missing (the one with the ring). This is the source of the ghost.
Room 1-6: Black Owl Tower
This door to the tower is locked.
The lower room is empty, although a central room (also locked) is filled with barrels of explosives used to blow up rocks during construction.
There are three guards in Room 3-3.
Room 1-7: Storeroom
This door to this room is locked. This room is used for curing and smoking meat. Currently, two freshly killed deer hang by hooks in this room. There is firewood and several buckets of water here.
Room 1-8: Workshop
A smithy is here along with a general repair shop for wooden and leather items. The furnace is cold, and the shop is in general disarray, as several hasty repairs have been made to items during the fight. This room is filled with tools and scraps of wood, leather and metal.
Room 1-9: Guest Hall
Several tables have been pushed together here. A number of cots have been put up, and a temporary command center has been created. The captain and two men are always here – getting intel and sending messages. A copper horn sits on the table.
Room 1-10: Kitchen and Stores
A soldier’s kitchen with large metal pots sitting over fire pits, large tables for carving meat and cutting vegetables, an array of knives and utensils, and a baking oven can be found here. In the back is a storeroom filled with food, drink and water. There are enough supplies to last 40 men for one month, if rationed.
Room 1-11: Dungeon
Ten cells are lined around the edge of this room. All are currently empty and clean. Straw has been laid down in several. A ring with keys is here. One member of the staff is watching out the arrow slit.
Rooms 1-12, 1-13 and 1-14: Stairwells and Trapdoor
Empty. The trapdoor is unknown to the party.
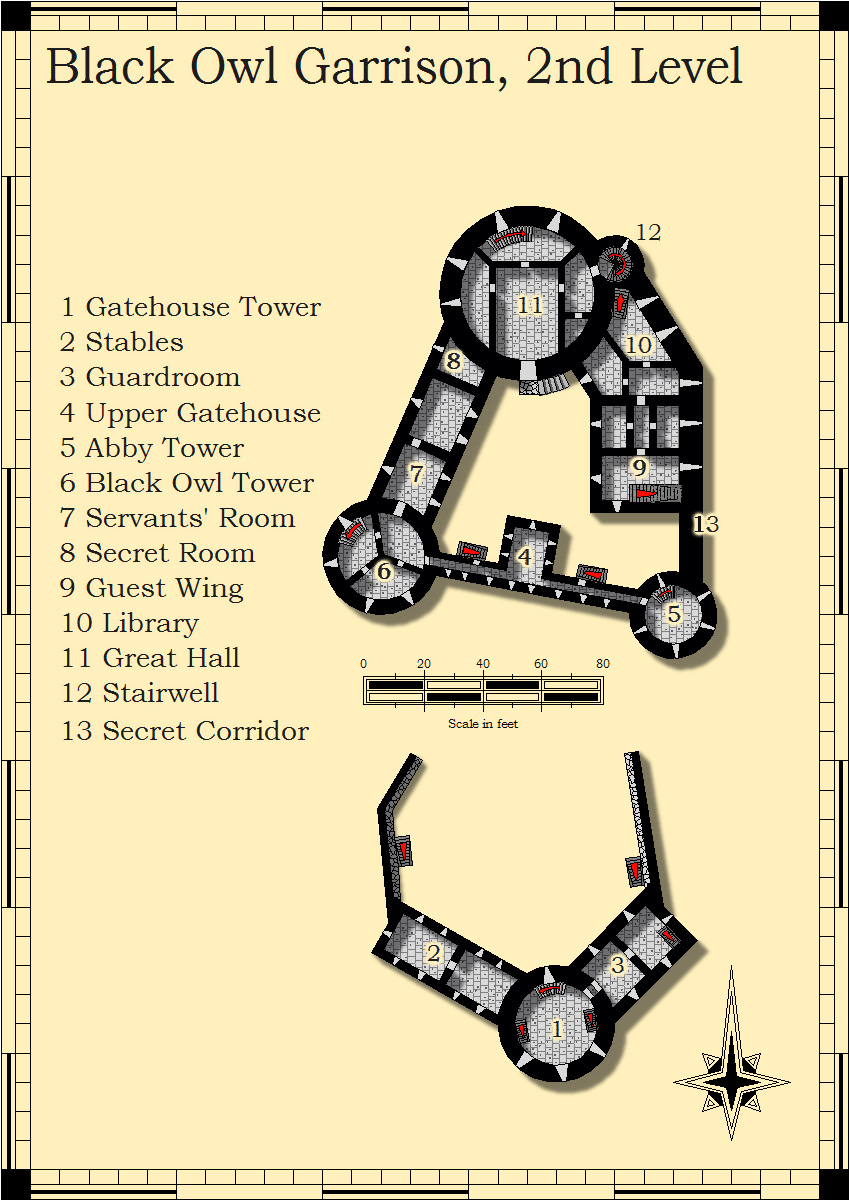
Room 2-1: Gatehouse Tower
This room is empty except for a large stone pot in the middle of the room which contains almost a hundred arrows. On one wall, a copper horn is hung on the wall by a leather strap. A pile of freshly-chopped wood sits against one wall. The door leading to the guardroom is open – although there are no signs that it has been damaged. A set of stairs leads up from this room, while two sets of stairs lead down.
A flickering red glow is coming from the upper floor.
Room 2-2: Stables
Open to the room below.
Room 2-3: Guardroom
Four beds are in the inner room. The outer room has a small table with four chairs and some crudely constructed sideboard – all now scattered. A dead soldier is here, and there are signs of a struggle.
Room 2-4: Upper Gatehouse
This corridor has six guards with bows.
Room 2-5: Abbey Tower
This room is empty.
Room 2-6: Black Owl Tower
These rooms are empty.
Room 2-7: Servant’s Rooms
These two rooms have three beds each with simple bedroom furnishings. Several footlockers and chests have mostly personal items belonging to the household staff. There is a total of 30 gold here. One staff member is here.
Room 2-8: Secret Room
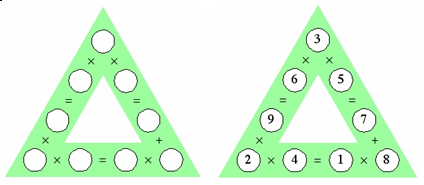
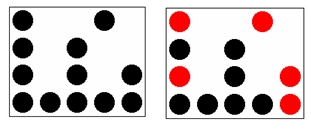
This room is accessed only through the Great Hall (2-11). It contains the Lord March’s treasure chest. The room requires knowing the numerical code to enter. Three chests are lined up in this room. Each contains 1200 gold. On top of the chests are: Cloak of Resistance +1, Short Sword +2, Long Bow +1. A small coffer contains: Potion of Levitation and Potion of Climbing.
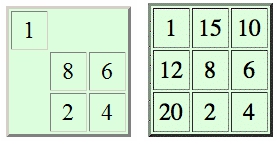
The puzzle is as follows:
Rows have same sum.
Columns have same product.
Room 2-9: Guest Wing
Four small rooms each have several beds which have been pulled down into the Guest Hall for the siege. The accommodations are rough by most standards, but they are clean and neat.
Room 2-10: Library
Bookshelves line this room, and a table for research is pushed up against the inner wall. Two wooden chairs sit near the chair. The books here are mostly on military strategy, orcish traditions and lore, and basic crafting – such as making armor.
Room 2-11: Great Hall
This room is fashioned of the same grey stone as the rest of the castle. Banners of the Lord March and the Western Reaches adorn the walls. Ceremonial swords and shields are also hung here – reminders of comrades lost in arms. A full set of ornamental plate hangs on a dummy. Two staff members are here.
Provisions have been stacked here. A large table has been moved towards the outer wall. This is the retreat point for the castle.
Room 2-12: Stairs and Secret Corridor
This room is empty. The party knows of the corridor.
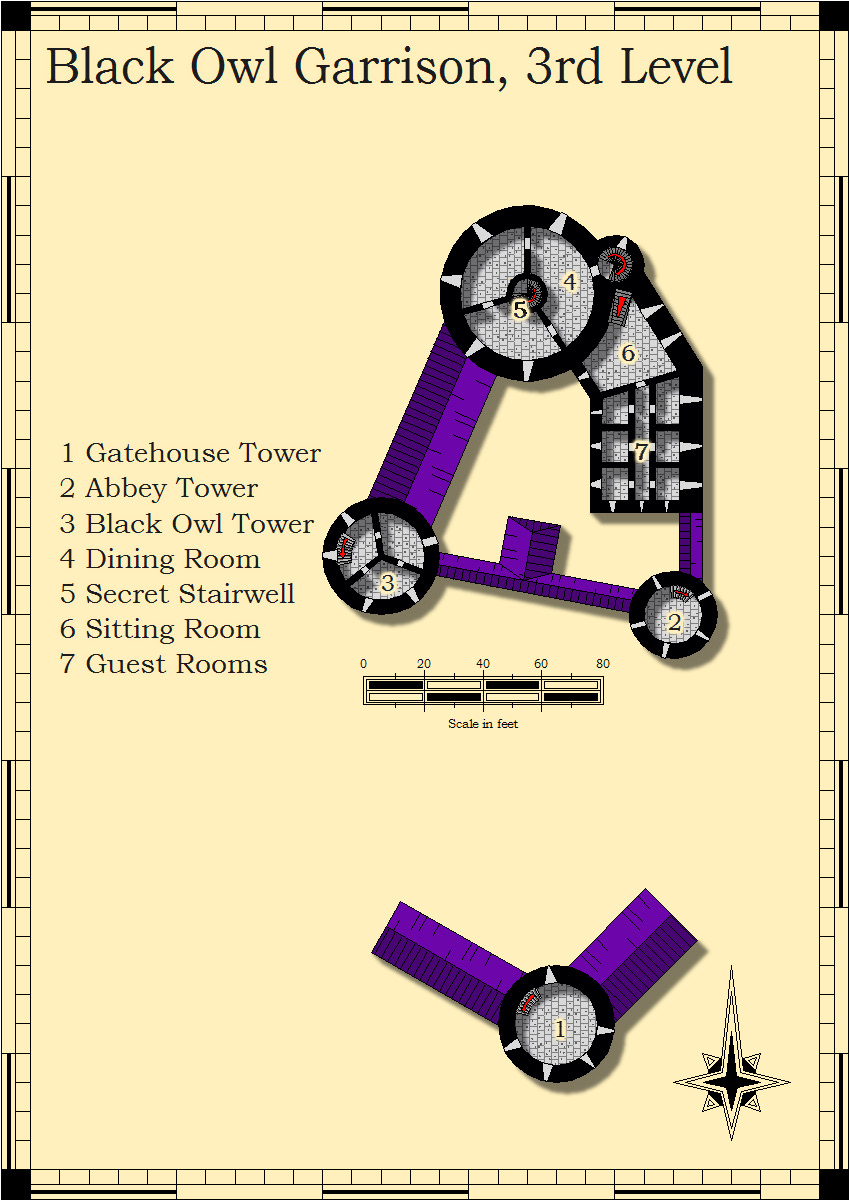
Room 3-1: Gatehouse Tower
This room is empty except for a very large metal cauldron – which you have never seen before – sitting in the center of the room. From it, flames are dancing about six feet into the air – although you cannot see any source of fuel.
If the room is entered without any firewood, the elemental attacks. It’s name is Gysanuldir, and it is one of a number of “seeing” fires used by the Guild for communications. Once fed firewood, it will allow the person to talk with another until the fuel is consumed. Gysanduldir will talk with Rumosyl, another elemental.
Room 3-2: Abbey Tower
This room has three archers in it. A pile of arrows are in the center of the room.
Room 3-3: Black Owl Tower
This room has three archers in it. A pile of arrows are in the center of the room.
Room 3-4: Dining Room
This room has a large table with a several long benches and a throne-like chair at its head. There are simple pewter tankards, dishes and cutlery here. The room is encircled with tapestries taken from the Lord Marches castle to the south. They are historical in nature and oddly out of place here.
Room 3-5: Secret Stairwell
The party knows of this.
Room 3-6: Sitting Room
This room is decorated by the Lord March’s wife. It has several comfortable couches and stylish wooden tables – all of which look unused of late. There is one servant here.
Room 3-7: Guest Rooms
These tiny rooms are used for guests. They each contain a bed and small nightstand. A chair and a tapestry to cover the door are of fine quality.
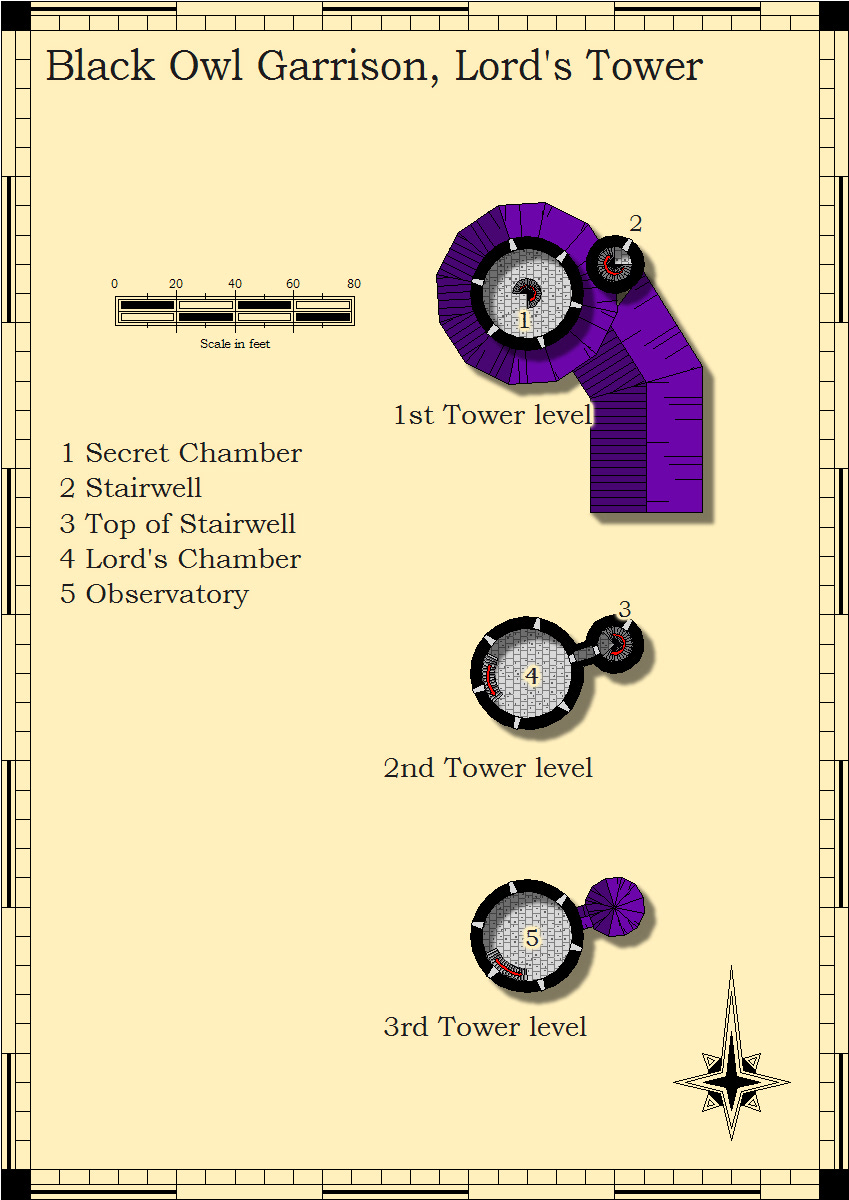
Room Lord-1: Secret Chamber
The party does not know of this.
Room Lord-2 and Lord-3: Stairwell
Empty.
Room Lord-4: Lord’s Chamber
This bedroom is furnished in solid, heavy furniture. A canopied bed sits in the middle. Around the edges are fine furniture, although a bit mismatched. The letter can be found here on a writing desk. A Rod of Resurrection is hidden inside a secret compartment in the posters on the bed.
Room Lord-5: Observatory
A small desk and chair are here. A copper horn sits on the desk. A crude glass telescope is here along with a member of the staff.
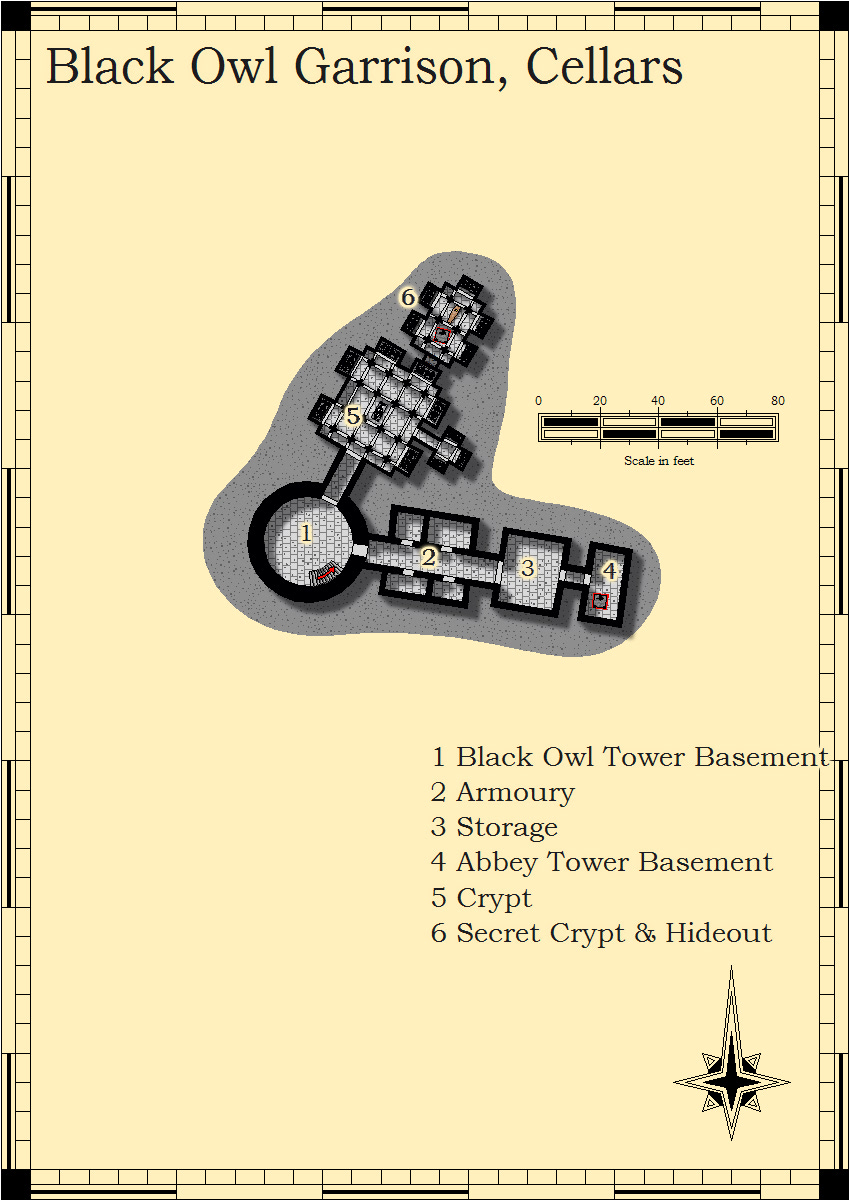
Room Cellars-1: Black Owl Tower Basement
This room is musty, apparently of older construction than the others in this area. A single door leads to the Armory
A secret door leads to the Crypt – not known to party.
Room Cellars-2: Armory
Four small rooms off a main hallway lead into the armory. Two rooms are filled with equestrian equipment, chain mail for warhorses, battle saddles and the like. The far end of the room holds a rack filled with lances and pennants. The other two rooms contain archery equipment and swords, respectively. There are enough bows, crossbow, arrows and bolts to stock a party of 40 men. The sword room also contains several suits of chain mail, helmets and shields of all sizes.
Room Cellars-3: Storage
This room contains bolts of cloth, coils of rope, torches, lanterns and other general supplies. While the explosive and weapons are held elsewhere. This room is the main storage for the rest of the castle. This room is orderly with items clearly labeled and stacked on shelves.
Room Cellars-4: Abbey Tower Basement
This room is musty and empty except for a small table and two chairs. A lantern sits on the table along with several empty mugs.
Room Cellars-5: Crypt
A secret door – plastered over long ago leads to a warren of small crypts holding the bodies of an ancient sect of priests. The ceiling here is much lower and the stone is covered in black moss. A shuffling can be heard here. A ghoul in leather armor (friend of the dead thief in the next room.
Room Cellars-6: Secret Crypt and Hideout
This small crypt is clearly meant for the leaders of the abbey, as the stonework is more ostentatious and the spaces larger. A single passageway has been dug into the western edge of this room. It appears to have collapse, a set of bony legs in leather armor are all that can be seen of the cave-in.
The legs are those of a thief who has the abbot’s ring. Thus the ghost. His bag also contains an ancient gold cross with emeralds, and 30 silver pieces.
| My Liege Fleetwood
I fear this missive will make you think that I am either an old man who has reached the precipice of senility or a desperate lord who wishes his knights home. And while the latter is my desire, this story is borne of neither affliction. About four weeks ago, I received a message from an old man that I have placed near the entrance to the Guild’s Gate at the base of Hookhill. As he is blind and his grandson scarcely more than a toddler, they are allowed to beg at the gate. Woebringer’s men watch for more traditional spies. Again, I relay this story as it was told to me, without embellishment. One morning, at daybreak, an elderly man approached the gate from the east, as if he crossed through the treacherous swamp leading from the Bloodlent and traversed the patchwork of orc camps that fill that area of the Misty Woods. He was alone and walked slowly and without fear. The grandson described the visitor as he approached. The man was hunched, wearing a faded brown cloak. From his neck hung a glowing purple amulet suspended by a thick silver chain. The man’s staff was made of a black wood, nobbed on top and streaked with silver down its shaft. The silver in the staff glowed brightly in the morning’s sun. As the man approached, he looked at the boy – purple eyes showing vigor that his old body did not mirror. The man had black lank hair and brownish teeth. Approaching the gate, the man knocked once with his staff and was admitted entrance without challenge or question. As he stepped through, a strange, acrid smell remained. And, what happened next is what has drawn my interest. As soon as the was gate shut - the strange visitor now inside the Hookhill stronghold - the old man asked the boy to describe the amulet and staff once more. “What old man?” the boy asked. The old man pressed him, and the boy denied any knowledge of the strange figure – eventually running home in fright, claiming his grandfather had gone mad. What business the stranger has in the tower is unknown, but the orcs in the area have become restless – even fighting amongst themselves when humans can’t be found to battle. Just today, another message arrived from the old man. He said that the orcs have begun digging up all the graves in the Hookhill cemetery. What’s being done with the bodies is a mystery, but they are burning the grave sites and coffins – leaving only scorch marks and ash. The boy still remembers nothing of the old man with the purple amulet and black staff. It goes without saying that I would be more comfortable with a company of able-bodied knights to protect us from this madness. Even my men seem more on edge of late. I await your reply eagerly. Wirkswirth, Lord March |
Captain Trotwood - The current garrison commander at the Black Owl Garrison, Captain Trotwood has fought for the Lord March in several campaigns in the Orcish Wars. Known as a competrnt soldier, fair administrator, and able fighter, Trotwood is a no-nonsense leader. While lacking the strategic brilliance of the Lord March, Trotwood has proven himself as a solid military tactician.
|
Forty Troops of the Black Owl Garrison
Lord March – (missing)
Men-At-Arms (27)
|
Adventures Three and Beyond
The Bloodlent – this is the home of Bentbrood. The tree ents, now possessed with glowing purple eyes will attack all invaders. This is the site of the follow-up campaign – as Bentbrood will most likely flee here if defeated at Hookhill. Bentbrood lives in a cave in the hills near the center of the forest on the edge of a large lake.
The Cairns – Here is where power will be drawn (once the dead have been used up in the Hookhill Graveyard). The cairns are being emptied to power the staff.
The Crypt of the Three Kings is important in that it contains the Gate of Souls – a magical barrier (sphere) that prevents the dead or undead from being called forth. It is why the crypt (and the areas near it) are unsullied by the initial storms from Bentbrood. The crypt can be penetrated, and the Gate taken. This can be used to protect the Cairns from Bentbrood’s plan.
Hookhill – The village, dungeon entrance and castle are where Bentbrood has taken up residence. Woebringer is the master of the castle, although he is clearly under the mad druid’s influence now. The graveyard provides a temporary source for his first two storms.
Myrrha’s Tower – It is Myrrha’s body that drives Bentbrood to send the orcs into the accursed tower. He seeks this to add a new magical power to his staff – one that will allow him to summon a storm of transmutation. All those who are hit by the rain will become frogs or pumpkins or worse.
Northnesse is a fallback for the party if they fail to hold the Black Owl Garrison. It is also the home of artisans who can craft items they might need. The nearby Woodsmen’s Hall is a way for the party to get introduced the Spiders of the Misty Woods.
Orcs of the Evil Eye – These orcs and goblins are servants of Woebringer and the Horned Society. There is much confusion among the clan as to whether their leader Ronak Axethrower is alive. Sightings of him at Hookhill have been made. Of course, he is dead, sucked into the staff of Bentbrood. The orcs are out to gather the components needed by Bentbrood – the spider queen (poison), Myrrha’s body (transmutation), and the Lord March (command).
Shadebarrow – A source of intel because of its open layout. It is here that the party can learn of the “secret” entrance into Hookhill, the plans of the Guildmaster of the Horned Society, and other tidbits about the orcs.
The Spiders of the Misty Woods – Their queen, Golgothol, is being hunted by Bentbrood for her power to introduce poison to the storms. She might make a good ally – or a dreadful enemy. Goblins of the Spider Queen - A second “order” of orcs and goblins exist in the forest. While Bentbrood has put a price of 1000 gold for the capture of the spider queen, these followers have banded with her in an uneasy alliance against the Orcs of the Evil Eye.
The Bloodlent
The forest of Bloodlent is home to a large number of bandits from the Horned Society. The trees of this small wood include the beautiful sugar maple whose sweet, red sap is sought throughout the Reaches. Of late, shipments of red syrup have been very scarce. Historians believe that the Bloodlent was once part of the Misty Forest.
During the most recent military activity, the Orcs of the Evil Eye avoided Bloodlent, refusing to spend even one night under it boughs.
The Cairns
At the far western edge of the Misty Mountains, lies a large barren field which becomes a swamp in the mid-summer from the runoff of the Cairn Hills. Several small rivers and large streams lead into the areas which are littered with rock piles from a previous age. Several expeditions to the Cairns failed to return, after which the Lord March declared the area off limits. Rumors hold that this swampy morass is infested by the souls of dead warriors slain by the Orcs of the Evil Eye, while others claim that a mad wizard has taken up residence, building a tower from the stones of the Cairns. In either case, it is generally agreed that the Cairns are a place of ancient evil.
The Tomb of Balthasard
Balthasard was a vampire lord who feasted on the destruction of the orcs and humans during the Orcish Wars. By providing services to both sides of the conflict, he attempted to escalate the fighting and bloodshed – while picking off stragglers on both sides of the war. He became a grandfather to many undead in the area, using their strength to build the prodigious number of cairns in the area. His followers, the gravediggers, provided burial services to both humans and orcs – which provided food for his growing army. His tomb was originally built as a resting place for the human general and his officers – if they should be felled in battle. The gesture was meant to persuade the human leaders of the nobility of his intentions.
Balthasard was beheaded while traveling to a rendezvous with the orcs. Without his charismatic leadership, he was buried in the Tomb. Discovering his plot, the human warriors raided the cairns, sealing all of them and separating Balthasard and his head. A bell of undead control was placed above his head as a final ward against evil.
Nineteen wights can be summoned from the other tombs to aid Balthasard, as needed. They will not reanimate without the master.
Crypt of the Three Kings
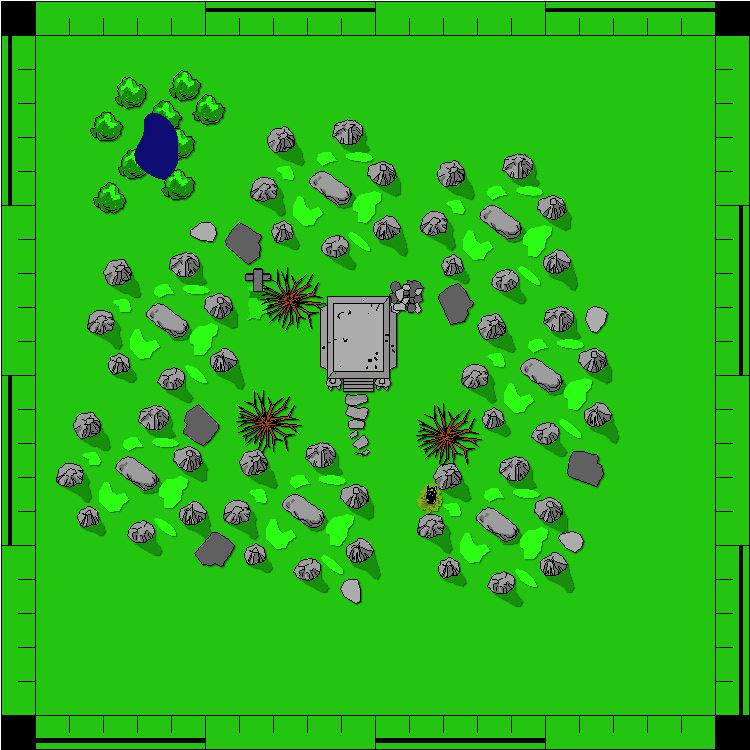
Known also as the Temple of Death, this strange burial chamber lies at the edge of The Bloodlent. It is rumored to lead to a vast underground treasure trove from the Second Age. Shunned by orcs and goblins, a magical set of plate mail and matching swords and shields discovered sixty years ago has made the Crypt of the Three Kings a popular final destination for treasure hunters.
When approached, a voice is heard in the minds of one of the trespassers – “beware the souls imprisoned here; they are most foul – unquenchable in their thirst for life – your life if you are foolish enough to enter”.
The appearance of normalcy is actually an illusion. The iron gate has been pried apart and actually hangs useless to the side. Once the party discovers this, two ghouls rush out to greet them.
The tomb leads down to a four passageway room. Each of the three kings lies off of one passage. Puzzles must be solved – or the undead defeated or driven off. The Gate of Souls is located in the center room (again illusioned). It looks like a lantern hanging from the ceiling giving off a funky light. If removed, the two kings will be free to attack – the third was ransacked.
The “three kings” were three necromantic rulers of Hookhill – a father and his two sons - who were buried in the crypt in order to keep them from returning to power. The father was Jotham Raithmore. His sons were Jacoby and Jenkin. They dabbled in the dark arts. When all three were poisoned by some rival merchants, they came back as wraiths.
Jacoby was known for his love of burning things – living and otherwise. He was a pyromaniac that ruled through fear and intimidation. Jenkin was an axeman that was known to lop the heads off his victims with such ferocity that they axe would cut through stone blocks.
Jotham’s tomb has been raided.
Entrance Room
A small pile of tools nearby seem to be appropriate for the job. In the pile are also torches, oil and tinder, several crowbars, mallets and other grave robbing tools. If you squeeze through the crack in the stone, you can just manage to get into the passageway, a set of stairs leading down.
The ghouls have holes in them from the iron maidens in Room 2.
Room 1: Jotham’s Tomb
NOTE: This room contains a pit trap in the NW corner. The southern door is a secret entrance which is guarded by a ballista trap that fires from the southwestern corner of the long hallway. Both traps are pressure plates in the floor.
The coffin is empty, having been long ago ransacked for its treasure – which is now strewn amongst the “tomb raider” bodies in the dungeon.
On the chest is a riddle.
On the battlefield, many equations are needed – to keep men and support, enemies and terrain in balance. Balance your forces from one through nine so that this battlefield makes sense.
The chest contains: Potion of Fire Resistance, Arrows +1, Bracers of Armor +2
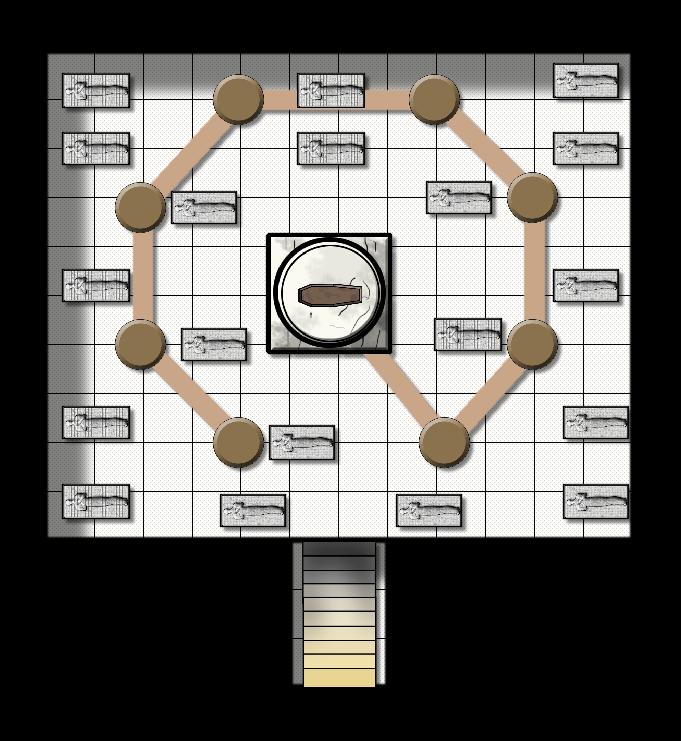
Room 2: The Iron Maidens
May the three kings lie entombed forever.
May our light keep their deathly powers at bay.
May the guardians here be true to their task,
For as long as it shines, the evil must stay.
Examination shows that the sarcophagi are actually iron maidens. Each sarcophagus has two metal five-pointed badges attached to their chest.
The ghouls (here and in the Entrance Room) have holes punched throughout their bodies. The third sarcophagi holds another ghoul which will come out if opened or Room 8 is entered.
The badges are used to turn off the statues in Room 7.
A secret door across from this room has been BROKEN. A passage leads up to a center room.
Room 3: Vidkin, Servant of Jotham
Here lies Vidkun, Servant of Jotham.
May he be forever damned.
As you approach this room, you can hear scratching. A voice from inside cries to be let out. He can hear his master calling him. (Which was true when the tomb was last robbed). Vidkun is a ghast. A blade trap is in the corner of the hallway here. It is activated via a pressure plate.
A leather backpack is scattered on the floor near the corner. There is no sign of a body. The backpack contains a journal page. An invisible axe is also on the pressure plate.
| We have found the first copper key for the Gate of Souls. It was with the father. The final two must lie with his sons. For the sake of our cursed town, I hope we can get the lamp before our loved ones come back to haunt us as the undead…. |
Room 4: Carrion Crawler
Here lies Nona, Consort of Jenkin.
May she be damned forever.
A cursory examination of the room shows a number of larvae in a nest. A scroll of identify can be found here as well, strewn amongst the gathered debris.
A tunnel has been opened by an earthquake. It leads about 200 feet out to some ruins in the nearby swamps. A secret door across from this room is SEALED. A passage leads up to a center room.
Room 5: Jenkin’s Room
This room is also of plain stone. A single wooden coffin sits upon a pedestal near one end. This room contains Jenkin’s wraith.
The body in this room contains a small copper key.
Room 6: Anteroom
Inspection shows that the passageway was opened hastily. Jotham’s tomb has been raided.
The lantern is an ancient copper device. It is held in place by three chains ending in three copper locks. A small key is in one lock, and it is opened.
Opening the sarcophagi will animate the statues in Room 7. The tombs are empty.
Room 7: Guardians
This room contains four statues of human-sized warriors carved in stone. From the symmetry of the room, two statues appear to be missing.
The statues appear to be warriors. Each has a series of five holes near the chest – over where the heart is.
These will animate as golems if the sarcophagi in Room 6 are opened. They can be “turned off” by using the metal badges from the iron maidens in Room 2.
Room 8: Jacoby’s Room
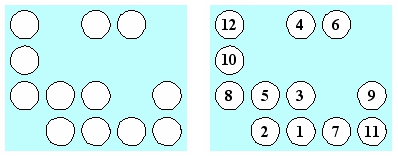
Outside the door to this room, lies a chest tumbled against a wall. The chest is still locked with a puzzle.
A secret door across from this room is SEALED. A passage leads up to a center room.
As the generations grow, so to does their separation. A wise man lets his children wander, but only as far as they need. For each of twelve generations (from one to twelve) place them so that they are farther away from their parents.
It contains: Potion of Lesser Restoration, Ring of Detect Invisibility, 600 gold.
A long hallway slopes down into a black room at the bottom of the incline. In it a single wooden coffin sits in the center of the room. Hung over his coffin is a black wood staff slowly twirling without any visible means of support.
Jacoby is a wraith.
There is a small copper key hanging from the corpse’s neck.
Myrrha's Tower
Myrrha Mindthrush was one of the greatest transmutationists of the early Third Age. She was admitted into the Wizard’s Council at age 16. She was known for her powers to become anything – including inanimate objects. Myrrha became wealthy, it is said, by transmuting her hair into pure gold. A single strand was said to demand outrageous prices in the markets of Teufeldorf.
Sixty years after her entrance into the Council, she left abruptly – not having appeared to age a single day in her tenure. In her letter to the Council elders, she complained that they were all tired, old men who couldn’t teach her anything new. Myrrha was last known to inhabit the wizard’s tower in the Misty Woods. The tower has long since fallen into disrepair. The legacy of Myrrha’s power has kept most intruders at bay.
The tower is a 40’ square. It contains a main level with housing – bedroom, kitchen and great room. A set of stairs lead up to a ruined laboratory above – which is open to the sky. There a large black owl will be found nesting. The main level has been taken over by a shambler, and a set of stairs leads down to a root cellar (now the home to several giant frogs). A simple passageway leads under the river and comes up through a secret entrance in the bridge. The giant frogs are waiting to attack.
Of course, Myrrha isn’t dead – just turned into a giant black owl that can’t polymorph itself back. She will try to get the party to break her curse by reading the spell – which she can’t in her present form. The spell is in her book in the laboratory. Taking the book enrages her. She is becoming more owl-like with time, so she may react in a non-human manner.
Room 1: Kitchen
This kitchen has a table, sideboard, and stove sitting alongside several barrels of clear water. The room is tidy, although a thick layer of dust covers everything.
Room 2: Sitting Room
Four large chairs look over a brazier, now long cold. A bookcase stands in the corner of the room. The books are scattered on the floor, deep claw marks tearing into their covers. A door in the corner is closed and locked.
The bookcase is actually a secret passage to the bedroom beyond.
Several on appear to be magical treatises on transmutation.
Room 3: Dining Room
It is hard to tell what the original intent was for this room. The corner of the room has crumbled leaving it exposed to the elements. Debris from broken tables and chairs are littered everywhere, but many have been pushed into the far corner to form a nest. A large heap of rotting vegetation completes the destruction. A passage leads to a stairway leading up.
Room 4: Sleeping Room
This room is tidy and simple. A bed is pushed into one corner and an ornate rug lies in the center of the room. A large chest is against one wall.
The chest contains linens and a woman’s clothes – mostly cloaks and hunter’s garbs.
Behind the bed is a secret door which leads to a chest containing gold and several personal treasures. Potion of Flying, Scroll of Polymorph 700, Hat of Disguise, a very small silver key, and 300 gold.
Room 5: Pens
A short underground passage leads to this room. The floor here is dirt, hardpacked and dry. Curtains on either side of the room are tattered brown, showing glimpses of the room beyond. A large box is pushed up against one wall. The front of the box is made of bars, and it is clear that several cages have been fashioned in the box. The cages are all open now. A single chair sits behind one door.
Four large cages are empty now, lined with straw and apparently waiting for new occupants. A key hangs on a brass ring above the door.
The cage doors will swing if Room 6 is opened.
Room 6: Underground Passage
Opening the door immediately brings in a wave of humid dank air. The floor slopes steeply away, and the sounds of water can be heard here.
Four giant frogs are sitting in a sloping room that opens into the river. The opening is submerged, and the frogs can easily escape into the river, if threatened.
Room 7: Teleport
This room is empty. Unlike the outer room, the floor here is set with polished stones. A starburst pattern is etched into the stones. In the exact center of the pattern, a hole has been drilled into the floor, about the size of a torch butt.
This room is actually a teleport. The staff of teleportation is needed, although it won’t be found here. An identical teleport is in the Hookhill Castle (where the staff is). Myrrha used it to travel to town and pick up supplies.
Room 8: Laboratory
This room is completely open to the outside world. Some rubble on the top of the stairs shows a collapsed stairway leading up to a now-missing floor. The only items remaining in this room are a large pool of grayish water, five stone slabs – one of which has the skeleton of a human-sized creature on it, a desk strewn with papers and a book, and a bookcase, the contents of which have been ravaged by the elements.
Examination of the room shows black scorch marks on the floor in several places, as if the tower had been hit by lightning. Also, you notice a number of black (owl) and white (eagle) feathers scattered around the floor.
A thick hide-bound book sits on the table. Unlike the others, it has not been damaged by the elements, although dust and debris show that it has sat here for quite awhile. A silver lock holds the book shut. A stylized “M” has been carved into the hide cover.
The book is Myrrha’s spellbook. The key can be found in her treasure chest, although the lock can be picked. The current spell being researched is a transformation spell – for determining and transforming stones into the most feared enemy of a victim. It appears incomplete with a note that Myrrha is going to test the spell
If the book is removed from the room, the pool will gurgle and spit – eventually having creatures come out of it to attack the holder of the book.
If Myrrha is there, she will try to convince the party to break the spell. You see, Myrrah performed the spell on a rock that had a hole containing a small mouse. The mouse’s most feared creature is … an owl. It will take Myrrha about a week to come up with the solution.
Myrrha Returns
If the party camps overnight at the Tower, they will encounter Myrrha returning. She is in black owl form, of course.
If they are able to read the spell for transformation back from an owl, then she will aid them on their quest.
Myrrha is a tall, athletic, dark-skinned woman of an indeterminate age, although she is exhausted from the ritual, she appears radiant. Myrrha has closely cropped hair and beautiful golden eyes. She still shakes and moves in an owl-like fashion, although she is clearly human.
“Thank you for rescuing me from my infernal stupidity. I can’t remember how many years I have been flying about these woods looking for help. Hmmm, maybe the company of the Wizard’s Council isn’t so bad after all.
“I can’t believe that you were able to kill the owlbears that have nested here for so many months. They were a constant threat to my books and notes.
“While my memory of what I saw as an owl is blurry – obscured by my transformation and the maddening rain that has been falling these past few days. I know three things that might help you on your quest:
- I know that the mad druid Bentbrood is behind the storms – and he is working with Woebringer in Hookhill to make them more deadly.
- I have overheard the orcs attempting to capture the spider queen in order create a poison storm.
- And, I know that the keep on Hookhill is guarded by a black dragon of the nastiest disposition.
“While I am weak, and it will take many days of rest to get my strength back. I could manage a simple spell to transform you each into an animal of your choice. The spell would last only a couple of hours, but it may help you on your quest.”
I will rest in my secret room downstairs. I can fend for myself now. When your quest in this forest is over, I will have gained enough strength to return to the Wizard’s Council to continue my research.
Northesse
The grim hamlet of Northesse lies directly north of Rivershaw Castle. A working mine was established after the discovery of iron ore veins running near the surface. Now, a number of smelters, smithies and artisans encircle the mine entrance. Northesse is a primary supplier of weapons for Rivershaw Castle. Recently, several gnomes have arrived in town to construct a giant metal golem which they hope will provide additional protection for the town from orc raids.
Orcs of the Evil Eye
Distribution of Orcs of the Evil Eye
These orcs and goblins are servants of Woebringer and the Horned Society. The orcs are out to gather the components needed by Bentbrood – the spider queen (poison), Myrrha’s body (transmutation), and the Lord March (command).
North camp – near the base of Hookhill. These guard the woods outside the city from invaders.
Middle camp – on the road to Shadesbarrow, these orcs are stationed to stop traffic from moving north. They patrol along the river all the way from The Cairns to the plains.
Southern camp – these orcs patrol the edge of the forest to keep anyone from coming though the plains. They will follow any groups trying to get to the Crypt or the Bloodlent.
Secret Camp near the Black Owl Garrison – these orcs are to report on any issues at the castle. They are a short ways north, near the road.
- A dispatch from the Secret Camp is at Myrrha’s Tower – looking for the body of Myrrha.
- Another is trying to take over the Garrison – trying to get the Lord March.
- A final group is attempting to find the spider queen in the forest east of the garrison and north of the Tanglebough Traders.
Goblins are in the trees watching:
- The Tanglebough Traders.
- The action at the Castle.
- Myrrha’s Tower.
- The Cairns.
- Shadebarrow.
- All pigeons from these go to Hookhill.
| Yo Bercan.
Things here are not so good. The finger that I sent to the Tower of the dead hag haven’t come back. Our raiding bands north and east of the castle have found some spiders, but no queen. One band is missing, although we stumbled across Gribby – his body had an infected goblin arrow in it. What gives with that? We did sack the garrison, and March is coming to Hookhill – in plenty of time for the sacrifice on the full moon. I really wanted to bite his face off, but Woebringer said unspoiled. Bah. I hope the goblins are giving you better news. I’ll put my face in the fire tomorrow night. I really hate those things. They freak me out. I hate the woods, you village-loving, bed-sleeping maggot. Dug. |
Shadebarrow
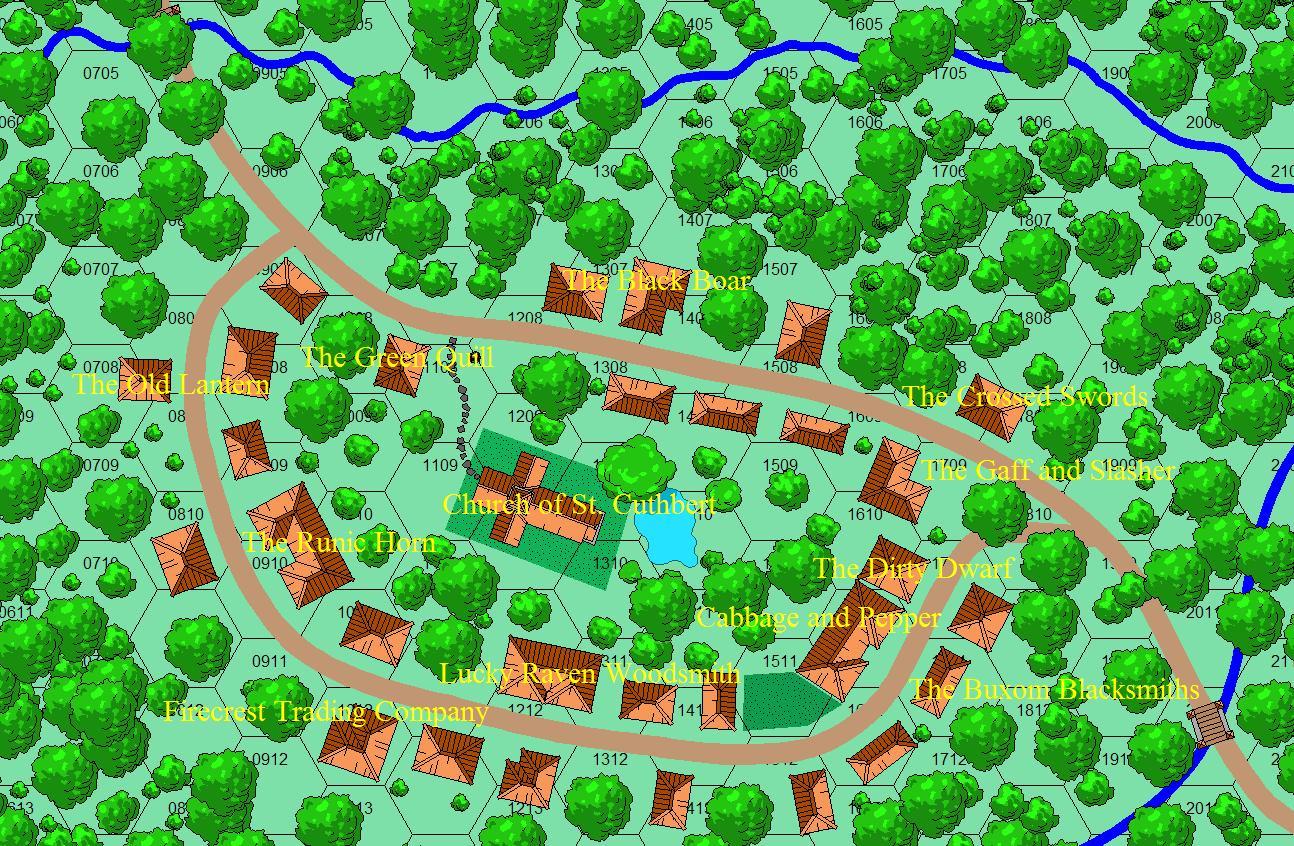
Hookhill has always been a dangerous place – filled with backstabbing and intrigue. For those disenfranchised or considered too dangerous for the hilltop village, the hamlet of Shadebarrow provides a refuge – allowing open practice of black arts, dangerous alchemy, and insane experimentation. A tenuous alliance with the goblins and orcs is held in place by periodic displays of enormous power and evil.
Built along two divergent paths, several pubs are stationed for easy access by travelers. There does not appear to be a town guard or any sort of centralized defenses to the town.
The buildings here appear to be solidly made, although a bit run-down in their current configuration. Outside of the main collection of buildings, you see no outbuildings of any sort – odd even for a forest village.
Careful examination shows that the buildings are in the midst of repairs – stacks of wood, tiles and thatch can be seen in the streets. There are boxes of nails, tools such hammers and saws, and the like strewn about.
Merchant Buildings
Private Homes
Establishments
There are four pubs in the village. Two are at the Hookhill end, and two are at the Black Owl end. All four are carefully watched by the Horned Society – even run by them in several instances.
The Gaff and Slasher – Scrapp, proprieter. The most rundown pub in the village.
The Crossed Swords – Athl Aleman, proprieter. Mayhem waits here for anyone entering the village. He will try and poison any who appear to be outsiders. His sons Doniol and Egron assist.
The Old Lantern – Ansel Tallowgill, proprieter. This pub is the current location of Blackwood – who is waiting for an audience at Hookhill. Maggie is his wife.
The Black Boar – Birchard Blackboar, proprieter. The pub has a giant stuffed black boar inside. Birchard wears a necklace to allow him to control his lycanthropy, although it is rumored that he turns into the black boar on full moons.
There are a handful of other establishments in Shadebarrow. These serve the local population and, more importantly the Castle. With the exception of Corwyn Rand and Leta, the entire population works for Hookhill – although not all are members of the horned society.
Firecrest Trading Company – Corwyn Rand, proprieter. Lives here with his daughter Leta. He has knowledge of necromancy in order to combat Mayhem. His daughter is a cleric with limited healing abilities. The Rands are spies for King Vince – for the last 12 years. They smuggles information out via encoded leather scabbards that Corywn makes. They will have a variety of healing and antidote potions. The backroom of the establishment is a safe haven.
The Dirty Dwarf – Brothel – behind the Gaff and Slasher.
The Green Quill – magic shop – run by Mayhem.
The Buxom Blacksmiths – armorer and weaponsmith, run by Wilhemmena Worth.
Cabbage and Pepper – grocer, actually run by Borik – although he goes by the name Nicholas Faytor
Lucky Raven Woodsmith – Hobart Ravenswood.
The Runic Horn – headquarters of the Horned Society.
The Church of St. Cuthbert - The ruins of the church of St. Cuthbert appear to have been ransacked – rather than falling to the ravages of old age. The entire building is built of grey stone. While simple in its construction, it is clear that a number of stained glass windows lined the entirety of the building. The windows have been destroyed – opening the church to the outside elements. The front doors have been nailed shut with heavy boards.
The interior of the church has been desecrated with signs of vandalism and marks of the horns rampant. There are large piles of leaves and debris blowing around the main sanctuary, and there is a large hole in the roof directly in the center of the sanctuary.
The altar area is likewise ravished, although one of the transept shrines appears to be in good condition. Within the shrine, there is a feeling of calm. Here the signs of vandalism have been erased. Candles have been neatly stacked by the altar, and it is clear that the area has been in recent use. Dark cloth has been hung over the exterior windows here, providing a shelter from the weather and prying eyes. A font at the shrine’s entrance is filled with fresh water, and several vials sit nearby. There are several altars here to small statues of St. Cuthbert.
The Cast
* Those that follow the Horned Master have his mark tattooed somewhere on their body.
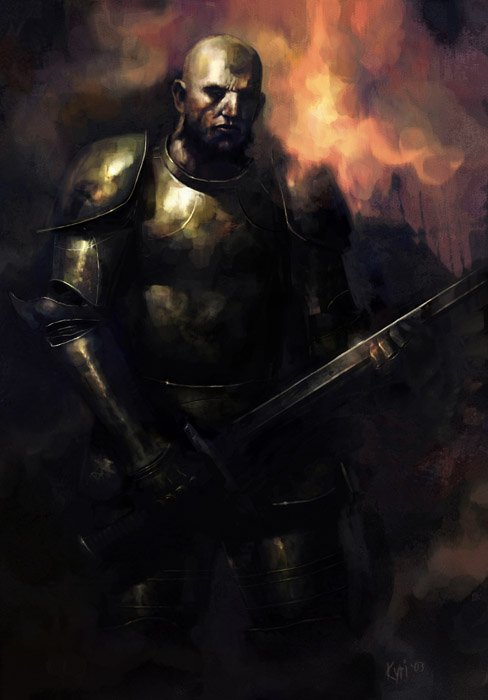
Blackwood – a big bald merchant, he carries state secrets about the war the with the orcs – including troop movements, etc. He is currently in Blackwood has already been vetted by Mayhem for the Horned Society. He is allowed free run of the town until word comes back from Hookhill Castle.
Borik "The Nightblade" (aka, Nicholas Faytor) – an assassin, Borik knows the location of the secret entrance. He is the highest level member of the Horned Society cabal in Shadebarrow.
Corwyn and Leta Rand – dark and brooding, it is clear that Corwyn is in fighting condition. His skin is brown from many days in the sun. He wears a hunter’s garb with leather armor, a sword, and a bow – when in the field. His daughter, Leta, is a thin girl but also very athletic. She is dark complected and quiet. She is a cleric and has some knowledge of St. Cuthbert’s old church – which has been gutted for years.
Flisk – the town “mayor”. He is an unpredictable dabbler in the arts of elemental fire. He will always bow to Mayhem in matters of running the town. He is a drunk who is oftentimes at The Old Lantern.
Mayhem – a rakishly-thin man with dirty grey robes and straggly, greasy white hair, Mayhem is the town master at the dark arts. A necromancer of great skill, he has an amulet of regeneration which requires the sacrifice of a human every dark moon. He also carries a staff at most times.
Odeon Sludge (practical joker) – very short, very fat man dressed in outlandish garb. Odeon is actually an agent of King Vince – not even known to Corwyn. He is always around making fun, and will use his ruse as a joker as an excuse for being places he is not supposed to be. He is at the Old Lantern most nights.
Scrapp* - an average man with brown hair, brown eyes. He usually dresses as a barman. He is a fighter, but he will always bow to Mayhem.
Spiders of the Misty Woods
Driven from the forests south of the River White by the human settlement of the Misty Woods, the canopy spiders have become some of the most feared denizens of the dark northern woods. Preferring to drop on their prey from the tangled boughs of ancient oaks, the poison of these huge beasts paralyzes victims instantly – making it prized by goblin shaman and orc archers.
Bitter enemies of both orcs and humans, the Spiders of the Misty Woods have recently entered into an alliance with the goblin shamans of the Evil Eye Warband. The source of this truce is unclear, although it is rumored that the spider queen sought out the goblin high shaman after nesting for the winter in some ancient ruins in the foothills of the Cairn Hills. During the recent Orc Rebellions, goblins from the Evil Eye Warband were discovered riding giant canopy spiders into battle.
Hunted by the orcs and goblins of the Evil Eye, the spider queen, Golgothol, has taken refuge in a cave surrounded by dense webs deep in a hollow just north of the Woodsman’s Hall. She is currently laying eggs and cannot fight or move. Her giant spider minions go out into the forest to hunt orcs and goblins and to keep the men away from her domain. She will have her spider eggs laid by October 30 and be able to hunt again soon!
There is currently a 1000 gold piece reward for the capture (alive) of the spider queen. Bentbrood wants her poison to introduce into the storms.
Golgothol’s home is in The Bentwood, although she was chased out by the ents shortly after the storm. She can tell the party of the storm. This is where the rubies come from. She also knows why she is hunted.
Golgothol has promised a band of forty goblins – now wearing the badge of the Goblins of the Spider Queen – riches beyond imagine for their aid in keeping her safe. She has given them sixty small rubies as an incentive. These are now the Spider Riders (who come in groups of eight). They dip their arrows in the venom. Also, they are strapped on so that they can ride in trees.
Woodsmen's Hall
The furnaces of Northesse require tremendous amounts of fuel. With the nearby copses long ago put to the axe, a small permanent settlement of woodsmen has been established in the nearby Misty Woods. Recently, several woodsmen have gone missing. Officially, these disappearances have been blamed on the orcs, but Harold Hislop (the senior woodsmen) is adamant that a sinister force is at work here.
The leader is Ellestar, a huge man with black hair and a grisled beard. He will tell the party of the encounters with the spiders.
