Tegel Environs
| Type | Dungeon |
|---|---|
| Status | Explored October 889 TA |
| Location | Tegel Village |
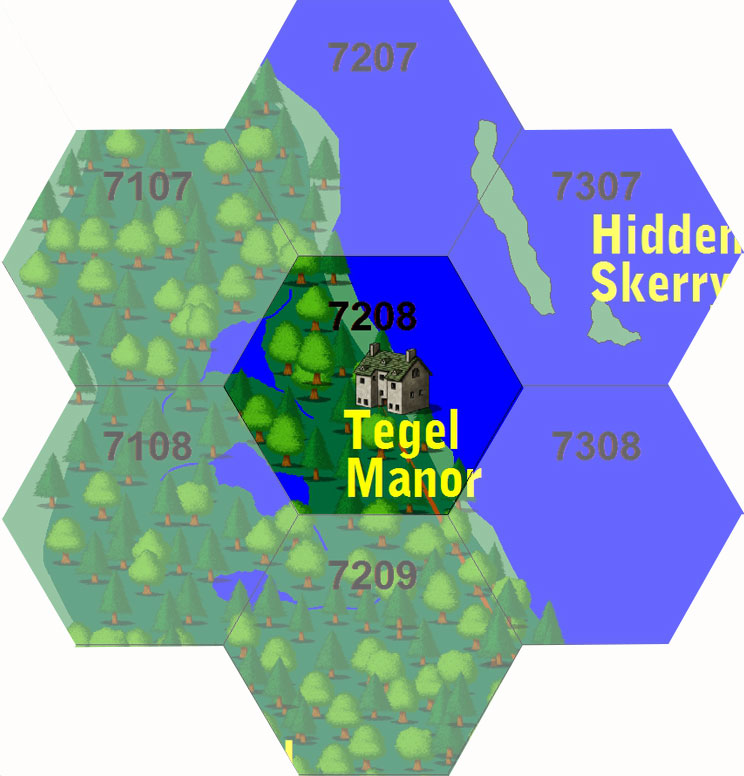
| Hex | 7208 |
| Campaign | Return to Tegel Manor |
| Adventure # | 103 |
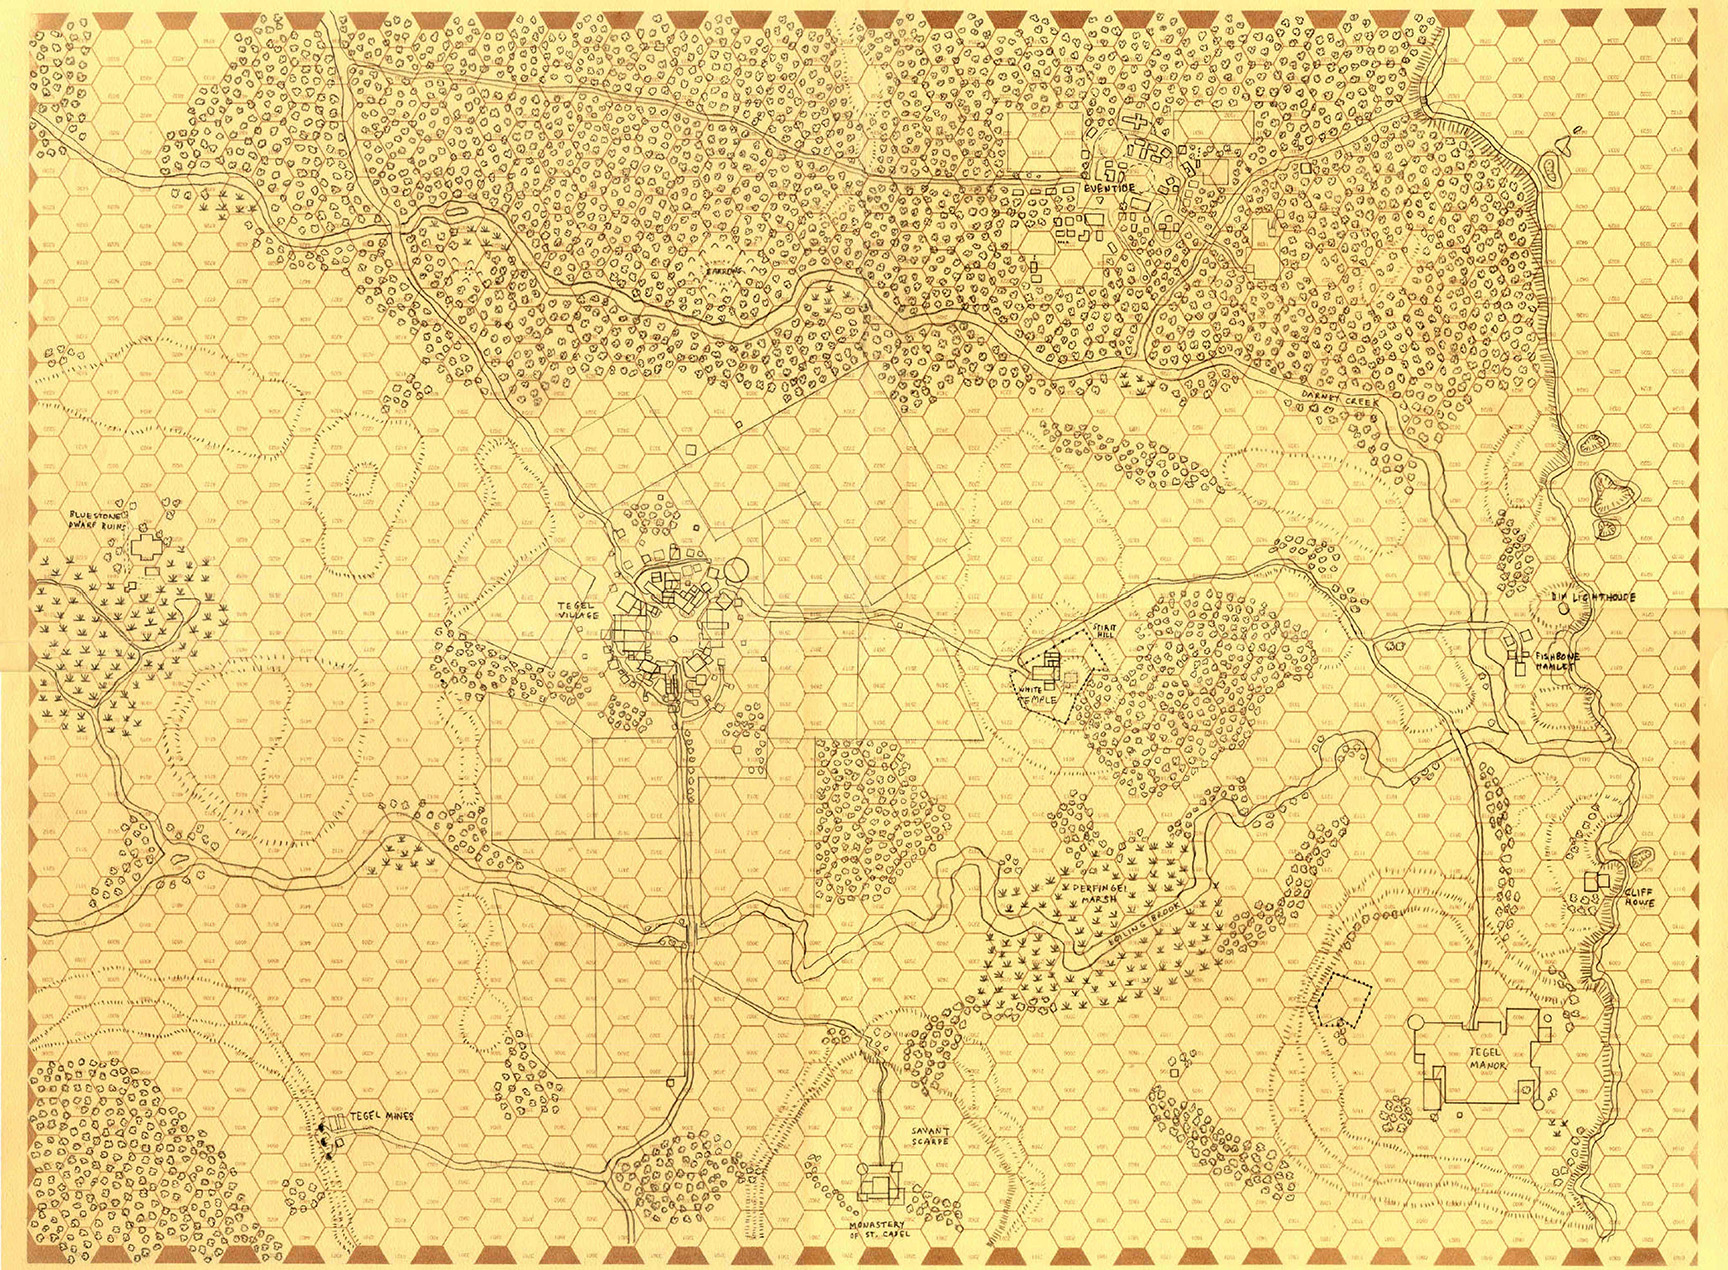
Map of Tegel Manor, Village and the Environs
Tegel Village, the Manor House, and the surrounding environs are nestled in dark trees of the Dreadwood. The Dreadwood is the easternmost forest in the Reaches, stretching south to the River White and north to open plains of the Orc Nation. An evil and forbidding place, only the discovery of mithral in the area brought explorers and later settlers to the area. The village is located on a small open plain between the Darnby Creek in the north and the Boiling Brook in the south. Much of the farmland in this area has been cleared over the past three hundred years, but the depths of the forest surround Tegel Village west of the Bluestone Dwarf ruins and south of the Monastery of St. Cadel. Despite their close proximity to the forest, few villagers travel into its depths.
The terrain in the area is rolling hills with dozens of small hillocks dotting the valley. Several of these, such as the Savant Scarpe, are sites of great buildings. Tegel Manor lies on a rocky seaside cliff at the top of one of the highest points in the area. The Monastery of St. Cadel, the Cliff House, the White Temple and the Dim Lighthouse are also built on rocky hills. Southwest of Tegel Village, the Mines are dug deep into the hillside, cutting back upon themselves and spreading underneath the valley. Two swamps are found along the lowest areas of the valley fueled by the black waters of the Boiling Brook. The swamps west of town are home to strange ruins from an early age and the easternmost swamp, Derfingel Marsh, is rumored to be home to the fearsome Shambler.
In October and November 888 TA, evil swept this area - killing Rumpole Rump, the thirteenth Lord of Tegel Manor. The adventures are chronicled in the Registry by Ronic Rump, now the fourteenth Lord of Tegel Manor, and the sole surviving heir. An Adventure Script also survived.
Cliff House
The Cliff House was originally built as a guest residence for visitors to Tegel Manor. Designed with no expense spared, the opulent luxury of the Cliff House was a treat for visiting dignitaries and nobles. Then, as it often has, tragedy struck. During the Summer of 635 TA, as the story goes, Rivona Rump (known as the Radiant) daughter of Roderick the Righteous (later the Third Lord of Tegel Manor) and granddaughter of Sir Rumpole had an illicit affair with her cousin Radow (later given the moniker “the Rebel”) son of Rufienna Rump the Reckless. The affair was a brief torrid one, which was discovered by one of the servants sent down to ready the Cliff House for upcoming visitors. Called in to face her grandfather, Rivona, broke into uncontrollable sobs when she saw him. After Radow declared that he had no feeling for Rivona, only using her to wile a long summer’s day away, she ran screaming from Tegel Manor, down the hill to the Cliff House. There, she spat her curse upon the descendants of Rufienna Rump (which are now known as the Evil Rumps) and threw herself off the cliff. It is said that Radow laughed when he heard of his cousin’s death. Maybe he was evil.
Recently, the Cliff House has been again rumored to be a den of evil. The feared highwayman, Roughneck Rump is said to have taken up residence with his orc and giant companions in the building. Several “raids” by Captain August Reem have failed, revealing just an empty house. Despite signs of recent habitation, nothing linking the old stone building with Roughneck has been found.
The Cliff House appears as a solid stone structure two stories in height with a dark slate roof. Although the building appears old, it is in solid repair.
Cliff House: DM’s Notes
The Cliff House is a mid-level dungeon for the campaign. The house is currently the residence of Ruang Rump the Ripper. Ruang is an assassin from the “evil” side of the Tegel family tree.
- Ruang is looking for riches beyond those of his ancenstral heritage. To that end, he has join in league with the orc plot to take over the village, and while he suspects something bigger is at foot (how many dragons do you need to take out some villagers), he is unaware of either the evil of the snake demon or the lizard demon. He is biding his time and having fun with torturing the villagers and those around him. His contact with the orcs is Major Domo Bitterbark. He has not ventured past the blue dragon in the Mines.
- Ruang has enlisted the aid of dopplegangers to help him with his task, although he prefers to work alone and uses the shapeshifters primarily as spies and lookouts. He is having the dopplegangers disrupt the Hillman Exchange at the current time by stealing supplies which he gives to the orcs for their use in the mines.
- In addition to the dopplegangers, Ruang is very interested in poisons. This is a natural outcropping of his love of assassination. To this end, he has “hired” Gorlack, Goblin Alchemist to concoct new and exciting potions in the laboratory under the Cliff House. The goblin has come up with a plot to poison the towns water supply on the eve of the big invasion (June 30). To do this, he needs lots of bloodroot. The harvesting of the bloodroot will be noticed by Hedda in the village, who may try to enlist the party to help her find out what is happening. Finally, Ruang has stolen Hedda’s alchemy book for Gorlack using a doppleganger in the guise of Rukhs the Ogre. Gorlack is aware of the “dreck” but unable to fathom either its use or origin. He is aware that copper has a negating effect on the substance. In addition, he suspects that it is the essence of pure evil (which it is, tied to the snake demon in Eventide).
- Roughneck Rump, Ruang’s evil brother, is in league with the assassin. Roughneck is hanging out in the Silver Glades with the horses. Although Ruang knows that his brother is also helping the orcs, he doesn’t know the details. They meet once a week for a beer at the Cliff House. Roughneck is very careful, always suspecting an ambush.
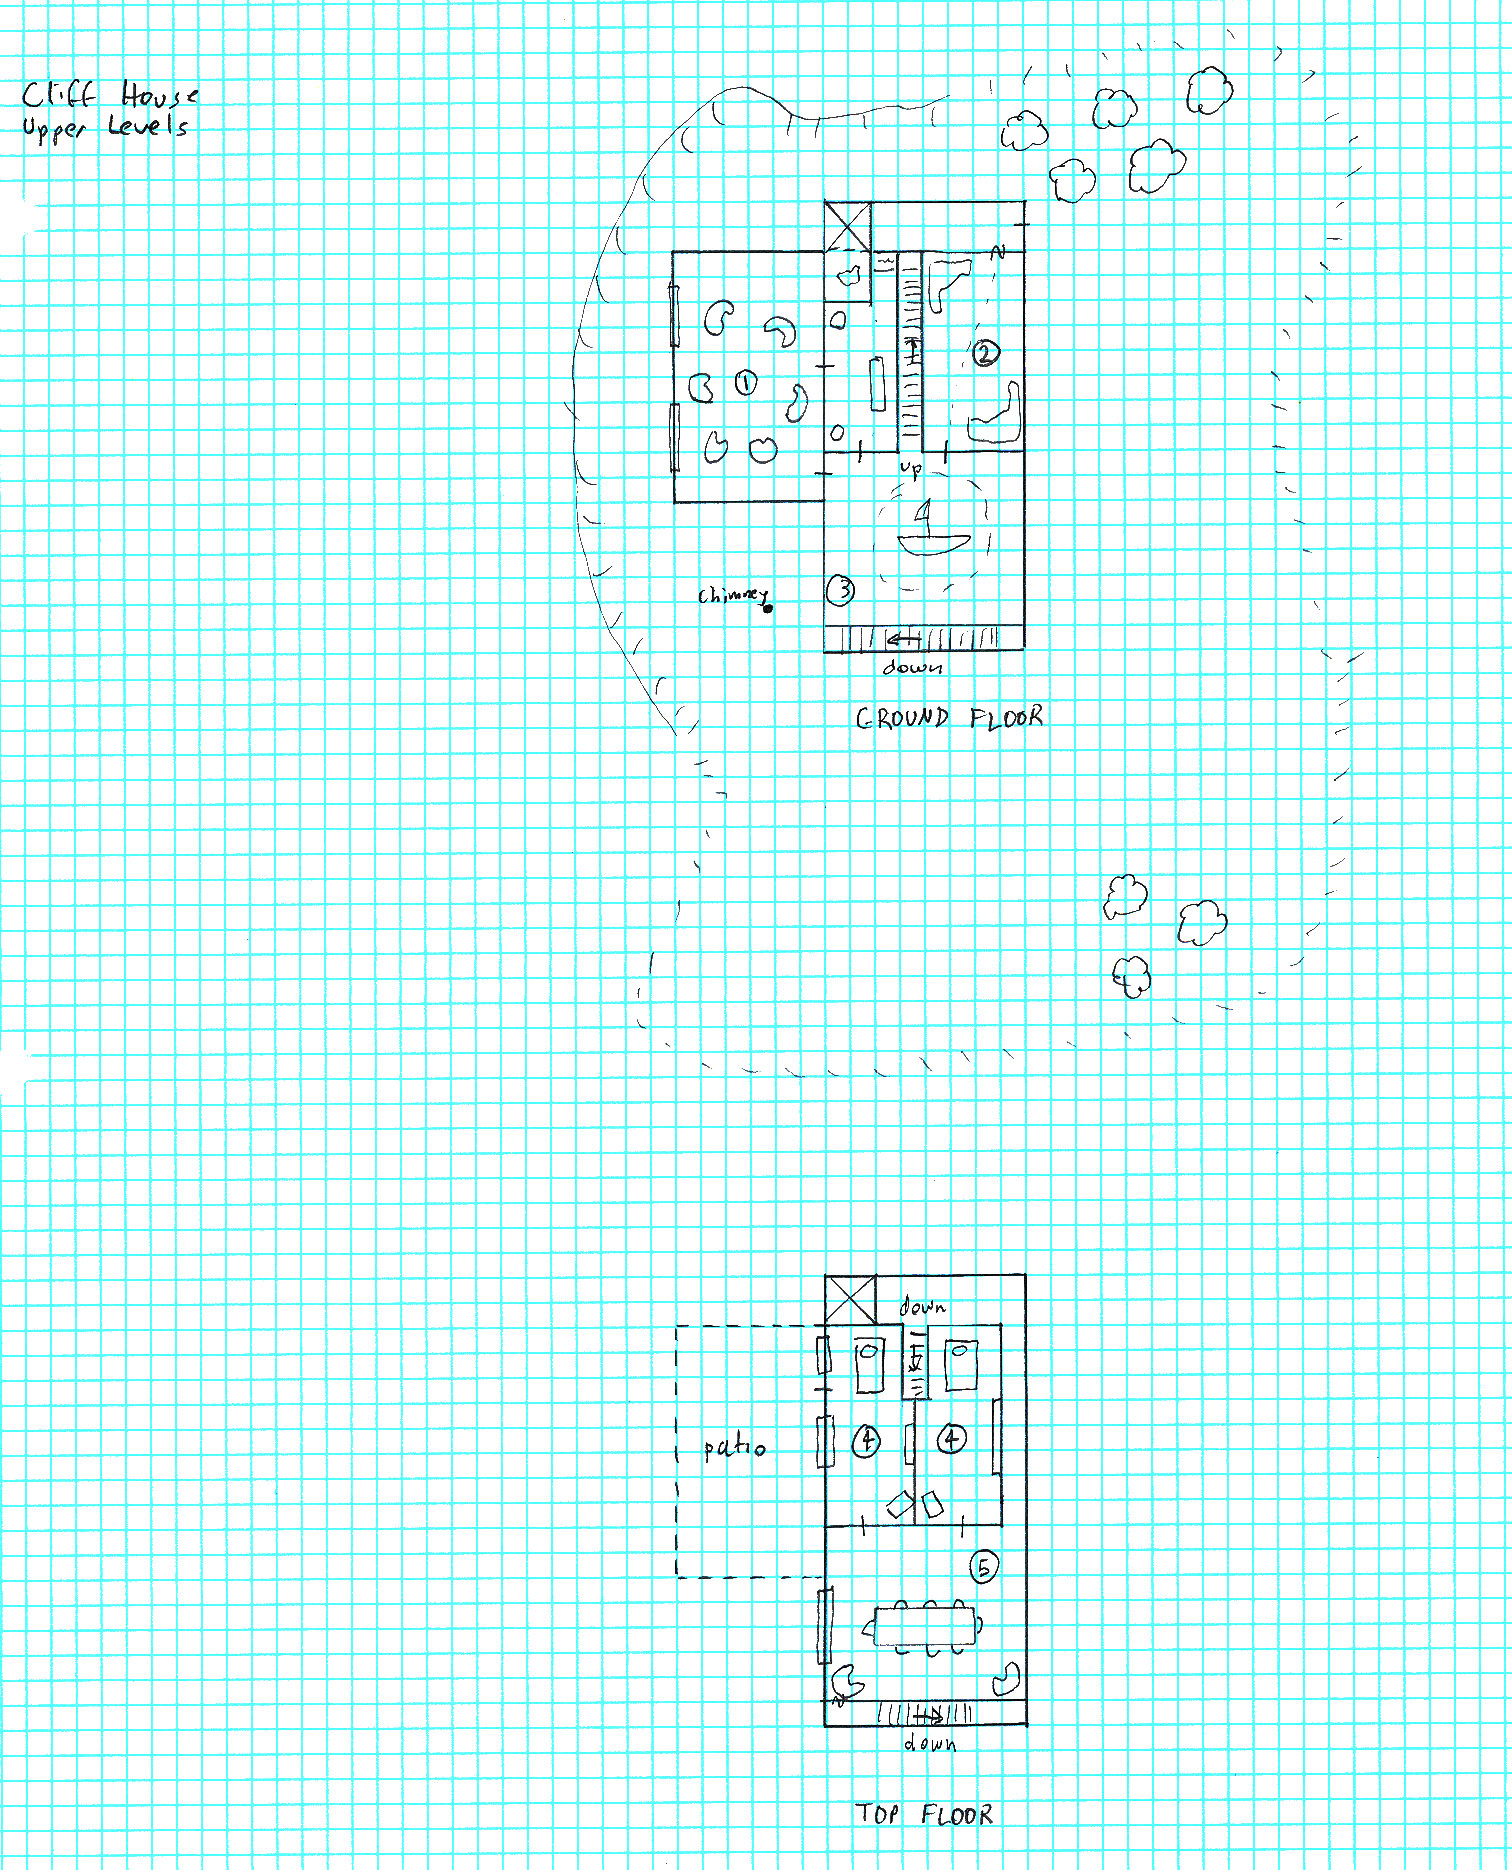
Room 1: Porch
Invisible statue attacks AND makes noise. The place is populated by Ruang Rump.
Room 2: Sitting Room
Room 3: Foyer
Room 4: Opulent Bedrooms
The key will continue to return to the room as soon as it is move from the room. The chest needs to be brought to the key.
Room 5: Planning Room
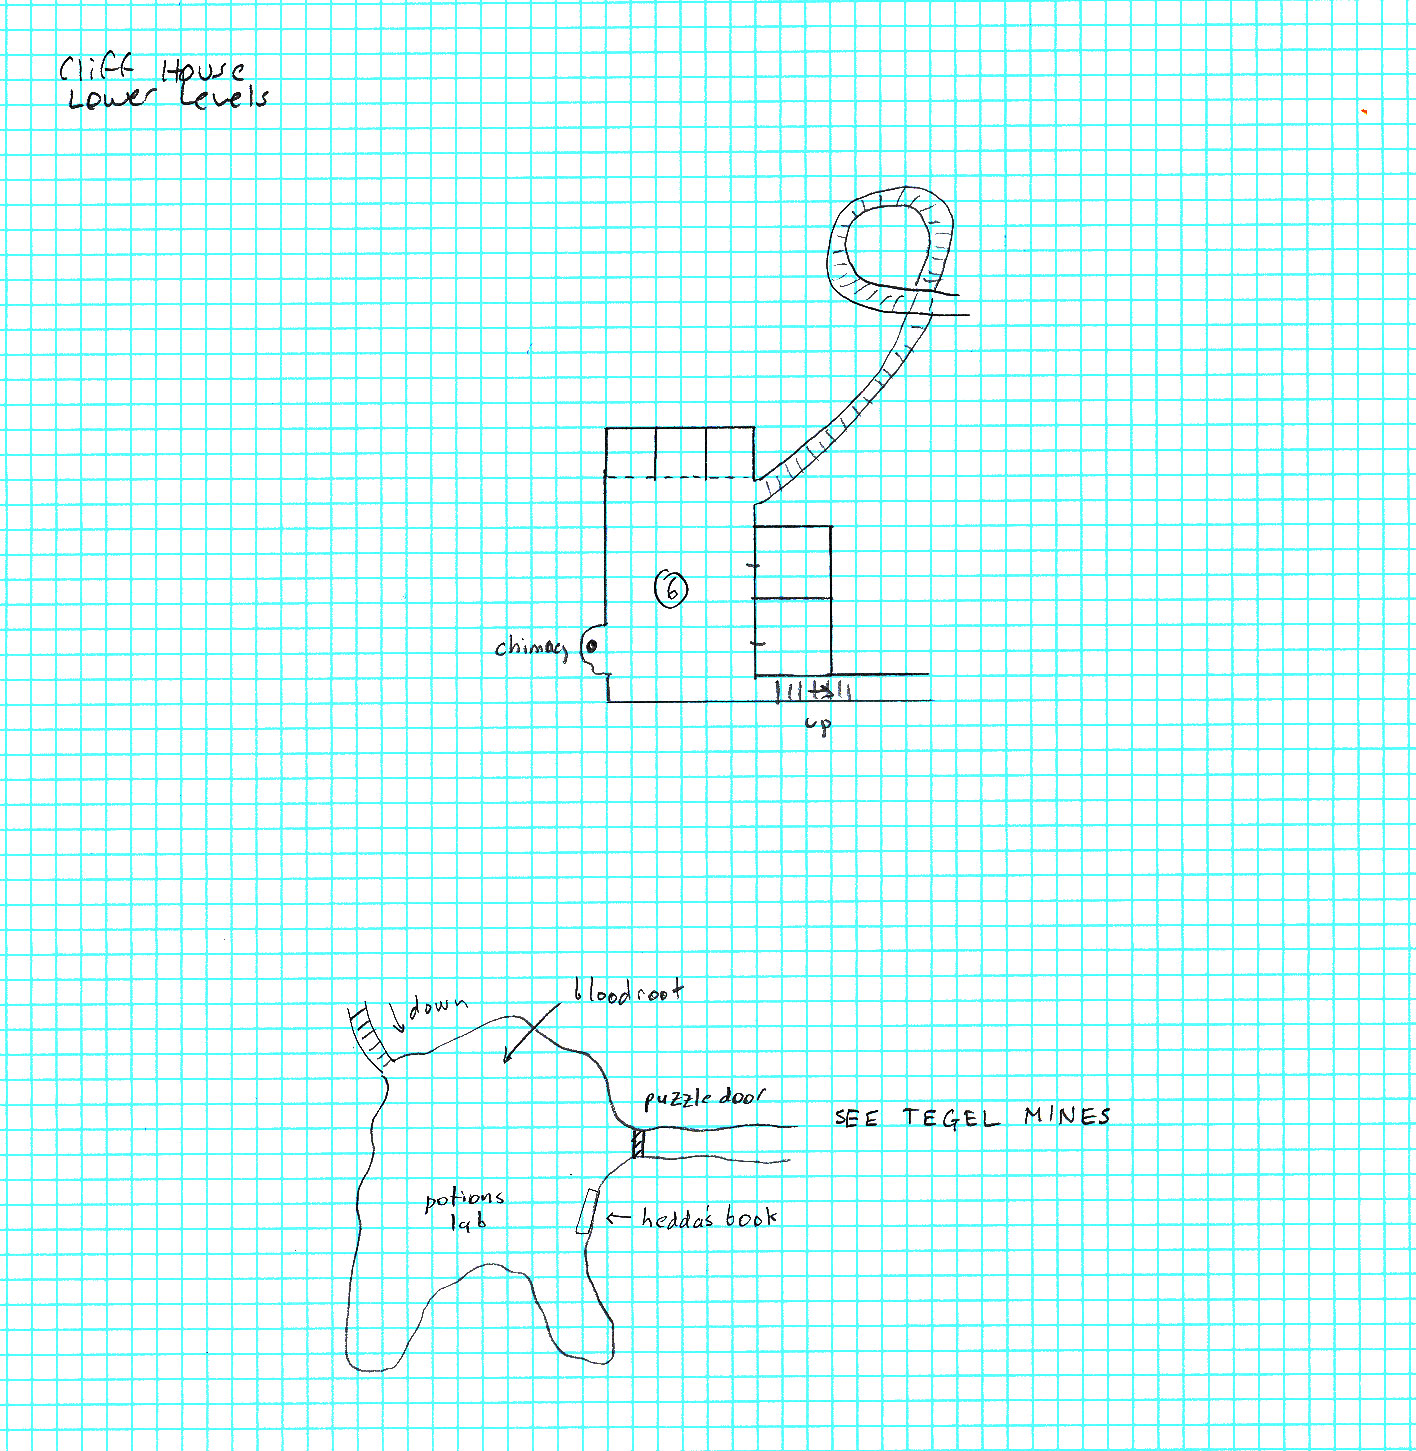
Room 6: Central Dungeon
The grooves are for a car that is used to move between levels. The car is very fast and can be a weapon.
The Dopplegangers of Cliff House
There are six dopplegangers that are currently in residence at Cliff House, although they change shape so often, it is hard to keep track of them.
Room 7: Potions Room
There are several items of note in the Potions Room:
- There is a large pile of bloodroot being distilled into large jars of thick, blood red viscous poison.
- On one table near the back is Hedda’s book, somewhat the worse for wear. Several pages have been marked, mostly on the brewing of poisons and potions to control the minds and thoughts of others.
- The goblin’s alchemist notes. It seems mostly to tell about a newly-discovered black goo that can be found just south of Eventide, bubbling from a spring. The goo is evil and seems to have some sort of zombifying effects on those who drink it. It appears to induce a comatose sleep in woodland creatures. Copper seems to be a natural resistance to the substance.
Gorlack the Goblin will drink either a Potion of Invisibility or Flying (or both) to escape the party.
The party is attacked by four slow moving zombies – Stuffed with Hellwasp Swarms!!! Hellwasps are vicious, foul-tempered magical insects. A single hellwasp resembles a thumb-size wasp with a gleaming black carapace with ruby-red stripes and iridescent green compound eyes.
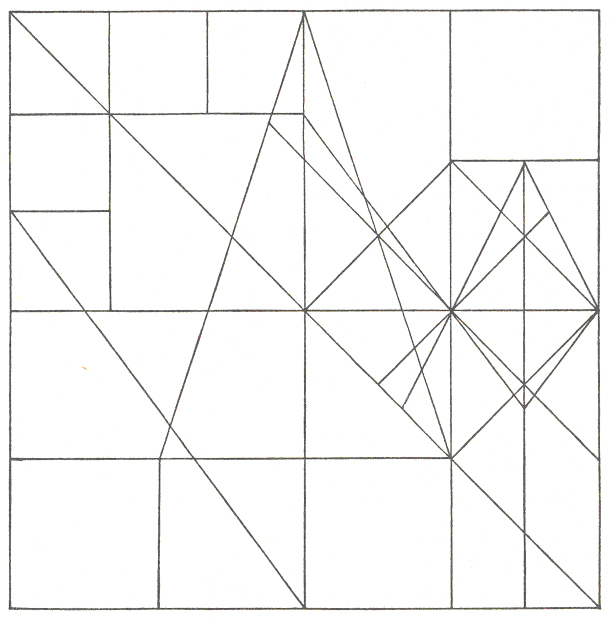
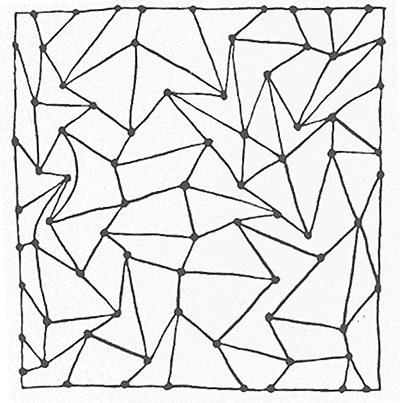
The flickering door in the Potions Room is a puzzle lock. “The key is the squares in this puzzle fair.”
There are eight buttons around the edge of the square numbered 18 through 25 inclusive. The answer is, of course, 23. Opening the door leads to the Tegel Mines.
Dim Lighthouse
The Dim Lighthouse is not known by its moniker because of its brightness. Created by powerful magic at the height of the mithral mining, it has shown brightly for over three hundred years. The lighthouse was built by dwarves, a sturdy stone structure which has weathered all storms. Its magical light was created by a cadre of wizards and druids that were commissioned to build similar structures up and down the western coast of the Inner Sea. The light is powered by a single firefly which must be caught each month and put into a small crystal chamber within the upper floor of the building. Fireflies are very common in the area. While typically disappearing in winter months, the lighthouse keeper at the Dim Lighthouse is known to keep a warm room near the structure’s boiler stocked with the insects.
The Dim moniker is because of the current lighthouse keeper, Dan the Dim. Dan is a very large man with a bald head and a well-muscled frame. He is very stupid and usually can be seen with a blank look on his face. He walks through town once a week swinging his arms wildly and chanting, “Dan, Dim, Dan, Dim”. The local merchants give Dan basic supplies, although he is often given foodstuffs that are too spoiled for the townsfolk to buy. These are happily taken by the large man. Dan keeps the lighthouse locked at all times, wearing the giant metal key around his neck for safekeeping. He never allows anyone into the lighthouse.
Fishbone Hamlet
This small collection of five huts east of Tegel Village are the homes of the area’s fishermen. All the huts are run-down affairs built from scraps of shipwrecks and driftwood that have come ashore from the Inner Sea. The five men that fish the water are all older, with the youngest almost forty. They rarely come to town except to drink with Bilgewater or drop off fish for their buddy Esmond Stillwater to sell. Despite their rough appearance, the men are skilled fishermen. Typically, they go out in two boats trailing a large net between them, leaving before dawn and returning shortly after mid-day.
The Fishbone Men, as they are known, are looked down upon by the “proper” villagers because of their willingness to offer housing to the old wenches of the town. Currently, two shady women live in Fishbone Hamlet in some sort of communal arrangement that the townsfolk can only gossip about. The Fishbone Men are always trying to recruit the young men of the village into their ranks, although no mother would ever allow her son to frequent their dingy abodes. Rumor holds that the men have captured a mermaid in their nets and keep it in a tidal pool just south of their hamlet.
Grinder’s Mill
DM's Notes
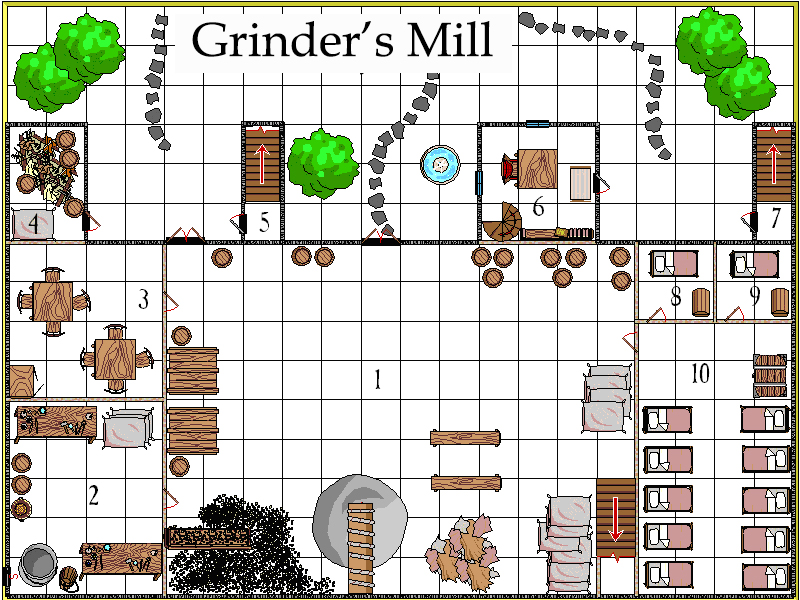
Inhabitants: Bobo “Grind” Burwright, Owner; Child Gregory, Child laborer
This is where the first encounter happens. It will be either an ambush – if the party discovers the secret of the Doppleganger. Or a siege – if not.
All doors of the Mill are wood (2 in. thick; hardness 8, hp 30, Break DC 22, Open Lock DC 20). The secret doors require a Search DC 20 to find.
Room 1: Main Mill Floor
The orcs have the door at the top of the northeastern stairs open. While they may not actively watching for intruders, they will poke their heads out every few minutes to check the room. The continual light coins can be found throughout the mill. There are 20 of these worth about 1 gold each.
A Spot DC 20 will discover several small footprints leading from Room 1 into Room 2.
Room 2: The Kitchen
In the northeastern corner of the room are a set of undisturbed human prints and a cleverly-concealed secret door. The door opens up to the outside. The footprints require a Spot DC 15, and the secret door has the standard Search DC 20.
Room 3: Common Dining Room
A small pouch of 18 gold pieces has been taped under one of the tables. The pouch seems to have been under the table for several years. A Search DC 20 is required to find the stash.
Room 4: Storage
A Listen DC 18 will detect sounds of large birds moving about inside the room.
This room was used as a storage room in the past. A very large pile of rubbish is in the northern part of the room while several bags of grain are neatly stacked in the south.
A number of stirges move to attack when the door is opened. As they can freely fly through the missing transom, they will pursue the party if a good meal is still to be had.
Room 5: Stairs Up
Silent Movement is reduced by -5 when using these stairs.
Room 6: Mill Office
Room 7: Stairs Up
Silent Movement is reduced by -5 when using these stairs.
Room 8: Grind’s Room
This is Grind’s room. The chest is locked with a poison needle trap. It contains: 120 gold, a silver and ruby ring worth 240 gold, and a deck of marked playing cards.
Needle Trap: CR 2; mechanical; touch trigger; lock bypass (Open Lock DC 18 or special key); Atk +6 ranged (1 plus Deathblade poison); poison (DC 19 Fortitude save resists, 1d6 con/2d6 con); Search DC 18; Disable Device (DC 18). Worth 2,000 gold pieces.
Room 9: Gregory’s Room
This is Gregory’s room. He is so messy nobody wants him nearby. The chest has been used as a trash bin and toilet. So, it is very disgusting. There is nothing of value here.
Room 10: Common Sleeping Quarters
The chest is filled with sheets and blankets. While not clean, they are reasonably well-laundered.
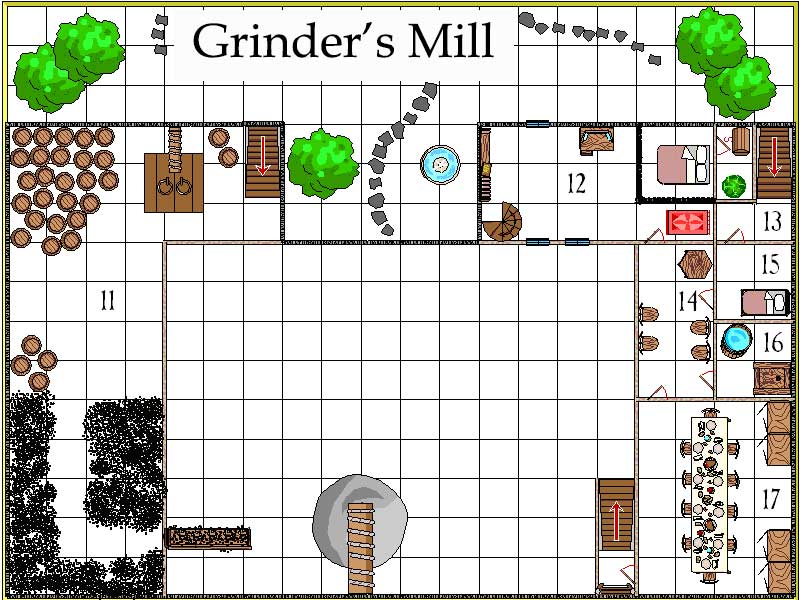
Room 11: Drying Room
The trap door is swollen from disuse. It requires a combined Strength DC 28 to open, and the door will make a very loud squeaking noise.
The orcs ignore this room. Although two ankhegs have taken up residence in the piles of grain.
Room 12: Haunted Study
If the party enters the room, a ghostly presence will start to manifest itself. This is the spirit of Old Man Grigglesby. He haunts this room because he was cheated out of the mill by Grind. He cannot speak, and appears as a faintly green-glowing spirit. He mimes out his desire for the party to get rid of the evil doer. The spirit cannot leave this room. However, because of the ghost, this room is mostly undisturbed. If the party can convince him that they are here to help, then he will allow them to use the room as sanctuary.
Behind the bed is a secret door which has not been opened since the time of Old Man Grigglesby. In it is a chest that nobody knows about and a magical teleport. The chest is locked with a Glyph of Warding trap.
Glyph of Warding (Sleep) Trap: CR 4; spell; spell trigger; no reset; spell effect (glyph of warding [sleep], 5th level cleric, sleep, DC 15 Will save avoids); multiple targets (creatures within 15 feet of the trap lasting 5 rounds, see the sleep spell in the PHB for information about the effects of the spell); Search DC 24; Disable Device DC 24. Market price 1,800 gold.
The chest contains the following treasure: 300 gold pieces, potion of cure moderate wounds (2), and dagger +1.
The magical circle is the focus for a later adventure, as the party will have to collect the three missing candles to get the circle to work.
Room 13: Landing
A Listen DC 15 will alert the party to the sounds of a single sleeping person beyond the door. The door at the top of the stairs is locked.
Room 14: Common Room
The two northern doors are unlocked, and the two southern doors are locked.
Room 15: Servant’s Room
Room 16: Private Bath
Room 17: Fancy Dining Room
Roof
The landing outside the dining room has a ladder that leads to a trap door in the roof. The trap door is unlocked and not particularly heavy. Strength DC of 10. The roof is wood and in need of repair. Any small characters may move about without fear of falling, but medium characters, especially those in armor must make a DC 20 reflex check once every 10 rounds to avoid hitting a soft spot and falling through to the corresponding room below.
The trees that surround the mill can easily be climbed for access onto the roof. Moving from the roof to the trees (in order to beat a hasty retreat) takes a Jump DC 15 and a Climb DC 10 to successfully make it to the ground. Failing the first roll means that 2d6 points of damage are taken as the character tumbles down the branches. Failing the second roll means that 1d6 points of damage are taken as the character slips on a branch. Both failures will produce a good deal of noise. Jumping onto the roof requires a DC 20 reflex check to avoid falling through the soft wood.
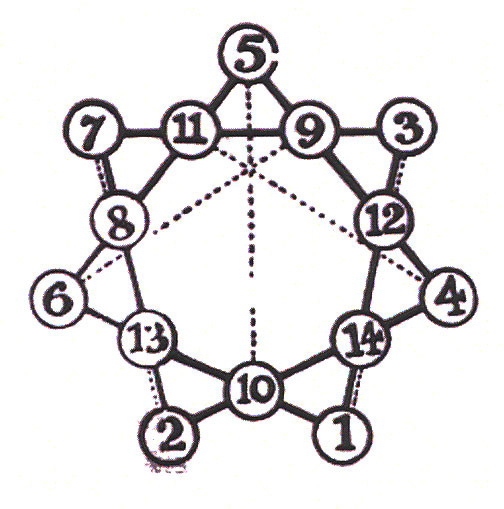
“Star puzzle with 30 in the center”
Monastery of St. Cadel
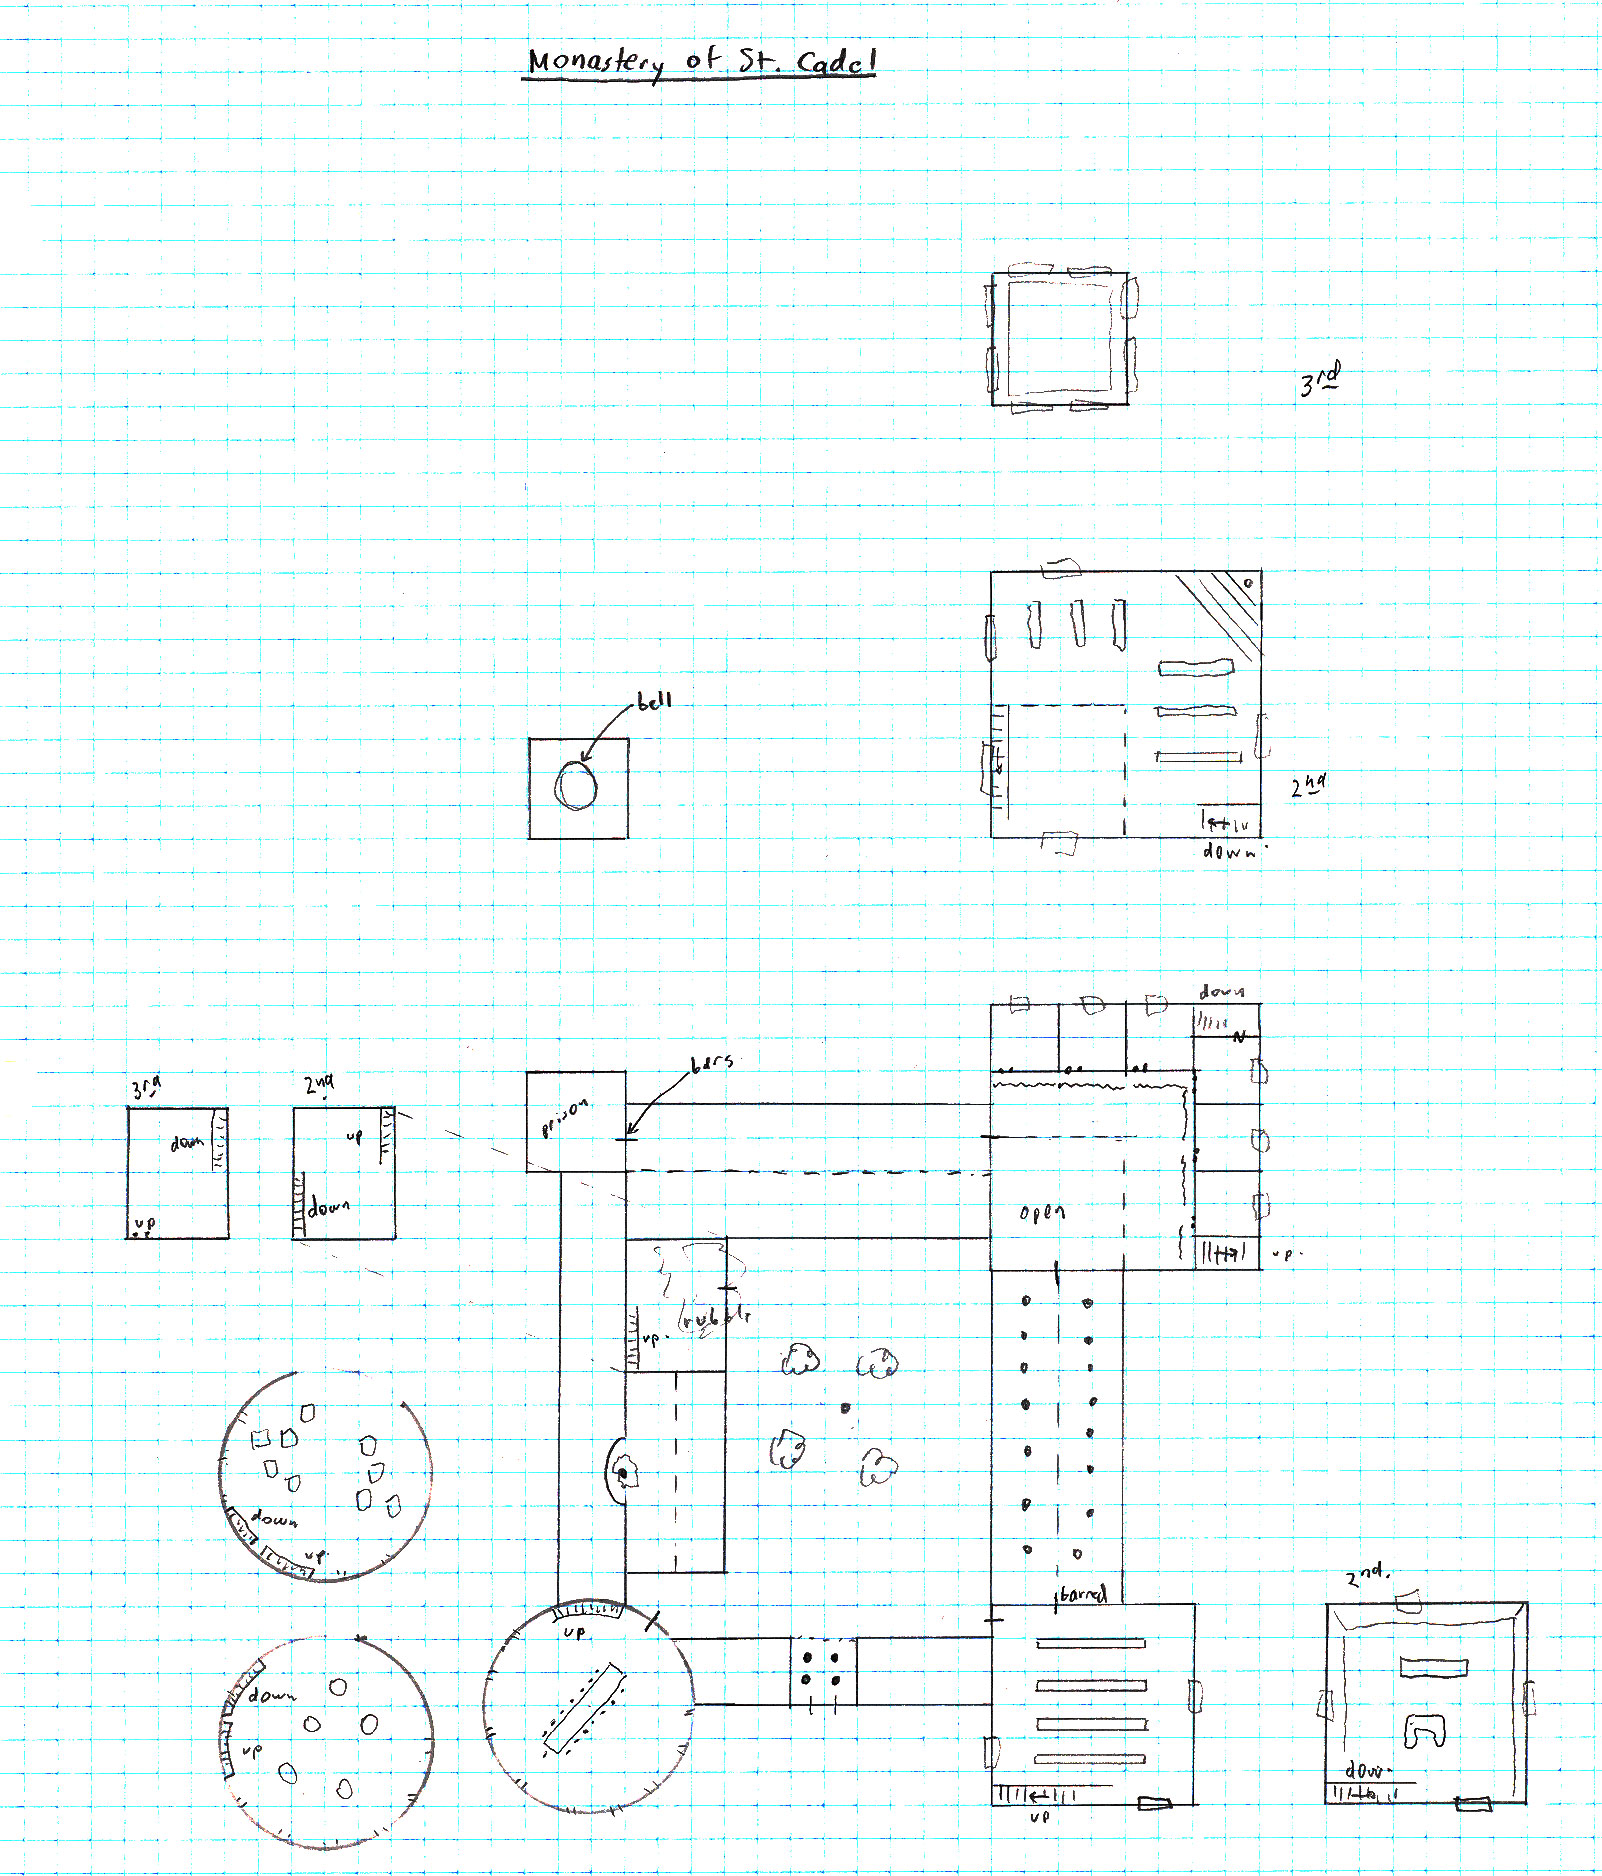
Overgrown and tumbled down, the ruins of the Monastery of St. Cadel lie on the Savant Scarpe south of Tegel Village. Built by a generous gift of Rosienna Rump, eldest daughter of Sir Rumpole and known affectionately as the Romancer during the early days of Tegel Manor, the establishment of the Monastery was hoped to bring good fortunes on the Rump family. The Monastery is a collection of five towers surrounding an inner cloister. At the height of its influence, the monastery housed twenty brothers. The order was not particularly effective in bringing luck to the Rumps, but they were master brewers and distillers. The Monastery was profitable for many years after its establishment, but eventually the lack of true spiritual leadership dissolved the brotherhood. After that, the building was used as a secular brewery and distillery.
In 665 TA, the Monastery burned. Fueled by alcohol-fed flames, the interiors of almost all of the buildings were gutted. An investigation showed that the fire was intentional, set by the last member of the order, a blind monk named Salvatore. Salvatore was badly burned in the fire and died shortly after confessing his sins to the local cleric. After that, the building fell into further disrepair.
In modern memory, the Monastery has never been inhabited. Local sightings of lights in the high windows have always been dismissed as will-o-wisps. However, these reports have increased during the last month, as has the credibility of the witnesses. Even the skeptical Captain Reem confirmed that he could clearly see movement in the old buildings one evening. When he went to investigate, however, the lights quickly disappeared. A daytime patrol found footprints in the area, larger than the usual orc tracks and unknown to the locals. No search of the Monastery has been made.
This is where the lizardmen that have come into the area to return to the call of the Immortal King are camped.
Northwest Tower
The northwest tower of this complex is a small two story affair. There are no windows on the lower floor, but a number of large slits have been carved into the second floor. (for the bells).
Closer inspection will show these to be filled with cobwebs.
A single door has been recently reinforced with iron bars, although the wooden planks are rotted and falling apart in places. The room within is filled with webs. A spider will watch over prisoners put here. The head lizardman cleric will “speak” with the spider when putting someone in here. They won’t be eaten, just hidden away until recalled.
Central Tower
This tower was once three stories and square in structure. A number of windows on the second and third floors show rubble, as if the roof has collapsed.
A single door leads into a rubble strewn room. It is blocked and almost impossible to get into from the courtyard side. Originally, it looks like this room was some sort of an apothecary. There are large jars of dried herbs, mostly smashed, a large stone mortar and pestle, and several fire pits. It is obvious that this room has not been used recently.
Southwest Tower
A large circular tower of stone is clearly from a later period of construction, as the work is more detailed and the stones more well shaped. Small slit windows on all three floor sare too small for a person to fit through.
The lower floor was obviously used for formal occasions. A large statue of St. Cadel stands opposite the door. A massive wooden banquet table with 21 chairs sits in the center of the room. Tapestries of a monk herding sheep and slaying wolves line the walls. The smell of blood wafts down from above. The party will notice a trail of blood leading upstairs.
The second floor was obviously used as a kitchen as a number of dormant ovens line the walls and tables are strewn throughout. Crockery and cutlery are spread around. The only sign of recent use is a large pile of deer carcases piled near the stairs. A number of crocks contain hops and yeast.
The third floor is musty with disuse. The floor is spread with a thin layer of barley, now long past dried. From the wooden beams in this room hang long wooden rakes, shovels, and bags for hauling grain.
Northeast Tower
This three story structure has been gutted by fire, and the smell of charred timber is very strong here. The ground floor holds the remains of a number of copper stills and pots, scorched and broken. Around the perimeter of the lower floor, a number of curtains hang in burned tatters. And beyond those are a number of small monk cells, also ravaged by flames. Bedding and bits of charred furniture are all that remain.
A second floor chapel is still recognizable, although the pews in the south of the room have been pushed aside to hold what appears to be a bottling assembly line. A small corner altar with a statue of a smiling St. Cadel looks down into the room. A single flight of stairs leads to an open air room above.
The top story is merely a wooden catwalk around eight blackened windows. If cleaned, these will reveal blue, green and reds of stained glass showing the brave St. Cadel in the field with his sheep, killing wolves, reading to the common folk, writing by candlelight, and speaking to a large green dragon.
Southeast Tower
This squat two floor tower seems to have escaped the ravages of the fire, although the north and west sides are badly charred. A single iron-bound door leads into an old scriptorium. The north door is barred from the inside with a steel rod thrust through the handles. A number of wooden benches are in this room, each with a dried pot of ink, pigments, and brushes and pens of a variety of sizes and styles. On the lectern at the front stands a large ledger showing the sale of beer, buying of hops and barley, and the profits of the monastery. A small holy book has been used under one corner of the lectern to keep it from wobbling.
A second floor room is lined with books, many decayed and all damaged by the smoky scent that is pervasive here. A single chair sits facing the southern window. Behind the chair, a large table has some ancient tablets written in an alien language, several odd-shaped relics of shiny metal carved in strange geometric shapes. A makeshift cot has been created in the corner of the room.
This is where G’ruk the Shaman is staying.
Courtyard
Four large oak trees provide shade for this oddly shaped courtyard. In the center of the oak trees, a fountain bubbles with clear, fresh water and empties into a small pool filled with water plants. Five mismatched towers surround the courtyard. Three are approximately 60 feet high, although the smallest of those is crumbling and is listing to the west, as if ready to topple. The large circular tower is whiter than the other with narrow slit windows showing three floors within. The large square tower has a small third floor that appears to be made of a black glass. The exterior of this building and the surrounding porticos are blackened by fire. Two smaller towers, each about 40 feet high are on opposite corners of the courtyard. The smallest has slits on its top floor while the larger has large window-sized opening.
A curious grotto in the west wall also has a small statue of St. Cadel standing in a pool of bubbling water. The air near the statue is cool, and a sense of peace comes to those that approach.
Rump’s Hump
Since the early days of Tegel Manor, there has always persisted a legend of a great sea monster swimming in the deep waters off the coast. First seen by Ronahr Rump in 636, the initial sightings of the monster were typically made just at dusk, usually in foggy or stormy weather. Usually, the creature is described as snake-like, although Rigat Rump swore to his grave that he spotted four tentacles rising from the sea. The monster’s existence has never been confirmed by the local fishermen, a key clue in the mystery washed ashore in 722 when a dwarven trading vessel was destroyed in a fog bank. It is said that pieces of the hull were found with huge bites taken out of them. In fact, one of these ship hull fragments is on display in the Bark and Byte.
Seen many times over the centuries, usually by the Rumps, the creature is now known as Rump’s Hump. Although, some in town still hold to the old stories, the tale of the creature is more a testament to the craziness of the Rump family. Most fear that the legend of Rump’s Hump will never be solved.
Silver Grove
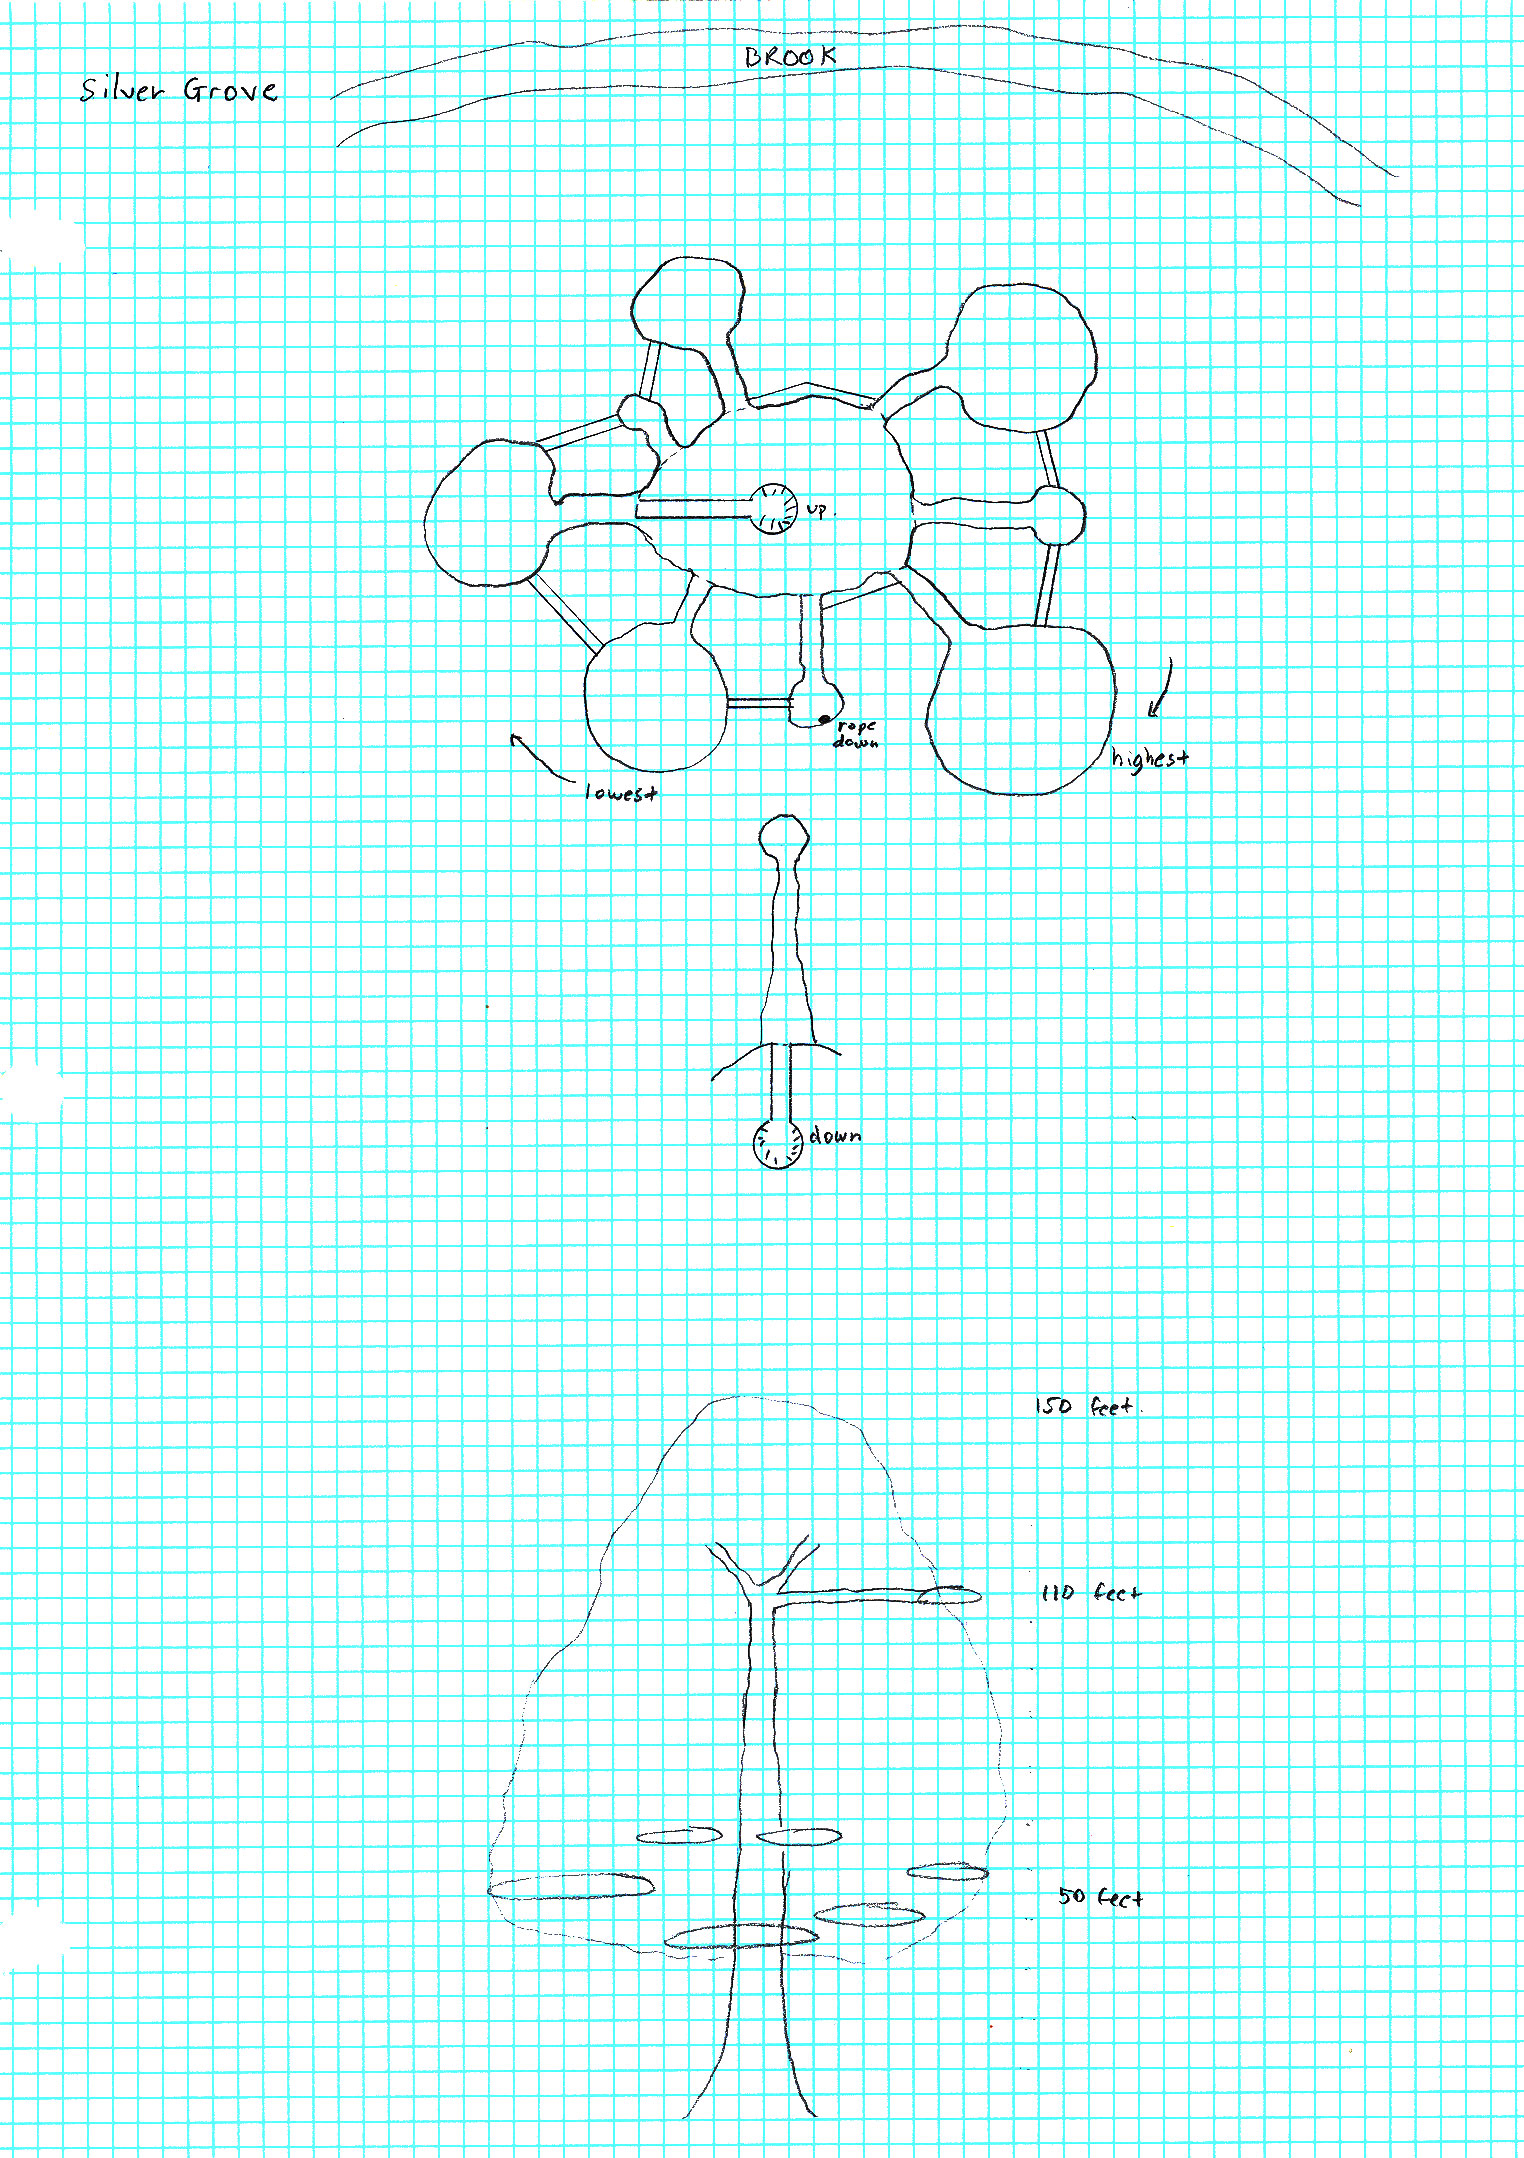
The Silver Grove is located north of town near the Barrows. In the past, it was the home to the druid Willowman, who served Oakentree in the northern Dreadwood. With little human activity, Willowman focused most of his time on keeping the orcs at bay. An infrequent visitor to Tegel Village, all memory of Willowman has been washed from the townsfolk, except the elven family of Farshot. They are seeking the Silver Grove to discover what happened.
Willowman was ambushed in the Summer of 889, as the orcs were planning their attack on Tegel Mannor. Knowing of his ability to summon help from the South, the decision was made to capture the druid, keep him tied up, magically wipe his memory from the townsfolk, and disguise his glade under a magical cloak. The first was done as Willowman was leaving Tegel Village, distracted by a group of children that followed him asking for special woodland pets. Two giants grabbed the druid while the shaman silenced him. Tying him upside-down from a tree in his grove, the shaman sacrificed as many types of natural animals as they could find. The effect of the spell was that the last 80 years of memories were wiped out for the villagers (although the elves were unaffected). The second effect was that the grove was rendered invisible, only natural animals can find their way through the trees to the glade at its center. Other goblin shaman outside the spell effect were then brought in to explain what happened to the spellcasters.
Currently, Roughneck Rump is at the grove. He rides to the edge of the woods, binds his eyes with a handkerchief, and allows his horse to lead him into the glade. If he looks, he sees a chasm in front of him or a wide, raging river. These always cause him to steer away and become lost.
In order to protect his grove, Roughneck has captured or killed all the horses in the area. Lately, these have been bought by the orcs for the price of one bag of mithral per horse. They are being used to drain the dreck from the lake at the center of the Tegel Mines to the surface, where the river carries it away into the sea.
The DM can make up all sorts of weirdness here to keep the party lost and confused.
As you approach the tree, you notice the initials “RR” are carved in it recently in a sloppy hand.
In the bored hole in the tree which leads to the lookout, there is a secret compartment in the floor. It is locked (key around Roughneck Rump’s neck) but not trapped. In it is a chest with an intricate carving on its top. Inside, are the treasures of Roughneck that aren’t in the Caves: a map of the caverns showing the draining operations, 10 small bags of mithril ore, 1000 gold pieces, Druid’s Vestments, and a Wand of Lightning.
Upon killing Roughneck Rump and discovering the location of the Silver Grove, the party will be able to revive Willowman the Druid. At first, they won’t remember who he is, but as time goes on, their memories will slowly start to return to them about the friendly druid who would come to town periodically.
This “mass amnesia” spell can also be used to explain why the people of Tegel Village are so surrounded by evil and yet somewhat oblivious to its infestation. It appears that elves are less affected by the magic. NOTE: Willowman is also under the effects of the spell. In fact, being at its center, he remembers nothing about himself initially. Slowly, over time his memory (and ability to use spells, etc.) will return.
Rump, Roughneck the Rotund (feared highwayman) – Descended from a distant branch of the Rump family tree, Roughneck and his brother Ruang are the only the two surviving Rumps other than Sir Runic. Roughneck has taken residence near Tegel Village and waylaid many a traveler, greeting them with a shrill, “Stand and deliver.” Several years back, he nailed a proclamation to the door of the Village Hall stating that anyone attempting to buy Tegel Manor would be killed and any woman attempting to marry Runic Rump would meet the same fate. It seems that Roughneck wants to inherit the manor.
The Ring of Passage appears as a large sapphire ring. It radiates a faint aura of Divination on it, although it does not appear to have any magical functions. The ring allows free passage for the wearer past the dragons at the entrance to the Tegel Mines.
The small emerald ring is from Gnobbin Goldtooth. He will trade it for a Staff of Fire (see Boons).
Cut the net from top to bottom, never at a knot. The fewest cuts will win the prize, any more will not.
The Shambler
In the early Spring, a violent storm dumped torrential rains on the western coast of the Inner Sea. Common during these months, the villagers of Tegel huddled in the Inn, drank wassil and swapped stories of the great rains of years past. The Boiling Brook and Darby Creek both flooded, again this was not a reason for concern. When finally the rains turned to a gentle mist, the farmers returned to their crops. It was shortly afterward that one of the Granger children came running into town looking for his father Congal. It seems that a large creature, resembling a rotting pile of leaves and twigs was eating one of their prized highland cows that had gotten out of the field and wandered into Derfingel Marsh. Several of the villagers and Congal ran to the place, swords and axes in hand. The creature, a Shambling Mound, was so bloated that it could barely move. Even disabled, it took five men almost twenty minutes to kill the creature, and several injuries were inflicted on the brave villagers.
Satisfied the creature was dead, the men turned to return to the village and seek out the help of Hedda the Healer. They surmised that the Shambler had been washed downstream by the storms. As they reached the far side of the field, a bellow cut through the air. Turning the men could make out a much larger form, although familiar in its massive, heaped continence. It seems the men had killed a baby shambler, and now the mother was mad. Hurrying quickly to town, Congal warned the others of what he had seen. A party of twenty men and the village guard were unable to find any trace of the creature.
The Shambler has been seen only once or twice since the Spring, as it seems like it needs to eat only once a month or so. However, its attacks have circled the city, usually striking at the cows and sheep found on the outlying farms. The biggest concern, voiced by August Reem at a town meeting a few months back, is that if the Shambler is not killed soon, it may reproduce in the Spring. Soon, the village may be threatened not by one such creature but several. Currently, there is a bounty out for killing the creature.
At the dark of the night, the hole may glow green if the hut is filled with fog.
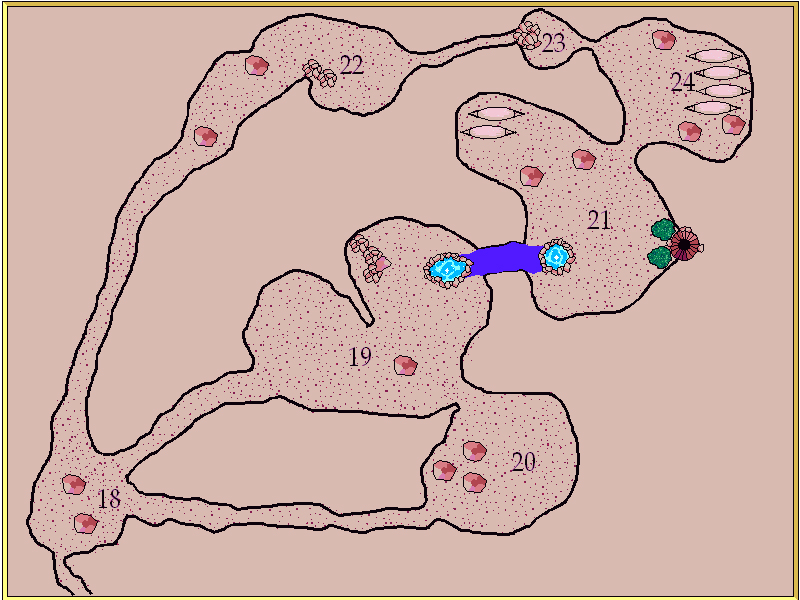
Room 18: Cave Entrance
The room has seen recent traffic. A Search check (DC12) will allow characters to notice this. An extraordinary Search check (DC 20) will pick out specific tracks: goblin and giant centipedes tracks both leading from Room 18 to Room 19. There are a few centipede tracks into Room 20. The trail into Room 22 is harder to distinguish as a shambler covers its own tracks.
Room 19: Goblin Trap
A goblin waits behind the rock piles in this room. He is hunting giant centipedes which will follow the trail of food. The goblin will attack the party if cornered or if he thinks that he can get some fresh meat for his tribe. An opposed Spot check (the goblin gets a +5 on his roll) will allow a sneaky party to see him from Room 20. If he must escape, the goblin will jump into the pool and seek reinforcements. The DM may add some giant centipedes into the melee to make things more interesting.
The pool leads to an underground passage that connects to Room 21. The floor of this pool is covered with a phosphorescent moss. The water in the pool is clear and cool.
Room 20: Three Pillars Cave
‘This room is empty.’
The party can use this room to scout out Room 19, and the pillars provide good hiding places for an ambush of the troglodyte. There may be giant centipedes in this room.
Room 21: Goblin Main Room
The man is Johan Salt. He is the cook for the goblins. His guard is the old cook, a nasty female goblin who will attack with her rusty fish knife. She will immediately call for help if the party is seen.
Johan will help the party if allowed. He was an old sea hand thought to be lost at sea. Actually, captured by goblins. Will make the fishermen friendly with the party.
The shaft in the ceiling leads into the hut. This natural shaft was used as a dump for food when the hut was occupied. As such, the area below the shaft is home to green moss and smells foul. Although tight and slippery, this shaft can be climbed with a Climb check (DC 18).
Room 22: Shambler’s Den
A shambler has taken residence in the rocks in this room. If it has just eaten, it may be sluggish to respond or asleep. It will wak up if the goblins make too much noise. Hanging near the south entrance to this room on a hook is a deer carcass. It is old and smells of decay. This is used by the goblins to keep the Shambler happy.
Room 23: Goblin Treasure
A small metal chest sits in the center of this room. It is guarded by a poisonous needle trap.
Needle Trap: CR 2; mechanical; touch trigger; lock bypass (Open Lock DC 18 or special key); Atk +6 ranged (1 plus Deathblade poison); poison (DC 19 Fortitude save resists, 1d6 con/2d6 con); Search DC 18; Disable Device (DC 18). Worth 2,000 gold pieces.
The chest contains the modest goblin treasure: 120 silver, 60 gold pieces, Long Sword +1, Potion of Invisibility.
Room 24: Goblin Sleeping Chambers
There are typically two or three sleeping goblins here. If alerted, the goblins will be hiding behind the pillars in this room.
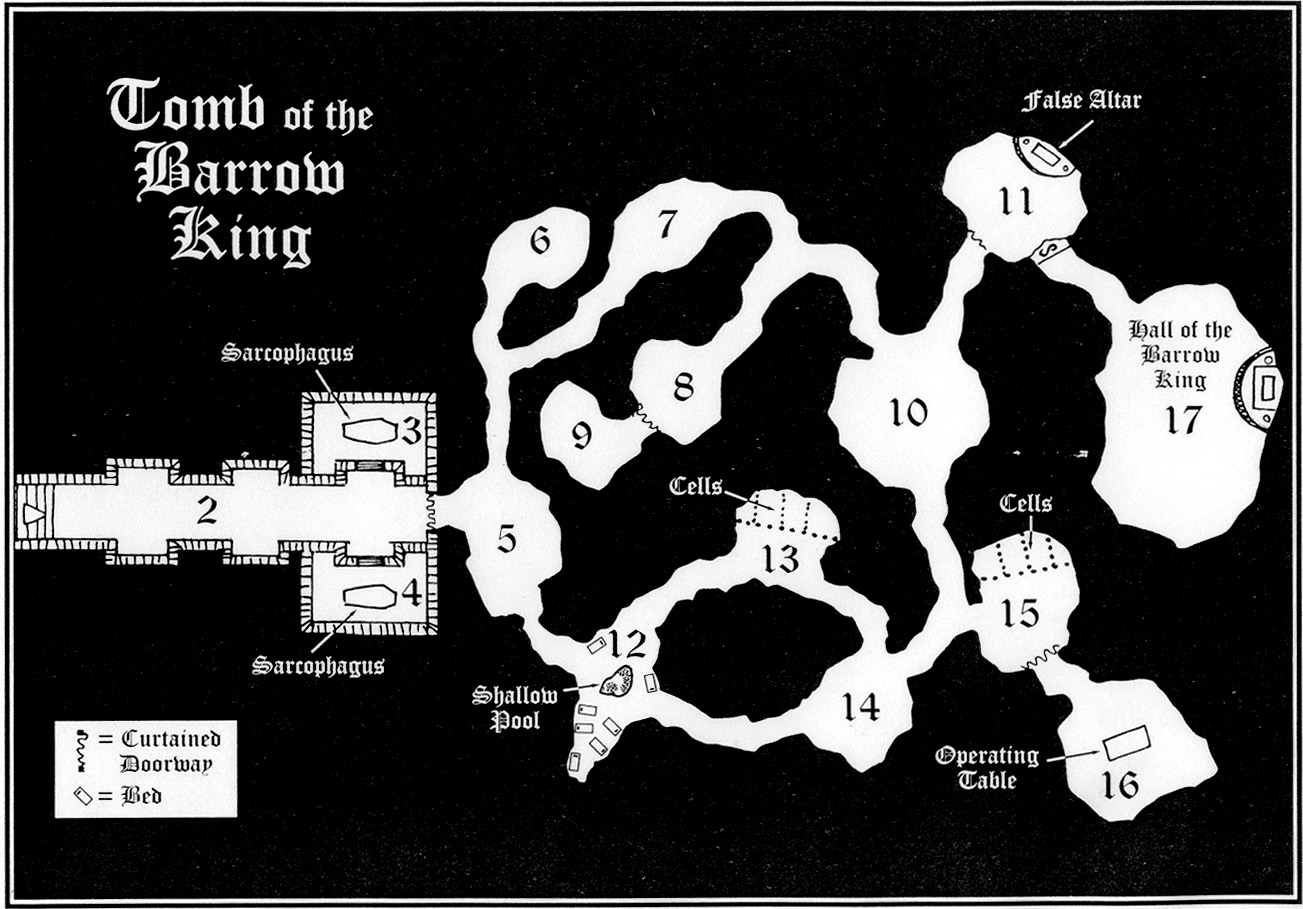
Tomb of the Barrow King
Legend: The Barrow King
One summer evening, old Widow Cranswell retired to her chamber and lingered by the window, watching the last light fade across the sloping lawn outside and pool in shadows near the small copse of oaks north of her home. Two small, flamelike lights danced among the darkening trees – will o’ the wisps, perhaps. She stared at them, and as she stared, they moved towards the forest edge; free of that confinement, they floated in aimless fashion at the bottom of the lawn. Unnerved, Widow Cranswell pulled the window closed and latched it. Then she bolted the door and got into bed. She sat propped against the pillows for some moments, listening, but all she heard were the creakings of the old house as it settled for the night. At last she smiled at her own timidity and closed her eyes.
Suddenly she was jolted awake again. Something rustled at the window and rattled at the latch. Outside the casement, two points of light shone, refracted by the glass panes. It was clear, at these close quarters, that the lights were the eyes of a man-shaped creature. While she gazed, transfixed, a shadowy hand rapped softly on a windowpane. Old Widow Cranswell opened her mouth to scream, but no sound came. Frozen by fear, she watched the hand explore the window frame and panes. Presently the sound of scratching echoed in the room. The creature was picking away the lead that sealed a pane. With a crash, the pane fell out. The hand, necrotically gray, reached through the space and lifted the window latch. Then the window swung open, and Old Widow Cranswell’s visitor stood fully revealed.
He was a pale man, so pale that his face gave the effect of a network of cobwebs, except for the glowing eyes and fleshy, crimson lips. On his head was an ancient silver crown tarnished with age. His head swung from side to side as he surveyed the room; then, nimble and silent as a spider, he leaped over the window sill and across the floor to the side of Old Widow Cranswell’s bed. He loomed over the bed, swaying slightly. Motionless where she lay, Old Widow Cranswell looked up at him with blank eyes. Then, as gently as a lover, he twined his withered hands in her hair, forcing her head back. His lips drew apart, the incisors gleaming white. Then he bent down, as if to bestow a kiss.
The conclusion of this scene was later described by Old Widow Cranswell’s brother. Evidently she found her voice at last, for a high-pitched, wavering scream echoed through the quiet homes of Tegel Village. Within seconds, the man was at his sister’s door. It was locked. He set his shoulders to it and knocked it down.
The brother found an appalling sight. Ashen-faced, his sister lay against her pillows. Narrow streams of scarlet blood pumped feebly from her throat, mingling with darker, bluish trickles from severed veins and staining the white linen by her head. Only the faint twitching of her arms and legs beneath the bedclothes showed that she still lived. Bent on saving his sister’s life, the brother merely noted the open window and broken windowpane. Later, he remembered the odor of mold and the sweet stench that overlay it in the room. At that time, however, his energy was devoted to staunching the flow of blood and summoning aid. He was successful. The Widow Cranswell survived the attack, and as soon as she was strong enough, her brother closed the house and took her south to Haggelthorn.
The next year, the Cranswells returned to Tegel Village. Having heard his sister’s tale, the brother suspected what kind of creature had wounded her, and he was set on destroying it. To his dismay, Widow Cranswell insisted on helping him. On a winter’s night, she lay once more in her bedchamber and waited for the moon to rise. Once more, twin flames gleamed in the darkness outside. Once more, she heard scratching at the windowpane and saw the glass fall and the casement swing open. But this time she was not alone. Her brother, armed with a magical sword, waited with her, and as the vampire rose to the window sill, he swung. At once, the creature dropped from sight. All the Cranswells heard then was a whining howl; all they saw was a dark figure scuttling across the lawn, making its way north out of the village. Together, they waited out the watches of the night, for they did not care to venture abroad when one of the demons of the night was loose. At first light, they gathered their neighbors and walked north to the old barrows.
The place was quiet, the tombs undisturbed except one. Descending into the crypt, a dreadful scene waited. The coffins in the crypt had been desecrated – torn from their niches and broken open. Their piteous contents – bones for the most part, fragmented and scarred with the marks of human teeth – lay scattered on the stone floor. One coffin alone was undisturbed. In grim silence, the villagers did what they must. They dragged the coffin from the crypt into the sunshine and burned it to ashes, so the vampire could not strike again. That night, the villagers celebrated the destruction of the Barrow King.
The next morning, however, the Cranswells had vanished without a trace. Some say that they left Tegel Village in the dark of the night to return to Haggelthorn and forget the memories of their experience. Others say that the Barrow King had returned, taking the Cranswells back to his underground lair. In either case, the villagers turn away when asked about the Barrow King and avoid the barrows to the north of Tegel Village. The Cranswell house is now The Rusty Hook.
DM’s Notes: The Real Story of the Barrow King
Several years ago, a cult devoted to Hate began seeking a location to found a new temple. Since the open worship of Hate is forbidden in the Eastern Reaches, the devout sought a site that was far away from prying eyes, and yet someplace that would glorify their dread god. The cultists found their locale in the form of an ancient burial ground far from any large towns or well traveled roads. After conditioning the burial ground’s resident ghouls by providing equal amounts of bloody brutality and juicy morsels to eat, the cult moved into the warrens beneath the graveyard.
Several miles to the south of the burial ground lay the small farming hamlet of Tegel Village. The superstitious residents of Tegel Village all knew about the ancient burial site and stayed far away, fearing that they might disturb the Barrow King, an entity that they believed stalked the area.
After initial consecration of the new temple to their dark god, Abraxes, posted sentries all around Tegel Village to ensure that no villager be allowed to leave the area, insuring that the temple’s location would remain secure and secret. The village would provide fodder for the cult’s bloody sacrifices as well as Mordiggian, the cult’s spiritual leader, own blasphemous surgical experiments.
The first raid on Tegel Village happened about nine months ago. The villagers awoke one morning to discover that a house of the edge of the village had been sacked and all its occupants had gone missing. The villagers mounted their own search party but found no trace of the missing family. In the months that followed, the raids continued. After the third attack, with no sign of the missing villagers, a messenger was sent to seek aid from Dragonsford. He never returned.
- RAID 1 = 4 (February 11, 888)
- RAID 2 = 4 (May 18, 888)
- RAID 3 = 4 (August 19, 888)
- MESSENGER = 1 (sent out August 20, 888)
- TODAY
- RAID 4 = 3 (November 10, 888)
Some villagers have begun to believe that the disappearances are the work of the Barrow King come to punish them for some unknown transgression. If asked, the villagers will describe the Barrow King as a restless spirit from an age long past that haunts the ancient burial ground several miles to the north of the town. His malevolence is said to loathe all life, seeking to destroy the living whenever possible, especially delighting in the suffering it can inflict upon its victims before it snuffs out their lives.
To complete this adventure, the party must stop the vile activities of the cult leaders (Abraxes and Mordiggian), and rescue as many captured villagers from the temple as possible.
NOTE: The Silver Crown of the Barrow King in a village shop
Epilog
- Other cult members will come seeking revenge for the deaths of their religious leaders (once the next caravan arrives).
- The tasks performed in order to destroy the enchanted axe, Fiend, could become a quest for the party.
Room 1: The Burial Ground
The barrows are approximately 30 feet wide and do not contain anything of interest. Five orc guards and four ghouls are currently stalking around the burial mounds. The orcs will attack anyone who approaches the open barrow. The orcs will fight to the death. They are fiercely loyal to Abraxes. The ghouls, on the other hand, will only attack someone with the scent of the purple mushrooms in Room 14 on them. Otherwise, they are content to stay clear of any fights that occur and sate their hunger on the fallen once it is safe. If the ghouls attack, they run as soon as two of their numbers are slain.
Once the party has dealt with the orc guards (and possibly the ghoul lurkers) they may make their way safely into the open crypt. If the party leave mounts outside the crypt and the ghouls have not been slain or driven away, the unprotected animals will be eaten by the time the party return.
Room 2: The Crypt Hall
There are no actual dangers in the crypt hall, but the atmosphere is gloomy. The hide hanging against the back wall hides the entrance to the ghoul warrens.
Room 3: The Queen’s Room
All of the valuables from this tomb were looted months ago by the cultists and have been moved to Room 17.
Room 4: The King’s Room
All of the valuables from this tomb were looted months ago by the cultist and have been moved to Room 17. If the PCs enter the room, The King and Queen, now transformed into ghasts, will attack them from the corner of the room to the left of the door, and will fight until destroyed. The Queen has an antique hair comb crafted into the shape of a gold dragon set with a red garnet clinging to her matted hair. The comb is worth 580 gold.
Room 5: Room of Gibbering Chirurgeons
There are three Chirurgeons here that attack the party as soon as they enter the room and fight to the death.
Room 6: Ghoul Cave
Six ghouls are skulking in this room, feeding upon the remains of a cultist thrown to them by the orcs in Room 7. The ghouls will only attack someone with the scent of the purple mushrooms in Room 14 on them unless they are attacked themselves. Once four of the ghouls have been killed, the remaining two will attempt to flee north along the corridor, alerting the orcs in Room 7 of danger. The ghouls themselves have no treasure, but a small pearl worth 200 gold can be found on the remains of the unfortunate cultist the ghouls are eating.
Room 7: Orc Guard Post
The crates and barrels are empty, as the orcs are using them for a makeshift table. There are six orcs standing around the central table placing bets on a game of chance. The orcs have just finished feeding the ghouls in Room 6 and are not expecting any trouble from that direction. If the party is attempting to be stealthy at all, the orcs are surprised and only receive a partial action during the first round of combat. However, if any of the ghouls from Room 6 have run in this directions, the orcs are alert for danger and ready to attack the party. The orcs will fight to the death. They fear the wrath of Abraxes more than they fear death.
In a chest are 200 gold in coins from Sandal, the Reaches and the Orc Nation, and two gold teeth from the cultist they fed to the ghouls worth 5 gold each. The chest is locked with a puzzle trap.
Room 8: Choker Cave
A choker is clinging to the ceiling near the entrance to Room 9. The party must make an opposed skill check against the choker’s Hide skill to spot it. If it goes unnoticed, the choker will patiently wait for the party to investigate the room and begin entering Room 9. It will strike out at the last person entering Room 9.
Room 9: The Mimic’s Lair
Aside from the chests and barrels, there is nothing of interest here. One of the objects in the room is a mimic. Located in the chests and barrels surrounding the mimic is 600 gold, a large folded tapestry with mildew stains (worth 100 gold), a well-crafted bag of elven silk (in reality a bag of devouring), a slender rod of birch wood (a wand of magic missiles; casts as a 5th-level wizard, 3 charges), a silver dagger with a deep blue spinel set in the pommel (in reality a +2 dagger), and a very small opal (worth 500 gold).
Room 10: Desecrated Antechamber
Three chirurgeons attack the party as they enter the room and fight to the death. Aside from the bloodstains (which are from the chirurgeon’s last victim), there is nothing of interest in this room.
Room 11: The False Altar
Concealed against the northeastern wall is a secret door (search skill check DC 20 to find). The secret door opens with a loud grating sound alerting anyone in Room 17. The four cultists rise and attack anyone who enters this sacred area and fight to the death.
Room 12: Human Cultist Barracks
This is where the human cultists sleep. Common items like idols, peasant clothing, and food items are all the occupy most of the chests. However, hidden in one of them is a magic emerald guarded by a homunculus who immediately attacks anyone that opens the chest. The homunculus is guarding a deep green emerald. When activated with a command word (“Hate”), the magical gem heals the person holding it of 2d8+5 damage (as cure moderate wounds spell cast by a 5th level cleric). Each use of the gem expends 1 charge. There are 3 charges left in the gem. If sold, it is worth 500 gold.
Room 13: The Cells
The four prisoners in the cages are from Tegel Village. Once they notice the party, the will begin clawing at the bars of the cages and begging to be rescued. If any cultist guard comes within arm’s reach of the cages during combat with the party, the prisoners will reach between the bars to claw at the guard. Treat the prisoner’s attack as having a +1 to the attack roll. If successful, the attack inflicts 1d3 damage to the guard.
Once freed, the former prisoners will gladly follow the party as they continue to free more imprisoned villagers.
Three cultists attack the party as soon as they enter this location and fight to the death to prevent the rescue of the prisoners.
Room 14: The Hall of Bone
Nothing in this room is actually dangerous to the party. If the party crosses the room, the mushrooms will leave a sticky resin on their clothing and exposed flesh. It is this resin that is responsible for the unpleasant odor of the cavern. The resin, and the accompanying scent, will remain on clothing and flesh until it is washed thoroughly. The ghouls (located in Rooms 1 and 6) will immediately attack anyone with this scent on them.
Room 15: The Surgical Prep Room
The woman in the first cage is actually a ghoul, and moves to attack anyone who opens the door to her cage. The prisoners in cages 3 and 4 are unaware of her true nature. The ghoul will spring to attack the nearest available target as soon as the door to her cage is opened. Once they are freed, the former prisoners will gladly follow the party as they continue their quest to free more imprisoned villagers.
Room 16: Mordiggian’s Operating Theater
The bound man is an imprisoned villager, and acts like the others if freed. Mordiggian and his two chirurgeons attack the party as soon as they enter this area.
Chirurgeon are ghoulish collections of body parts cobbled together to form composite forms. They stand about six feet tall and have sallow skin. They weigh between 200 and 400 lbs. Steel pins and rods stretch the flesh of these creatures in horrific mockeries of their original human form. Their gaunt bodies are completely hairless, making them look like living jigsaw puzzles. Gore-smeared razors extend from the stumps of their hands like slender fingers. They smell faintly of freshly dug earth and alchemical preservatives. From their mouths they utter a constant gibbering caterwaul. They move and strike with a grace rarely seen in other constructs.
Room 17: The Hall of the Barrow King
Abraxes, the false Barrow King, attacks the party as soon as they enter this area. Abraxes is carrying a black greataxe named Fiend. He is wearing a minor ring of fire resistance and a suit of full plate. In the chests on the dais are 700 gold.
|
Monsters
11 Orcs |
Treasure
50 gold |
Tomb of Redurn Rump
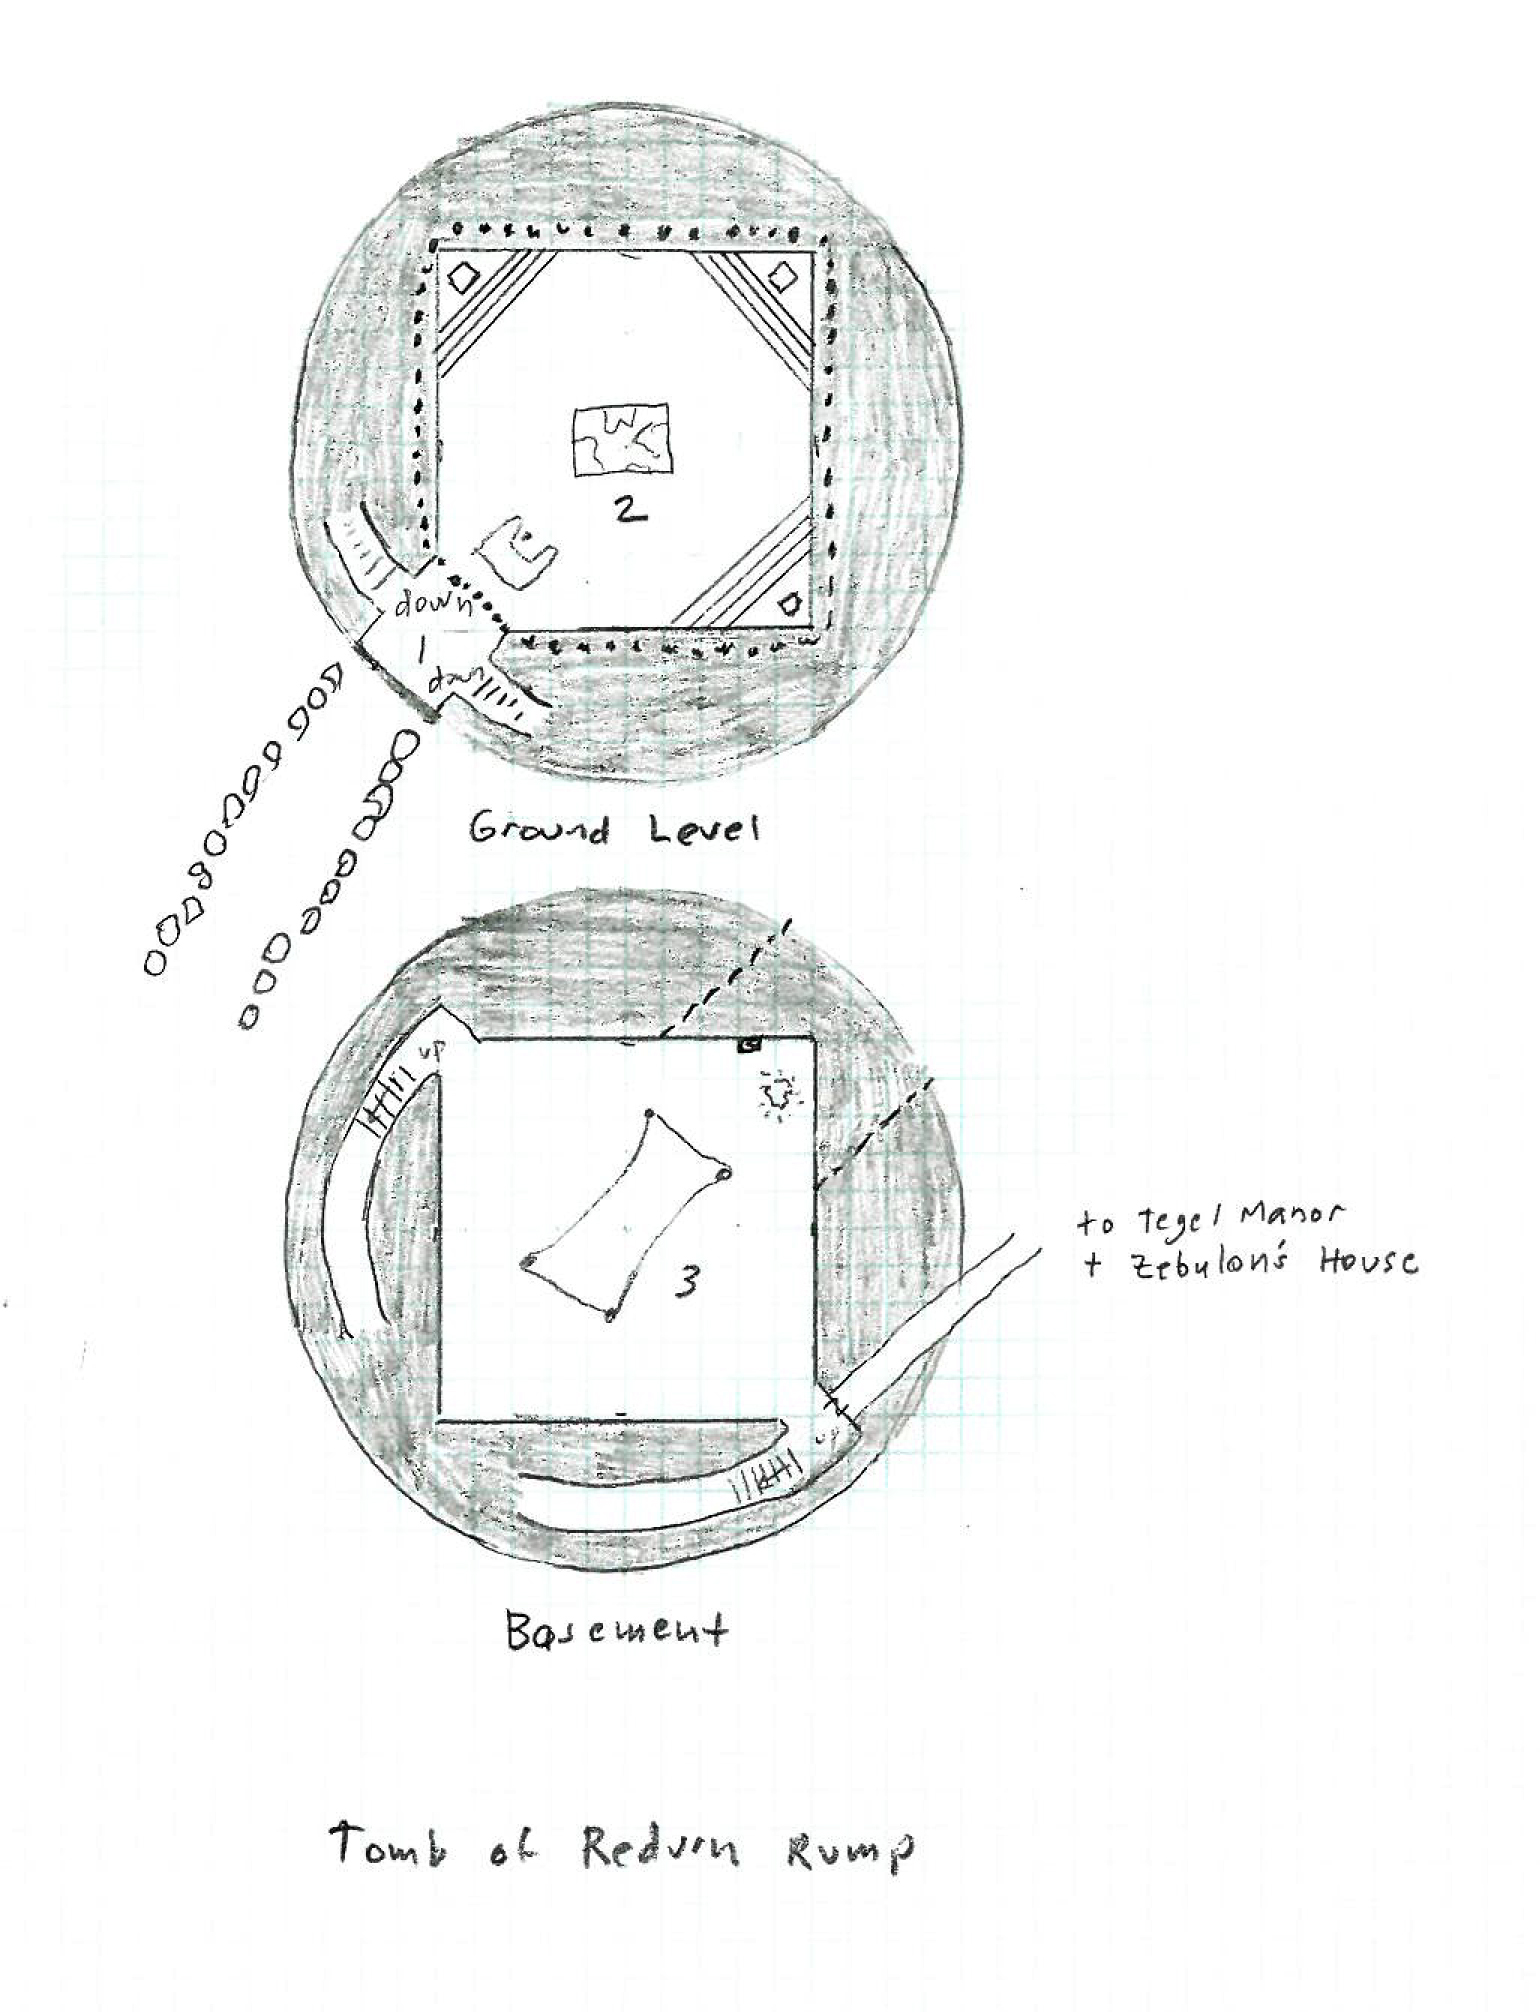
Redurn Rump was a strange young man. He was a quiet, gaunt man with straggly black hair and a sour disposition. He was known to collect strange artifacts, shrunken heads and the like. In 858, a team of dwarven builders arrived in Tegel Village. They came into town quietly one night, arriving by ship from across the Inner Sea. Silent about their business, they brought gold and hearty thirsts to the town’s taverns. Shortly thereafter, they began building a mausoleum in Tegel Village apparently at the command of Redurn Rump. Rumors flew about this strange happening: the Rump’s had always been buried in their family plot near the Manor. The building was thought to be for Redurn’s sick father Raoul. It was a round tower domed at the top, solid without any apparent entrance. The most unusual feature of the structure is hundreds of small niches carved in its surface. Placed seemingly at random, the tomb had no other distinguishing marks. The night after the tomb was finished; the dwarves disappeared without a word. In the morning, their ship was gone. No trace remained of the dwarves except the strange building.
When Raoul finally died, the town was shocked again as Redurn buried him in a simple grave in the family plot near the Manor. Shortly thereafter, Redurn married and almost immediately fathered a son, Runic. One year after his son was born, Redurn disappeared. Rumored to have gone into the strange building, his tomb, Redurn never returned. As his wife soon discovered, what little remained of the vast Rump fortunes disappeared as well. When Runic came into his inheritance, it included an envelope from his father. The envelope did not contain a letter telling his son where he had gone. Instead it contained a map of sorts with strange figures drawn around it. Unable to discern the meaning of the map, Runic has since lost it. All subsequent attempts to get into the tomb have failed.
The wrath of ancient Skybound Lords,
Their glorious wings unfurled,
Once lit the air in bloody fire,
To Hell their foes were hurled.
Their Age is gone, the Skybound Lords
Have fallen fast to sleep,
They slumber in their ancient crypts
Beneath the Elder Keep.
The Skybound Lords fear only One,
Although all Five are He,
When once again his fury flies,
His children will be free.
The power of the Skybound Lords,
Will fill the Summoned One,
The ancient fires of scaly wing,
Will cause the weak to run.
The coming of the Skybound Lords,
Starts at five altars far,
Arranged around the Elder Keep,
Like points upon a star.
Five come to one upon full moon,
The journey takes a turning,
And all must reach the Elder Keep,
Lest keys to home returning.
Of sixteen relics ancient hewn,
Five show the altar path,
Keys are they to secret lairs,
To summon Children’s wrath.
Five ancient relics summon them,
The sky lord’s children’s might,
Five more gain ancient power,
To aid them in their flight.
The final key will hasten back,
The Five in One, praise ten.
Then summon back his brethren strong,
To end the Age of Men.
The Fives Scales
A secret society known as the Five Scales are attempting to gather the artifacts of the Skybound Lords riddle, and along with a master key, they plan to summon Tiamat back to the Realm and with him restore the Age of Dragons. They are the latest in an ancient Summoners following. It will be these fifteen priests and their Supreme Priest that become the Skybound Lords – rulers of the Realm of Men.
The Five Scales are divided into five conclaves of three members each: two High Priests and one Acolyte. They are scattered throughout the Reaches along the points of a star. Each of the five chapels of Tiamat has a verse written on it. Only by deciphering the verses can the secrets of getting the statues together be understood. The center of the star is near the small village of Riverrun in the March of Wirkswirthy. There an ancient chapel (elder keep) sits, waiting for the artifacts to return. If the walk fails, all the artifacts are teleported back to their starting place – thus assuring that they cannot be lost forever. If successful, Tiamat can be summoned and all hell breaks loose.
In Tegel, the elder High Priest is the Judge and the younger High Priest is the potter. He actually works as a messenger, coding messages in the designs that he puts into his pots - those bound for other agents of the Five Scales. While his work is famous, many of his pots (empty of their weed) find themselves in the hands of the cultists. They wear the dragon scale medallions which protect them from scrying and detection spells. These are actual scales from Tiamat.
Knowing that the artifact was in Tegel Manor, they first recruited Redurn – who thought he had discovered the final talisman, a compass. He was wrong – it was an astrolabe. He built the temple to replace the one that was originally housed in the orphanage from plans that he found at the Manor. He had a son to carry on the Manor until his ascendence. When he went into the Tomb, however, the summoning failed and he starved to death – 30 days without food – ouch! And so, the Judge and Potter recruited Runic to look for the key – a task at which he failed miserably. All the keys had also teleported away. Sigh.
A “fake” organization was formed, by the urging of the Judge – as the Five Scale society. They are really just a bunch of old men who have named themselves after the ancient order, created fake medallions – gold with a red banker’s scale etched into them, and hold secret meetings under the Wine Cellar. They are a true red herring for the “real” organization.
Hierarchy of the Five Scales
| Apprentice | Junior | Senior | Knows |
| U | R | R + U | U - R |
| R | W | W + R | R - W |
| B | G | G + B | B - G |
| W | B | B + W | W - B |
| G | U | U + G | G - U |
- Red senior dies.
- Red junior gets Blue key from Red apprentice and becomes senior.
- White apprentice is summoned to be Red junior.
- New white apprentice is found.
- Red junior dies.
- White apprentice is summoned to be Red junior.
- New white apprentice is found.
- Red apprentice dies.
- New red apprentice is found.
In addition, each Junior and Senior knows the location where he came from (i.e., Red Junior and Red Senior knows where the White church is). This is also where new priests are summoned from.
Keys to the Tomb of Redurn Rump
The keys to the Tomb are the volcanic pumice figures with moonstone eyes. These were designed by Redurn. In addition, a service tunnel was built to move the gold for the chariot. After the construction was completed, the tunnel was collapsed. However, Zebulon has discovered the tunnel and extended it to his house.
To open the tomb, the party must find the figurines of the appropriate shape. If taken too far from Tegel, they teleport back. Under the light of the full moon, the idol will glow with a particular color which corresponds to the map. The figures on the map denote the position the statue must be in to open the door. Note: there are some additional figures that are not needed. Only the ones that have matching colored arrows are needed.
The keys into Redurn’s jail are statues moonlight pale.
A map you need lest you rail to sort the head from tail,
Full moon shines o’er us all, it casts its shining pall,
Into their dens, the creatures crawl, and then the power calls,
Like an ancient alabaster tomb, the doors will open soon,
Inside the relics light the gloom to carry out their doom.
| Red Bee | M12 |
| Oranage Fox | Sweetvine’s Basement |
| Blue Spider | D5/Barrows |
| Orange Cat | E5 |
| Blue Bear | Playroom 2nd Floor |
| Red Bird | UG32 |
| Blue Horse | H15 |
| Deer | - |
| Tree | - |
| Snake | - |
The Gathering
Once all fifteen artifacts have been gathered by the fifteen priests and placed on their ceremonial altars, the maps in the center of the room will glow with a red star showing the location of the secret chapel. This will only happen under the full moon, and it signals the start of the journey. The artifacts in Tegel have the following powers:
- The astrolabe – guides the journey (“public key”)
- The dragon – summons a dragon to carry the party (“summoning”)
- The egg – powers the defenses of the chariot (“power”)
Room 1: Foyer
Careful examination show that the bars are made of mithril and actually extend all around the room.
Entering the room, the party notices that all of their magic auras are extinguished and magic items seem to lose their functionality.
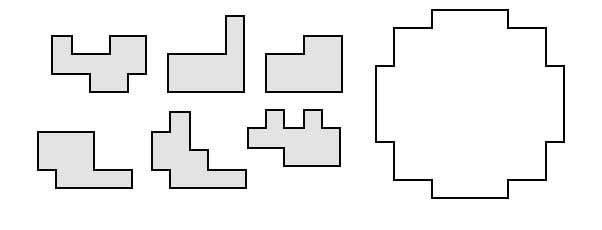
A final puzzle must be solved to enter the Summoning Room.
- Six boxes contain eight of each of the following shaped metal “keys”.
- Against the wall is a strangely shaped “keyhole”.
- A message written on the back of the keyhole in dwarvish says, “Choose the box from which you cannot fill this keyhole to enter. All other boxes are death.”
The answer is:
Room 2: The Summoning Room
The body is that of Redurn Rump, emaciated and clearly dead from starvation.
When the astrolabe is set onto the third piller, the ceiling of the room appears identical to the night sky outside. Light from the stars (assuming all torches are put out) shine on the pillar objects - causing them to glow in a red light. Suddenly, the map is illuminated with a large red five-pointed star.
This shows the location of the elder keep.
If the wrong items are placed on their niches, the mithril gate will close again.
Room 3: Chariot Room
An examination shows that there are three indentations in the chariot corresponding to the three artifacts from the room above. The first near the front right is for the astrolabe – which will gyrate wildly for a few moments before pointing decidedly southwest. The second also near the front is for the dragon – which will summon a great red dragon to be the chariot’s steed. The third is near the rear for the egg – which will magically imbue the chariot with protective spells and levitate it so that a dragon could carry it.
The lever on the wall causes the northeast corner of this room (and some of the dirt around the tomb) to vanish, making a launch pad for the chariot.
The Encounter
There are many possibilities here. The Judge, Potter and Runic could head off. The party could have to kill the Judge and Potter and take the chariot. They could try to reassemble the chariot. It’s really hard to tell. Of course, the dragon will need to be subdued.
White Temple
Like many ancient structures, the White Temple is actually comprised of buildings built over the course of centuries. Each new addition is built while the older buildings fall into disrepair. Spirit Hill is the common name by which the slight rise to the east of Tegel Village is known. Walking the road that leads over Spirit Hill towards the ocean often fills one with a sense of peace and serenity. The crest of the hill, now covered with religious buildings, has long been a place of quiet contemplation.
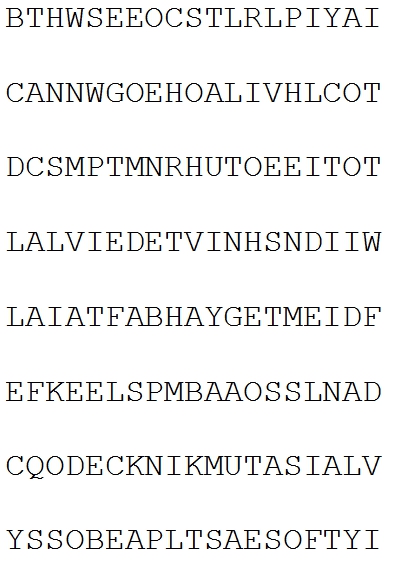
The oldest structure on the hill is a small two-room affair behind the current temple. It is simple stone with a cross above a skull relief carved on the lintel above the door. Nothing is known of its origins, although it is possible that the original foundations were laid in the Second Age. In the center of the small inner room is a most peculiar magic. Floating mid-air in this room is a ghostly coffer, a box several feet in each dimension. Observers can clearly see through the box. Entering the room causes some to be sickened, although most find the room very peaceful and almost warm to the skin. Windowless, the walls of this room are filled with letters carved in stone, although no meaning has been attached to Musgrave’s Ritual, so named for a long-deceased town drunk who was always coming up with solutions to the puzzle. The outer room of this structure is filled with windows, now open to the air, and is used as a viewing room where the dead of Tegel Village are laid to rest between death and their burial. This tradition carries to this day. A member of the family or village guard watch over the body until the next holy day, when it is buried in the cemetery surrounding the complex.
The modern temple, built at the end of the seventh century, currently is occupied by the Monks of St. Jacob, or as they have affectionately been called, the Monks of the Briny Deep. A curious cult, these monks have taken a vow of celibacy and silence. Their religion seems to be based on the belief that the Realm will one day be swallowed by an enormous sea serpent. The writings of St. Jacob supposedly tell of such a creature being sighted in the Great Sea, a bestial creature of impossible size with writhing tentacles and a maw the size of a town. Each day at dusk and dawn, one monk wanders down from the temple to the fishing village. There, he strips down, prays and then walks into the sea. Only to return an hour later, cold, shivering and apparently relieved not to have been eaten by Mother Hydra. Picking up an offering of fish and ale left by the fishermen, the monk returns to the Temple for prayers. The Monks of the Briny Deep do not come into Tegel Village, except a rare visit by Brother Bob (a little joke by the townsfolk on how the monks bob like a cork when in the water).
Surrounding the entirety of the White Temple is the graveyard of Tegel Village. While the Rumps are buried in their family crypts at the manor house, the common folk of Tegel have been buried in the peace and contentment of the White Temple since the time of Sir Rumpole Rump. That is not so say that nothing strange has ever happened in the graveyard. Crazy Cogsworth, the gravedigger, can oftentimes be found sleeping in the shade of the old tombstones of the cemetery.
DM’s Notes
Book and seaweed (boon)
