DM's Notes
There are three plots here to wrap-up culminating in a final coronation showdown.
- The Gray Councilors, after having lost Molloc in the Crown Jewel collection, have taken over the mind of Quintin Howers, the Master of the Heptarchy. He is wearing, after all, a tainted crown. They are calling the shots from Molloc's workshop below the throne.
- Theodric XIX is going mad. His palace is under siege, but the party must go on to raise money for the army and the fight against the Reaches.
- Young Master Theo, who might be Theodric XX. He is only a child, but his position is being supported by Antone Graves - who has a favor from Ernie in his back pocket - delivery of the Staff of Io.
NOTE: This also includes the conclusion of Alfric's Amulet, Part 2: The Highgate Crown
Masquerade in the Throne Room
This massive room is 60 feet wide and 240 feet long with arches supporting a ceiling that is 90 feet high and constructed of a series of domes that stretch the length of the room. Unlike the simple architecture of the Reaches, every inch of the stonework consists of intricately carved figures, scrollwork and ornamentation. Everywhere the eye lands, there is another detail to be discovered.
The room reeks of ancient magic - making spell casters slightly nauseated with the power of layers of enchantments and protections that have been cast here. Along the long walls of the room - about 60 feet from the floor - are a series of 30 foot square stained glass windows. At first glance, the figures seems to be representations of past Overlords. However, as you watch, the windows morph slowly showing scenes from the Overlords' lives - a living motion picture done in glass. The windows are mesmerizing.
Below the windows hang the banners of different houses and divisions within the kingdom. Some of the banners are ancient - mostly disintegrated showing almost no color or form. Others are new, bright and bold. Between the banners, stand suits of armor - 40 in total. Each sports a shield with a different insignia. Again, some are ancient in design while others look almost new. All the armor appears in functional condition, and the figures carry identical polearms.
Behind the knights running along one wall is a long tapestry. It shows an ancient wall snaking through the countryside. Beyond the wall is a dense forest. In front, plains with farmland, villages and small streams are common. Valiant figures of knights and battles against fantastical creatures - although oftentimes the enemies are sinister elven creatures with elongated ears and pointy, shining armor.
In front of each knight, a glass case stands - magically lit with a bright white illumination. In the cases are all manner of art: paintings, drawings, sculpture, artifacts and the like. They range in size and material - some clearly gold and gem encrusted and priceless. Others common but ancient in appearance. Patrons move from case to case. They are well dressed, unarmed and some wear masks or other finery. A number of men and women dressed in black robes and wearing heavy silver chains watch the patrons, periodically coming forward to answer questions or allow access to the items.
The near end of the room has three public entrances - arched doorways bound in steel - each about 15 feet wide and 20 feet tall. Near the entrance, a small 20-piece orchestra is performing a stirring concerto.
The far end of the room is dominated by a massive 40 foot square throne - with the seat perched about 25 feet in the air and reached by means of cleverly hidden stairs. The front of the throne is alabaster carved to resemble an a giant lion. The detail is stunning as are the emerald eyes of the massive cat. The throne itself is made of gold encrusted with hundreds of large jewels. The jewels glow slightly. The banner of Theodric - a white tree and seven stars - hangs on a wall that makes up the back to the throne.
Sitting on the throne is Theodric XIX. Theodric is a large balding man with a flowing white beard. He is speaking with a noble whose ermine and velvet gown matches that one of the bannered noble houses. The lord holds a small white statue and appears to be discussing the item animatedly with the Overlord.
While watching, the Theodric nods at the young noble. At the signal, a man dressed in dark, conservative robes comes forward. He wears the chains of a moneychanger. A slip of paper is exchanged - which the noble signs and returns to the banker. The noble beams at the white statue - clearly that of a small dragon, and then moves down the stairs and into the room.
Near him, Queen Jocelyne - young and beautiful - is dressed in a stunning green dress. Bedecked with emeralds, Jocelyne is speaking quietly with a young man dressed in the foppish costume of an entertainer.
The center of the room is filled with nearly 200 guests about half of which are dancing to the orchestral music.
Overhead, you see a number of black crows sitting on a ledge. Periodically, one will swoop down to a party goer and steal a strand of hair off a dress or costume. The black crow will swoop upwards and disappear.
Some of the dignitaries at the Masquerade:
- Victor Kane was beheaded for making a deal "going forward" - orders had already been given. And failing to get the 5 million gold from the Reaches. A new emissary will show up to help them establish a consulate in Whitecliff. Well played.
- Ernie made a deal with Antone Graves. For a future promise, he provided a distraction for the party to get into the painting while the guards searched the throne room. NEED to return platinum staff to Antone Graves to fulfill that promise.
- MC 37: a dark sorcerer who leads the Order that is currently occupying Teufeldorf. He is here to meet with the Overlord about the talks between Victor Kane and the Three Kings. He will instantly recognize the party, although he will try to disguise this. His distinguishing features are jet black hair and bright, piercing green eyes.
- MC 38: He is still dressed in a black cloak with a staff resting against his legs. His distinguishing jet black hair has some streaks of grey, but his eyes are still bright, a piercing green. He wears the emerald ring and matching necklace, as before. As usual, he is reading a slim book, which he puts into a pocket of the cloak as the party approaches.
- Celebrin - Elven Charge d'Affairs has been contacted by Falstaff. Tell Celebrin that he saved the world from the Illithid. Tell about the Constable. Should the time come, working to preserve the balance, protect land, unite. Did not have knowledge of the intruders.
- No Cha, Grandmaster of Thieves and his servant, Binden. An old man dressed in dirty brown robes, dilapidated sandals with a long white beard and crooked teeth. Messenger of No Cha gives them a replica puzzle. It is vital you can assemble it quickly once you have gained all the original shards.
- Quintin Howers, the Master of the Heptarchy.
- Constable of the Crown - A tall, thin man with a stylish mustache and well-tailored robes. He carries a staff with an odd-shaped tip - round with spike-like protrusions.
- Sisters of the Bloodmoon - dressed in red flowing gowns with ruby necklaces and ruby rings. They will ask the party to dance, for drinks, etc. Attempting to get a piece of hair or clothing for the voodoo dolls. Eveningdust, Swiftwhistle, Catshore.
Highgate Crown Conclusion
Encounter 1: The Real Highgate Crown
Quintin Howers is a young man with rough features, a close-cropped brown beard and hair, and brown eyes. He forgoes traditional courtly garb, wearing a leather jerkin over a chain mail shirt. He stance is that of a swordsman. His speech is slow, deliberate, and thoughtful.
Quintin would normally not attend the Masquerade Ball, but he made a last-minute decision to do so, at the surprise of his advisors. The Highgate Freelands have played a decidedly neutral role in the first few years of the war with the Realm. Following in the footsteps of his predecessors, Quintin had shown all indication of following that same course of action.
Quentin is staying in the "official residences" reached via a secret staircase from the Manuscripts Room (marked as a Green A on the map).
RUMOR: Quintin Howers, Master of the Heptarchy, has come to the Masquerade Ball - against tradition of the Highgate Freelands. He has taken residence in the Palace and plans to attend the Masquerade to make an important proclamation.
He can't come to the ball because of the Collars - which is ironic since he has the last piece of Alfric's Amulet.
The "real" Highgate Crown worn by Quintin Howers, Master of the Heptarchy 918 TA has been substituted for one that allows a counselor (grey figure) to whisper in Quintin's ear. The "real" Highgate Crown is in the display of Crown Jewels at the Palace - guarded, of course, in Oblivion.
This small room is more an alcove than a proper room - 5 feet deep by 15 feet wide. The walls are covered with ancient tablets inscribed with First Age runes. Moves down slowly into a long hallway.
Encounter 2: Sisters of the Bloodmoon
Four women, dressed in flowing red gowns, stand outside a set of ornate brass and mahogany doors. Clearly guarding the room beyond, they do not stand at rigid attention like most palace guards. Instead, they move about, keeping vigilant eyes open and a dialog between them. Each woman wears a ruby necklace and ring. The women appear to be without weapons.
The women are Sisters of the Bloodmoon. They are able to travel through physical and magical walls with ease due to their rings. Their minds are stored in their necklaces - which can be discarded (or broken) if possessed.
As the party approaches, six black crows will fly through the air and attempt to grab a strand of hair from each party member (unless they have already been attacked).
Encounter 3: Silentstroke
This large room is ornate and clearly originally intended for formal meetings or events. However, the gilded chairs have been pushed against the walls, the formal vases and decorative bowls unceremoniously piled nearby. The center of the room is empty with the exception of a large Tang rug with an interlocking geometric design and a large chandelier which has been pulled close to the ceiling, an obviously not used.
In addition to the double doors leading to the Palace, there are two single doors at the far end of the room.
Sitting in the center of the room is a very, large black woman. She float several feet above the ground. Her legs are crossed beneath her, and she is in rapt attention. Her eyes are open, but only the whites of her eyes can be seen. Around the woman, there are concentric circles of radiant light - some just a few feet in diameter and others that extend into the walls of the palace.
As you enter the room, she smiles.
This is Silentstroke, Quintin Hower's wizard. She is current protecting the suite from magical attack. She is also gathering the thoughts and energies of those in attendance at the Masquerade.
Encounter 4: The Doll's Room
One of the doors from Silentstroke leads to the Doll's Room. The door is locked and magically held against any of the Palace staff that currently has a doll made for them.
This room was clearly a private library at one time. Currently, it is filled with floor to ceiling bookcases - all divided into small shelves about 6-8 inches high. The books have been piled in a large pyramid in one corner. On the shelves are hundreds of dolls. While not terribly lifelike, they differ in ways that make them appear to be modeled after real people. The center of the room is filled by a large table around which sit 13 men and woman - stick-thin and fully concentrating on their task of cutting, stuffing and sewing dolls. Cotton and cloth is piled in the center of the table.
When the party enters, six black crows will appear at the door. Each crow will attempt to pluck a hair from the party - if they have not already been attacked. The hair will be taken to one of the doll makers for quick inclusion.
The doll makers are creating copies of everyone from the Palace, although their use will be undertaken only once the collars have been removed. They can find, however, a particular doll and Silentstroke can cast spells upon it to make it do anything.
Encounter 5: Quintin's Room
One of the doors from Silentstroke leads to Quintin's Room. The door is locked and magically held against any of the Palace staff that currently has a doll made for them.
This room appears to have been recently transformed from a private meeting room into a bedchamber. Indents in the floor show where furniture has been moved, and the space is too empty to be a dedicated living space.
The room now holds a large canopied bed - who curtains are currently closed. Three large black dogs sit at the foot of the bed. A dresser, nightstand, small table and other furniture are small compared to the space and create an ill-fitting tableau. Clothes have been laid out neatly on a nearby chest of drawers.
The sound of snoring can be heard coming from the bed.
The bed has a sleeping Quintin and four grey Counselors who appear as wisps of insubstantial grey smoke. They draw their power from illithium and will attack characters who have some.
Quintin is here. The crown is in the chest of drawers guarded by a puzzle. Inside is his crown.
The Drowned Ball
Encounter 1: Activating Alfric's Amulet
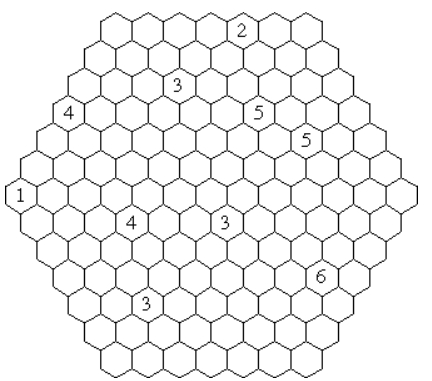
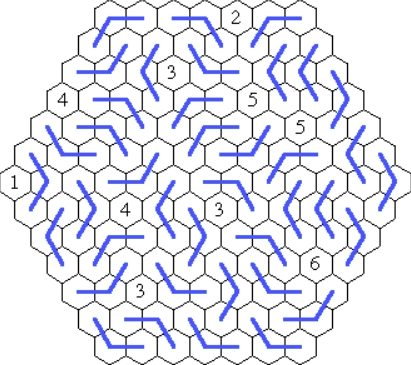
Divide the hexagonal grid below into worms that look like , or some rotation. Worms do not overlap, do not cover hexes with numbers, and cover every vacant hex. The numbers indicate how many different worms are adjacent to that hex.
Encounter 2: Assembling Alfric's Amulet
The pieces of the ancient amulet slide together easily. Well-worn and smooth to the touch, they glide together easily. The final pendant is roughly cube-shaped with several small protuberances. As the final piece clicks into place, the amulet shimmers for a few minutes. A chain emerges from the device, and it settles and dims.
Around the room, you hear the gasp from the crowd. Women and men are all holding their hands to their throats as if choking. There is a silence to the crowd as the room grows deathly still. Then, a clink as the first guest collar drops to the ground and shatters. Suddenly, a cacophony of sound as hundreds of collars release and fall to the stone floor - shattering into shards of ordinary glass.
The overlord activates his throne's cube of protection! His guards move to protect him. Most of the guests are stunned, but the room quickly fills with the murmurs of the guests as it slowly dawns on them what happened.
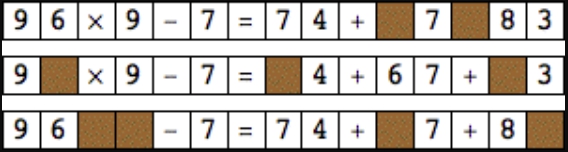
The secret door can only be opened by solving a puzzle:
Place some + and x signs inside the digits 1 2 3 4 5 6 7 8 9 so the result is 2002.
1 × 2 + 34 × 56 + 7 + 89 = 2002
Order of operation (PEMDAS): Parenthesis, Exponents, Multiplication and Division (from left to right), Addition and Subtraction (from left to right).
Encounter 3: Molloc's Cave
Molloc's Cave is directly below the Overlord's throne - albeit deep in the earth.
On the sides of the throne, near head height is the marble relief of a scene of the night sky - planets and stars are pictured with other celestial phenomena such as comets and meteors. Looking closely, you see several of the comets on either side of the Overlord's head are actually holes drilled into the marble and painted black. However, it is clear the throne is hollow behind the holes.
The back of the throne appears to be hollow. A small staff-sized hole at the base of the throne appears to be a lock - although the indentation is oddly shaped.
The cave can be reached by a single narrow spiral staircase built into the throne. The Constable of the Crown will be the way the party finds its way to Molloc's Cave.
A narrow spiral staircase leads down through the floor of the throne room. After a while, the carved stairs give way to cruder, earthen stairs - but the path is always the same - winding downward into the musty darkness.
The stairway breaks into a vaguely spherical room. Hanging in the center of the room is a black grey stone about the size of a medicine ball. Piles of broken rock attest to the fact that the meteorite has been well-mined. There are no picks or shovels here - as it seems the rock has been mined using jeweler's equipment.
Surrounding the stone are hundreds of Grey Counselors who will move to attack.
Around the edges of the room are four workbenches. They are filled with more jeweler's tools. A lone gnome is sleeping on a stool, his head resting on the workbench. A half-finished Crown of Durin replica sits near his hands.
The gnome is the last of an impossibly long line of craftsmen that have been taken from White Cliff and brought here to make forgeries for Molloc. Compelled to work by the Grey Counselors, the artisans typically work themselves to death after a few months. This gnome is Eurig (which means gold in gnomish).
Eurig has two magic items: Warding Bookmark and Vesper Candles - which he will use to barter for his life.
Encounter 4: Theodric XIX's Death
Alfric's Dagger is the only weapon able to penetrate through the Overlord's throne. If he is killed, either by the party or Grey Councilors:
The Overlord of the Old Kingdom, Theodric XIX, lies on the marble floor of the Great Hall. His long, flowing white beard is flecked with crimson blood. Slowly, his hand releases a small blue-green orb, some 2" in diameter. The orb rolls onto the floor and then suddenly picks up speed, as if alive in its own rights. As it weaves its way through the room, any who attempt to pick it up are thwarted - always just missing the orb. It finally comes to rest at the feet of Hylax.
Encounter 5: The Coronation
The Overlord's throne has been replaced into its traditional position (or replaced, if destroyed). The Throne Room has been cleared of the debris from the fight - a task that has taken the entire Overlord's staff to accomplish.
Antone Graves, dressed in the regal finery of the Court, walks beside the small figure of Theo. Graves carries Alfric's Scepter in his hands, holding the ancient relic aloft. Both look straight ahead with the serious bearing of the occasion. In front of the throne, the Throne Room has been filled with rows of chairs. In a precession of regal complexity, the nobles of the Old Kingdom have filed to their places. You notice the frequency at which many members of the court reach to their throats - an involuntary reflex after many years of servitude.
As they reach the throne, Graves turns to Theo. The Master of the Crown enters the room bearing the Overlord's Crown on a pillow of the finest purple velvet. The nobles murmur and strain to get a glimpse of the crown as it passes by.
As the crown reaches the front of the room, Graves begins an incantation granting the power and responsibility of the Overlord's throne to Theo. It is a surprisingly short ceremony. After donnng the crown, Graves uses the scepter to magically link the boy to the crown - creating a glimmering shower of white and gold sparks - followed by the thunderous applause of the nobles. Some clearly are looking to gain favor by their boisterous support.
Theo climbs into the throne, a diminutive form in the massive chair. His feet do not touch the ground, although he sits still with a regal bearing.
The Atoll
As Theo and Graves leave, Hylax finds the orb in his hand, an incantation on his lips.
Suddenly, the world around you gets wet and dark.
You are floating in the sea, salt water stinging your eyes. The light is like twilight from the surface - some 500 feet above. A school of large sharks swim near the surface, their sleek bodies gliding effortlessly through the water. Around you, the room full of nobles are thrashing about unable to breath. Some are swimming for the surface. A few seem at home in the water.
DM's NOTE: The Overlord is dead, he is not here.
Below you is a large submerged atoll, a ring-shaped coral bed some two hundred feet in diameter. At the center of the atoll, lies a hill of large clam shells, each about six feet in length. They are covered with green moss. At one end of the atoll, is a large green hillock, spherical in shape and some 50 feet high. It too, is covered by slick green algae. At the other end of the atoll is the hull of a sailing ship, the masts and sails are crooked and dilapidated, but the cause of the wreck appears to be a large hole in the hull about 20 feet in diameter. The ship appears to have been here for years.
Off the edges of the atoll, the seafloor drops precipitously. You cannot see the bottom of the sea here, the inky darkness absolute. Pinpoints of light show a school of lantern fish scouring the depths below.
- Teleports will not work. The Eye is holding the party here until they find the dwarven chest.
- The Eye will push its owner on, "the treasure is here..."
UPPER: Great White Sharks (mundane)
MIDDLE: Silver Hex Fish, Carnivorous Sea Clams, Sea Moss, Fastitocalon
LOWER: Lantern Fish, The Lost City
Great White Sharks
Dozens of large torpedo-shaped sharks swim above you. Their large heads and cone-shaped snouts display rows of sharp, razor-sharp, white teeth. The top half of the shark's is grey colored, while the bottom half is white.
The sharks will begin feasting on the members of the court - leaving a grisly scene when the party returns to the Overlord's Palace.
Silver Hex Fish
As you cast your spell, you are surrounded by a cloud of small silver fish, swarming around you. Each fish has what looks like a single hexagon scale in each side. The scales glow with a blue-white brightness.
Clouds of them appear as if out of nowhere attacking and feeding on magical energy. They can devour spells being cast, discharge magic items, and suck beans from spellcasters.
Carnivorous Sea Clams
You feel a strong water current pulling you towards the atoll. As you look, the large pile of clams on its surface seem to be contracting, as if the ground beneath the clams is collapsing. Suddenly, you are hurled back as the clams come shooting out in all directions above the atoll. The docile creatures take on the properties of shotgun pellets fired from a buckshot load - the edges of the clams are sharp as the moss covering them explodes in a green fog around the atoll.
If the party is aggressive towards Fastitocalon, it will shoot the sea clams into the water around it.
You see the sailing ship, previously perched precariously on the edge of the atoll begin to list, then tumble, and finally - breaking apart - dislodge from its mooring and fall into the inky abyss below. As it falls, you see the ship disintegrate, its old wooden structure quickly being turned into kindling.
The clams are actually carnivorous sea clams. As they approach a character, they will open up and try to swallow the character whole. They can move about by pushing water out one side of their shell.
Many will contain a pearl - that, upon inspection, is made of human skulls and bones covered by a shiny clear coating. Bits of treasure (gold mostly) can be seen in the pearls.
If released they will also start eating the Overlord's court.
Sea Moss
The sea moss shakes loose in a violent cloud, disintegrating and inking the water around the atoll in a thick green soup. The atoll becomes obscured as the cloud expands outward.
The Sea Moss is poisonous and will cause characters to go into a rigor mortis, expelling all the air from their lungs and drifting slowly to the depths of the sea.
It is not a sentient creature and cannot swim, so it will dissipate normally. If a character is exposed, however, they must make a save vs. poison AND they will be unable to remove the green substance from their skin. It doesn't hurt, just creeps them out.
Fastitocalon
The atoll is actually a monster that resembles a primitive stingray called Fastitocalon. It has wide pectoral fins and a long, whip-like tail, absent a barb. Its eyes are on stalks and its mouth is apparently extendable.
The fins and tail are currently tucked under the atoll. The tail is directly below the ship. Its mouth is the crater in which the clams are sitting. Its main eye is at the far end of the atoll. Swimming under the atoll shows that it is actually a creature, not a feature of the sea floor.
DM's Note: If disturbed, the large eye at the far end of the atoll will open. A number of smaller eyes will appear from stalks. On the first round, it will use a carnivorous clam attack (see above) - which will also dislodge The Sharke. Now obscured by the green mist, the tail attack will whip about from seemingly nowhere. And, it will use its 150-foot wide maw to attack the party. If threatened, it will quickly disappear into the inky blackness below.
The 50-foot hillock raises into the water and reveals its true nature, a giant eye. Simultaneously, dozens of smaller 5-foot eyes on long tentacle-like stalks shake up through the green moss.
A large, barbless tail whips out from the dark green of the moss-stained water. It appears to be impossibly long and impossibly dangerous - capable of creating a large hole in a ship's hull.
Coming out the green cloud, the atoll - now revealed as a strange creature resembling a large stingray with a single eye - its surface malformed into a single giant maw. It attempts to swim under you, creating a powerful suction that pulls you down while extending its teeth up towards you.
The Flying Sharke
The derelict ship is The Flying Sharke which was sunk here eighty-six years ago by the atoll which fed on its crew before falling into its current slumber.
The ship is a three-masted sailing ship of a make similar to those in use today. It is 30 feet in breadth and about 80 feet long. The masts are akimbo and the wood of the hull looks mostly rotted. The ship's flag can still be seen - half red and half yellow with a griffon on one side and an anchor on the other. The aft of the ship is visible with the vessel's name, The Sharke, in silver letters. The most striking feature of the ship is a large hole, some 20 feet in diameter punched into the hull.

The Interior
The ship can be entered from the large hole in the hold OR via the cargo openings (netting long since rotted away).
It is possible that the ship will go over the edge before it is explored.
Room 2: Captain Elija Whitehey's Room
The mahogany wood of this officers's stateroom is now warped and decayed. A desk stands overlooking the door to the room. Several bookcases are along the walls, along with a simple bed.
At the desk, a figure is slumped over - clearly the captain from his uniform. The figure is mostly skeletal. A book in front of him has completely disintegrated with the exception of one page that floats still attached from the binding.
Careful examination shows that the captain was eating a meal while writing in his logbook. Several dishes and a large pewter mug stands pushed off to one side, some fish bones still sitting on the plate.
Under the desk is a stone box which was being used by the captain as a footrest. The box is carved with dwarven ruins and is clearly ancient in make. The box is about 6" wide and tall by 18" long. A long set of runes run along the top of the book.
- Whitehey was poisoned by the wizard and died here.
- The Eye owner will be drawn to this room and then the stone box.
- The one page of the journal will disintegrate after handling in any way.
- The bookcases were filled mostly with map scrolls - very standard issue for Reaches ships. There are also books on naval history and pirate stories for young boys.
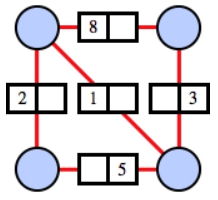
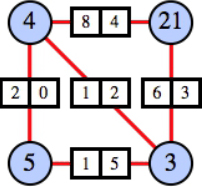
The chest is locked with a dwarven 2-3-4 puzzle:

Solving the puzzle will allow the box to be opened. This will show three triangular pieces, each of a blue-green material and set into a finely crafted stone recess in the box. The box is exceedingly light given the solid nature of its construction.
|
Logbook of the Flying Sharke
Ship of Harrowport
18 June 833 TA
We sail on towards the Old Kingdom, although I do not know why. The strange dwarven chest sits nearby. Sometimes it haunts my dreams and waking thoughts. At other times, it sits forgotten. I cannot get rid of the thing. I have ordered the ship's wizard, Draven, to teleport it away.
We have tried all manner of magics and divination but cannot pierce the enigma of its existence. Draven believes that it can be opened, but none so far have broken its secrets. The runes on the box read simply, "The Nine". But, the nine what? Curse the dwarves for devising such a cunning lock - one that has resisted all mundane and magical attempts to open it.
Whether I am following the chest, or it is following me is unclear. I seem to be able to act of my own free will, but still I cannot shake the feeling that there is some underlying intelligence, faint and always lurking just below the surface.
Last night I dreamt of a great storm again - churning seas and a storm without end. When the ship finally comes within sight of landfall, the shores are covered in ropes and vines, crawling up the cliffs from the sea, covering all in its path. A green menace. As always, I wake in sweat and fear.
Today, we sail on towards our unknown destination through waters for which I have no chart. Hopefully, tomorrow will bring answers and maybe a release from this foreboding.
Captain Elija Whitehey
|
|
Room 3: Apothecary
This small room is more of nook than a proper room. A work shelf sits under a bookcase filled with glassware, vials, a rusted iron scale, instruments and several large tomes - now lost to the sea. The vials are filled mostly with animal parts and unidentified plants. Under the table is a small folding bench used for the doctor to sit and work on alchemical projects. Small metal barrels of oil have long since leaked their contents into the sea.
The books will simply disintegrate. The party can recover 1d20 vials with lead stoppers still intact.
Room 6a: Nursery
This room is clearly been transformed into a nursery. Painted motifs of mermaids decorate a room mostly made of fine, dark hardwood. Two small beds replace what would have been a large built-in sleigh bed. On the beds are the skeletal remains of two young girls - now bones settled in floating rags of fancy dresses.
Between the two beds is a fish tank. Surprisingly, a fish is still in the tank. A highly venomous lion fish, named Nialob, is in the tank. It will attack to "protect" the girls. Actually, Nialob is a descendent of the girl's original fish.
Room 6b: Nanny's Room
This room was once a stateroom, but it now filled with seaweed and moss. On the rotted table by the also rotted bed is frame with drawings of two young girls. The room is very decayed except for a lantern which sits on the mantle.
Hidden in the seaweed and murk is a sea hag who has taken up residence here. She will attack any who enter the room.
Room 7a: Draven's Room
This room is clearly a private stateroom on the Sharke. Its walls are paneled, and the furnishing are well-appointed but standard for the ship - built-in bookcases, beds, and a desk.
Floating in the center of the room is a human body dressed in blue robes, more well preserved than the corpses found elsewhere. The body is notable because it hangs from a rope secured to the center of the ceiling. A chair nearby still sits on its side. Around the neck of the corpse floats a chain of a wizard of the Collegium with an engraved coat of arms on the front.
A piece of paper hangs from its pocket:
|
I, Draven, being of sound mind, have killed Captain Elija Whitehey this 18th day of June 833 TA. I believe the captain to be under the influence of a magical dwarven chest and potentially a threat to the Western Reaches and the Barony of Southwark. Upon his death, I now feel my sanity is compromised. My death should be a warning to any who come upon The Sharke to leave the chest here and not probe to understand its contents.
Draven
Wizard of Abjuration
Wizard of Southwark
|
|
Room 8: Lower Deck
The foredeck of the Lower Deck is open to the deck above via the cargo hole - the nets of which long ago rotted away. The Lower Deck is also open to below via a large hole in the side of the ship which leads into the hold below.
This part of the Lower Deck is inky black - with no sunlight coming in from above. The water here is silty with eddies of currents mixing up the water into a greenish-black soup. In the far corner, tucked into a natural alcove some movement seems to be against the flow of water.
A giant octopus lurks here in case a juicy morsel comes along. It will attempt to swallow its prey, using its poisonous ink to stun and disorient.
Room 13: Cargo Safe
This massive steel safe is accessed via a puzzle. It cannot be opened by brute force, as in doing so would most likely cause the ship to shift from its precarious perch. This safe contains:
100,000 gold
40,000 silver
Room 14: Hold
The Hold which runs along the entirety of one edge of the ship is dark and very rotted. A large hole in the side of the ship connects this level with the Lower Deck above. This area is often filled with sharks.
The ship appears to have sunk with about half of its cargo still intact. Barrels and crates, now long rotted are broken and upended, their contents spilled and mostly washed into the sea.
Two doors lead from this area. A large set of steel doors set in the wall are for a large cargo safe - a common feature of many deep ocean vessels. Placed at the exact center of the ship, these very large safes provided ballast and an unassailable storage area for treasure.
The Lost City
Moving down into the darkness, the pressure is immense and breathing is difficult. You follow the trail of ship debris as it floats towards the bottom of the sea. As your eyes become accustomed to the light, you see a rocky ledge where the larger pieces of The Sharke have come to a rest.
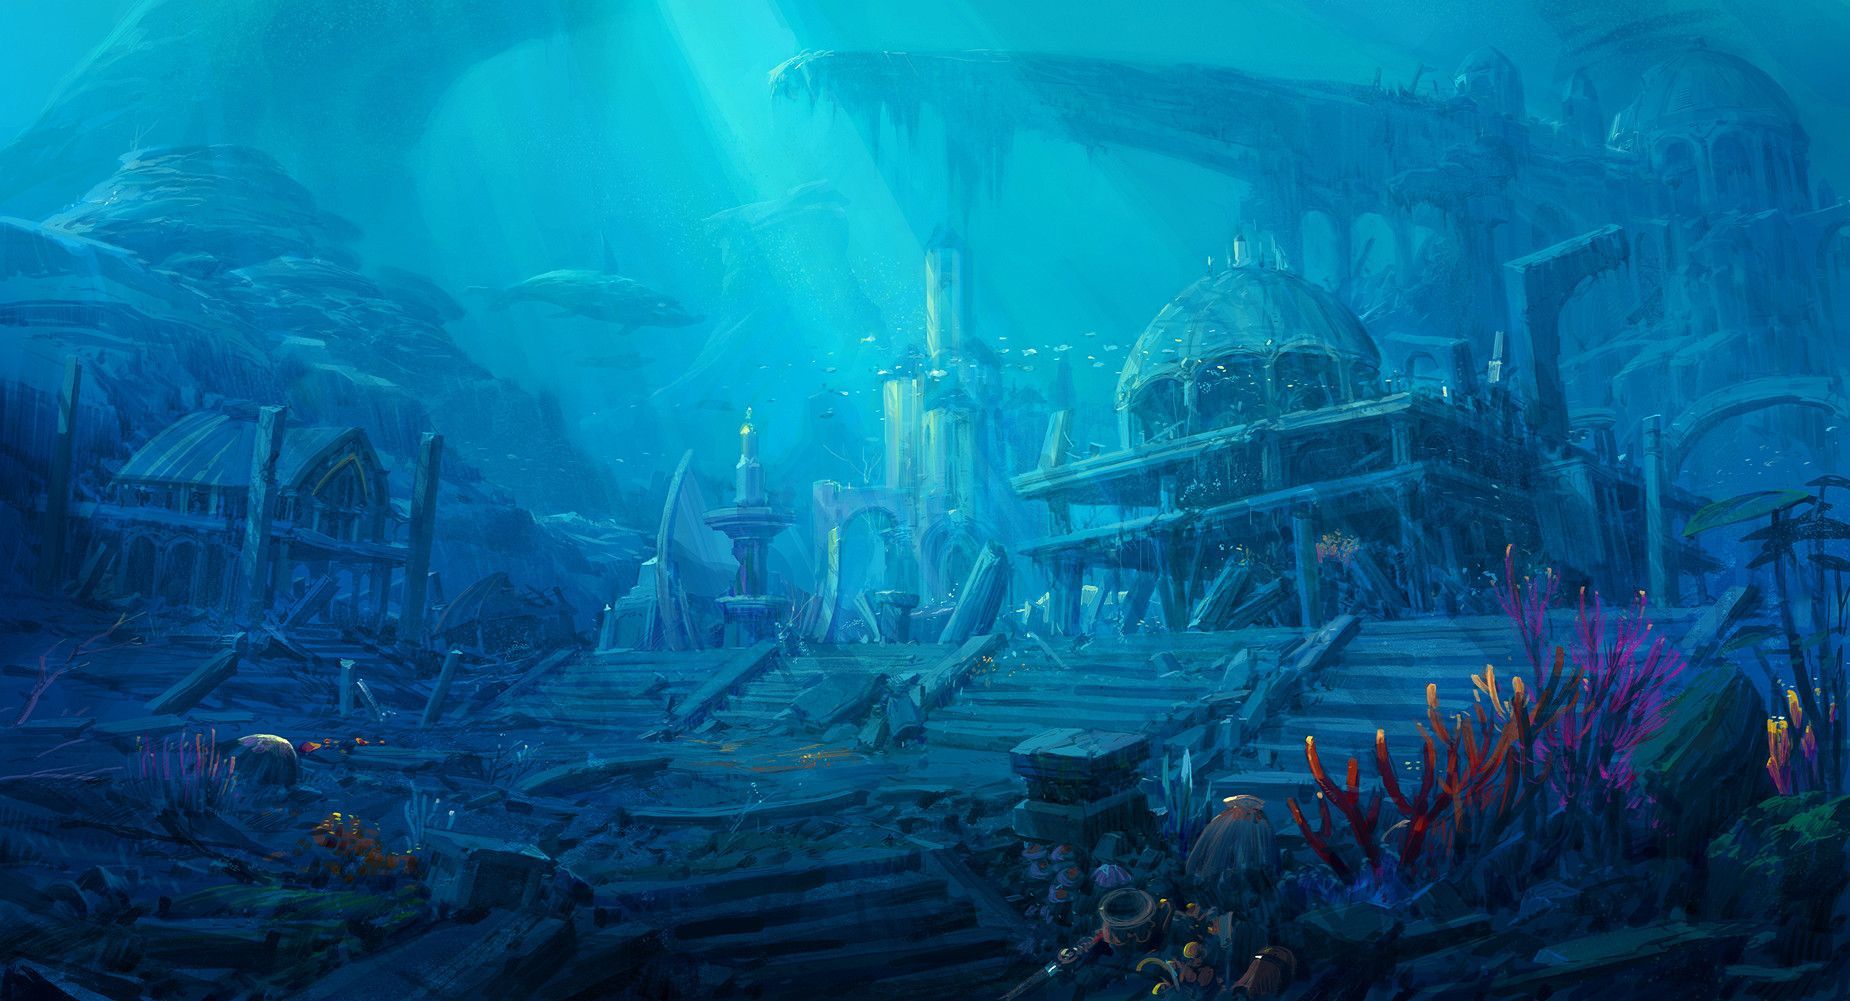
As you arrive at the wreckage, you see on the valley floor below, ruins of an ancient city. No life can be seen moving around its abandoned streets. Statues and great temples show that this was once a major city for its inhabitants.
DM's NOTE: The Eye will again guide its owner to the box.
The Drowned Ball (finale)
You find yourself back in the throne room of Theodrix XIX. For a flash of an instant, you see a cube of water centered on the marble floor - it is impossibly bright in the room, and you blink. As you do, the water, no longer undersea and no longer constrained by the room crashes outward - breaking furniture and flooding the room and the hallways beyond.
All the figures that were teleported arrive back. Some face-down drowned in salt water. Others are half eaten by sharks. A few shake their heads, rise staggered from the ordeal, and quickly make to flee the room. Somewhere in the distance, you hear an alarm sound. The throne room is a mess. At your feet is the stone box sitting as if it has always been there. The blue-green orb sits lifeless in the pocket of Hylax.
Suddenly, a brief vision flashes in your brain.
You are standing on the high spire of Teufeldorf Castle. It is brutally cold, but a storm is lashing the city. At first it seems to be nighttime, but it is, instead, mid-day - the sun blocked by the tempest outdoors. Along the shores of the Great Sea and the delta of the River White, you can see the shores are filled with large green tendrils, crawling up the shore and into the city and surrounding lands. Amongst the tendrils, green shambling forms - perhaps mounds of seaweed from this distance - move among the streets, engaging the city guard and unlucky merchants and townsfolk. The city is under siege -but from who remains a mystery.
You sense nearby the whirring of a machine, strange and high-pitched. As you turn to look upon it, you wake up. Your clothes are drenched and you are still in the Overlord's Palace. Your homeland is under attack. From whom? Unknown. Why? Unknown. The only clue you have are the sphere from the Overlord and stone case from The Sharke. You try to shake off the fear, but it is persistent. Some great evil is coming. Time is fleeting.


