The Great Walls
| Type | Dungeon |
|---|---|
| Status | Explored January 919 TA |
| Location | Old Kingdom |
| Hex | 2829 |
| Campaign | The Old Kingdom Campaign |
| Adventure # | 158 |
The Great Walls
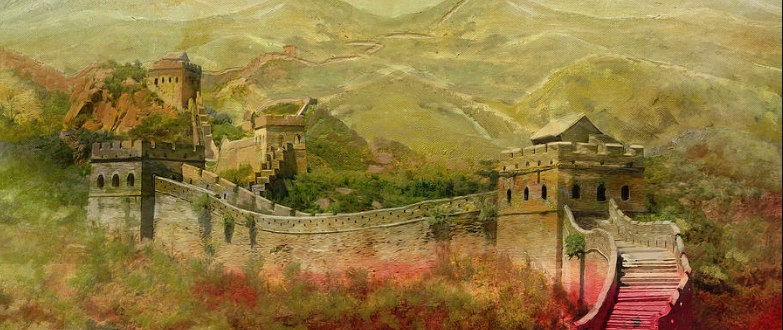
The tapestry depicts the Great Walls, built in the early First Age to keep marauding elves from Elothian from raiding the countryside of the Kingdom. The Walls appear in many works of art, although no physical traces of them have been found. Some scholars believe them to be metaphorical.
NOTE: The tapestry is signed. The artist's initials, HiH, are drawn in the shape of a chess rook. Placing the black chess piece on the tapestry fires off the Great Walls dungeon.
Encounter 1: The Black Rook
Once stolen (see the Masquerade), the party can use the black rook to move into the tapestry.
Depending on the activity of the Masquerade, there might be a physical guard here. In all cases, the Overlord watches access to the tapestry very carefully. So, any passage in will trigger a "welcoming" committee when the party leaves.
Encounter 2: The Village of Kinfold
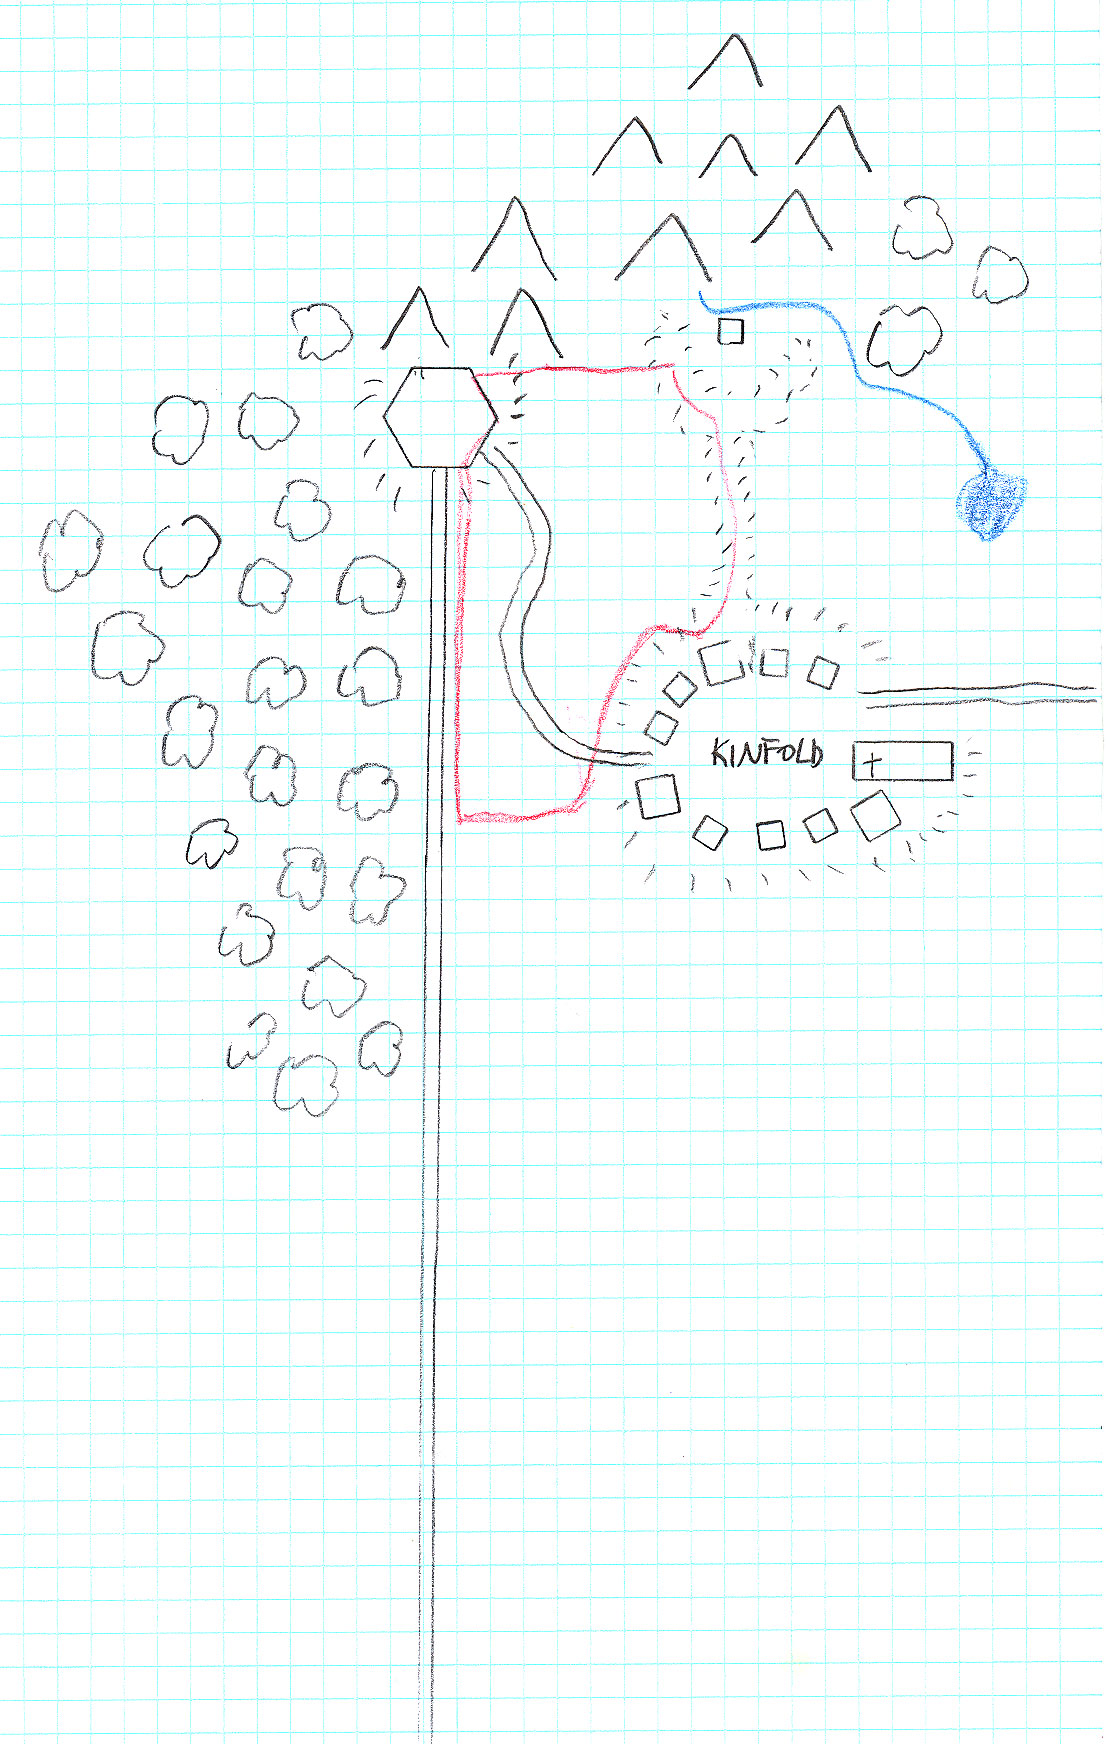
Upon examination, the homes here are empty and the furnishings antique - although sturdy and in good repair. Furniture and textiles are also of an ancient design, although they look as if they have been used recently.
In addition to the chapel, the town has basic buildings: a blacksmith, carpenter, leatherworker, baker, weaver, tinkerer, mercantile, and pub with an inn and stables. The only shop with a sign is the pub, "The Kinfold Inn".
NOTE: There are signs of movement of horses and soldiers recently heading northwest down a narrow path towards the forest.
The Dragon's Chapel
The sides and back of the chapel are surrounded by a simple graveyard - with headstones made of the same mud-bricks. These are without adornment. Each marker has a single silver coin pressed into cob. There is a small cow pen just behind the chapel.
The path to the church is well-worn and in good repair.
The church can be entered by cutting out the mud-bricks from around a door or window.
The people are the villagers of Kinfold. The dragon is their protector, Arianwyn (welsh for silver-white). His wife is Hopea (latin for silver).
Solving the dragon's riddle will bring him back to life .
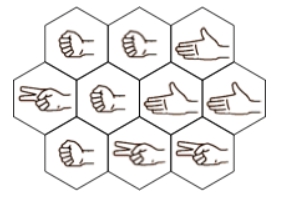
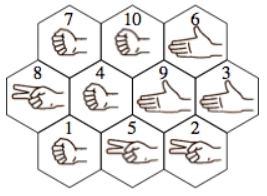
This puzzle is filled with rocks (fists), scissors (two fingers) and papers (palms). Start on a rock and visit each hex exactly once by jumping to a hex in the same row or sloping diagonal as the current hex. Each jump must follow the pattern rock → scissors → paper → rock, until you end on a rock. The jumps must never reverse direction, though you may jump over a hex multiple times.
The rod is a piece of the Staff of Io. Which can be unscrewed from the altar if the puzzle is solved.
The dragon will assume the party attacked his patrons.
Arianwyn will explain that he and his wife live in a small cabin nestled in the forest just west of town. When they settled here, they found the local people gentle and reverent of the two silver dragons. They built a small chapel with a cow pen out back in which they would put offerings. Being the frontier of the Kingdom, the dragons provided protection - mostly from bears and wild beasts - although an occasional elf raid would be thwarted. Overall, it was an idyllic life.
One day, Hopea did not come home from a patrol of the forest's edge. Searching, Arianwyn found her injured from crashing into a large invisible wall - shielded even from a dragon eyes. Following her lead, Arianwyn soon determined that a wall some 20 feet in height stretched along the forest's edge for many miles to the east.
Shortly thereafter, a company of heavily armed knights and a cadre of a half-dozen wizards appeared. Hopea was still at the cabin resting. Arianwyn was in town at the chapel when Father Whitefold came in shepherding the entire town. Arianwyn was just about to give orders to board up the chapel when everything went grey. Until today.
Arianwyn will show the party the invisible wall, but he will insist on finding Hopea.
Kayden Wallace - blacksmith
Encounter 3: The Dragon's Cabin
As you move closer, the dragon appears to have been cut into slices about one foot in thickness. The slices are neatly stacked somewhat like a sliced turkey. This is Hopea. Her eye is magical - Hopea's Eye.
The Swords and Armor of Arianwyn may be ruined.
As quickly as it arrived, the blur of blades drops into the ground. With surprising speed, you see a mound of freshly-sodden earth begin moving towards you. These devices are known as Gnot Blades.
Encounter 4: Approaching the Tower
IMPORTANT: Only the bearer of the black castle can actually see the tower. Whenever the party approaches the tower and gets into the red zone of the map, they will be subject to explosives fired from the tower.
You hear a screaming like a whistling moon traveler coming towards you.
Suddenly there is a blast nearby in a sixty foot globe. (Falstaff - green; Fuzzwort - orange; Vince - deep red; Ernie - brown; Hylax - blue; U-Gene - gray). The sky erupts with (fire, ice, electricity, force, dispel magic, time stop, etc.) - saving throw to half. Will be aimed at one character - for whom the blasts are specially designed. Can be fired once each round.
Encounter 5: The Tower
From around the tower (or out of nowhere if the tower is invisible), come a phalanx of one hundred knights on horseback. Each is carrying a strangely tipped lance as they spread out in a single file in front of the tower. The tips glow and cycle through a series of colors (green, orange, red, brown, blue, gray).
Alternating groups of five charge - each group with a similarly colored tip. The other five have light sabers coming from their lances which they use to cut paths to the party.
NOTE: These men are from the Third Age. They know the party by name. They have recently traveled here on the Overlord's command to protect the tower from invasion. They are on the watch.
- The leader of these knights is Hendale, Knight-Commander of the Knights of Whitecliff.
- None of these guards (Norburn, Woolhurst, Ashcaster, etc.) have ever been in the tower - protection against Speak with Dead.
The door into the tower appears to be ancient. A picture of a black rook is painted on the outside of the door. There is no handle nor lock on the door.
Encounter 6: The Chess Room
NOTE: Taking the marble and throwing it against a grey surface will cause the surface to become transparent for a moment - showing the occupant of the room beyond. This will deactivate the stone and destroy it 1 out of 6 (then 2 out of 6, then 3 out of 6). Touching a wall will teleport the party into the room.
NOTE: The surviving marbles will reactivate after each turn.
GOAL: Looking for the surface with the other rook carved into it (ceiling, top level). This will allow the party to move to the Control Room.
RULES
- Party enters a room with a monster - FIGHT!
- The room will become 80' x 80' with a 60' ceiling - they will be on the corresponding square within the puzzle.
- Some squares will be trapped with pits, filled with whirling blades. Monsters will avoid traps. Monsters include - Reflective Horror, Elemental Shambler (taste, sound, light, smell, and touch), and a Random Warder (acid, etc.). These are cumulative with a new monster appearing with all of the previous monsters.
- Win - get a stone
- Party enters a room without a number or a monster - PUZZLE!
- Puzzle rooms will be trapped - rising water, crushing walls, fire spigots - these will be timed.
- Party enters a room with a number - NOTHING!
- Will just see a grey stone floating in the air.
- Get a stone
- On "my turn" I can move a monster to any un-numbered square.
Puzzles
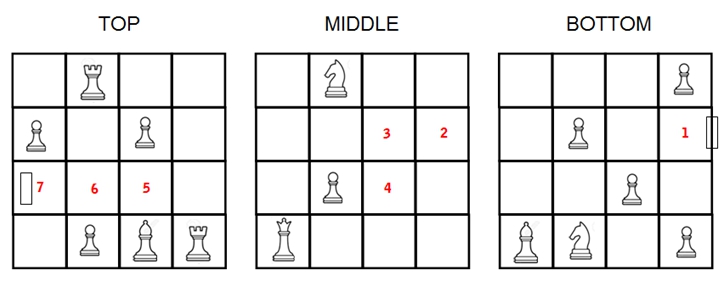
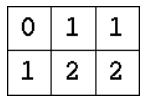
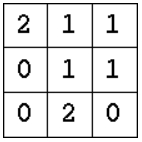
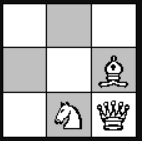
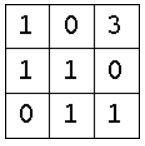
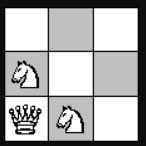
Place any 3 white chess pieces on each board so that each square is attacked a number of times equal to the number in that square.
Encounter 7: The Control Room
General Foxwich has the same dilated eyes as his men (cannot be charmed). He has the black chess piece in his pocket. He will attempt to beguile one member while swinging at the other. The knights will fire explosive that ONLY harm their intended victim. The mirror is an Inversion Mirror.
NOTE: Falstaff has the Javelin of the Black Knight. Which will slay the Black Knight holder, Foxwich will teleport it to someone's pocket as his first action.
NOTE: At first, the glass seems ordinary allowing you to see the forest from one window, the valley from another window, and the snaking wall from the others. If you stare at something in the distance for a few minutes, it wills start to appear closer - zooming in, if you will. This brings in more details from further away, allowing even more remote viewing. Once your gaze shifts, the image returns to normal and the process needs to be started again.
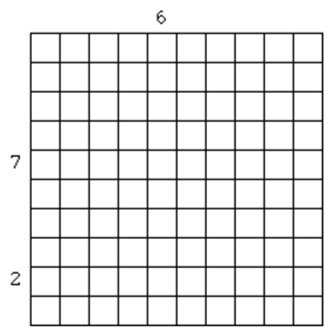
The map appears to be painted on a glass-like surface. A large wooden pin in the map has a number wooden cubes trailing off from it. The pieces look ancient and well-worn, although a thin layer of dust shows that they haven’t moved in quite some time. Above the map, floating in the air, is a 10x10 grid of boxes.
Can’t touch the map unless the grid puzzle is solved.
Shade in some of the squares in each grid so that there are two shaded squares in every row and column, and shaded squares do not touch, even at corners. The numbers on the side of the grid indicate the number of white squares between the shaded squares in that row or column.
NOTE: You are frozen in time. Cows don't move.
NOTE: You can see all the walls from here. The Tower is actually in the tapestry on the island of the Celestial City. So, the vantage point is from there.
NOTE: Searching the room, the party should be able to piece together what is happening. A small ledge with two small indentations are at one corner of the room.
Pushing will take them to the vault or back to the tapestry respectively.
NOTE: The Tapestry button looks well used. The Coins button is almost pristine.
Encounter 8: The Treasure Room
NOTE: The chests are empty. They have been pilfered for the war effort.
A large golem-like creature is here. He is made of brown stone as well. Most noticeably, he is wearing a copper band around his left arm. The band glows filling the room with an eerie reddish light. This is a Copper Rune Band.
This band allows the golem to use rune powers from other players. Cool. Otherwise, he is crushingly powerful.
IMPORTANT NOTE: He is guarding the exit spot which allows teleport back to the CASTLE.
The Old Kingdom Campaign (Finale)
Encounter 1: Exiting the Tapestry
A Chute of Force has been put up around the tapestry to keep the rest of the room from burning as the fire is being thrown at The Great Walls. These walls are being held by the four dark elf mages. A fifth dark elf mage, wearing a golden amulet, is silent with his eyes closed – he is creating a dimensional anchor in the room. Once they are finished, they will take payment in gems (diamonds) from Antone – taken from the crown jewels. The five will leave by drawing a figure on the ground in light and stepping into it. The mercenaries are called The Ascendancy. The Master Ascendant is Dringadir (“to beat” + “male”).
Four channels of fire come from the mouths of four red dragons, precisely aimed at the tapestry which appears to have taken no damage. Once they are done channeling, they will revert to small red-skinned kobalds (from Ssruthu). They will take payment in gems (rubies) from Antone and teleport away - also from the crown jewels. Rubywrath is the lead dragon. The group is on the run from the Forbidden Lands.
Antone Graves will determine whether the dragons and mages can take down the party. If not, he will call for an immediate halt – explaining that he did not mean to harm the party, he was simply trying to destroy the tapestry. He had a vision that a great evil would be coming from it and the staff had been unable to move the tapestry.
NOTE: It can be moved by anyone who holds both black rooks.
NOTE: The stained glass now shows little Theo playing as a knight. Malloc’s gloves will be apparent to those who look hard enough.
Encounter 2: The Final Negotiations
Antone will push for a peace treaty and the return of the party to the Reaches. He will reluctantly allow them to take the tapestry – in exchange for the items that he promised as rewards to overthrowing the Overlord.
- Antone Graves still wants the Staff of Io.
- Little Theo has Molloc's Gloves - which he wears when pretending to be a knight. This is a future link to the Grey Councilors.
