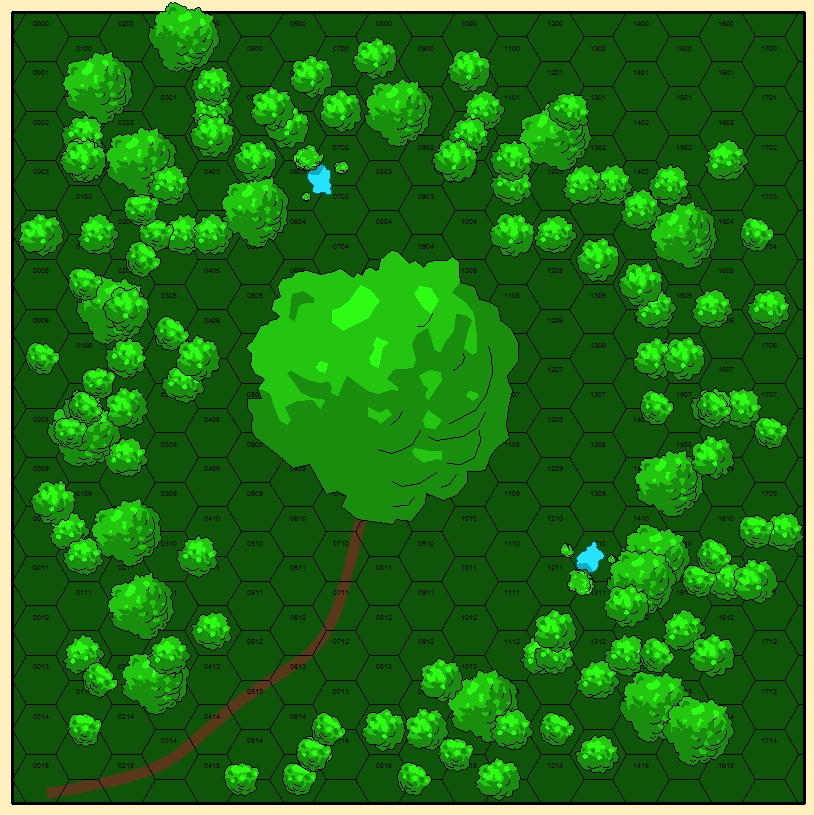
Bedlam at Seamount
| Type | Dungeon |
|---|---|
| Status | Explored October 904 TA |
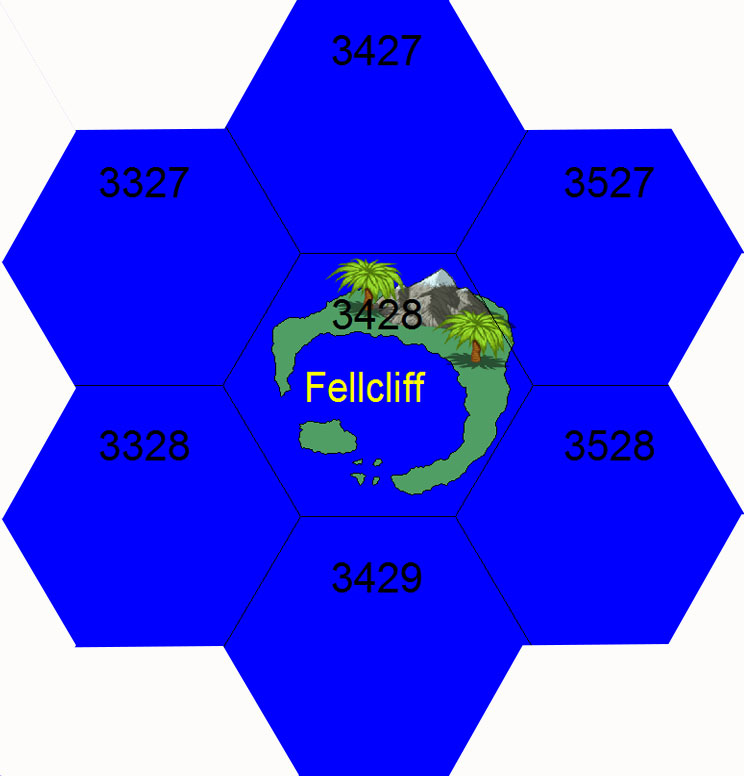
| Location | Fellcliff Island |
| Hex | 3428 |
| Campaign | One Night Stands |
| Adventure # | 115 |
Introduction
A Night of Storms and Terror
DM’s Background
Overview
The party has five main goals to the adventure:
- Retrieving their possessions.
- Getting rid of the bands on their necks and arms.
- Rescuing Arianna the Bear.
- Finding the Silver Oak.
- Securing passage on the ship.
The Briefing
Character Secrets
The last sheet of your character gives you both a reminder of your motivation and describes a collar and two bracelets which each of you is wearing along with the powers that are affected by the bracelet. You may share your motivations – although you might want to discover those of your companions before doing so.
Resurrection
For those of you who have not played in my adventures before, a word of warning – all encounters are not level-appropriate. There are no training wheels in this game. Also, I never change dice rolls – in fact I make most of them in public. So, you can die. All of my adventures allow for the possibility of resurrection, and this one is no different. However, resurrection is painful – and it might be that your party decides the price is too high. You have been warned.
Welcome to Freedom!
Since your time at the Madhouse, this has been your room - a 30 foot by 50 foot prison with six wooden slabs, bolted to the floor. The stonework of the floor looks ancient, but the stone walls and ceiling appear to be of recent construction albeit using stones from the earlier building. Leather straps are clear indications that “patients” are not free to roam the halls of this ancient infirmary. The room is not tidy, but it is much cleaner than traditional prison cells. Along the north wall a low bench runs the width of the room. On it are stacked trays of food, plates, cups and utensils - already congealing from this evening’s meal. A single chair leans up against the wall – minus the burly, red-robed attendant that is usually on guard. The door appears slightly ajar – which is also strange. Though the crack in the door you see the flashes of lightning with an instantaneous rumble of lightning – as if a storm is right on top of you. Good luck…
The Events
There is a terrible storm brewing that will last throughout the night and into the morning. The ship is in port but will leave if things get too bad.
Fellcliff Island
General Description and History
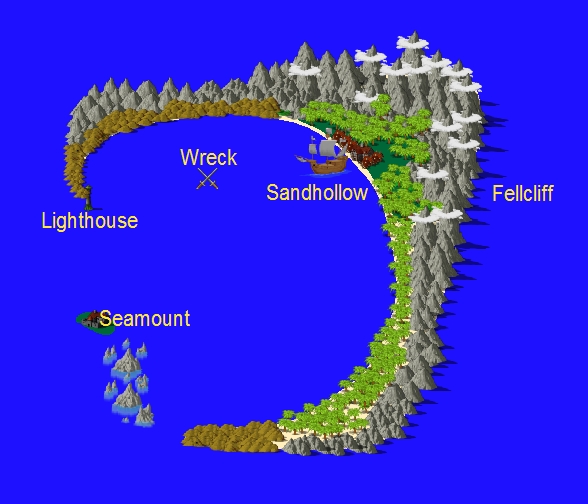
The small island of Fellcliff lies in a mostly un-inhabited volcanic atoll. It is a crescent-shaped island with a sandy beach along its inner rim and steep cliffs on the seaward edge. The cliffs create a sufficient wind break allowing a sizeable forest to grow up the slopes of the island.
The island was discovered eight hundred years ago by Captain Rufus Fell who discovered coffee growing on its forested slopes. A small port called Sandhollow was built and trade was opened. Being the only port for several hundred miles, the town prospered under Governor Fell’s rule. Slaves were brought in to pick the coffee beans and stevedore the ships.
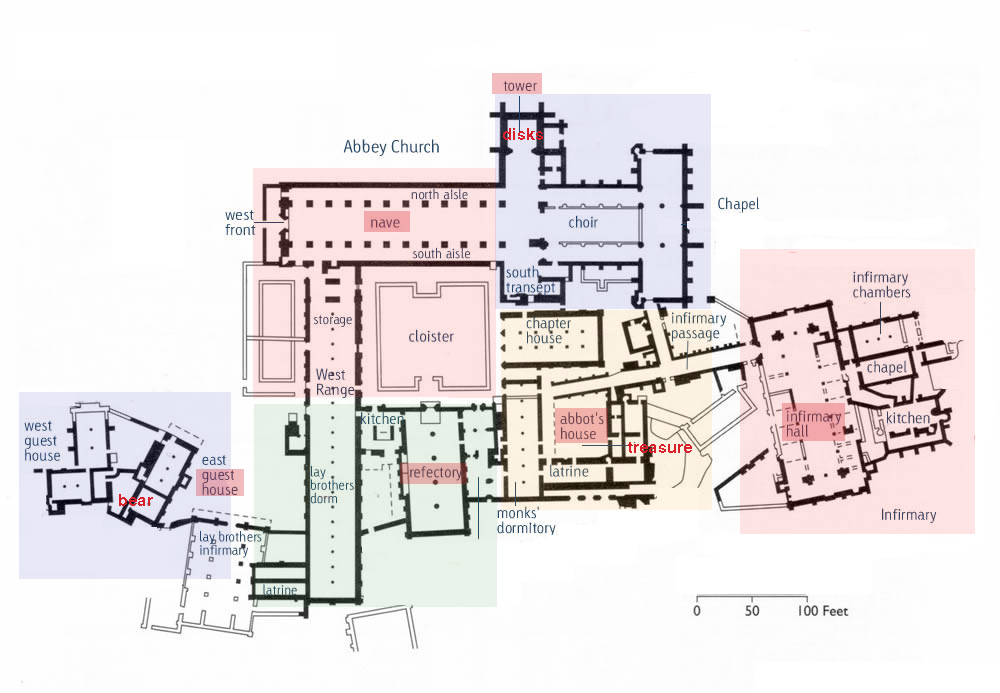
During that time, Aldbarrow Abbey was established on a rocky outcropping of lava that sat along the rim of the ancient volcano that formed the island. As such, the abbey sat across the bay from Sandhollow with almost a half mile of water separating it from the town. The monks of Aldbarrow built a large complex of building including a church, cloisters, chapter house, refectory, and infirmary.
It was the infirmary and it subsequent buildings that give the place its current name – the Seamount Madhouse. As the healing reputation of the monks grew, the number of sick and dying that were shipped to the abbey grew. About two hundred years ago, the island underwent a terrible calamity. A ship arrived with its cargo hull full of lepers and other disfigured folk who had paid handsomely to visit the island. However, the villagers – fearful of an outbreak of disease – sealed the passengers on board the ship and burnt it into the water. The wreckage still stands today.
Within hours, a storm began brewing – the likes of which had never been seen on Fellcliff. The gale struck the island with the force of an epic hurricane – and for six days the villagers fought to save any building and their own lives. Even the abbey was mostly destroyed – with scorch marks from lightning seen in dozens of locations throughout the grounds.
The abbot took the storm as a sign from the gods and fled with his remaining monks back to the mainland on the next available ship. The townsfolk buried their dead – but the coffee plants survived, and so the town limped forward.
Sixty years ago, a strange old wizard – with a long grizzled beard and unnatural blue eyes came to the town and claimed Aldbarrow Abbey and its small outcropping of rock. With generous payments to the town mayor, the cooperation of the villagers was sealed. Soon after, strange cargo started arriving and repairs began to be made to the ruins. The building was renamed the Seamount Madhouse because of the odd assortment of travelers brought through its walls. The old wizard – Basil of Drear – keeps the gold flowing and questions are not tolerated.
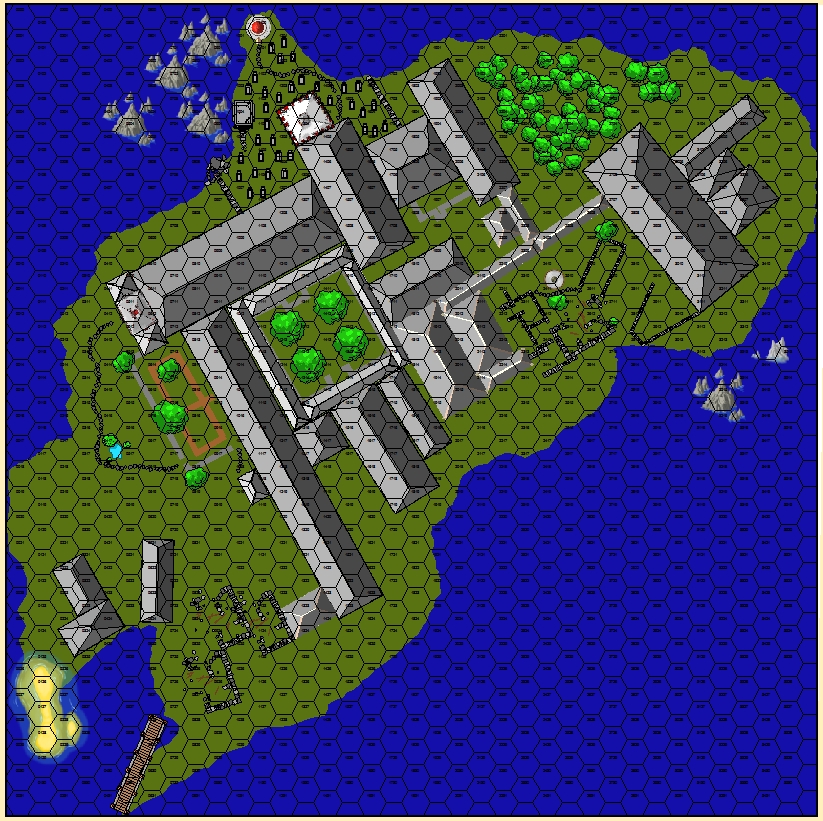
The Seamount Madhouse
Note: The green-glass windows cannot be opened and flicker with a slight hint of magic. Breaking one will cause an alarm to sound and the breaker is shocked for 1d6 points of electricity – DC15 Reflex save to halve the damage. The stained-glass windows are normal, but nobody would break them…
Note Also: Each guard has a randomly-colored small disk on him. The player searching can choose a stone out of the bag: Blue 5, Green 4, Red 3, and Orange 2.
The Infirmary
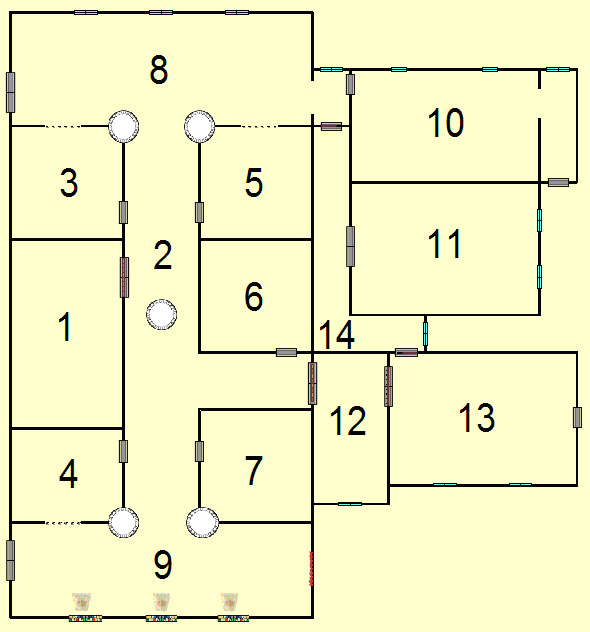
Room 1: Hame
Room 2: Infirmary Hall
You know that you are usually taken to the north down a series of long passageways to the wizard’s tower.
A DC20 Perception test and smell cooking coming from the east OR a low guttural snoring from the north.
A DC20 Perception check will notice a small figure – about the size a small boy crouched in a hidden recess in the central pillar. The figure does not appear to be moving.
A hobbit child who is dressed in filthy brown robes. She appears to be almost dead, foam bubbling at the corners of her mouth, her features set in a hard, unnatural gaze. Examination will show that she is slowly turning to stone.
This is the figure of Elia – “I’m glad you’re free.” The party will have only 1 minute to formulate a question.
Keeper’s Note: Elia has heard the calling of the Silver Oak. She felt compelled to release the elves and fey – although she does not know why. The urge has always been there, but now it is stronger.
Room 3: Owlbear Cage
Anyone passing into Room 8 will undoubtedly wake the owlbear sleeping in this room.
An amalgam of fur and feathers, this bizarre half-bear, half-owl monstrosity has huge ursine claws and emits a threatening rumble.
Room 4: Guard Room
The guard may be away for a piss, but not for long.
If he is here, a single candle will be burning on the table and guard will be playing a solitaire card game. This room contains Manacles of Cooperation in a small box.
Room 5: Cloaker Cage
The door to this room is locked. This room contains a cloaker who is waiting for a meal. The sword is a Guarding Blade.
Room 6: Doppleganger’s Ward
The door to this room is locked.
Entering the room, you see that the southwest bed is also occupied by what looks like the twin to the creature in the northwest. The fourth bed is empty.
DC20 Perception Roll to see either of the doppelgangers change into elf form. Both are evil. They will call themselves March and Milo.
The liquid will suppress the doppelganger’s ability to change form.
Room 7: Mage’s Ward
The door to this room is locked.
Hollister – an old man with long grey hair and a grizzled gray beard. He is the one making the noise. His blue eyes are completely shot through with red, his nose is running and he is thrashing uncontrollably.
Hollister is mad, mad I tell you. He will uncontrollably burst into fits and spasms whenever he is excited. He likes to randomly cast Magic Missile spells.
Rufina – a young woman with dark hair sleeps soundly. She is thin, but well-fed. There is a steel band around her head. (This is to keep her from using mind-control).
Rufina will immediately try to mind control the party. She is obsessive about using others to escape.
Nona – a young woman with dark hair streaked with white stripes. Like the others she appears to be well-fed, although she is tossing in her sleep – pulling against her restraints.
Nona will appear to be okay – although she is really a split-personality with her alter ego – Nova – who will attempt to kill anyone through the use of her succubus-like powers. In fact, she can transform into one.
Room 8: Northern Gallery
The wolf is a hell hound. His eyes are a burning fiery red.
The levers control the portcullises in Rooms 3, 4 and 5. Raising them will create a large amount of noise. There are two additional doors and another green-glass window here.
Room 9: Southern Gallery
From the tapestry the party can get a rough overview map of the area. It must be studied for some time to gain this knowledge. Reveal in real time.
Sleeping next to the door in the west is a thin, lanky wolf with reddish-brown fur and white claws. It is curled up directly in front of the door.
The wolf is a hell hound. His eyes are a burning fiery red. Any light in this area will alert the guards in Room 4.
Room 10: Staff Bedrooms
The door to this room is unlocked – it opens silently, well-oiled.
There may be guards (3) or cooks (2) here. If so, they will most likely be sleeping.
Perception DC 20 check will hear the sounds of guttural snoring coming from the alcove in the east.
On one of the tables is a delicate tin music box – a Clamor Box.
The alcove leads to a door – the flash of lightning can be seen from the crack under the door. Sleeping next to the door is a thin, lanky wolf with reddish-brown fur and white claws. It is curled up directly in front of the door.
The wolf is a hell hound. His eyes are a burning fiery red. Any sound in this area will alert the sleepers in the room.
Room 11: Chapel of Eternal Youth
You sense an aura of tranquility about this room.
Originally this small chapel would have held a massive stone font at its center with a hexagonal arrangement of pews around it. Four paintings on the wall – now greatly faded with time are still visible. The pews have been stacked haphazardly against the far eastern wall – mostly covering two green-glass windows. The font is gone, broken into pieces that have been piled to the side. A large hole descends for several feet through the stone and is filled with water. The area is littered with digging equipment. On a workbench near the font are beakers, vials and other alchemical tools. A candle is still burning under one which is distilling a potion into an almost-full vial.
A DC 18 Knowledge Science roll will determine that the potion is Cure Light Wounds. Also, you think that a body placed in the font would resurrect in several hours – although it would not be expected to return a creature from stone.
The scenes are of a man carrying his dead child in his arms arriving outside this small chapel – which stood alone in a small clearing. The sun is high in the sky. The next shows the child being lowered into the font while the man stands with head bowed next to him. The child has a massive wound in his chest. The third shows the child stepping from the font, sans wound. The final scene is that of the father and child leaving the chapel, hand-in-hand. The moon is now high in the sky.
Room 12: Mess Hall
Sounds of two men talking can be heard from the door in the east.
Room 13: Kitchen
These two guards will come if an alarm is sounded or this room is entered. One of the guards carries a Firehand Wand.
Lightning can be seen flashing under the crack in the door.
Room 14: Hallway
This hallway is well-travelled and clean. Three sets of doors are here along with a single green-glass paned window.
Abbot's House
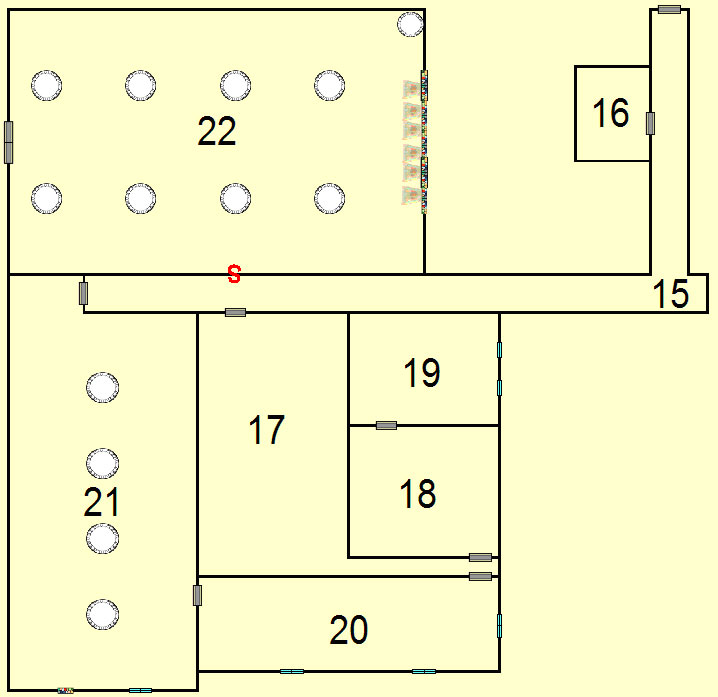
Room 15: Portico
The storm is raging outside.
Perception DC20 – you notice a movement among the trees to the north.
This is actually a shambling mound that is wandering in to find food.
NOTE: The portico actually extends 100 feet from the Infirmary Room 8 to the intersection shown in the CC2 map.
Room 16: Explosives Room
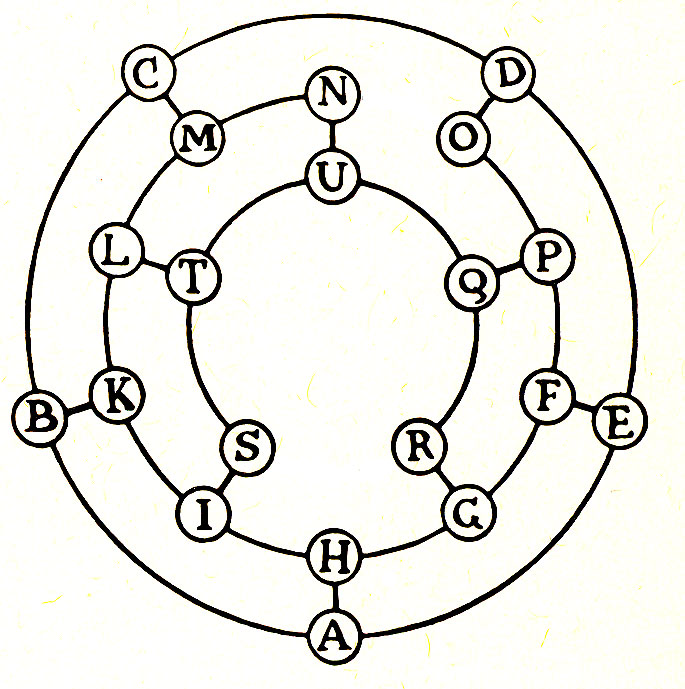
Start at H and go back again passing through each symbol once and only once.
The bags are packed with sand.
Solving the puzzle will cause the door to swing open revealing a single table sitting in the center of the room. A strange apparatus behind it is boiling, bubbling and creaking away – like a moonshine still except vastly more complex. There are several large bottles of liquid feeding into the apparatus. Every minute a drop of liquid will come out of a long spout and drop into a now almost empty vial.
A DC20 Knowledge Science roll will determine that this is Dwarven Stoneshine – a highly explosive liquid that is used in mining. At the present rate, it will take until morning for the vial to be full.
Room 17: Abbot’s Room
This room once belonged to the Aldbarrow Abbot as his conference chambers.
The statue is a mechanical warrior who fights as a golem.
Room 18: Abbot’s Study
This room contains the character’s stuff: Flameleaf (Ash), Rapier of Puncturing (Grimscar), Sleep Arrows (Thorn), Memory Loss Arrows (Thorn), Alchemist’s Pack (Vinewurm). In addition, a Potion of Stone to Flesh is here.
Room 19: Abbot’s Bedroom
One wardrobe contains 2 red robes, several sets of clothes, boots and the like. The only personal item in the room is a picture of a young woman with brown hair and brown eyes – breathtakingly beautiful painted under an apple tree with sunlight dancing about her.
This is Basil’s room – and the woman is his wife Gail – whom he is trying to reconstruct currently in the tower.
Room 20: Showers
This is the shower which uses rainwater collected off the roof. Pulling the handle releases the water. The chests are filled with towels. A small box near the abbot’s entrance holds several bars of homemade soap. This can be used to wash off the scent if being tracked. Note: an owlbear guard is oftentimes found near the showers.
Room 21: The Monk’s Dormitory
A thorough DC25 search will find a Potion of Neutralize Poison in one of the chests.
Room 22: Chapter House
Upon entering the room, the party discovers a single block of stone that has fallen from the ceiling. A pair of monk’s sandals can be seen nearby with a red stain seeping from under the rock. Immediately a ghost of a monk dressed in brown robes will attack.
Perception DC20 that the monk is wearing a glowing ruby ring.
The monk is Father Sprigg – who was the only monk left behind after the storm. His brothers could find no way to move the giant stone block quickly. His Ring of X-Ray Vision is still under the rock – plus burying his bones will grant a boon for the party.
Abbey Church
Room 23: Chapel
Room 24: Choir
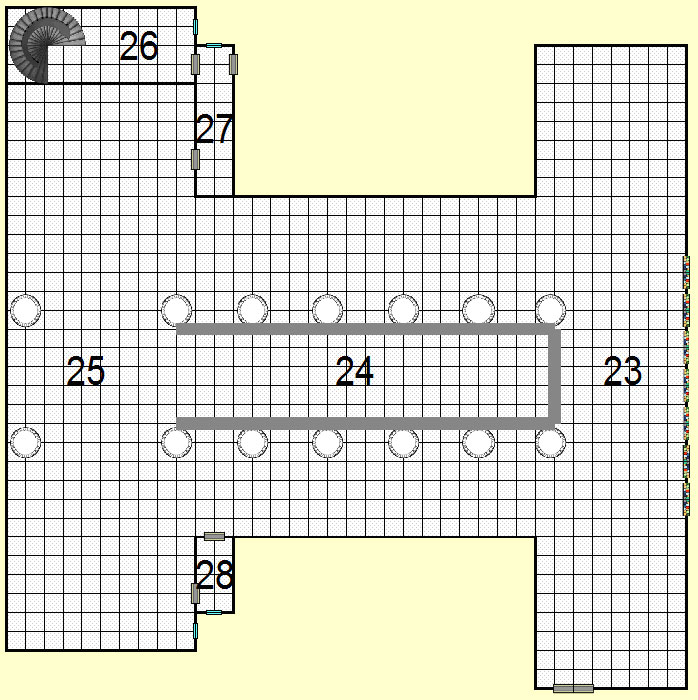
This area wards the two gargoyles which have been trapped in the choir.
Perception DC20 will notice that there are claw marks periodically in the wood – as if something is trying to escape.
The candles do not appear to be burning down.
Room 25: Transcept
The north and south transcept of the abbey church show periodic foot traffic coming from the northern door and leading to the door in the south end of the chapel.
DC20 Perception roll will hear snoring coming from the door in the north.
Room 26: Stairs Up
Room 27: Guardroom
A sleeping guard is in this short, newly-constructed hallway. He is dressed in a red cloak. The door to the outside is locked.
Room 28: Cloakroom
A search of the room reveals a small green glass bottle with a tiny winding key on its elongated stem. This is a Bottle of Messages.
Room 29: Stairs
Room 30: Guardroom
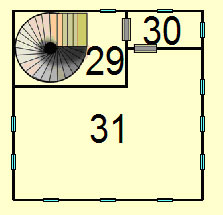
A mechanical warrior is at the end of this hallway. He will sound a warning that will arouse anyone working in the laboratory.
Room 31: Laboratory
This is the laboratory of the mad wizard Basil of Drear – and his bride Gale. He attempts to bride Gale back have failed.
There is an acorn from the Silver Tree here.
A chest is guarded by a flickering set of runes.
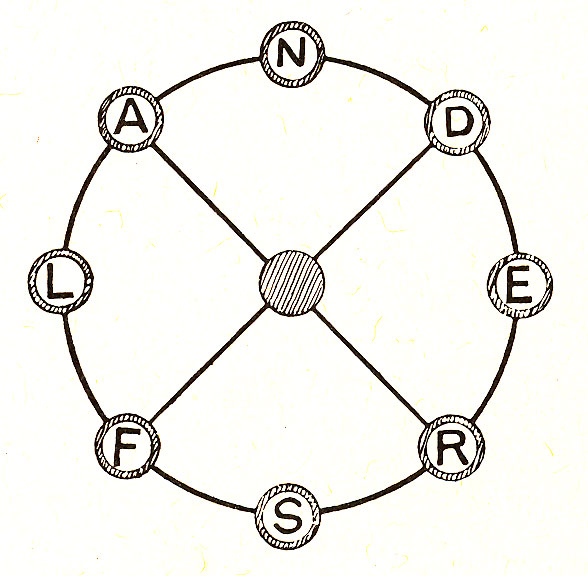
Move the counters along the lines circle-to-circle to spell FLANDERS along the rim with the “F” at the top.
The chest contains: a dozen large grey disks (for the neck collars), a number of small colored disks (for the bracelets), and the Crystal Ball.
Room 32: Nave
Room 33: West Range
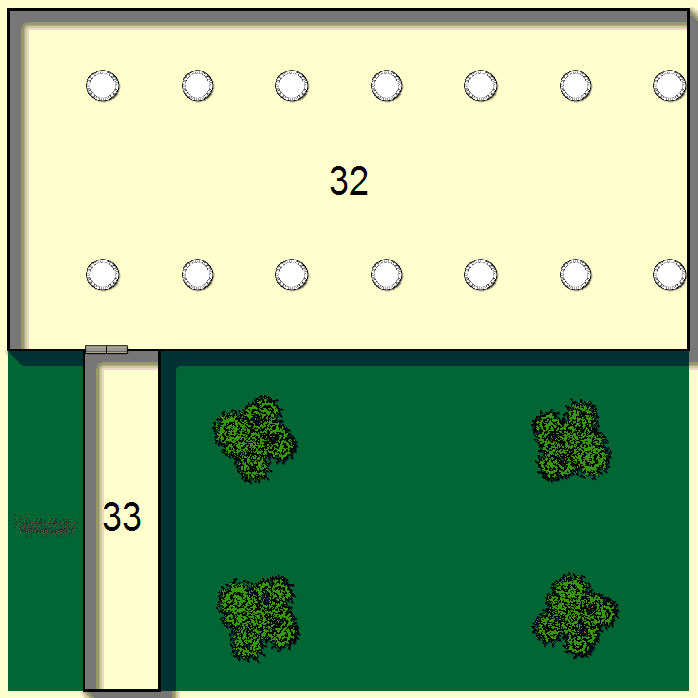
Four assassin vines guard this area. An alchemist can find poison ingredients here.
Refectory
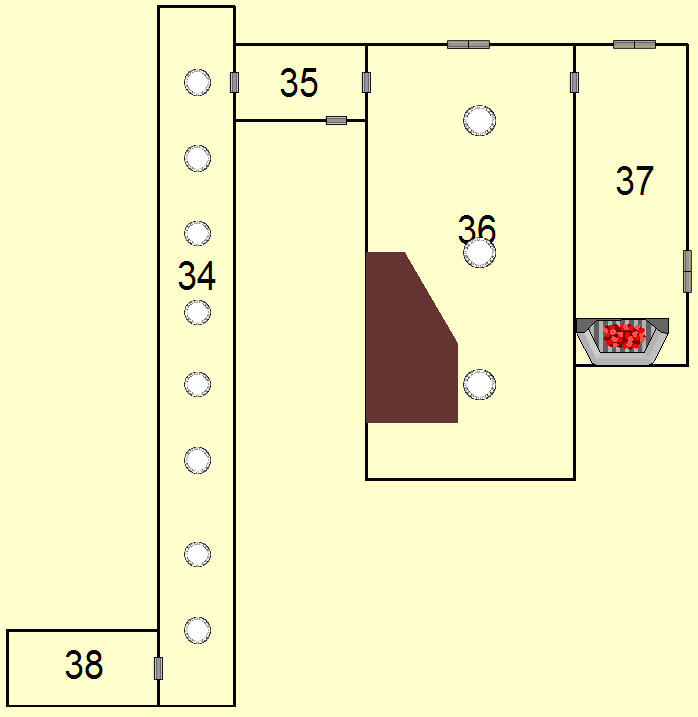
Room 34: West Range
Depending on the time of day, the smell of baking bread can be found at the north end of the portico.
Room 35: Kitchen
There will usually be two cooks here – bakers in the early morning.
Room 36: Refectory
A DC15 Perception check will discover whimpering behind the stage. It is here that three adults and three children have been placed in cages. Nearby hang costumes. A trunk is opened with a number of manuscripts piled about.
This is the gypsy Bardwell and his family – wife Mona and brother Nigel and three children Bo, Nita and Juno. They were captured on a ship and brought here to entertain the staff. They are well-fed and not mistreated if the performances are good – like the Starry Lovers. However, they are in cages and they want to escape.
Bardwell has two Sizzling Arrows kept as props that he will give to the party for help.
Room 37: Dormitory
This room was the old warming house – where the monks kept the fire burning. To that extent a large fire pit in the southern end of this room is still burning. Twenty beds are lined up along the walls with a row running down the center of the room. This room is well-kept and clearly in use.
A secret door next to the fire pit leads to a spiral staircase leading DOWN. This is the passage to the tunnel.
A number of sleeping guards (4) and cooks (2) can be found here. One guard is usually prowling about awake.
Room 38: Latrine
Note: an owlbear guard is oftentimes found near the guest houses.
Guest Houses
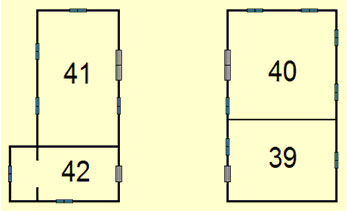
Room 39: Bear Room
The door to this room is locked.
One of these bears is Arianna – or the space will be empty if Bearoak has transformed for any reason. In this case, Arianna is wandering about the grounds looking for her lover. The other is just a bear.
Room 40: Spider Room
The door to this room is locked.
These are two nasty phase spiders.
Room 41: Stable
These are the caretakers for the animals – Tilloch and Windham. They will not notice the party’s approach. The animal, btw, will die.
Room 42: Caretakers Room
The journal details how Basil created the winged horse by grafting baby eagle wings onto the beast and using an elixir to make sure the graft grew. Mechanical drawings show how the wings were attached to the horse’s musculature. The last entry says – fever – it looks like the liver is giving out again. We will try one more transplant…
DC20 Perception notices a small ointment jar in on a shelf. This is Flying Ointment.
Environs
Area: Lighthouse
The light radiates a slight aura of evil. It is actually a trapped fire elemental.
Area: Graveyard
A flash of lightning and you can see movement – these are four ghouls and a ghast who wander the area at night looking for food. During the day, they retreat into the mausoleum. They will let the party into the mausoleum to trap them, if possible.
Area: Woods
Periodically, a rustling can be heard. This is a basilisk.
Area: Dock
Good luck. Note: an owlbear guard is oftentimes found near the dock.
Area: Well
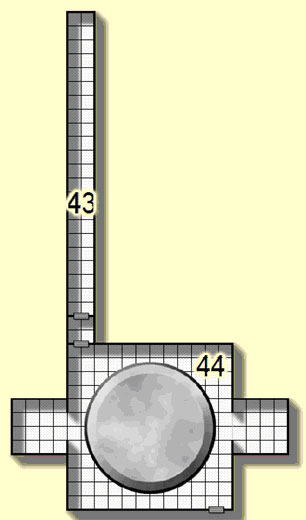
Room 43: Tunnel
These are overflow doors when the whirlpool is swirling.
A DC25 Perception check will notice a small stone-colored button just outside this door. Pressing the button will cause the diaphragms to open and seawater to fill the room.
Room 43a is a small room with the same set of hinged doors.
Room 44: Whirlpool
If the whirlpool starts, warning bells will sound both in town and on the island – this is to warn everybody to GET OUT OF THE HARBOR.
Room 44a (west) and 44b (east) are safe rooms.
On the ledges are four carrion crawlers who will go into the room to find fresh food.
In the back of one of the ledges is a secret entrance that leads to the lighthouse on the main coast.
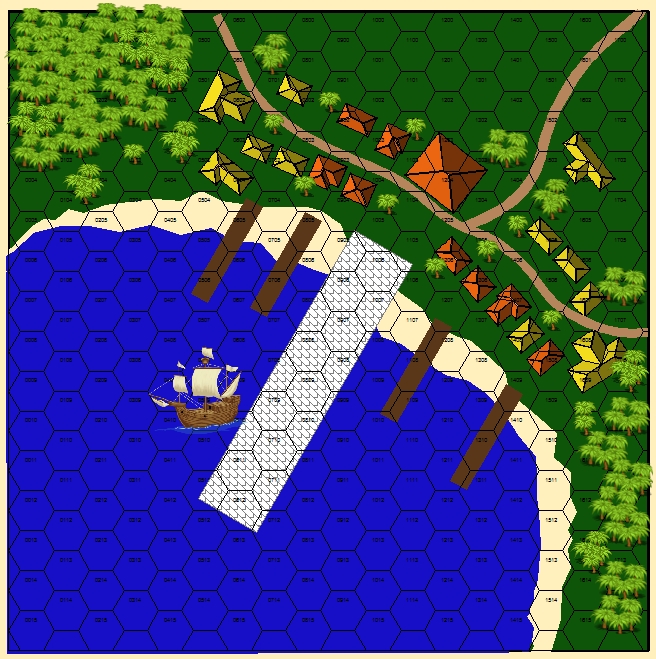
Village of Sandhollow
The main shops in town are:
- Coffee Warehouse – by far the largest building in town, this is where the coffee beans are brought, sorted and sacked.
- The Broken Trident Pub and Free House
- Starwind Traders – mercantile and bank
- Bywall & Sons, Blacksmith – blacksmith
- Ships and Sail, Carpenters – carpenter shop
- Fell’s Manor – mayor’s house
A series of a dozen well-tended fields are tucked behind the village - a single large barn in towards the back of one field is the home of the island’s four cows. Sheepherders in the hills provide some of the dairy and most of the non-fish meat for the community.
Most of the villagers are in the mountains gathering coffee beans – as it is the harvest season. They will not take the southern route – however, as that is “cursed” by the forest creatures.
Area: Sunken Ship
Sea Monster – will come out to feed if there are boats in the water or the whirlpool has been turned on…
Area: Fellcliff Lighthouse
Area: Whirlpool
Although it cannot be seen from above, it is possible that a creature swimming over the whirlpool will see unnatural patterns in the sand.
Area: The Jolly Hand
See above for description.
The captain of the crew is smelly Captain Ralls – an old man with a bushy beard and a surly disposition who dresses in a black wizard’s robe. Captain Ralls is a smuggler who is currently unloading two giant frogs for trade with Basil. He is also the one who brought several of the characters to the island.
His first mate is Strikker – an equally despicable character. Stikker is content to drink at the pub with six of his crew. The other six are on board with Ralls. Both will recognize the party and try to re-capture them if possible.
They have ship nets which have a stunning property which they will use, as needed against the party. As DC18 Reflex save dodges the net, and a DC18 Fort save is needed each round to keep them from going catatonic. This is an electrical charge and does not affect those immune to electricity.
Area: Tree of Elfin Mourning
The tree’s name is Svia in common. If the party has been followed – this will be the big climax. If not, then they may still be discovered trying to get aboard the ship. Svia is the Tree of Elfin Mourning which answers the most desperate pleas for help with her magical acorns.
A DC20 Perception roll will see that the lightning is actually striking the will-o-the-wisps – who are frantically trying to save the tree.
If Arianna is there, she will burst forward (or Bearoak if he is in bear form). The tree will drop a silver acorn at Arianna’s feet. Eating it, she will revert back to her princess form. Arianna will tell the party that the tree needs a new forestall – someone to care for her.
Otherwise, the tree will speak - “I am dying. My forestall is dead – someone must step forward to take the mantle of my care.”
If someone volunteers, Svia will drop a branch at his/her feet. Picking it up, all the lightning will be sucked into the staff. However, the storm will start to dissipate into an ordinary storm – lessening noticeably and dissipating by morning.
If nobody volunteers, then Arianna will. If Arianna isn’t there, the tree will be consumed by lightning.
If saved, Svia will drop an acorn at the feet of each character as a gift. In addition, Grimscar will be allowed to climb the tree to reveal that she can fly and her scars will be healed. The party can then move to the docks to escape.
|
Monsters
The Madhouse Staff |
Treasure
Potion of Cure Light Wounds |
Magic Items
- Potion of Cure Light Wounds - Drinking this potion cures the imbiber of 1d8+5 hit points of damage.
- Dwarven Stoneshine – This clear liquid has a sulfurous smell and bubble profusely when moved. Periodically, puffs of smoke rise from the liquid. Shaking this will cause an explosion in 1d10 minutes of epic proportion.
- Ring of X-Ray Vision - On command, this ring gives its wearer the ability to see into and through solid matter. Vision range is 20 feet, with the viewer seeing as if he were looking at something in normal light even if there is no illumination. X-ray vision can penetrate 1 foot of stone, 1 inch of common metal, or up to 3 feet of wood or dirt. Thicker substances or a thin sheet of lead blocks the vision. Using the ring is exhausting, causing the wearer 1 point of Constitution damage per minute after the first 10 minutes of use in a single day. The ring must be used in 1-minute increments.
- Keeper’s Ring - The ring is magically attuned to all the iron prisoner's rings. When the wearer of a keeper’s ring places a prisoner's ring on a subject, the prisoner cannot remove the ring without the use of a remove curse, limited wish, miracle, or wish spell. The wearer of the jailer's ring can also remove a linked prisoner's ring at any time. The jailer is aware of any wearer of a linked prisoner's ring like a constant status spell. Additionally, all wearers of linked prisoner's rings count as familiar to the jailer for purposes of spells such as scrying and teleport.
- Bottle of Messages - This green glass bottle has a tiny winding key on its elongated stem that, if turned, causes a shadowy cork to slowly become substantial over a 1-round period. Anything the owner of the bottle speaks into the bottle during this time (up to 25 words) gets trapped inside it once the cork fully manifests. As soon as the cork is removed or the bottle is smashed, this message is released exactly as if the owner had spoken the words at that moment. Once the bottle releases its message, it shatters.
- Clamor Box - This delicate tin music box can produce a great volume of noise at a specific time determined by its owner. Four command words determine what sorts of sounds it is to play (battle, fire, massacre, or riot), and a fifth determines the delay (anywhere from 1 round to 20 minutes) until the box begins to produce the desired sound. The noise from the box is as loud as 40 people. The sound persists for 2d6 rounds.
- Flying Ointment - This preparation of herbs includes belladonna, mandrake, and foxglove (also known as “witch's glove”) in a base of rendered fats. When rubbed over the skin, the ointment grants the subject the ability to fly (as the overland flight spell) for up to 9 hours.
- Manacles of Cooperation - These tight iron cuffs can fit over the wrists of any Large or smaller humanoid. When placed on a helpless humanoid, they make the captive more docile and compliant. The prisoner never attempts to escape of its own volition and agrees to any reasonable request unless it makes a DC 11 Will saving throw.
- Firehand Wand - Upon utterance of a command word, a cone of searing flame shoots from the wand up to 30 feet. Any creature in the area of the flames takes 3d4 points of fire. Flammable materials burn if the flames touch them. A character can extinguish burning items as a full-round action. DC16 Reflex save to half. Charges = 5
- Guarding Blade - This +3 dancing sword automatically rises up to defend a fallen or sleeping wielder. To trigger the sword's activation, the wielder must fall unconscious or die while wielding the weapon or holding it in hand. Thereafter, should any creature other than an ally of the wielder attempt to touch or strike him with melee attacks, the sword attacks that creature for up to 4 rounds. After 4 rounds, the weapon drops in the wielder's square.
- Sizzling Arrow - This +3 corrosive arrow continues to leak acid onto its target each round, dealing 1d6 acid damage on the attacker's turn for the next 3 rounds. Removing the arrow is a DC 10 Heal check and prevents any further damage from the arrow (the DC increases to 15 if the target tries to remove the arrow from himself). Removing the arrow destroys it, and it dissolves up once the 3 rounds pass. Charges = 2
- Cloak of Displacement - This item appears to be a normal cloak, but on command its magical properties distort and warp light waves. The wearer appears to be about 2 feet away from its true location. The creature benefits from a 50% miss chance as if it had total concealment. Unlike actual total concealment, displacement does not prevent enemies from targeting the creature normally. This effect lasts for a total of 15 rounds per day, which the wearer can divide up as she sees fit.
- Crystal Ball - This is the most common form of scrying device, a crystal sphere about 6 inches in diameter. A character can use a magical crystal ball to see over virtually any distance, as with the spell scrying (Will DC 16 negates). It allows you see and hear the subject and its surroundings up to 10 feet away. A failed attempt prevents further scrying. A crystal ball can be used multiple times per day, but the DC to resist its power decreases by 1 for each additional use.
- Potion of Neutralize Poison - This potion will detoxify any sort of venom in the imbiber. A cured creature suffers no additional effects from the poison, and any temporary effects are ended, but the spell does not reverse instantaneous effects, such as hit point damage, temporary ability damage, or effects that don't go away on their own.
- Potion of Stone to Flesh - This potion restores a petrified creature to its normal state, restoring life and goods. The creature must make a DC 15 Fortitude save to survive the process. Any petrified creature, regardless of size, can be restored. By pouring this potion out, it also can convert a mass of stone into a fleshy substance. Such flesh is inert and lacking a vital life force unless a life force or magical energy is available.
Character Items
- Alchemist’s Pack – This oversized backpack includes myriads of small pouches, loops filled with vials, and hooks. This pack is full to the brim with plants, animal parts, and other unidentifiable items.
- Rapier of Puncturing - 3/day - Three times per day, this +2 wounding rapier allows the wielder to make a touch attack that deals 1d6 points of Constitution damage by draining blood. Creatures immune to critical hits are immune to this weapon.
- Flameleaf - +3 short sword; upon command sheathed in glowing fire that deals an extra 1d6 points of fire damage on a successful hit. The fire does not harm the wielder. Each charges lasts 6 rounds.
- Sleep Arrows - any opponent struck by these arrows must make a DC15 Fort check or fall asleep. (5 arrows)
- Memory Loss Arrows - any opponent struck by these arrows must make a DC15 Will save or lose all memory of what has happened during the previous 24 hours. (5 arrows)
Masterwork Items
- Masterwork Cold Iron Longsword – a non-magical longsword of masterwork quality and a +1 enchantment.
- Adamantine Dagger - a non-magical dagger of masterwork quality and a +1 enchantment.
- Leaf Armor – masterwork armor made of alchemically-treated leaves to create the strength of studded leather without any metal.
Cast of Characters
The Party
- Ash
- Thorn
- Tangle
- Bearoak
- Truestar
- Grimscar
- Vinewurm
Character Descriptions
Thorn Hailwasp resembles a very small elf, but with longer ears and gossamer wings. He is young, but not a child by fey standards. He loves to wear bright clothing including caps and shoes with curled toes. His weapon of choice is a short bow and magical arrows.
Thorn is a merry prankster who guarded the borders of the Sylvan Glade - an expert at leading adventurers astray and away from the fey meadows. He is friendly with elves, but he is very suspicious of evil and will always keep a watchful eye on any creature he feels might be a follower of the dark path. He can be boastful - but always in good-natured way. He secretly longs to prove himself invaluable to the queen and be taken on as one of her personal escorts.
During his watch one evening, Thorn came across two old men speaking in hushed tones around a campfire - a tale of a magnificent silver-leafed oak tree whose acorns were reported to bring extraordinary luck to those fortunate enough eat one. Intrigued, he followed the men through the forest to the shores of the Great Sea - trying to decide whether to seek the silver tree and an acorn for his queen.
Suddenly, his world went dark and he found himself strapped to a bed in a stone room - unable to escape. However, in the back of his mind, he can now hear the faint calling of the mysterious silver oak.
Ash Flameleaf resembles a very small elf, shorter than a hobbit and very slim, with tall gossamer wings. He is an exceedingly nimble fellow that may be related very distantly to hobbits. He loves to wear clothing dyed bright colors and decorated with elaborate embroidery or trimmed with silver or gold studs and buttons. He is the carrier of Flameleaf - a magical blade shaped like a long variegated leaf. He is easily excited into action and has an exaggerated sense of chivalry.
The sword was a gift from the queen of the Endless Forest for his bravery in fighting a nest of owlbears that invaded the fey meadows. Ash has special abilities with animals and hopes to someday work with the druids on behalf of his people. He has learned several languages and is an adept student.
Ash came to his present predicament while visiting a hobbit pub, the Old Beard Tavern, at the trade crossroads near the forest. Suddenly, all the patrons - mostly hobbits - were frozen in place, mugs still to their lips. A dark cold swept through the bar as an old man in black robes - smelling of fish and seaweed - strode through the door. He looked about, his gaze finally focusing on Ash. "Here's one the Master will like," was all Ash heard before he was stuffed into a bag and everything went dark.
Tangle is a small fey of large complexity. His family lived on the fringe of the wild, the untamed dark heart of the forest - a situation which tainted his ancestry, according to his peers. He was born on Midsummer's eve, although Tangle's mother claimed she didn't know who his father was. At an early age, he showed an unusual and unnatural characteristic - the ability to shape-change into a will-o-the-wisp. His mother tried to hide his talent, but after young Tangle shocked a member of the fey court, his fate was sealed. Cast off as a boggart - Tangle was on his own.
Stealing away in the dark of the night, Tangle was soon beguiled by a bobbing light which he assumed was his father - always out of reach and just over the next rise. Eventually, Tangle found himself on the coast of the Great Sea near a human trading village. Tangle soon became adept at stealing food and clothing from the men and women. Each night he would see his father bobbing over the water - moving farther and farther out to sea, beckoning Tangle to follow - curtailed by Tangle's fear of water.
One day, his desire to follow his father overcame him and Tangle stowed away on a ship - only to discover that he had fallen in with dark wizards. That first night he was captured, a spell cast over him that made the next few months hazy. He dreamt of his father and later of a shimmering oak tree filled with thousands of balls of lights - ornaments of happiness and family. That happy dream is now a living nightmare.
Bearoak was a Forestal in the service of the elven queen - charged with the care of the palace gardens. It was in his duty that he met and fell in love with Arianna - the princess and youngest daughter of the queen. She reciprocated his feelings. The queen, sensing her daughter's heart had been won by a stranger, forbid Arianna from seeing any male elf without her consort. Through the long years, Bearoak and Arianna made plans to flee the forest and make their way in the world of man - free from her mother's watchful gaze.
One night, under the darkness of the new moon, the lovers fled. They were met at the forest's edge by the queen wizard - who had followed them as a sparrow. There he cursed Bearoak and Arianna that one should always be in the form of a bear while the other was an elf.
Now cursed, Bearoak and Arianna traveled throughout the human lands looking for anyone who could help. It was in the furthest recesses of the southern kingdoms - in a pub that only the darkest wizards would dare to enter - that an old man in black robes and smelling of the sea promised them salvation in a far-off land. There was a magnificent silver oak with fruit that would break any curse. Against his better judgment, Bearoak accepted the invitation. His intuition proved right - as he remembers little of his long ocean voyage - waking up chained to a bed with no trace of Arianna in sight.
Truestar was the beacon of the elf queen's guard - loyal, courageous and without fault. He served the elven nation throughout the years with never an unkind word spoken of him. So it was that he was chosen when the queen's youngest daughter, Arianna, disappeared along with the queen's wizard and one of the palace forestals. None of the three had been seen for weeks, and the queen was frantic for news. She summoned Truestar to find her daughter and return her to the kingdom.
The three were not easy to follow, as their trails disappeared at the forest's edge. True to his word, Truestar followed every path, oftentimes questioning villagers and guards along the human highways. It was clear to Truestar that Arianna had been shapechanged into a bear - as it was only Bearoak who left a trail as an elf. But the druid was always in the company of his bear. He suspected the wizard of aiding the two, although no sign of the wizened elf was ever found.
Finally, Truestar caught up with Bearoak in the southern reaches, boarding a ship. His rescue was unsuccessful as the druid and bear left just hours before he arrived into port. Hiring a fast sloop, Truestart caught up with the ship - The Jolly Hand - whose captain was more than happy to take him onboard. While negotiating his passage with the captain, Truestar was overwhelmed with a sense of absolute evil. Passing out, he came to on the same bed where he rests today.
He has tried to befriend Bearoak - who is suspicious of his motives and remains reticent.
Sadene enjoyed an idyllic life as a child - with the freedom to roam with her friends playing in the woods and wilderness surrounding her parent's modest dwelling. She was as strong and as fast as the boys, performed well in school, and excelled at swordplay. Her only haunting memory was of the dreams - always the same - climbing the ancient silver oak. Higher and higher she would venture, always drawn forward by some mysterious force. Then - crack - a branch would break and she would find herself falling, bounced between branches like a ball kicked between children at play.
It was her father that suggested she climb the great oaks of the forest - a way to confront her fears directly. So, on that fateful day - the day of the accident that would change her life - Sadene set out in earnest to conquer her demons. And, like the dream, she fell, losing consciousness somewhere along the way. She woke up weeks later in the hospital, wrapped in bandages with her parents standing vigil. While her bones and muscles healed, Sadene bore the terrible scars of that day - along with the irony of her dream continuing.
Afterwards, the boys and girls of the village gave her wide berth - the idylls of her youth were gone. She jumped into her sword practice with gusto - the instructors where battle-scarred veterans who did not give her slashed face a second glance. An adept student, Grimscar - as she was now known - could have easily joined the military. Instead, she became a mercenary looking to find anyone who could answer her questions about the silver oak and the nightmare that had consumed her life.
That is why she was so reckless the day she met Vinewurm - a fool's errand taking the first ship out of port. No precaution landed her right where she deserved - in a stinking prison far from home.
Vinewurm is a dark elf of a dour and disagreeable disposition. Unlike most of her kin, Vinewurm's childhood (her name was Medali back then) was spent in the laboratories and libraries of Dier Drendal - as the thin waif would spend hours pouring over alchemical treatises and dusty tomes of forgotten lore. Now, as a young adult, she retains a gauntness that belies an average strength and endurance with lightning fast reflexes and the honed fine motor skills of a craftsman. But, it is her mind - and an astonishing memory - that best serves Vinewurm in her present vocation.
Her fascination with alchemy began in dramatic fashion on the day her mother died - as the doctors stood by her bedside ringing their hands. One had mentioned that only the healing properties of the silver oak would bring her back from the brink of death now. When she pressed them for details, they dismissed her as adults often would and spoke in hushed tones that merely provided a catalyst for young Medali's fascination with the unknown. Unable to save her mother, Medali was placed in an orphanage which coincidentally shared common buildings with an alchemical college. Her future was set.
Years later Medali was accused in the mysterious disappearance of the doctors who treated her mother the bodies were eventually discovered under a particularly nasty vampire vine that was growing near the college library. It was then that Medali was given the name Vinewurm - and she fled shortly thereafter from the city.
In her quest to find the silver oak that the doctors mentioned all those years ago, Vinewurm has befriended Grimscar - a fighter and almost a sister to the alchemist. Grimscar has been plagued with dreams about the same tree since childhood. Together, they set off to find answers. Unfortunately, their ship was attacked by pirates and both were taken as prisoners before being sold, crated and shipped to their current location. Vinewurm, however, remembers her journey from the port town to the hospital under heavy sedation - but her amazing mind remembers.
Character Secrets
Ash
You find around your neck a large iron band. It forms a complete loop and has no apparent latch or seam – except that it has a small slot on its outer edge about ½” in length and 1/8” wide. It seems to be etched with a fine tracing of magical runes. The impression seems to be rounded on the bottom. Playing with the neck band causes pain to shoot through your head – your temples pound.
On your arms are similar bands, albeit a bit smaller in diameter. The slots on these are about half the size as the one around your neck. They bands are different colors but also seem to be impossible to remove. Your bands are:
- Red – your ability to fly is suppressed
- Blue – your ability to Dimension Door is suppressed
Motivation: You want Flameleaf back – it is your pride and joy. You are also experiencing a longing to see the Silver Oak just once – although you will not sacrifice your life to do so. You do want so desperately to get back to the Endless Forest and your queen.
Thorn
You find around your neck a large iron band. It forms a complete loop and has no apparent latch or seam – except that it has a small slot on its outer edge about ½” in length and 1/8” wide. It seems to be etched with a fine tracing of magical runes. The impression seems to be rounded on the bottom. Playing with the neck band causes pain to shoot through your head – your temples pound.
On your arms are similar bands, albeit a bit smaller in diameter. The slots on these are about half the size as the one around your neck. They bands are different colors but also seem to be impossible to remove. Your bands are:
- Red – your ability to fly is suppressed
- Blue – your ability to turn invisible is suppressed
Motivation: The calling of the Silver Oak has been growing stronger since your arrival at Seamount. You can almost feel it longing for you – and you know that it will give you an acorn to take back to the queen of the Sylvan Glades.
Tangle
You find around your neck a large iron band. It forms a complete loop and has no apparent latch or seam – except that it has a small slot on its outer edge about ½” in length and 1/8” wide. It seems to be etched with a fine tracing of magical runes. The impression seems to be rounded on the bottom. Playing with the neck band causes pain to shoot through your head – your temples pound.
On your arms are similar bands, albeit a bit smaller in diameter. The slots on these are about half the size as the one around your neck. They bands are different colors but also seem to be impossible to remove. Your bands are:
- Blue – your ability to use Unstable Form is suppressed
- Green – your ability to turn invisible is suppressed
Motivation: You know that your father is here at the Silver Oak – a tree filled with will-o-the-wisp. You can feel him calling – if you could only escape this damned island. You hate the water, and you hope that you can find another way home.
Bearoak
You find around your neck a large iron band. It forms a complete loop and has no apparent latch or seam – except that it has a small slot on its outer edge about ½” in length and 1/8” wide. It seems to be etched with a fine tracing of magical runes. The impression seems to be rounded on the bottom. Playing with the neck band causes pain to shoot through your head – your temples pound.
On your arms are similar bands, albeit a bit smaller in diameter. The slots on these are about half the size as the one around your neck. They bands are different colors but also seem to be impossible to remove. Your bands are:
- Blue – your Lover’s Curse is suppressed
- Green – your 3rd level spells are suppressed
Motivation: You know that Arianna is alive – you can feel it. She must be on this damned island. You must rescue her – she is your life. Even with the curse that keeps you apart, you life would be meaningless without her.
Truestar
You find around your neck a large iron band. It forms a complete loop and has no apparent latch or seam – except that it has a small slot on its outer edge about ½” in length and 1/8” wide. It seems to be etched with a fine tracing of magical runes. The impression seems to be rounded on the bottom. Playing with the neck band causes pain to shoot through your head – your temples pound.
On your arms are similar bands, albeit a bit smaller in diameter. The slots on these are about half the size as the one around your neck. They bands are different colors but also seem to be impossible to remove. Your bands are:
- Blue – your ability to Lay Hands is suppressed
- Red – your ability to use Power of Faith is suppressed
Motivation: You must rescue Arianna and take her home to the queen. Barring that, you must at least make sure that she is safe from harm.
Grimscar
You find around your neck a large iron band. It forms a complete loop and has no apparent latch or seam – except that it has a small slot on its outer edge about ½” in length and 1/8” wide. It seems to be etched with a fine tracing of magical runes. The impression seems to be rounded on the bottom. Playing with the neck band causes pain to shoot through your head – your temples pound.
On your arms are similar bands, albeit a bit smaller in diameter. The slots on these are about half the size as the one around your neck. They bands are different colors but also seem to be impossible to remove. Your bands are:
- Orange – your Elf characteristics are suppressed – immunities and bonuses
- Green – your ability to fight with Blindfight is suppressed
Motivation: You must find the tree that has haunted your dreams since childhood and climb to the highest branches to fulfill your quest. You’re not sure what that destiny is, but you know it will finally break the nightmares.
Vinewurm
You find around your neck a large iron band. It forms a complete loop and has no apparent latch or seam – except that it has a small slot on its outer edge about ½” in length and 1/8” wide. It seems to be etched with a fine tracing of magical runes. The impression seems to be rounded on the bottom. Playing with the neck band causes pain to shoot through your head – your temples pound.
On your arms are similar bands, albeit a bit smaller in diameter. The slots on these are about half the size as the one around your neck. They bands are different colors but also seem to be impossible to remove. Your bands are:
- Orange – your Elf characteristics are suppressed – immunities and bonuses
- Green – your 2nd level spells are suppressed
Motivation: The calling of the Silver Oak has been growing stronger since your arrival at Seamount. You can almost feel it longing for you – and you know that it will give you an acorn to use in your studies.
