Priest's Altar
| Type | Dungeon |
|---|---|
| Status | Explored June 883 TA |
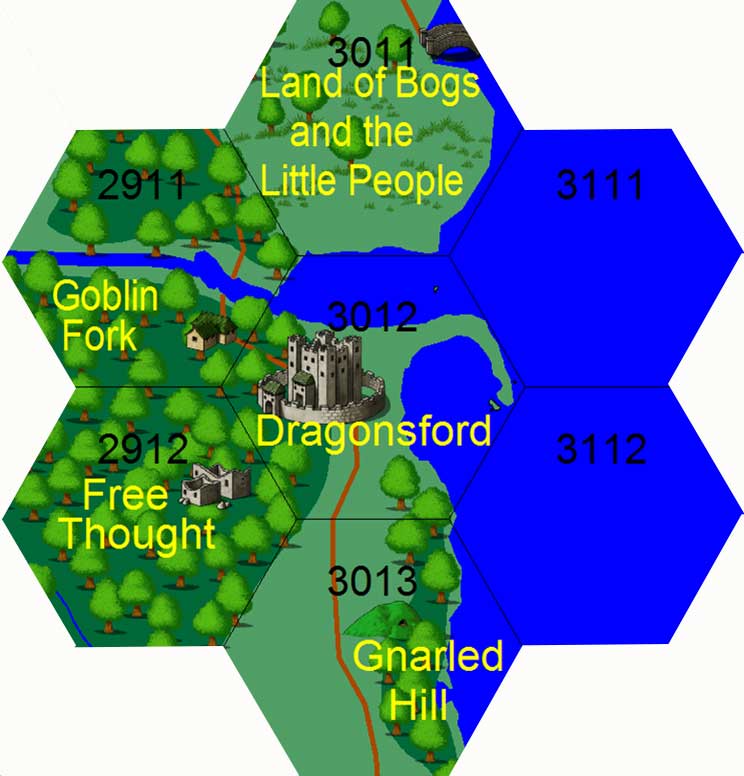
| Location | near village of Goblin Fork |
| Hex | 2911 |
| Campaign | Dragonsford Campaign |
| Adventure # | 79 |
Introduction
It has become a tradition at the Wicked Lady pub to publish notices on a large wooden post near a small stage where travelling bards and singers ply their trade. These notices usually attempt to enlist the help of local artisans in making special wares, the labor of young men to work the fields at harvest time, and other such mundane affairs. However, once in a great while, a notice is posted for mercenaries, adventurers, and explorers. It was about two days ago that such a notice was posted. It reads simply:
Adventurers wanted to help find my son
Taken at night near the Priest's Altar.
Reward: magical armor or weapon
See Fennel at the blacksmith's shop in Goblin Fork.
Goblin Fork
Most of the Golbin Fork townsfolk can be found at the tavern after dark, but they will be very quiet about the happenings in their town. There were three other children playing with Aron on the night of his disappearance: Fenwick (farmer's son), Rickard (weaver's son), and Alena (baker's daughter). They will be summoned if the correct approach is made. It is important to note that Rickard is actually the acolyte of the Priest's Altar. He will, naturally say nothing. However, he will volunteer to lead the party to the dungeon if there is not time for him to go to the Priest's Altar and warn his comrades. Rickard is careful not to leave any clues to his real identity in town. However, a small ceremonial dagger is tucked under his bed and will be found if a careful search is made.
Dungeon Exterior
There is a path that winds up the side of the Priest's Altar. The path shows signs of travel, but it is impossible to discern anything without careful inspection. The following can be detected at a -30% on a tracking percentage: the path has been travelled by a number of small-footed creatures (gnomes), several carts (slave carts), and a number of human creatures. At one point, the footprints stop about sixty feet (vertically from the top). If the initial detection is made, there is a chance at -30% that this will be detected. Otherwise, the path continues to the top of the rock. This area is 300 yards wide and 600 yards long covered with a number of scrubby bushes and small gnarled trees. In the center of the rock is a dense bush which conceals a 20 foot by 20 foot pyramid made of stone and colored glass. It is through this glass that the mysterious lights can be seen on a cloudy night. The glass is set in the ceiling of Room 5.
Priest's Altar
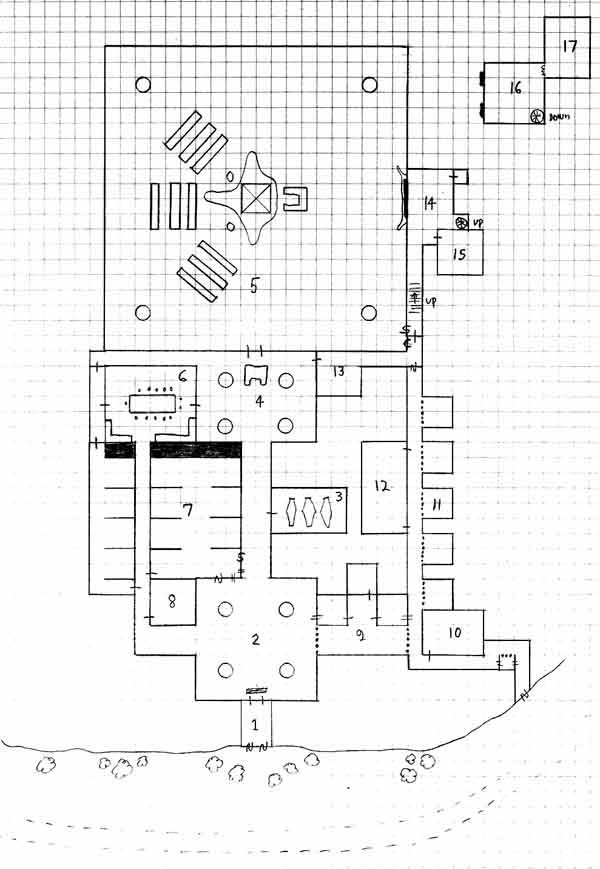
Room 1: Ante Room
What has roots that nobody sees,
Is taller than trees,
Up, up, it goes,
And yet never grows?
If the party mutters "a mountain", the doors swing silently open. If they do not, the doors will open effortlessly, but the first character through the door will be hit by a falling block of stone for 2d8 hit points of damage.
Room 2: Entrance Room
Careful inspection will reveal arrowslits in the walls and the faint sound of voices coming from the east.
Room 3: Ancient Burial Chamber
Unless the disk is broken with the Skull Staff, the three skeletons will animate and attack.
The skeletons within are high priests from the old religion. The vial is a Potion of Moderate Healing.
Room 4: Small Throne Room
This room will generally be empty.
Room 5: Large Throne Room
Careful examination shows the eyes and mouth of the screaming face to be windows which lead to rooms beyond.
Room 6: Priest's Common Room
Several large knives can be used as daggers, if needed. This room is where the priest go to eat and talk. Typically, this room will be filled only during mealtimes.
Room 7: Priest's Quarters
It is likely that a number of priests will be encountered here unless they are eating or in prayer.
The priests do not own any possessions, so nothing of interest will be found here. Careful inspection will not yield any clues.
Room 8: Ancient Vestment Room
Careful examination will show a seal similar to that on the door to Room 3.
Careful examination will reveal a single set of footprints moving from the door to the peg on the wall.
If any party member enters the room, a ghost will appear in the corner near the cases. It will speak in an unintelligible language, but the tone will be one of hostility and anger. The ghost will try, in any way, to frighten the party away. If the skull staff is returned, the ghost will smile and fade away.
Room 9: Guard Quarters
The southeastern four rooms in the complex are under the control of the head slaver, Slingsby. There are always 4 human guards and Sligsby in the complex. On days when the caravan comes for the slaves, there are 12 human guards in the complex. Each of the three rooms in this complex sleep two guards, with the northernmost room reserved for Slingsby himself. The rooms are simple, with beds similar to the priest's beds in Room 7.
Sligsby is third level and the guards are each second level. They are all dressed in Chain Mail which provides AC 6.
Room 10: Slave Trader's Quarters
The tapestry on the northern wall hides a hold which leads to the southernmost cell. From that cell, conversations in Room 10 can be overheard.
Room 11: Slave Cells
They cannot fight, and they will withstand only 2 hit points of damage each. The cells are filled as follows (N to S): 3 gnomes, 6 gnomes, 5 gnomes, 1 gnome and Aron, empty. If the party is captured, they will be put in the cell with Aron, and the gnome will be moved to the northernmost cell.
Room 12: Guard's Common Room
Several large knives can be used as daggers, if needed. This room is where the guards go to eat, drink, and gamble. The room will be empty at most times, but three guards and Sligsby can be found here at mealtimes. The remaining guard will always be in Room 9.
Room 13: High Priest's Vestry
Careful examination shows that the leather chair is well worn and the altar has seen little use. On the altar is a wooden candlestick and candle (no value). Under the altar, a small sack contains a latern, oil, three candles, and a tinderbox.
Room 14: Lower Observation Room
The western wall of this room opens up to a gaping mouth that overlooks Room 5. The mouth is large enough for several man-sized creatures to crawl through. There is a door in the northeast that leads to a privy, a spiral staircase in the east that leads to the Priest's Quarters, and a door in the southeast that leads into the Acolyte's Quarters.
Room 15: Acolyte's Quarters
The small bed has seen little use since Rickard typically sleeps in town. The foul odor comes from a small altar in the northeast corner on which is a blue ceramic bowl heaped with small dead and burned animals. Next to the bowl are a candlestick and candle. Several robes hang from pegs on the west wall. It is very unlikely that Rickard will be here. Rickard is a standard 5th level cleric with a standard spellbook. He is armed with a dagger and staff.
Room 16: Upper Observation Room
This is the outer chambers to Shadrach's room. The western wall of the room has two small openings that correspond the eyes in the large bas relief in Room 5. From here, Shadrach can easily overlook his priests in prayer.
Careful examination of the desk reveals a large bound tome which at first glance appears to be a ledger of sorts. The book is filled with the names of prisoners and two prices next to each. The last 16 entries in the book have a single price next to them: 5 gold pieces. The very last entry in the book reads Aron, 15 gold pieces. A bottle of ink and pen are sitting next to the book.
Room 17: High Priest's Quarters
This Shadrach's private chamber. The chest is not locked, but it does contain a secret compartment. Shadrach will be found here only at night, asleep.
|
Monsters
Shadrach the High Priest (urvile) |
Treasure
magical sword or armor from Fennel |

