The Tomb of the Plainswalker
| Type | Dungeon |
|---|---|
| Status | Explored March 883 TA |
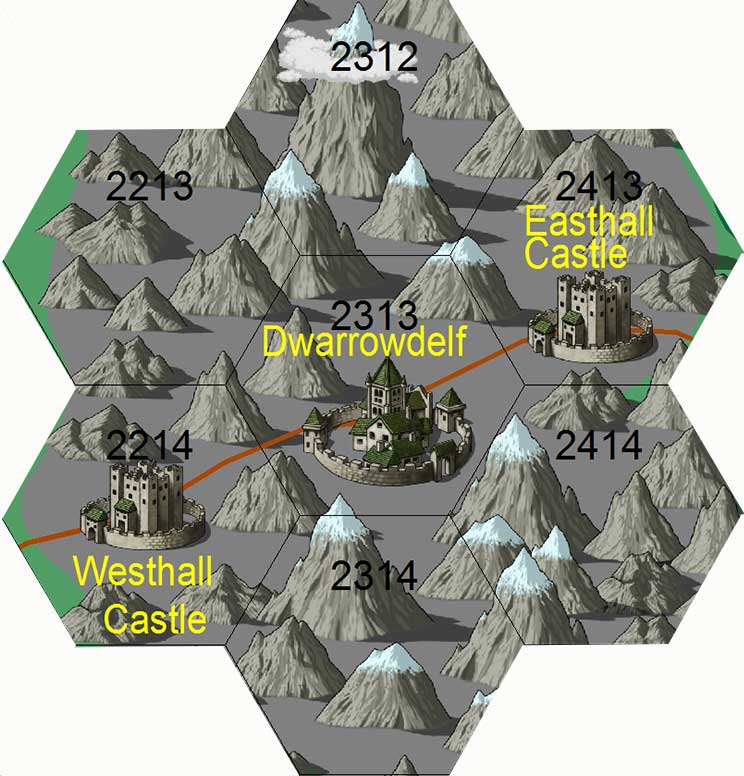
| Location | Shadowkeep (now Dwarrowdelf) |
| Hex | 2313 |
| Campaign | Shadowkeep Campaign #12 |
| Adventure # | 76 |
The plainswalker was a human, although it is doubtful that he was from the Realm. He was certainly not from this time. The plainswalker is not terribly interesting in himself, and, in fact is not even in this dungeon having fled once his family was killed. His wife, children, high priest, and guardian (sand golem) are left behind along with his most treasured possession, the Flute of the Planes, which will be used in a later adventure to journey to the Void. It will be a key item for future adventures.
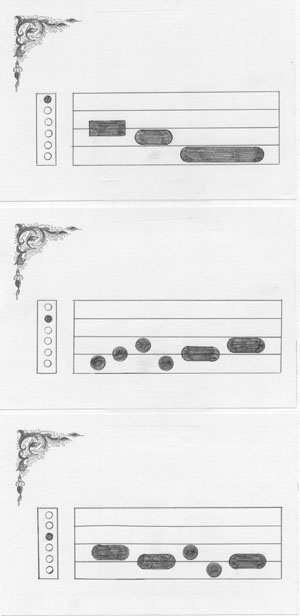
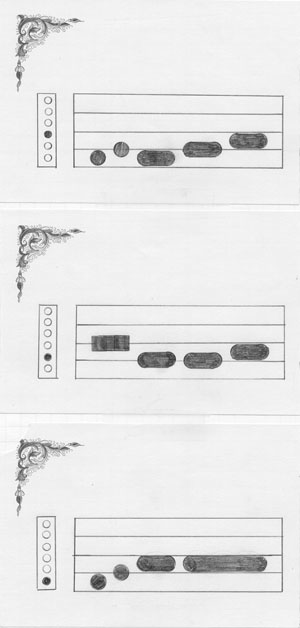
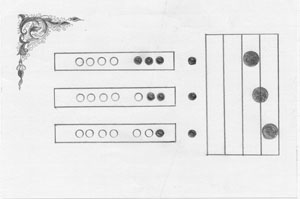
To defeat this level they must defeat the sand golem the size of a pyramid using the keys of stone (the four pieces of the pyramid), cloth (the six pieces of the musical score PLUS the key sheet), and the reed (recorder). These are put together to form music - the proper tune played on the recorder. The recorder can only be recovered by solving the numerical puzzle of the pyramid. The numerical puzzle of the dungeon is on pieces of stone which, when fit together, make a pyramid. The cloth is put together to form the musical score to play, and the recorder is used in the final battle.
There is sand on the floor of every room (except where noted). This sand makes up the golem. Mummies control the creatures in the dungeon. When the mummies are destroyed they burst into sand and fly to the Sand Golem room in the center of the dungeon, and the creatures flee to the next level. The "morphlings" of the dungeon are akin to licids - they "morph" with other licids to form different creatures. They also have a collective conscious which is controlled by their "mummy" protector.
Canto Twelve: Plainswalker
The orb of sand is the final test,
Its traps may be your endless rest,
Seek the tomb which long is sealed,
The travelling tools will be revealed.
My vision fades, three voices call,
My words return when the last test falls.
Tomb of the Plainswalker: Portal 12, Level 1
The Oasis
The oasis of Cenotaph-Duat lies a three day ride (by camel) north of Duat and three days south of Cenotaph. It is there that the party will meet with the caravan of Almeric. If they wander off in any other direction, they will be attacked by four sand dragons (which breath sandstorms):
Or by a massive sand wurm (which swallow up large tracts of land and digest)
The oasis is real, but the tent is an illusion. Buried under the sand are a number of large insect creatures that are waiting to suck the party under the sand. They are identical to very large ankhegs. They are called maiden bugs for their ability to project the images of beautiful women into the minds of their victims.
Once the oasis is cleared, the party can journey for several hours in any direction without finding any signs of life. If they wait, a caravan will come by and take them to either a town or drop them off within a few hour's walk of the tomb.
The Caravan of Almeric
The caravan is run by one Almeric who is an honest trader in spice. His brother, Amadis, however, will try to befriend the party (promising to act as a guide). Then, he will try to rob them acting in cohoots with Gilarod's Raiders. The caravan consists of 4 wagons, 10 guards, Almeric, Amadis, their four wives, and twelve camels, several chests filled with spices, two barrels of water, several bolts of cloth, and other non-magical tradeables.
The caravan inhabitants are: Almeric; Amadis - brother; Aimee - wife of Almeric; Arina - wife of Almeric; Elmira - wife of Amadis; Iana - wife of Amadis; Mustafa - guard (leader); Kevan - guard; Vidkun - guard; Rhys - guard; Elrad - guard; Dyce the Mute - guard; Dagmar - guard; Cowan - guard; Gaillard - guard; Vincas - guard. Almeric and Amadis are 9th level mages, the wives are all 3rd level thieves, and the guards are 15th level fighters for the purposes of melee combat.
Almeric will greet the party hospitably, offering to take them to the next town in exchange for six flagons of water or precious items (if the party lets on that they possess such). They are going to Cenotaph, the next village to the north to trade spices for water, dried meat, and silks. The silks will be taken back to Abtu to be traded for more spices.
The caravan will camp for one night at the oasis of Cenotaph-Duat. At night Almeric will tell the party several tales to help them.
The Land of Tuat
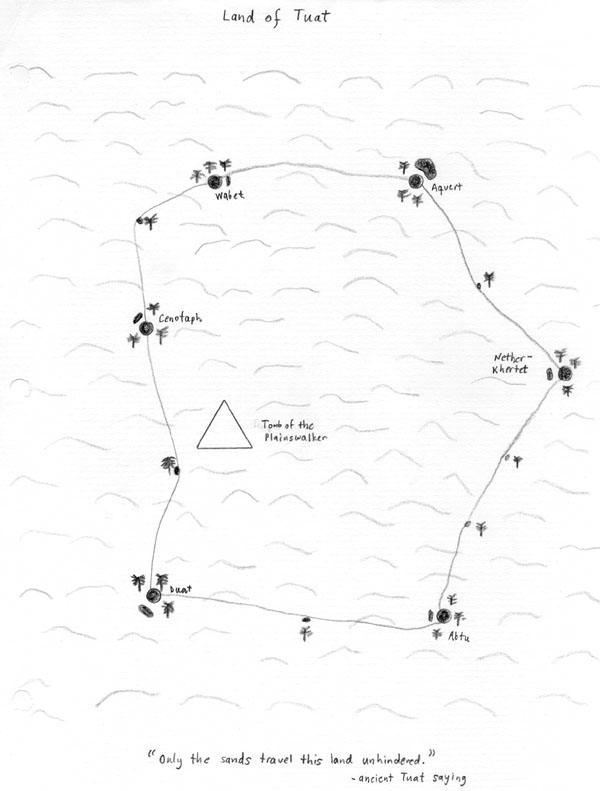
Almeric will give the party a copy of the map.
The land of Tuat is made of the six towns of the cycle. Six is a magical number for us, you see, there are six sins that we must repent for (pride, envy, gluttony, lust, anger, covetousness - it seems that sloth is okay), each man must make six hundred cycles for repentance, and there are six hundred men and women in all of Tuat. It is a number that runs our lives.
Outside of the towns is the vast emptiness of the desert streching to the ends of the earth. There is no escape from the cycle for, you see, the people of Tuat are being punished. We are a wicked people, an evil people, driven by our sins. Each of the towns of the cycle is ruled by a Caliph with his personal guards. It is not a society built on tradition, religion, or common goals. The caliphs reign by brute force. If one gets weak, he is replaced by another, equally evil, equally cruel. It is the way our land has been since the beginning.
For now, the land is relatively quiet. The caliphs have adopted a system of inter-marriages which has brought relative peace to our land. In the last ten years, since Maggold the Red went mad and attempted to capture all the water for himself, there have been no major disruptions to our life. Maggold was driven into the Djew for his efforts, never to be seen again.
But all is not in vain, for there is an ancient Tuat saying that anyone who travels the cycle 600 times will be forgiven all his sins and allowed to go to Oasis for eternal peace. I have travelled 412 cycles in my life.
Life in Tuat is endless. For you see, each time a man or woman dies, a child is born somewhere in the cycle to replace them. In times of peace, almost no children are born. In times of war, children are common. While there are sometimes travellers to Tuat, they never stay for long. Either they go crazy from the seeming futility of our lives, or they go to the Tomb, seeking an escape.
NOTE: If every cycle takes about a month, then 412 cycles is about 34 years.
NOTE: Clever adventurers will notice that all of the names here are for places of the dead. In fact, this is the Circle of the Dead, a place where spirits of men and women who are not good enough for heaven and not bad enough for hell are sent. Walking the circle in pennace for their sins. The souls are "reborn" into the children of Tuat.
The Legend of the Tomb of the Plainswalker
The Plainswalker (actually Planeswalker) was a visitor who came to the cycle many hundreds of years ago. I have never met anyone who is old enough to have known of him or his strange ways. But there are tales which survive about him.
It seems that he took a Tuat wife, as some travellers do. The unique thing about this marriage is that they had children, triplets. Imagine that, an outsider bearing children in Tuat. It was his family that was said to keep him in the cycle.
In time, he became the most powerful man in all the land. He constructed a great pyramid of stone to be his seat of power. The people of Tuat were enslaved to build the structure, and this proved to be his end. For there was an uprising, and a man named Derval fearing the Plainswalker himself killed his wife and children. In his rage, the Plainswalker slew Derval and summoned a great sand golem several thousand feet in height to destroy the villages of the Tuat. The people could not defend themselves and, in the end, they submitted to the Plainswalker, helping him turn his temple in a tomb for his children, wife, and retainers.
After the structure was finished, the Plainswalker made one final cycle of the towns of Duat leaving every man and woman with this message: 'The Sand Golem rests in my Tomb. Until the man or woman comes by who can solve my riddle, all who enter my Tomb will perish at the hands of my guardian. Beware. Do not disturb my family, or you will pay the price.' After leaving his message, he left a scroll in each town with an identical glyph. To date, nobody has ever solved the riddle of the Tomb of the Plainswalker. Some have entered the Tomb, none have ever returned.
Almeric will give the party the cloth "key".
The Towns of Tuat
ABTU. The Greeks called this place Abydos. It was the seat of worship of Osiris. It was also called Busiris, "the house of Osiris". Egyptian tradition says that the sun ended his daily journey at Abydos, and entered into the underworld here, through a gap in the mountains called "peq". In the 12th dynasty it was believed that the souls of the dead entered into the afterlife here.
AQUERT. A name for the land of the dead.
CENOTAPH. From the Greek word meaning; "empty tomb". A tomb built for ceremonial purposes that was never intended to be used for the interment of the deceased.
DUAT. The land of the dead. It Iies under the earth and is entered through the western horizon.
NETER-KHERTET. This translates as "divine subterranean place". A name for the land of the dead.
TUAT. The land of the dead. It Iies under the earth and is entered through the western horizon.
WABET. A place where part of purification and mummification rites took place.
Other Terms
DJEW. This means mountain. The Egyptians believed that there was a cosmic mountain range that held up the heavens. This mountain range had two peaks, the western peak was called Manu, while the eastern peak was called Bakhu. It was on these peaks that heaven rested. Each peak of this mountain chain was guarded by a Akerlion deity named AKER, who's job it was to protect the sun as it rose and set. The mountain was also a symbol of the tomb and the afterlife, probably because most Egyptian tombs were located in the mountainous land bordering the Nile valley. In some texts we find Anubis, the gaurdian of the tomb being referred to as "He who is upon his mountain." Sometimes we find Hathor takeing on the attributes of a deity of the afterlife, at this time she is called "Mistress of the Necropolis." She is rendered as the head of a cow protruding from a mountainside.
AKER. An Akerlion deity named, who's job it was to protect the sun as it rose and set. It is AKER who drives the people of Tuat to make the circuit of the cities over and over again.
The Pyramid of the Plainswalker
If the party spends some time observing the entrance from the top of a dune, "You can see movement around the edges of the slab."
Closer examination shows that the movement was that of a number of robed men carrying crossbows with large curved swords in their belts. They look as if they have set up some sort of camp in the entrance to the pyramid.
Tomb of the Plainswalker: Portal 12, Level 2
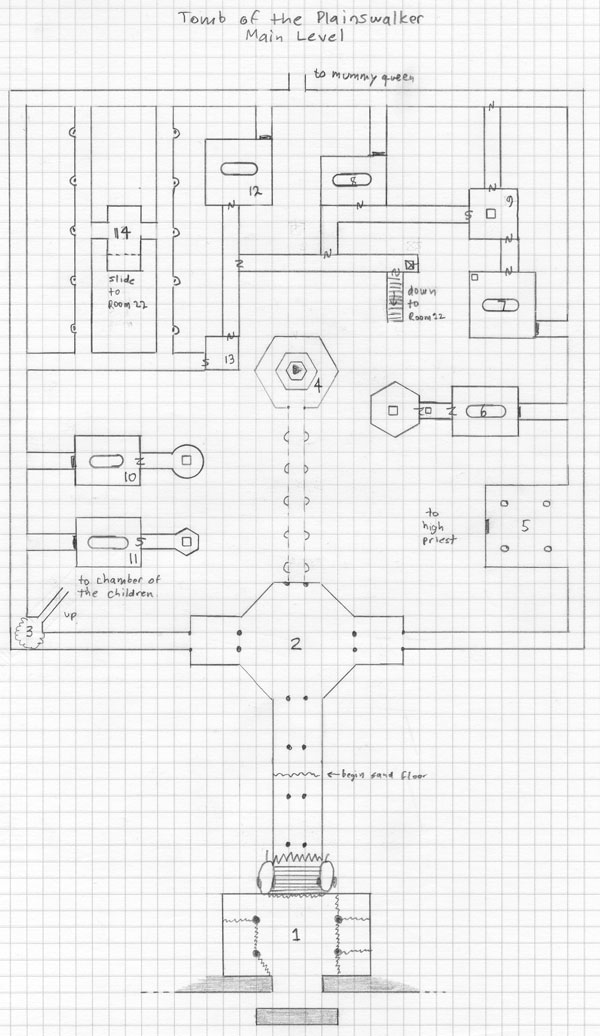
Room 1: The Antechamber
I am Gilarod-el-Pazad, Prophet of the Temple and Seer of the Paths of Smoke. Welcome to my home. I can see you have come seeking the treasures of the sand, like many before you. A thousand pieces of your gold will clear my sight and allow me to tell your fates and give you the first key to the Temple.
Your fates are dark, twisted by powers beyond your comprehension. I see mists of fire and pain swirling in your futures. You will either die by those fires or be made invincible by them. I see puzzles within puzzles, riddles within riddles. Be wary and follow the path of truth.
Avoid the sandman,
he comes to you in sleep,
Avoid the sandman,
he comes to you through greed,
Avoid the sandman,
you learn his secret deep,
Avoid the sandman,
seek the stone, cloth and reed.
Gilardo will give the party the cloth "key".
Gilarod is protected by twenty desert fighters, dressed in gray robes and armed with swords and crossbows (arrows tipped in poison). They have glassy eyes and speak in a strange gutteral language. Gilarod will simply disappear if threatened.
If the party befriends Amadis, then he will give the fighters a secret hand sign that tells them that the party is planning on attacking Gilarod. The fighters will position themselves and attack.
If the party enters alone, they will be given an audience with Gilarod. If anything goes wrong, they will attack.
Desert Fighters (18th level fighters). They are highly addicted to Gilarod's smoke (which may cause the party to hallucinate also), and they will fight as berserkers if Gilarod is threatened.
A closer examination shows that there is a shimmering wall just inside the last row of teeth. When the party approaches, a sense of fear suddenly overcomes them. Save versus 30th level or flee into the desert.
When you get within a few feet of the opening, the following poem starts running through your head.
What walks the plains in the hottest days, running with the wind,
It measures time flowing by, and never seems to end.
By whispering the answer (SAND), the party can pass through the teeth. Otherwise, they will be hit with snapping of the jaws for 100d4 points of damage, save to half.
Room 2: The Crypt Cross
Room 3: Passage Up
Room 4: The Flute Room
Upon closer inspection, the walls appear to be made of a black metalic substance that rings musically when touched.
If any move is made to take the flute, a single clear note will issue forth, reverberating off the walls. The intensity will first cause heart palpitations in the party, shattering their hearts (the death knoll) if touched without first solving the riddle.
As the party passes each set of pyramids they will crumble to sand. The sand will move along the floor to the south, diappearing at the golem on the end wall. If the party touches the golem, they will be transported outside the dungeon to face the sand golem in the final battle. Winning that battle, they are teleported to Level 13.
Room 5: Entrance to the High Priest's Chambers
The tiles are arranged in the following order:
|
Touching the tiles will cause the party to be instantly teleported to the appropriate room in the High Priest's Level. Note that party members hiding in the hallway will not be teleported.
Tombs of the Six Caliphs
The main level of the dungeon has six "tombs" which are the final resting places for the six caliphs that the Plainswalker dethroned when taking over the towns of the Tuat. These tombs are guarded by "curses". Solving the curse will allow the party to enter a dormant tomb. Otherwise, the occupants will be wakened. If active, the caliphs must be destroyed before their treasure is gained.
These are labeled: C - C# - D - D# - E - F - F# - G - G# - A - A# - B
The symbols are for chords. By ringing the correct chimes, the party will solve the curse and the door will slide open to reveal bodies and treasure. By ringing the incorrect chimes, the door will slide open but the party will be attacked.
Major 0+4+7+12 (Tonic+Third+Fifth+Octave)
Examples: Cmaj = C+E+G+C Ebmaj = Eb+G+Bb+Eb
Minor 0+3+7+12 (Tonic+Minor Third*+Fifth+Octave)
Examples: Cm = C+Eb+G+C Ebm = Eb+Gb+Bb+Eb
Seventh 0+4+7+10 (Tonic+Third+Fifth+Dominant Seventh)
Examples: C7 = C+E+G+Bb Ab7 = Ab+C+Eb+Gb
Major Seventh 0+4+7+11 (Tonic+Third+Fifth+Natural Seventh)
Examples: Cmaj7 = C+E+G+B Dmaj7 = D+F#+A+C#
Minor Seventh 0+3+7+10 (Tonic+Minor Third*+Fifth+Dominant Seventh)
Examples: Cm7 = C+Eb+G+Bb Em7 = E+G+B+D
Diminished 0+3+6+9 (Tonic+Diminished Third+Diminished Fifth+Sixth)
Examples: Cdim = C+Eb+Gb+A Gbdim = Gb+A+C+Eb
Augmented 0+4+8+12 (Tonic+Third+Augmented Fifth+Octave)
Examples: Caug = C+E+G#+C Eaug = E+G#+C+E
Room 6: Tomb of First Caliph
The glyph is "Cmaj" and can be solved by ringing C, E, and G.
The first caliph mummy will attack if animated.
The chest contains: 4 medium topaz gems (600 gp)
The chest contains: cloth puzzle piece #1
Room 7: Tomb of the Second Caliph
The glyph is "Ebm" and can be solved by ringing Eb, Gb, and Bb.
The second caliph mummy will attack if animated.
Room 8: Tomb of the Third Caliph
The glyph is "Eaug" and can be solved by ringing E, G#, C and E.
The third caliph mummy will attack if animated.
Room 9: Treasure Room of the Second and Third Caliphs
Poison pin trap.
The chest contains: cloth puzzle piece #4, cloth puzzle piece #5, 3 small amethysts, Rod of Smiting
Room 10: Tomb of the Fourth Caliph
The glyph is "Em7" and can be solved by ringing E, G, B and D.
The fourth caliph mummy will attack if animated.
The chest contains: cloth puzzle piece #3, 3 very small diamonds.
Room 11: Tomb of the Fifth Caliph
The glyph is "Ab7" and can be solved by ringing Ab, C, Eb and Gb.
The fifth caliph mummy will attack if animated.
The chest contains: cloth puzzle piece #6, Hand Axe +1
Room 12: Tomb of the Sixth Caliph
The glyph is "Cdim" and can be solved by ringing C, Eb, Gb, and A.
The sixth caliph mummy will attack if animated.
Room 13: Treasure Room of the Sixth Caliph
The chest contains: cloth puzzle piece #2, 1 medium sapphire (3000 gp), Periapt of Proof Against Poison +1, Whip +4, Potion of Fire Giant Strength.
Room 14: Slide to the Small Sand Golem's Room
The slide leads down to the small sand golem. This is where the mummy sand goes to when the mummies die.
Tomb of the Plainswalker: Portal 12, Level 3
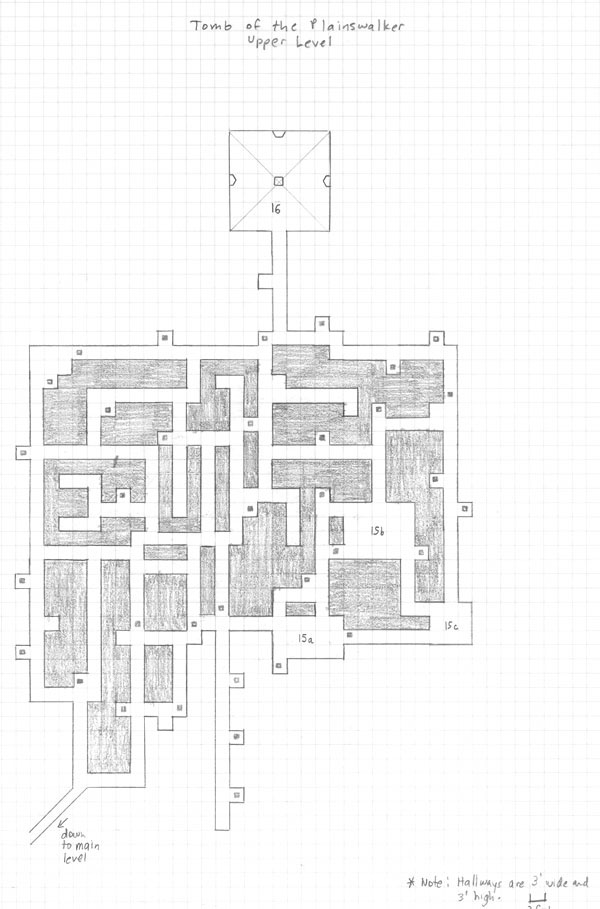
Upper Level
The reason that these hallways are clean is because of the moving blocks of stone which are used by mummy children to stop intruders. This level is a maze of small hallways filled with crypt beetles and moving blocks of stone. These will be used to isolate the party and crush them or trap them while the crypt beetles attack.
There are about 40 blocks of stone which can be moved.
Rooms 15a-c: The Beetle Rooms
These rooms are unremarkable except for the fact that these are where the crypt beetles gather. There will be 32 in each room and another 2 in Room 16.
Room 16: The Chamber of the Children
A flame flickering from a candle
An upside down water drop with a cloud above it
A cloud blowing a wind storm
The ground with stones in it
Each represents one of the children, except the ground which represents the earth with the puzzle piece in it. Pushing that will cause the "dome" to disappear.
These are the mummies of the triplet children of the Plainswalker who died in childhood. They were thought "cursed" because they possessed extraordinary powers and psychic ability.
- Telokoptic (telekinesis) - move things
- Pyrokoptic (pyrokinesis) - burn things
- Gravokoptic (gravokinesis) - reverse gravity
They will use their special powers to damage the party.
They will summon all the unkilled minions on their level when attacked. Also, the minions will "coalesce" in the larger room.
If destroyed, the children will explode and their sand will head towards Room 14.
Tomb of the Plainswalker: Portal 12, Level 4
The High Priest's Chambers
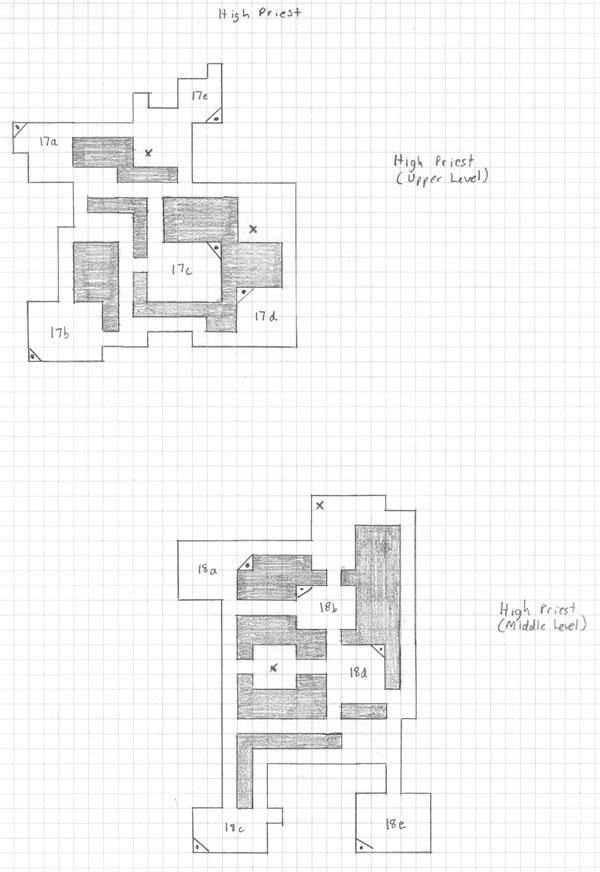
The High Priest's Chambers are three level of five rooms each, with the treasure room only accesable by the use of the proper pictograph (frog). The lower levels will begin to fill with sand once the seal is broken. They will fill up in 1 hour. The middle levels will fill up 1 hour later, and the upper levels 1 hour after that. The keys to the pictographs are:
- AIR - upper level
- LAND - middle level
- UNDERGROUND - lower level
All of the animals in the pictograph have a name that starts with the letters A through E except the frog (F). In addition, there is an animal of neither air, land, or underground: the frog. The colors are just there to look pretty.
There are sixteen animals in the pictographs:
|
NOTE: The air elemental is described as a whirlwind and the ape is described as a monkey.
The party will be given the following description.
|
The monsters in this maze understand the use of the pictograph, so they will use it to flee, trap the party, or otherwise cause havoc. There will be roughly 24 morphlings in each of the areas marked on the map.
These rooms will be furnished with the trappings of a priest who prepares bodies for mummification.
Rooms 17a-e: The Upper Level
If the party approaches the statue within 5 feet, the eyes with glowing a bright red. The allows the mummy of the High Priest to "see" the adventurers and send minions after them.
- Room 17a: AIR ELEMENTAL (red)
- Room 17b: BAT (yellow)
- Room 17c: COCKATRICE (white)
- Room 17d: DRAGON (green)
- Room 17e: EAGLE (blue)
Rooms 18a-e: The Middle Level
If the party approaches the statue within 5 feet, the eyes with glowing a bright red. The allows the mummy of the High Priest to "see" the adventurers and send minions after them.
- Room 18a: APE (green)
- Room 18b: BEAR (orange)
- Room 18c: CAT (white)
- Room 18d: DOG (black)
- Room 18e: ELEPHANT (black)
Tomb of the Plainswalker: Portal 12, Level 5
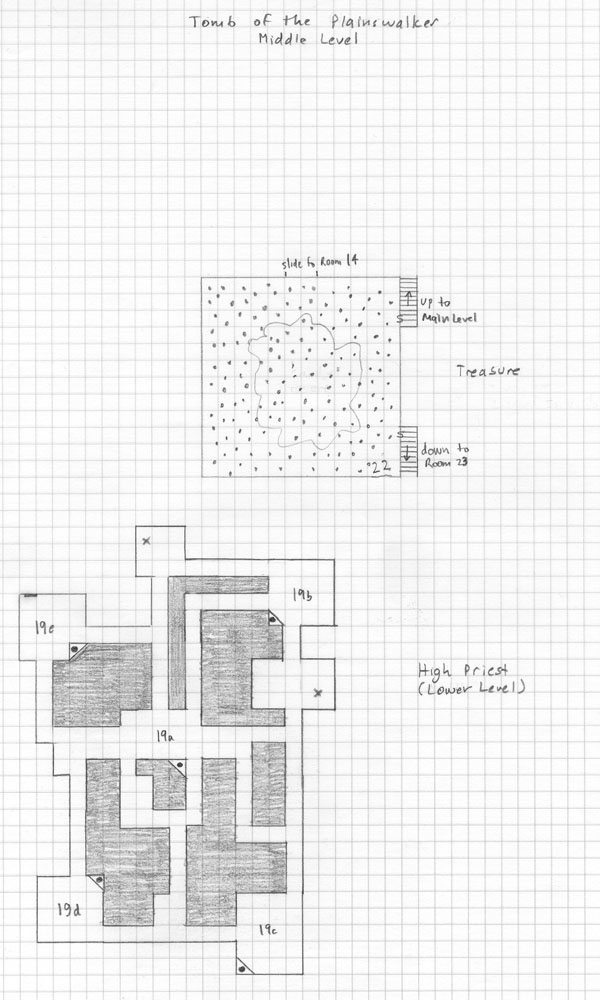
Rooms 19a-e: The Lower Level
If the party approaches the statue within 5 feet, the eyes with glowing a bright red. The allows the mummy of the High Priest to "see" the adventurers and send minions after them.
- Room 19a: ANKHEG (purple)
- Room 19b: BEETLE (blue)
- Room 19c: CENTIPEDE (orange)
- Room 19d: DWARF (yellow)
- Room 19e: EARTH ELEMENTAL (red)
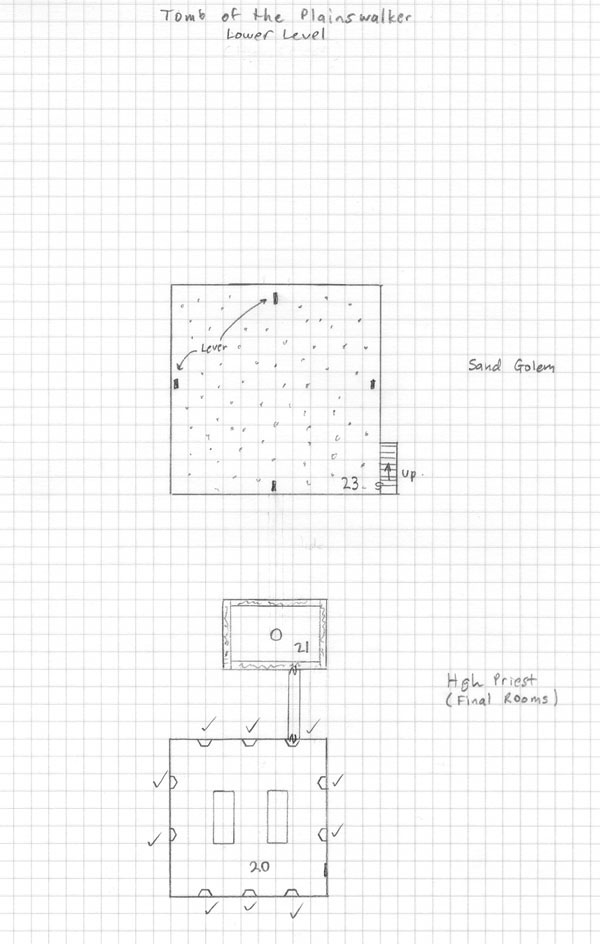
Room 20: The Mummification Chamber
If the party enters, the high priest will summon the rest of his minions to come here via the mosiac.
If the party kills the minions, the sarchopagii will open, and eight mummies will emerge. They will attempt to grapple with the party, exploding with a sand blast if they do so. At the same time, sand will start pouring "magically" from the ceiling filling the room in 1 hour. The ceiling is an illusion. There are actually a number of small holes in the ceiling.
Behind one of the sarcophagi is a secret passage which leads back into the wall.
Room 21: The High Priest's Chamber
The medallion will teleport the party back to Room 5. This could be used later to escape trouble.
When the party enters the room, the sand starts to swirl into a small sand golem. It will take several turns to form. Also, sand will start to "magically" pour from the ceiling of the room.
Careful examination of the mummy shows that a small blue stone is wrapped under the first layer of his bandages.
Room 22: The Small Sand Golem (upper room)
This room is guarded by the "little" sand golem. It will take him several minutes to form after the party arrives. See Sand Golem below for description.
Careful examination will show that there are a number of small holes in the floor. They seem to be about six inches deep.
The holes in the floor are opened by pulling the four levers in Room 23. This will cause the small sand golem to be pulled into Room 23, leaving only the treasure behind.
- Chest 1: 250 gold pieces, stone piece of the pyramid puzzle, Potion of Flying
- Chest 2: 200 gold pieces, Periapt of Proof Against Poison +3, Wand of Paralyzation
- Chest 3: 500 gold pieces
- Chest 4: 500 gold pieces
- Chest 5: Girdle of Stone Giant Strength, Chain Mail +1, Splinted Mail +6, Ring Mail +3, Log Bow +1
Room 23: The Small Sand Golem (lower room)
Careful examination will reveal a secret door leading up. Pulling the four levers simultaneously will cause the small sand golem from Room 22 to be sucked down here.
Tomb of the Plainswalker: Portal 12, Level 6
The Mummy Queen's Lair
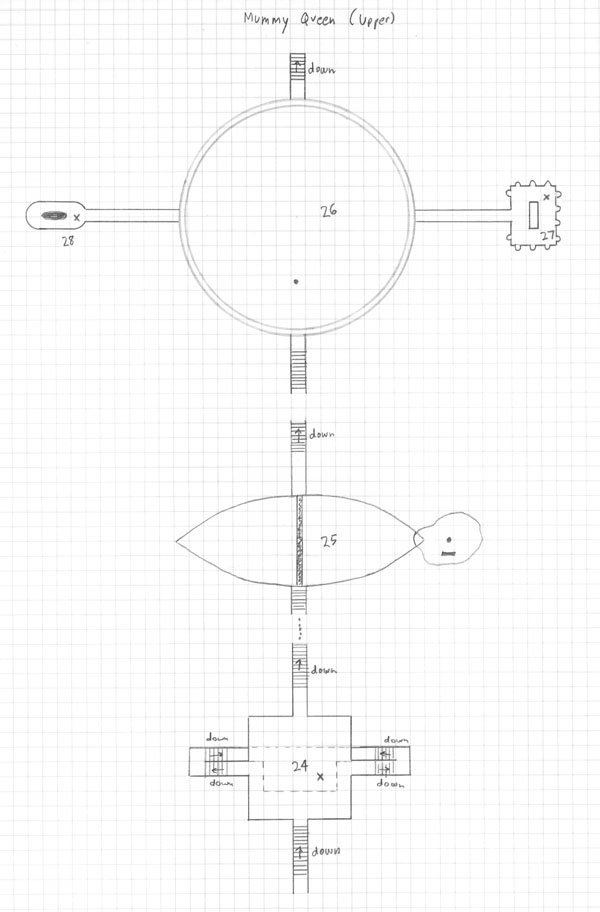
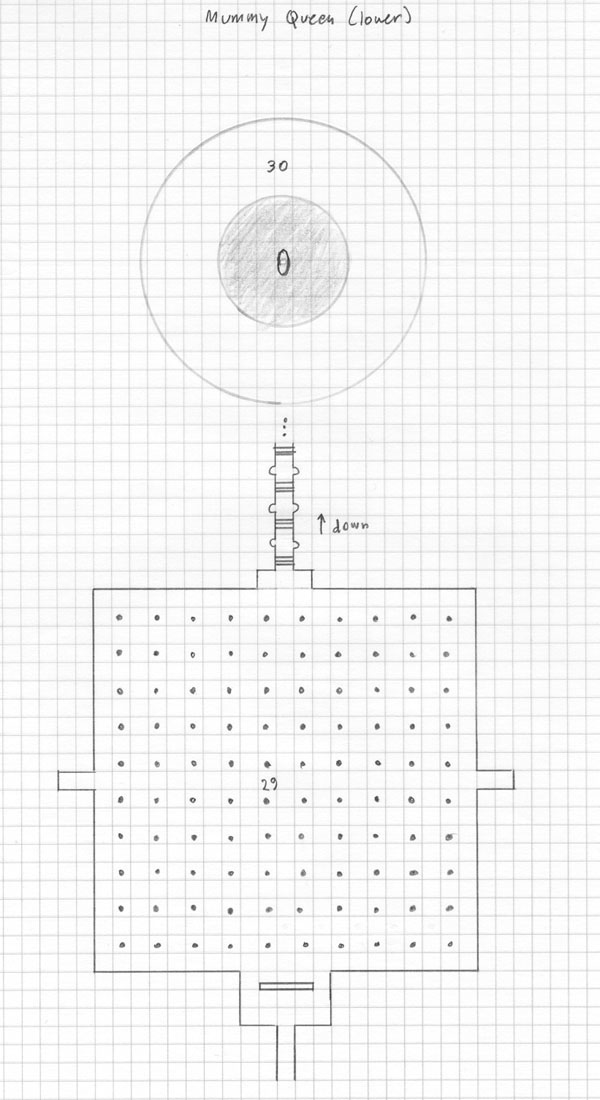
Unlike the serpentine hallways of the other parts of this dungeon, this lair is a series of rooms and hallways which tunnel straight down into the earth. In real life, the queen was very distrustful of magical spells, so her lair reflects an anti-magic theme.
If the party enters a room with any magical spells in force, they will be cancelled depending on their level versus the level of the room.
If the party casts any magical spell, it will fail if it is not of high enough level. Whether it fails or succeeds, the "stone" creatures will go crazy and attack. In this part of the dungeon, the fighting way is best.
There are animatory "stone" creatures in this level. They are able to turn from stone, attack, and reform into stone in the blink of an eye. If a party member is able to strike them in "real" form their weapon will be stuck 19 out of 20 times. In their stone form, they take almost no damage.
Many of the creatures will have poison.
Room 24: The First Landing
All spells of 1st and 2nd level are cancelled when reaching this landing. The straight passageway continues to the second landing, and the other stairways loop under each other and form a small room directly beneath this one, filled with morplings. If the party passes by, they will stay in the lower room until summoned.
Room 25: The Second Landing
Upon closer inspection, a small cavern can be seen cleverly disguised at the far end of the crevice.
All spells of 1st through 4th level are cancelled when reaching this landing. If needed, the queen can accelerate the sand fall into a sheet of sand which will cause massive damage to any entering it (shut off when the morphlings enter into it) by signalling to the gargoyle in the secret cavern.
The gargoyle will animate and pull the lever to increase the amount of sand coming through the ceiling.
Room 26: The Third Landing (Barrel Room)
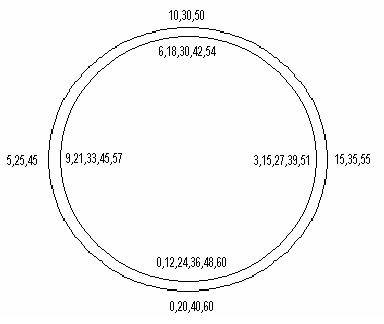
Roll 1d60 to determine which round the party is in. On 20 and 40, there is another wall behind the first moving right to left. On 0 and 60, a passway opens up for a few moments allowing the party to jump through.
All spells of 1st through 6th level are cancelled when reaching this room.
At the appropriate intervals, a hallway will become visible for a few moments. The party is in a giant stone cylinder with sand above and below them. Since they are rotating, it will be difficult to tell when they are aligned with anything. They can determine their own rotation by using the single hole in the ceiling (twelve holes one minute apart).
If the sand is allowed to collect, it will eventually become a sand golem and attack the party. If the party doesn't pass through the portal, the morphlings will jump in. If the party does pass through the portal, then the morphlings will lie in ambush.
Room 27: The Veiled Handmaiden's Trap (15)
Searching the man, you find that he is missing his purse (obviously cut from his belt), but a hastily scrawled note, "the path lies through the straight and narrow regardless of the obstacles" can be found in his tunic.
The sarcophagus is filled with the following treasure: 3 small emeralds (1200 gp), 150 gold pieces, Bracers of Defense AC 8, Potion of Moderate Healing
If opened, the maiden statues will begin to wail an awful noise, causing the walls to shake and sand to start pouring in from the ceiling. If magic is used (cast), then the maidens will animate and attack as banshees.
Room 28: The Serpent's Den (45)
If the party enters the room, large snakes will slither out of the pool and attack the party. They will keep coming out until the party is dead. If magic is used, then the pool will start bubbling up until it fills the entire room, working its way up the hallway to the door. The acid does 1d8 of damage per round.
Room 29: The Straight and Narrow (30)
If the party touches the dividing wall, they will be magically teleported to the far side of the room (just inside the doorway). If they venture into the room, they will be diced. Treat the fighters as 18th level.
All spells of 1st through 8th level are cancelled when reaching this room.
The other two passages are faux, causing the party to teleport into the center of the room (to be diced). Each section contains the following guards.
Room 30: The Queen's Chamber
All spells of 1st through 9th level are cancelled when reaching this room.
This is the mummy queen. If attacked, she will summon her minions to fight. She can also extend the "maw of the wurm" to include the entire room, making flight a manditory spell.
Her medalion is another piece of the puzzle.
Once out, the party will have to retrace its steps, but the ban on magic will be lifted (if they try to cast spells).
Final Battle
The golem has the ability to cause the sand to "grab" the party if they are not in the air, cast sand storms, cast sandballs, or stomp the party for massive amounts of damage. Bladed weapons do almost no damage. Playing the Flute of the Planes (right tune) will cause the golem to stand meekly aside. AC 0, HD 80.
"The Morphlings"
Crypt Beetle: "These small beetle-like insects are the size of small dogs but move at incredible rates of speed. Their outer shell is made of a hard black chiton, and their large mandibles are capable of lightning-like attacks."
Two crypt beetles can form into one Crypt Keeper.
Four crypt beetles can form into one Sand Warrior.
Eight crypt beetles can form into one Desert Walker.
AC -8, HD 8, 2 attacks, double initiative, 3d8 + 8
Crypt Keeper: "These scuttling kobold-like humanoids are have black skin and brightly glowing red eyes. They move at very fast speed and tend to blend into the shadows."
One crypt keeper can form into two Crypt Beetles.
Two crypt beetles can form into one Sand Warrior.
Four crypt beetles can form into one Desert Walker.
Crypt Keepers are able to shoot magic missiles out of each eye (8 missiles out of each eye). AC -4, HD 16, 8d4.
Sand Warrior: "These large ogre-like creatures look as if they are made of black sand. They have almost expression-less faces, although they move with great speed and fierceness."
One sand warrior can form into four Crypt Beetles.
One sand warrior can form into two Crypt Keepers.
Two sand warriors can form into one Desert Walker.
Sand Warrior are able to create localize sand storms (16d8 save half damage) which cause blindness and make communication difficult. In addition, they are able to cast sandballs (hit to do 16d8). They can do two fist strikes in melee. AC -2, HD 32, 16d8.
Desert Walker: "These large giant-like creatures appear as storms of black sand. They have no discernible features. They move furiously."
One desert walker can form into eight Crypt Beetles.
One desert walker can form into four Crypt Keepers.
One desert walker can form into two Sand Warriors.
Desert Walkers are able to change floors into quick sand (holds characters) and other cool things. AC -2, HD 36, 16d8.
|
Monsters
Sand Dragons (4) - more if needed |
Treasure
cloth key (Almeric and/or Gilarod) |
